Originally published by PHIL NASH at twilio.com
When AWS launched Lambda in 2014 there was no love for Ruby. Platforms like Python, Node.js, and Java started the serverless revolution for hosting and running functions in the cloud. At the end of 2018, support for Ruby was finally launched.
You can build with Ruby on Lambda using raw functions and Serverless Application Model (SAM) templates as described in the getting started guide for Ruby on Lambda, but Ruby is all about developer happiness and when the config file is longer than your program the process could be described as painful. Enter the Jets framework a framework that "leverages the power of Ruby to make serverless joyful for everyone."

From Rails to Jets
Jets combines the experience of building a Rails application with the ability to deploy to AWS Lambda and related services, including API Gateway, S3, and DynamoDB. In this post we're going to see how to get started with Jets and deploy a Lambda powered Twilio application written in Ruby.
What we're building
To keep things simple we're going to build an SMS based app and to make it a bit more fun, we're going to include a little humour. When you text into the application it will respond with a bad joke. Sorry, misspelling there, I meant a dad joke, courtesy of the icanhazdadjoke API.
This application will show us how to get started with Jets, create controllers, actions and routes. We'll build a single endpoint that responds to HTTP requests from Twilio when a number receives an incoming SMS message. The endpoint will return TwiML with a random dad joke each time and hilarity will ensue.
What you'll need
To follow along with this project you'll need:
- A Twilio account (sign up for a free one here)
- An AWS account
- Ruby 2.5 (the version supported by Lambda) and Bundler installed. If you don't have Ruby 2.5 installed, you can use one of the tools listed here to install and manage your Ruby versions.
Got all that? Then let's get started.
Getting started
We'll start by installing the jets gem globally. On the command line type:
gem install jets
The Jets executable can then be used like Rails as a generator to initiate a new project and then run commands within the project. We'll create a new project now, but given our scope in this post we are going to limit it a little. First up, we're going to create the project in API mode as there's no need for HTML views in this application. That also avoids asset compilation with webpacker, which will save in our build time. We also don't need a database. Run the following command to create a new project:
jets new dad-jokes-sms --mode api --no-database
Once the generator has finished running, change into the dad-jokes-sms directory and run your application locally with the following command:
jets serve
Open up http://localhost:8888 and you will see a page that look like this:

If you see this page then your new Jets project is running successfully.
Our first Jets controller
Now we have a Jets application we can use the gem to generate parts of our application, from models and controllers to full scaffolds. For our application we're going to need a controller with one action. Generate it with the following:
jets generate controller Messages create
The generator will create and edit a number of files for us. We need to check the new routes so open config/routes.rb.
Jets generated a GET route, but Twilio webhooks make POST requests by default and I prefer to keep it that way. Set the application up to receive POST request webhooks on the /messages endpoint instead like so:
Jets.application.routes.draw do post 'messages', to: 'messages#create' root "jets/public#show"# The jets/public#show controller can serve static utf8 content out of the public folder.
# Note, as part of the deploy process Jets uploads files in the public folder to s3
# and serves them out of s3 directly. S3 is well suited to serve static assets.
# More info here: http://rubyonjets.com/docs/assets-serving/
any “*catchall”, to: “jets/public#show”
end
Now, let’s go write our controller action. Open app/controllers/messages_controller.rb and you will see one method for the create action. This is the action which will receive our Twilio webhook and respond with TwiML to send back a dad joke.
Fetching a dad joke
To send back a dad joke we need to make a call to the icanhazdadjoke API. Let’s write a quick private method we can use to achieve this.
We’ll use open-uri as it’s useful for making simple web requests (including downloading files and images). The API will respond with plain text if we ask it to, which saves us doing any parsing. Add the following to the MessagesController:
require ‘open-uri’class MessagesController < ApplicationController
def create
endprivate
def random_joke
open(‘https://icanhazdadjoke.com/’, { ‘Accept’ => ‘text/plain’ }).read
end
end
Now we’re ready to return our joke to Twilio as TwiML.
Returning TwiML
We’ll build up a response using the helpers from the twilio-ruby helper library. Open the Gemfile and add twilio-ruby:
source “https://rubygems.org”gem “jets”
gem “twilio-ruby”
On the command line, run bundle install to install the gem. Now in the create action instantiate a new TwiML response object, reply to the incoming message using the <Message> TwiML element and render the XML response, like so:
require ‘open-uri’class MessagesController < ApplicationController
def create
twiml = Twilio::TwiML::MessagingResponse.new
twiml.message body: random_joke
render xml: twiml.to_xml
endprivate
def random_joke
open(‘https://icanhazdadjoke.com/’, { ‘Accept’ => ‘text/plain’ }).read
end
end
You can read more about how to use the twilio-ruby helper library for generating TwiML in the documentation.
We can run this locally to test we are getting the expected response. If you stopped the application, start it again with jets serve. Make a POST request to localhost:8888/messages using curl and you’ll see your joke, provided by icanhazdadjoke, in the TwiML response:
curl --data “” http://localhost:8888/messages

<?xml version=“1.0” encoding=“UTF-8”?>

<Response>

<Message>What’s the advantage of living in Switzerland? Well, the flag is a big plus.</Message>

</Response>
Great, our Jets application is working! Now to deploy it to AWS Lambda.
Are you ready to deploy? IAM!
To deploy our Jets application to AWS we first need to set up our project with credentials to allow it to access AWS services. A good practice here is to create a user that has the minimum number of permissions required to do everything it needs to. The Jets documentation describes the minimum permissions that our user will need. Within our AWS account we’re going to create a policy that contains these permissions and a new user that will be assigned the policy. We can then use that user’s credentials to deploy our application.
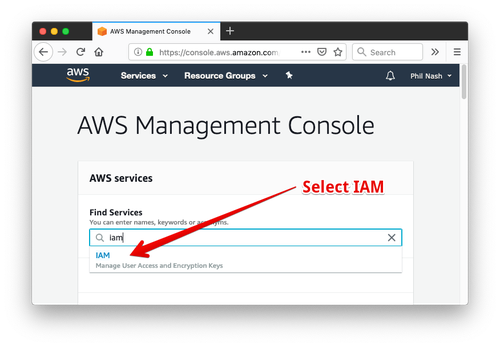
In your AWS console find the IAM service (or head straight to the IAM section).

Go to the Policies section and create a new policy.

Choose the JSON tab and enter the following JSON from the Jets documentation:
{

“Version”: “2012-10-17”,

“Statement”: [

{

“Effect”: “Allow”,

“Action”: [

“apigateway:",

"cloudformation:”,

“dynamodb:",

"events:”,

“iam:",

"lambda:”,

“logs:",

"route53:”,

“s3:"

],

“Resource”: [

"”

]

}

]

}
Click through to review the policy and give it a name.

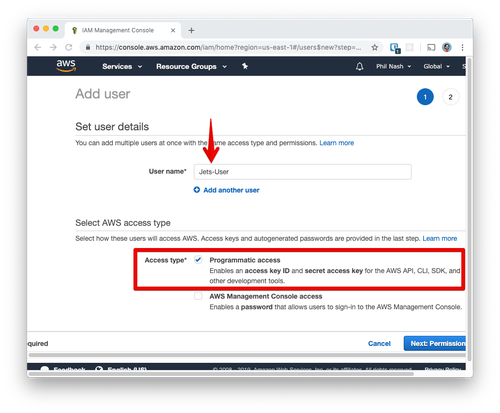
Save the policy. Now we need to create a new user and attach the policy to it, giving it the permissions to create the resources Jets needs to deploy. Open the Users section in the IAM console and create a new user.

Give the user a name and select Programmatic Access for the Access Type.

Click Next to choose the permissions for your new user. Choose Attach existing policies directly and filter for the name of the policy you just created. Select that policy and click Next.

Click Next until you reach the success page.

Save the Access key ID and Secret access key from the last screen. We’ll need them to deploy with. Now we’re ready to deploy.
Deploying to Lambda
On the command line enter:
AWS_ACCESS_KEY_ID=YOUR_USER_KEY AWS_SECRET_ACCESS_KEY=YOUR_USER_SECRET_KEY jets deploy
Jets will use the credentials as environment variables to set up all the resources in your AWS account to run the application. It takes a little while, but when it is complete you will have a URL where your application is running.

You’ll notice this deployed to a “dev” environment. You can read more about how Jets handles environments in the documentation.
We can now test this URL using curl. Remember we use the route /messages so add that to the end of your API Gateway endpoint and make a POST request.
$ curl --data “” https://YOUR_API_GATEWAY_ENDPOINT/messages

<?xml version=“1.0” encoding=“UTF-8”?>

<Response>

<Message>I knew a guy who collected candy canes, they were all in mint condition</Message>

</Response>
Now to have dad jokes on hand at all times let’s hook this up to a Twilio number.
Dad jokes by SMS
Head into your Twilio console to your active phone numbers. If you already have a number you want to work with, edit it, otherwise buy a new number that can receive incoming SMS messages. In the field for A message comes in enter your application URL.

Save your number and send it a message. You should get a dad joke in response. Now, in celebration, go and tell someone nearby that joke and let me know whether they laugh or groan.
Serverless Comedy
In this post we’ve seen how to get started with Jets to write Ruby applications that you can deploy to AWS Lambda. You can see the full project on GitHub.
There’s a lot more to what Jets can help you accomplish, including responding to events, storing data in databases and even run your existing Rails application. Check out these articles from the Jets documentation for more on what you can do with Jets.
Originally published by PHIL NASH at twilio.com
==================================================
Thanks for reading :heart: If you liked this post, share it with all of your programming buddies! Follow me on Facebook | Twitter
☞ Ruby on Rails REST API: The Complete Guide
☞ How To Install Ruby On Rails On Windows
☞ The Complete Ruby on Rails Developer Course
☞ Learn Ruby on Rails from Scratch
☞ Testing Ruby with RSpec: The Complete Guide
☞ Build a Crypto Currency Portfolio App With Ruby on Rails
☞ Ruby On Rails Web Development: To-Do List App
☞ Advanced Ruby Programming: 10 Steps to Mastery
#ruby-on-rails
