How to Implement a Linkedin Login System in Node.js using Passport.js
The LinkedIn Login System is a way for users to sign in to LinkedIn using their existing credentials from another website or application. In this tutorial, you will learn how to implement a linkedin login authentication system in node js using passport js.
Table of Contents
- Step 1: Install Node Express JS Setup
- Step 2: Include Packages and routes in app.js
- Step 3: Create views
- Step 4: Create Config.js
- Step 5: Start Node Js Linkedin Login App Server
Step 1: Install Node Express JS Setup
In this step, execute the following command on terminal to create directory:
mkdir LinkedinAuthAfter open LinkedinAuth directory with any text editor. And use the following command to enter your LinkedinAuth app directories, So open your cmd and run the following command:
cd LinkedinAuthNow, execute the following command on terminal to install express, ejs, express-session and passport:
npm init -y

npm install express ejs express-session passport passport-linkedin-oauth --save
passport-linkedin-oauth2
A simple passport strategy for LinkedIn OAuth2 http://www.passportjs.org/packages/passport-linkedin-oauth2/
Step 2: Include Packages and routes in app.js
In this step, you need to create a file app.js in the root folder of your app and add the following code:
const express = require('express');
const app = express();
const session = require('express-session');
const passport = require('passport');
const LinkedInStrategy = require('passport-linkedin-oauth2').Strategy;
const routes = require('./routes.js');
const config = require('./config')

app.set('view engine', 'ejs');

app.use(session({
  resave: false,
  saveUninitialized: true,
  secret: 'SECRET'
}));

app.use(passport.initialize());
app.use(passport.session());

passport.serializeUser(function (user, cb) {
  cb(null, user);
});

passport.deserializeUser(function (obj, cb) {
  cb(null, obj);
});

passport.use(new LinkedInStrategy({
  clientID: config.linkedinAuth.clientID,
  clientSecret: config.linkedinAuth.clientSecret,
  callbackURL: config.linkedinAuth.callbackURL,
  scope: ['r_emailaddress', 'r_liteprofile'],
}, function (token, tokenSecret, profile, done) {
  return done(null, profile);
}
));

app.use('/', routes);

const port = 3000;

app.listen(port, () => {
  console.log('App listening on port ' + port);
});
Now create a file named route.js in the root directory and paste the following code
const passport = require('passport');
const express = require('express');
var router = express.Router();

router.get('/', function (req, res) {
  res.render('pages/index.ejs'); // load the index.ejs file
});

router.get('/profile', isLoggedIn, function (req, res) {
  res.render('pages/profile.ejs', {
    user: req.user // get the user out of session and pass to template
  });
});

router.get('/auth/linkedin', passport.authenticate('linkedin', {
  scope: ['r_emailaddress', 'r_liteprofile'],
}));

router.get('/auth/linkedin/callback',
  passport.authenticate('linkedin', {
    successRedirect: '/profile',
    failureRedirect: '/login'
  }));

router.get('/logout', function (req, res) {
  req.logout();
  res.redirect('/');
});


function isLoggedIn(req, res, next) {
  if (req.isAuthenticated())
    return next();
  res.redirect('/');
}

module.exports = router;
Step 3: Create views
In this step, you need to create directory name pages. So, visit the views directory in your app and create the pages directory.
Inside the pages/ direcotry, you need to create two views file. The views file is the following:
- index.ejs
- profile.ejs
Application-folder/viwes/pages/index.js
Now, open your index.ejs file and update the following code into your file:
<!doctype html>
<html>

<head>
  <title>Linkedin Node Authentication</title>
  <link href="https://fonts.googleapis.com/icon?family=Material+Icons" rel="stylesheet">
  <link rel="stylesheet" href="https://maxcdn.bootstrapcdn.com/font-awesome/4.7.0/css/font-awesome.min.css">
  <link rel="stylesheet" type="text/css"
    href="https://cdnjs.cloudflare.com/ajax/libs/materialize/0.97.5/css/materialize.min.css">
  <style>
    .linkedin {
      background-color: #0073b1 !important;
      color: #fff !important;
    }
    .fa-linkedin-f:before,
    .fa-linkedin:before {
      content: "\f0e1";
    }
  </style>
</head>

<body>
  <nav class="light-blue lighten-1" role="navigation">
    <div class="nav-wrapper container">
      <a id="logo-container" href="#" class="brand-logo">Node Authentication</a>
    </div>
  </nav>
  <div class="section no-pad-bot" id="index-banner">
    <div class="container">
      <br><br>
      <div class="row center">
        <div class="col s6 offset-s3">
          <div class="card">
            <div class="card-content">
              <span class="card-title">Linkedin Login using Node and passport</span>
            </div>
            <div class="card-action">
              <a href="/auth/linkedin" class="waves-effect waves-light btn social linkedin">
                <i class="fa fa-linkedin"></i> Sign in with Linkedin
              </a>
            </div>
          </div>
        </div>
      </div>
    </div>
  </div>
</body>

</html>
This index.ejs file contains login form.
Application-folder/viwes/pages/profile.js
Next, open your profile.ejs file and update the following code into your file:
<!doctype html>
<html>

<head>
  <title>LinkedIn Node Authentication</title>
  <link href="https://fonts.googleapis.com/icon?family=Material+Icons" rel="stylesheet">
  <link rel="stylesheet" type="text/css"
    href="https://cdnjs.cloudflare.com/ajax/libs/materialize/0.97.5/css/materialize.min.css">
  <style>
    .card:hover {
      box-shadow: 0 10px 20px rgba(0, 0, 0, 0.19), 0 6px 6px rgba(0, 0, 0, 0.23);
      margin-bottom: 54px;
    }
  </style>
</head>

<body>
  <nav class="light-blue lighten-1" role="navigation">
    <div class="nav-wrapper container">
      <a id="logo-container" href="#" class="brand-logo">Node Authentication</a>
      <a href="/logout" class="right">Logout</a>
    </div>
  </nav>
  <div class="section no-pad-bot" id="index-banner">
    <div class="container">
      <br><br>
      <div class="row center">
        <div class="col s12">
          <div class="card">
            <div class="card-content blue lighten-3">
              <span class="card-title white-text"><strong><i class="large material-icons">person</i>
                </strong></span>
            </div>
            <div class="card-action">
              <h5><b><%= user.displayName %></b></h5>
              <p><strong>Linkedin id</strong>: <%= user.id %></p>
            </div>
          </div>
        </div>
      </div>
    </div>
  </div>
</body>

</html>
Step 4: Create Config.js
In this step, you need to config.js file in the root directory. Then add the following code into it:
module.exports = {
'linkedinAuth': {
'clientID': '<CLIENT_ID>', // your App ID
'clientSecret': '<CLIENT_SECRET>', // your App Secret
'callbackURL': 'http://127.0.0.1:3000/auth/linkedin/callback'
}
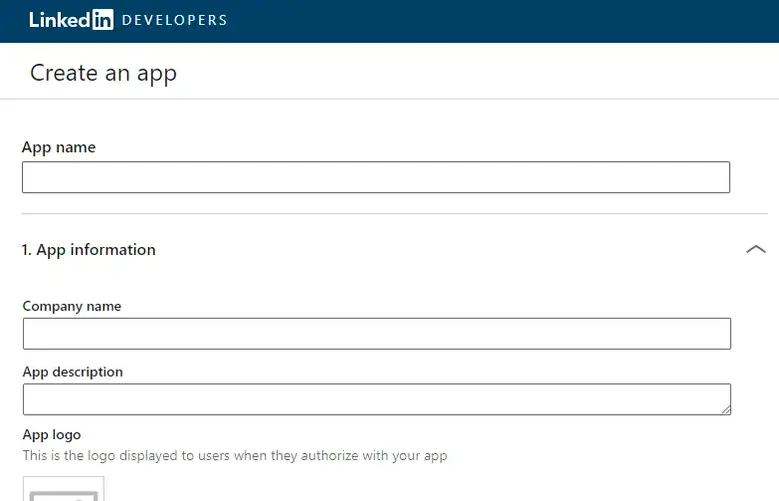
}Step 1:- create linkedin app by click the following url :- https://www.linkedin.com/developers/apps/new . And create linkedin app.
When you click the above given url the following below page will be displayed. So fill the details and create your linkedin app:
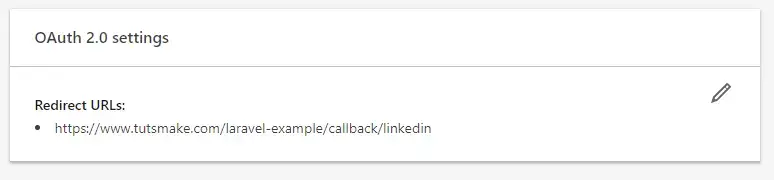
Step 2:- After successfully create the app set the redirect URL for example :
Recommended:-Node js Express MySQL User Authentication Rest API Example
Step 3:- Finally, you redirect to dashboard by linkedin.com. So you can copy client id and secret from linkedin app dashboard like following picture:
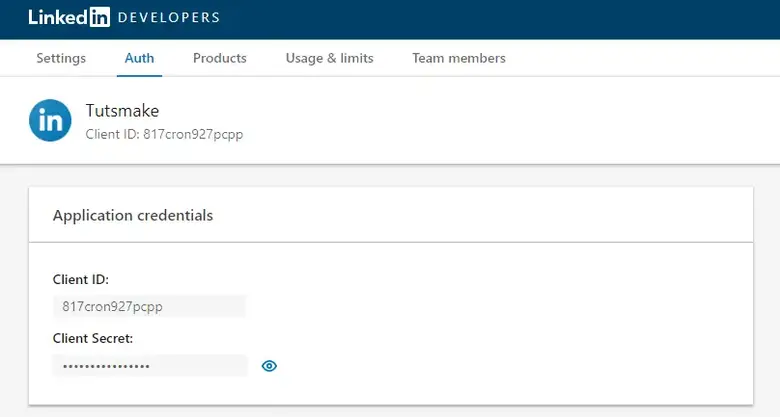
Now linkedin app has been created successfully.
Step 5: Start Node Js Linkedin Login App Server
You can use the following command to run development server:
//run the below command

npm start

after run this command open your browser and hit

http://127.0.0.1:3000
OR
http://localhost:3000
In this tutorial, You have learned how to create LinkedIn authentication in node js express with passport.
Thnaks for reading !!!
#node #passport #linkedin