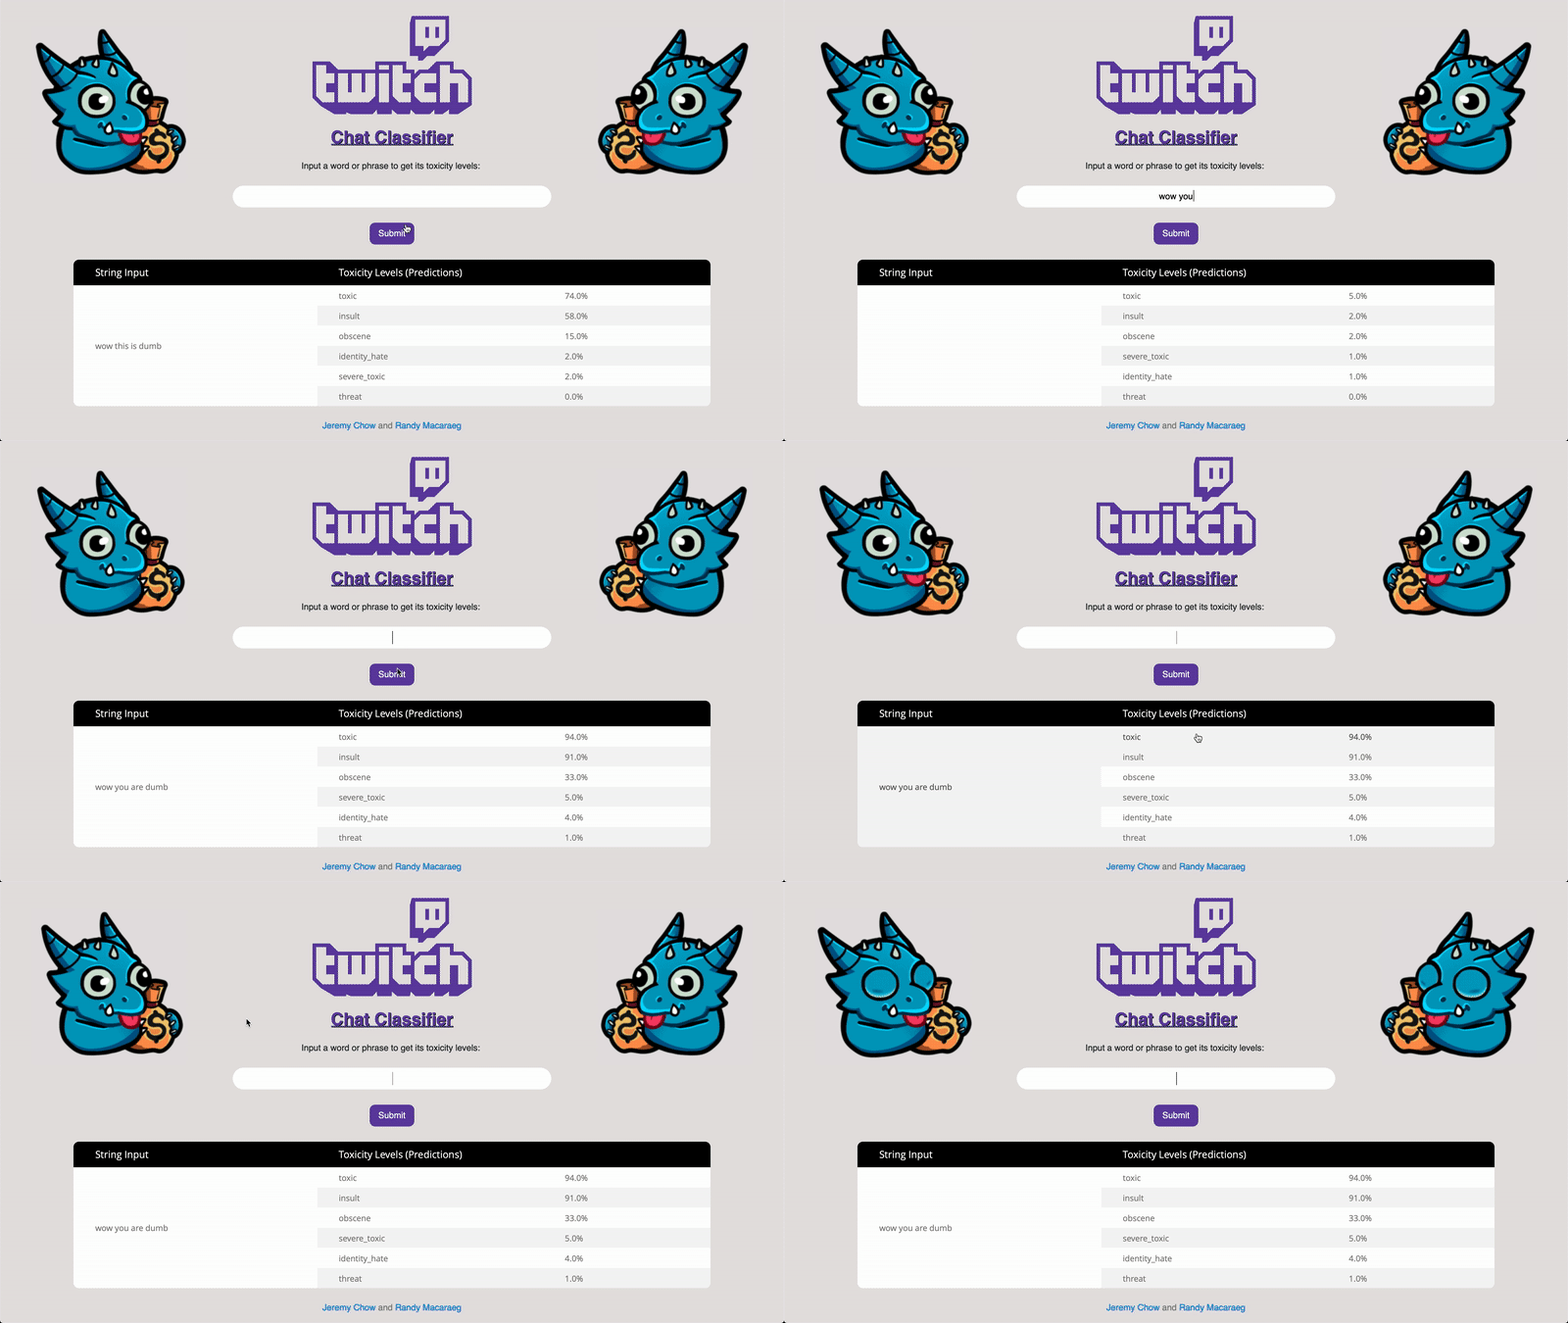
A walk-through on how to deploy machine learning models for user interaction using Python and Flask…
You’ve built a model using Pandas, Sci-kit Learn, and Jupyter Notebooks. The results look great in your notebooks, but how do you share what you’ve made with others?
To share models, we need to deploy them, ideally to some website, or at minimum using Python files. Today I will walk you through the process of deploying a model to a website using Python and Flask using my chatroom toxicity classifier models as an example. This article assumes you know how to write Python code, know the basics of HTML, and have Flask installed (pip install flask or conda install flask). We’ll start by going into the file structure!
The Flask File Structure
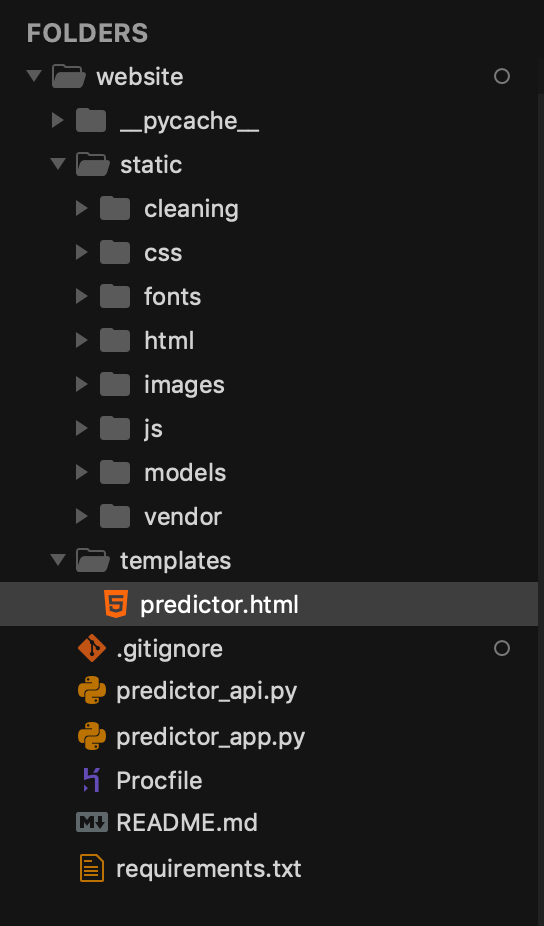
Flask wants things in a specific folder layout in order for it to load properly. I’ve taken a snapshot of my file structure for this project but there are only a couple important elements listed below:

The necessary elements are:
- Static folder — Exists in the root directory. This contains all your static assets like css files, images, fonts, and compressed models.
- Template folder — Exists in the root directory. This is the default location that template HTML files MUST be in for Flask to render them properly. Any page that interacts with your models will be in here.
- predictor.html — This is the front-facing HTML file that users can interact with and that your model will output its results to. This is an example of a file that needs to be in the Templates folder.
- predictor_api.py — Exists in root directory. This file contains the functions that run your model and data preprocessing.
- predictor_app.py — Exists in root directory. This file acts as the link between your API file calling the model and the HTML file to display the results and take in user inputs.
Everything else in the image above is not necessary for Flask to operate properly and can be ignored for the rest of this article. Let’s go into how you set these files up!
Setting up the API.py file
To start, you need to make an API Python file. This is the file that contains all the methods that preprocesses your data, loads your model, then runs your model on the data inputs given by the user. Note that this is **independent of Flask, **in the sense that this is just a python file that runs your model with no Flask functionality. Here is the skeleton of my predictor_api.py file that contains all the functions to run my model:
# predictor_api.py - contains functions to run model
def clean_word(text):
    # Removes symbols, numbers, some stop words
    return cleaned_text
def raw_chat_to_model_input(raw_input_string):
    # Converts string into cleaned text, converts it to model input
    return word_vectorizer.transform(cleaned_text)
def predict_toxicity(raw_input_string):
    # Takes in a user input string, predict the toxicity levels
    model_input = raw_chat_to_model_input(raw_input_string)
    results = []
    # I use a dictionary of multiple models in this project
    for key,model in model_dict.items():
        results.append(round(model.predict_proba(model_input)))
    return results
def make_prediction(input_chat):
    '''
    Given string to classify, returns the input argument and the
    dictionary of model classifications in a dict so that it may be
    passed back to the HTML page.
    '''
    # Calls on previous functions to get probabilities of toxicity
    pred_probs = predict_toxicity(input_chat)
    probs = [{'name': list(model_dict.keys())[index], 'prob': \
            pred_probs[index]} \
            for index in np.argsort(pred_probs)[::-1]]
return (input_chat, probs)
This is personal preference and your data processing steps will vary on the type of model you’re doing as well as the data you’re working with, but I break up the functions in this toxic chat classifier into:
- String cleaning
- Vectorization of the string to feed it into the model
- Model predictions using output of step 2
- Final
make_predictionsfunction which calls all the previous steps in a pipeline from raw input to model predictions in one function call.
Side note: you’ll want to pass your predictions in a dictionary format, as this is the format that Flask passes information between its templates and your python files.
Testing the API.py file
Once you’ve set up your functions, you need some way of testing them. This is when we set up a main section to our script:
if __name__ == '__main__':
    from pprint import pprint
    print("Checking to see what empty string predicts")
    print('input string is ')
    chat_in = 'bob'
    pprint(chat_in)
x_input, probs = make_prediction(chat_in)
    print(f'Input values: {x_input}')
    print('Output probabilities')
    pprint(probs)
The <strong>name</strong>=='__main__' portion will only run if we launch script on the commandline using python script_name.py . This allows us to debug of our functions and add any unit tests in an area of the file that will not run once our app or website is launched. This part of the code is purely for you as the programmer to make sure your functions are working.
Setting up the Flask Python app.py file
Now your API file should be working. Cool, how do we get it onto a website? This is where Flask comes in. Flask is a Python framework that uses Jinja2 HTML templates to allow you to easily create webpages using Python. The Flask framework deals with a lot of the backend web stuff so that you can do more with just a couple lines of Python code. To get started, you’re going to need to create your app Python file:
# predictor_app.py
import flask
from flask import request
from predictor_api import make_prediction
# Initialize the app
app = flask.Flask(__name__)
# An example of routing:
# If they go to the page "/" (this means a GET request
# to the page http://127.0.0.1:5000/)
@app.route("/", methods=["GET","POST"])
def predict():
    # request.args contains all the arguments passed by our form
    # comes built in with flask. It is a dictionary of the form
    # "form name (as set in template)" (key): "string in the
    # textbox" (value)
    print(request.args)
    if(request.args):
        x_input, predictions = \
            make_prediction(request.args['chat_in'])
        print(x_input)
        return flask.render_template('predictor.html',
                                     chat_in=x_input,
                                     prediction=predictions)
    else:
        #For first load, request.args will be an empty ImmutableDict
        # type. If this is the case we need to pass an empty string
        # into make_prediction function so no errors are thrown.

        x_input, predictions = make_prediction('')
        return flask.render_template('predictor.html',
                                     chat_in=x_input,
                                     prediction=predictions)
# Start the server, continuously listen to requests.
if __name__=="__main__":
    # For local development, set to True:
    app.run(debug=False)
    # For public web serving:
    #app.run(host='0.0.0.0')
    app.run()
There’s a lot going on here, so I’ll try to break it down into digestible sections.
Imports
First we import flask, and explicitly import request for quality of life purposes. Next, we have
from predictor_api import make_prediction
This goes to the API file we wrote earlier and imports the make_predictionfunction, which takes in the user input and runs all data preprocessing then outputs our predictions.
Hosting the web page
I’m going to skip to the bottom code briefly. As mentioned earlier,
if __name__=="__main__":
runs when you run the Python script through the command line. In order to host our web page, we need to run python your<em>app</em>name.py. This will call app.run() and run our web page locally, hosted on your computer.
Routing
After initializing the app, we have to tell Flask what we want to do when the web page loads. The line @app.route("/", methods = ["GET","POST"]) tells Flask what to do when we load the home page of our website. The GET method is the type of request your web browser will send the website when it accesses the URL of the web page. Don’t worry about the POST method because it’s a request conventionally used when a user want to change a website, and it doesn’t have much relevance for us in this deployment process. If you want to add another page to your website, you can add an:
@app.route("/page_name", methods = ["GET","POST"])
def do_something():
 flask.render_template('page_name.html',var_1 = v1, var_2 = v2)
The function name under the routing doesn’t mean anything, it just contains the code that will run upon the user reaching that page.
Running the model
In the function below the routing, we have request.args. This is a dictionary (JSON) object that contains the information submitted when someone clicks the ‘Submit’ button on our form. I’ll show below how we assign what is in the request.args object. Once we have the args, we pass it into our model using the function we imported from our other file, then render the tempate with the predicted values that our model spit out by returning:
return flask.render_template('predictor.html',
                              chat_in=x_input,
                              prediction=predictions)
This function takes in the html file that our website runs, then passes in our variables outputted from the model x<em>input, predictions and shoots them to the HTML template as chat</em>in, prediction . From here, the job of the model is done, and now we just need to worry about displaying the results to the users!
Flask templates
Passing user inputs to the app.py file
First we need to make a way for the user to pass in their input to our model. Since we’re taking chat input, let’s make a text box and a submit button.
HTML Code
<input type="text" name="chat_in" maxlength="500" >
<!-- Submit button -->
<input type="submit" value="Submit" method="get" >
When the user enters a value and hits the submit button, it will send a get request to the template and will fill the request.args dictionary with the key being the name flag in our text box. To access the user’s input, we would use request.args['chat_in'] in the our Python app file. We can pass this into the model, as shown above in this line:
make_prediction(request.args['chat_in'])
Passing model outputs to the HTML template
So we’ve made our predictions using our python files, but now it’s time to display them using HTML templates. Templates are just a way to change HTML code so that we can update the user with new values (such as our predictions). My goal isn’t to teach you HTML here, so I’m not going to elaborate on the HTML code (but you can find it in the github link if you’re curious), but basically you will display the passed variable using the following syntax:
<!-- predictor.html file -->
<!DOCTYPE html>
<html lang="en">
<p> Here are my predictions!
<br>
{{ chat_in }}
{{ prediction[0]['prob'] }}
</p>
In this example I am displaying the chat_in variable that was passed in our render_template function above. I also display the first element in the dictionary prediction that I passed to the template, which contains multiple models. From a functional standpoint, we are done! From here, you can focus on making your app look pretty and responsive.

That’s it for Flask! With some extra HTML code and possibly some JavaScript, you can have a pretty and interactive website that runs on your computer. From here, you can deploy the website to a platform of your choice, be it Heroku, Amazon Web Services, or Google Cloud.
#data-science #machine-learning #python
