Learn how to build a Vue.js Application and add Authentication
TL;DR In this article, I’m going to show you how to build a Vue website that will showcase events hosted by an organization. Users will be required to sign in to view details of an event, so we’ll also be adding authentication to the website. We’ll go over some Vue background, Vue application structure, creating components, setting up routing, and styling with Bulma.
Requirements
This application is using the latest versions (at the time of writing) of the following:
Note: This tutorial uses Vue 2. The release for Vue 3 is scheduled for the first quarter of 2020, but that doesn’t mean you shouldn’t start with Vue 2! This tutorial lays down the foundations of Vue that will carry over into the next release as well.
You can download Node.js here, which automatically installs npm, a Node package manager, as well.
We’re going to be using npm to install our dependencies. This tool will allow us to quickly install millions of libraries and easily manage any dependencies we have in our applications.
Once we start our application and you see it in action, you’ll quickly see just how beneficial npm is!
I’m going to walk you through how to create everything from scratch, so you don’t need to have any prior knowledge of Vue or Node to follow along! You will, however, need a code editor (VS Code is my favorite) and access to the terminal to follow this tutorial.
Let’s get started!
Why Learn Vue?
Vue history and popularity
Vue.js is a JavaScript framework created by Evan You that has blown up in popularity over the last few years.
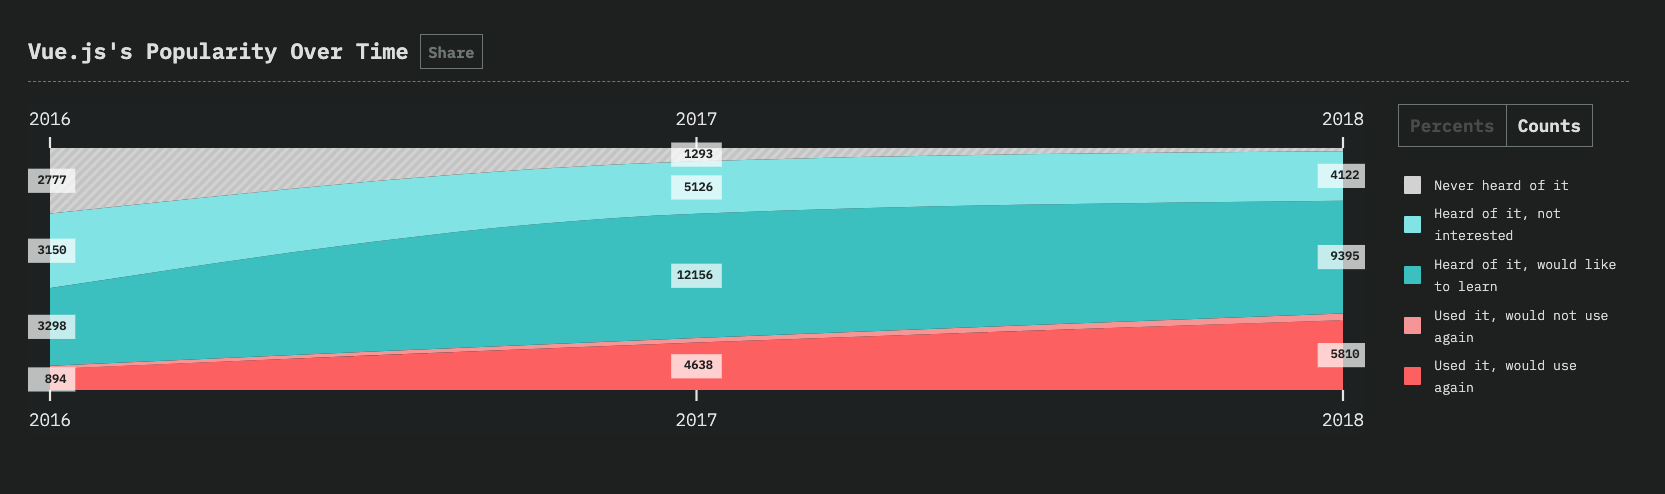
Source: 2018 State of JS Survey Interest in Vue.js has nearly tripled from 2016 to 2018 with an increase in those who are interested in learning it and those who would use it again.
Source: 2018 State of JS Survey In 2018, the majority of people surveyed have heard of Vue.js and would like to learn it or have already used it and would use it again.
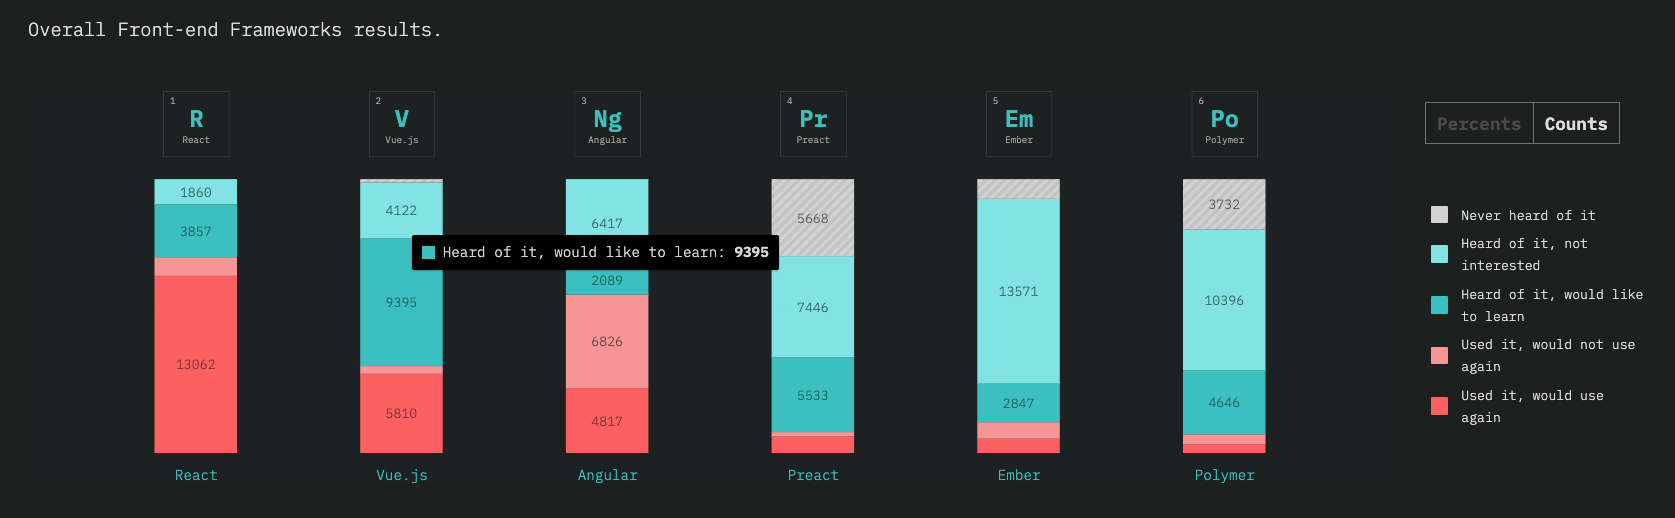
Evan You launched the project after having worked on several AngularJS projects when he worked for Google. Vue isn’t backed by huge companies like Google (Angular) or Facebook (React), but as you can see in the charts above, Vue is still able to stand on its own among the top JavaScript frameworks.
Because of Evan You’s history at Google, you might even notice some similarities between Vue and AngularJS (old Angular).
I figured, what if I could just extract the part that I really liked about Angular and build something really lightweight.
— Evan You on creating Vue.js
Vue vs Angular vs React
One of the best things about Vue is the low barrier to entry.
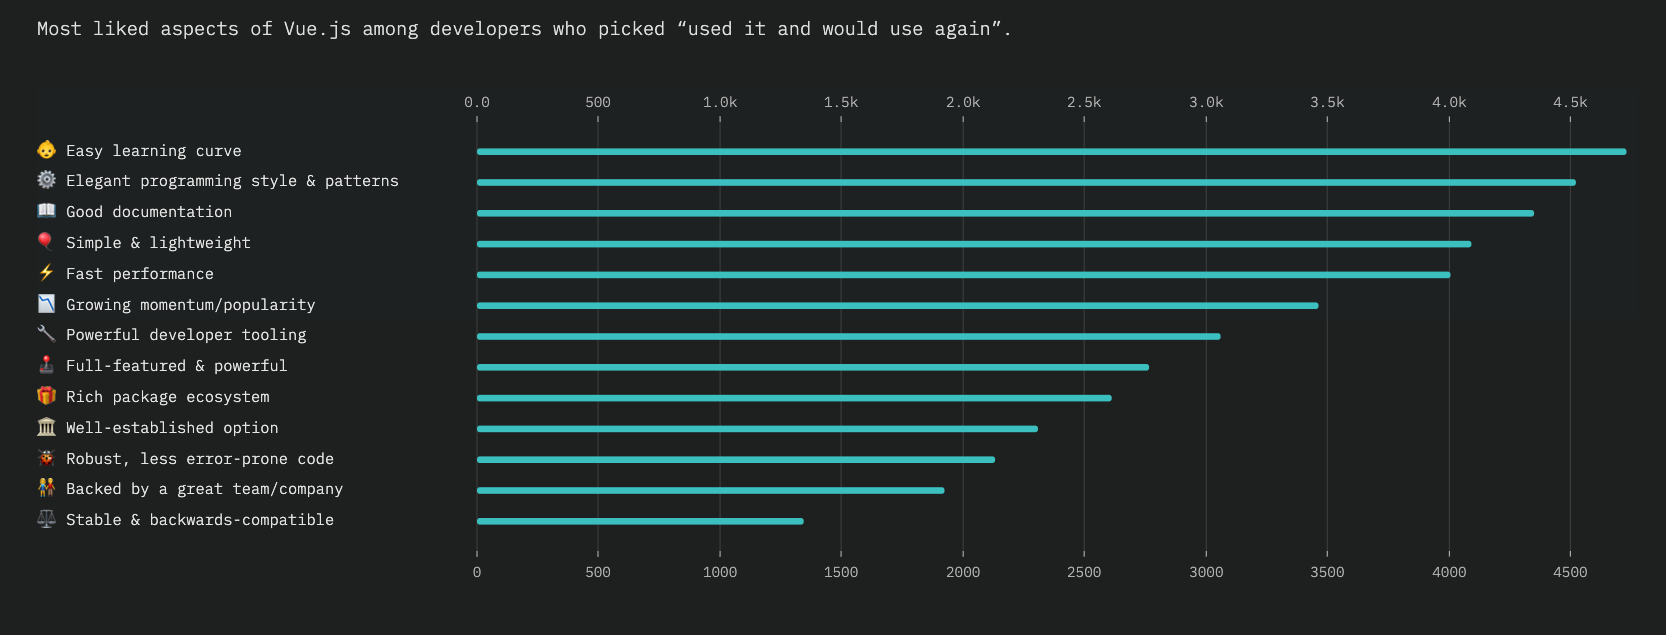
Source: 2018 State of JS Survey For developers who chose “would use again”, their favorite Vue.js features were the easy learning curve, elegant programming style, and good documentation.
A lot of other frameworks may require (or strongly suggest) that you learn their own syntax or integrate other technologies (e.g. TypeScript for Angular or JSX for React). Of course, there’s nothing wrong with this, but it does make it a little harder for a beginner to get started when they have to know all the things right away. Vue allows you to use TypeScript or even JSX if you’d like, but it’s not required. This isn’t to say one method is better than the other, but this HTML-like syntax is one possible explanation as to why developers find Vue easier to learn initially.
Again, when it comes to comparing the popular frameworks, none of them are better than the others. At the end of the day, it comes down to what you feel most comfortable using.
Vue is a great option if you’re looking to get something up and running quickly. It has great community support, robust documentation in several languages, and it’s just fun to use!
Setting Up
Alright, let’s get started with some code.
First, open up your terminal and switch to the directory that you want to store the project in.
We’re going to create our new project using the Vue CLI.
The Vue CLI tool lets us get up and running with Vue quickly by letting us choose from pre-configured build setups. To use the CLI, run npx @vue/cli create events-app in your terminal. This will create a new folder called events-app and start the installation process in that folder.
npx @vue/cli create events-app
Note:
npxallows you to use the Vue CLI without installing it globally. It’s available in versions of npm >= 5.2.0.
The CLI tool will now ask you a few questions so that it can set the app up correctly. I’ve listed the options that this tutorial uses below. Press ENTER to select.
- Pick a preset —
Manually select features
? Please pick a preset:
  default (babel, eslint)
> Manually select features
- Check the features needed —
Babel,Router,CSS Pre-processors,Linter/Formatter
Note: Press SPACE to select multiple features and ENTER once you have all features selected.
? Check the features needed for your project: (Press <space> to select, <a> to toggle all, <i> to invert selection)
 ◉ Babel
 ◯ TypeScript
 ◯ Progressive Web App (PWA) Support
 ◉ Router
 ◯ Vuex
 ◉ CSS Pre-processors
 ◉ Linter / Formatter
 ◯ Unit Testing
 ◯ E2E Testing
- History mode —
Y
? Use history mode for router? (Requires proper server setup for index fallback in production) (Y/n) Y
Note: This will remove the default hash (#) from URLs
- CSS pre-processor —
Sass/SCSS (with dart-sass)
? Pick a CSS pre-processor (PostCSS, Autoprefixer and CSS Modules are supported by default): (Use arrow keys)
❯ Sass/SCSS (with dart-sass)
  Sass/SCSS (with node-sass)
  Less
  Stylus
Note: Dart Sass is the primary implementation of Sass.
- Pick a linter/formatter -—
ESLint with error prevention only
? Pick a linter / formatter config: (Use arrow keys)
❯ ESLint with error prevention only
  ESLint + Airbnb config
  ESLint + Standard config
  ESLint + Prettier
- Additional lint features —
Lint and fix on commit
? Pick additional lint features:
  ◯ Lint on save
❯ ◉ Lint and fix on commit
- Config location —
In dedicated config files
? Where do you prefer placing config for Babel, PostCSS, ESLint, etc.? (Use arrow keys)
❯ In dedicated config files
  In package.json
- Save as preset —
N
? Save this as a preset for future projects? (y/N) N
Now the CLI will run through and configure your application. It will also install the dependencies, so give it a little time (~30 seconds).
Once it’s finished, you can start the application by running npm run serve or yarn serve:
cd events-app
npm run serve
See it in action at http://localhost:8080/! Go ahead and keep this running in the background so that you can see the app’s progress as you go through the tutorial.
Vue App Architecture
Now open up your project in your code editor and you’ll see some default files that the CLI created. Let’s clean some of this up.
Delete these files:
src/components/HelloWorld.vue
assets/logo.png
Now open up src/views/Home.vue and replace it with:
<template>
  <div class="home">
  </div>
</template>
<script>
export default {
  name: 'home',
  components: {
  }
}
</script>
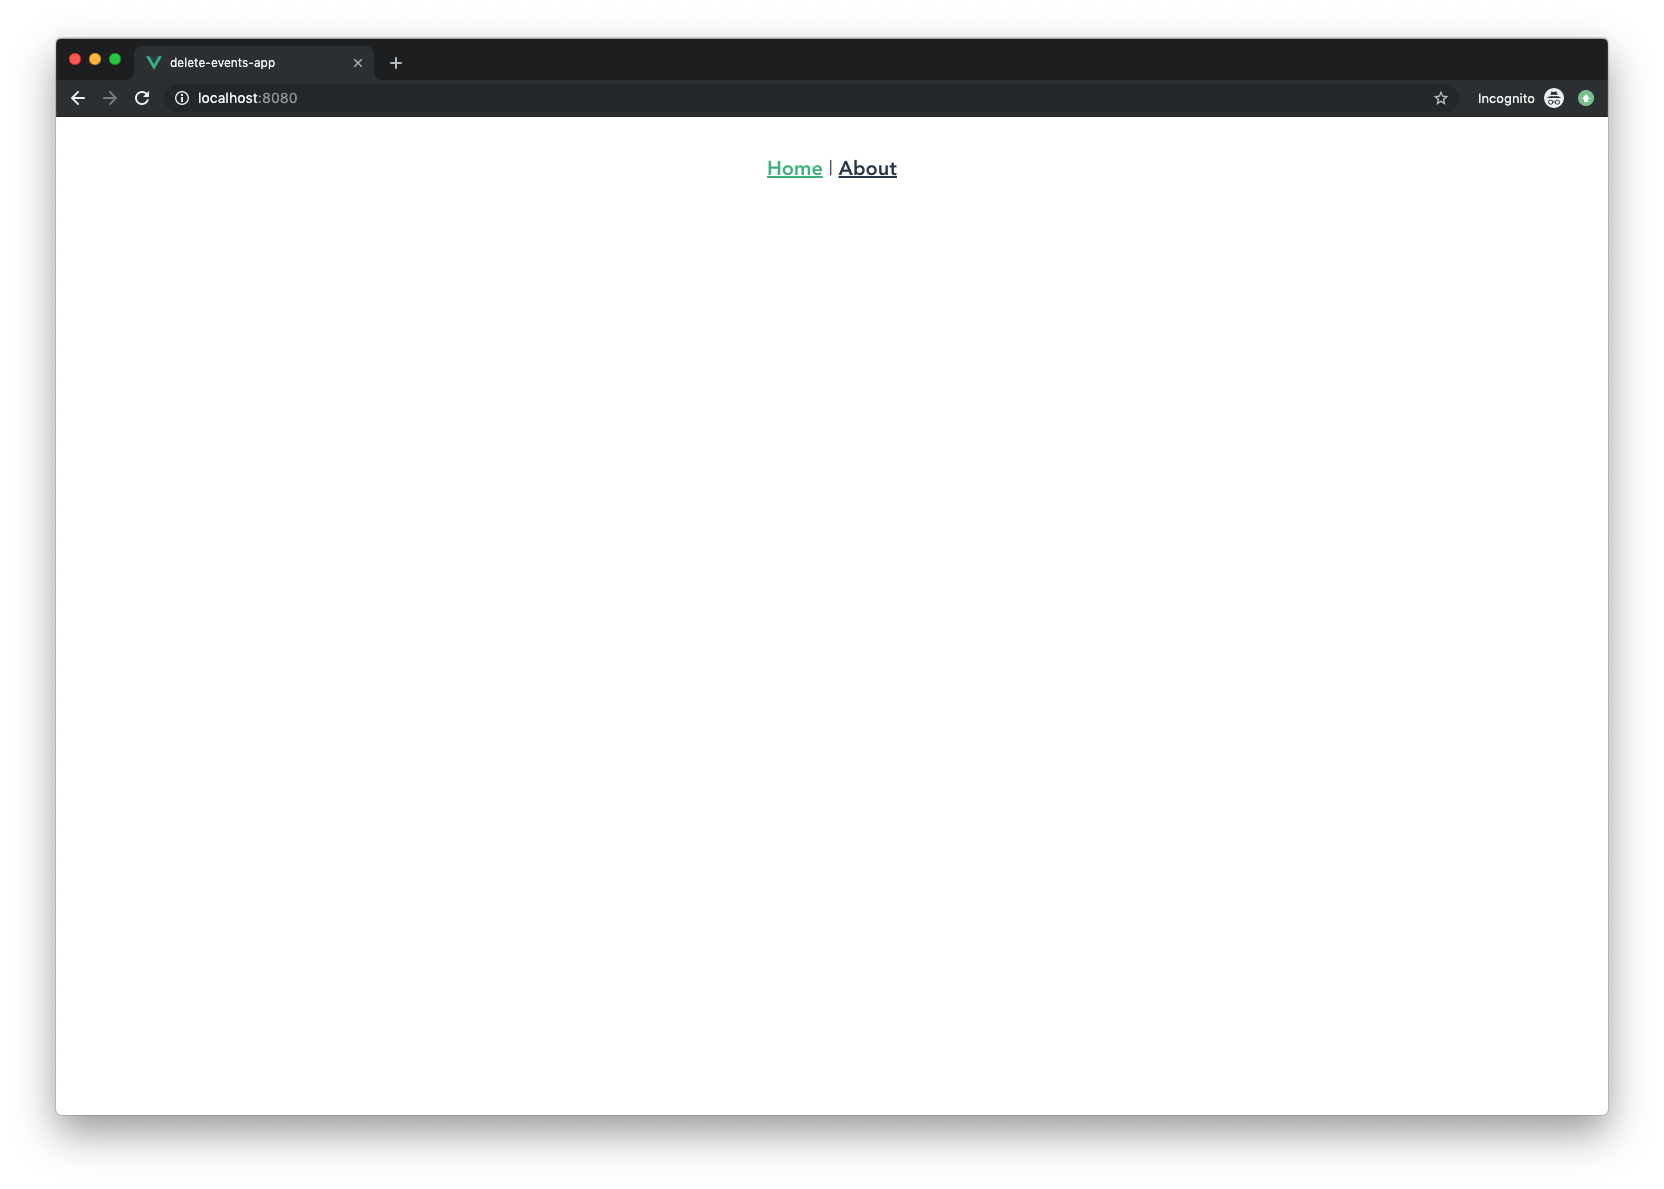
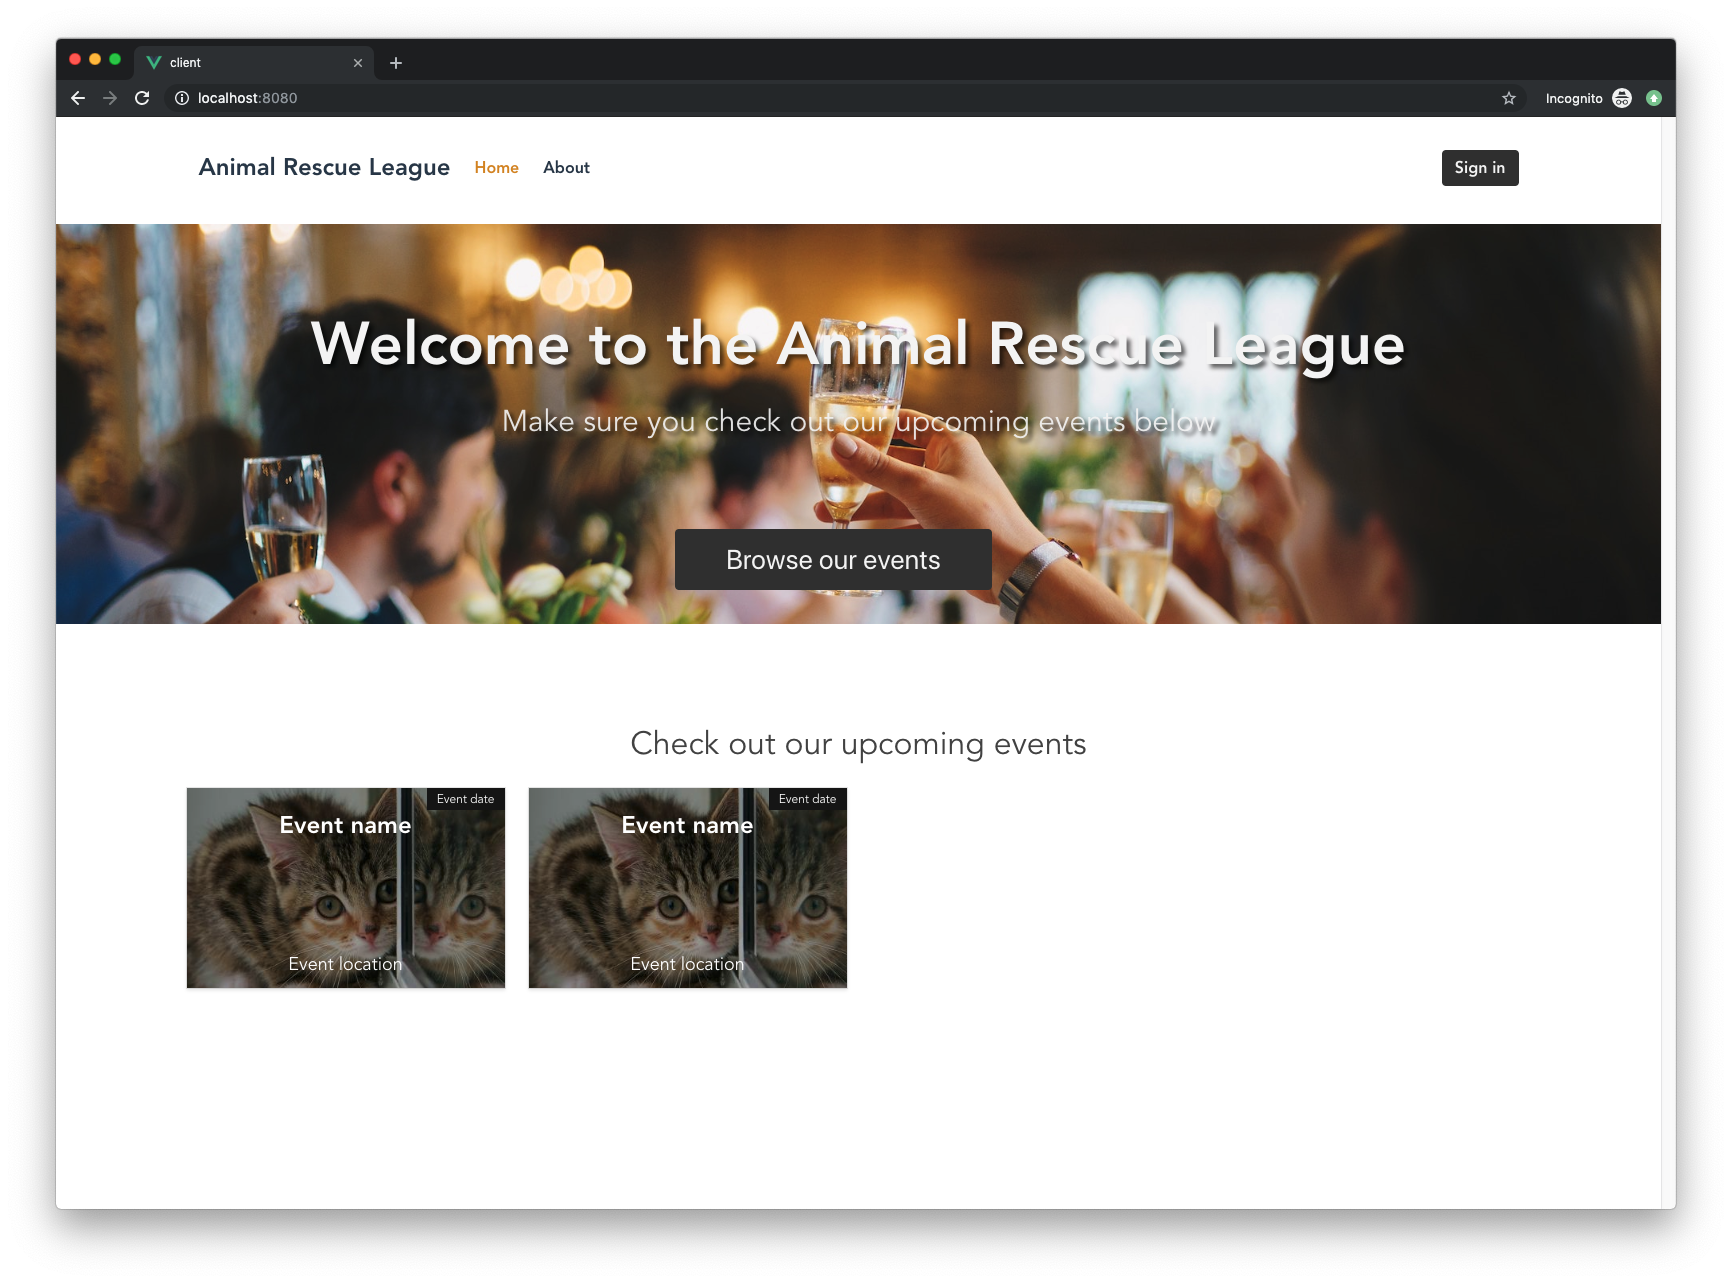
This will leave you with a blank homepage and a nav bar with two links: Home and About.
Let’s take a quick look at the important remaining files so that we can see how they work together.
main.js
The first file to note is the src/main.js file. This will be the entry point for our Vue application.
import Vue from 'vue'
import App from './App.vue'
import router from './router'

Vue.config.productionTip = false

new Vue({
  router,
  render: h => h(App)
}).$mount('#app')
First, we have our imports at the top of the file. We’re bringing in Vue, the App component (which we’ll go over in a moment), and the router (created by the CLI).
Next we have Vue.config.productionTip = false, which sets our app in development mode.
And finally, we’re creating a new Vue instance.
A Vue instance is required for every Vue application. The Vue instance will accept an options object that contains information about your application such as the DOM element that the Vue instance will be mounted on, data the instance will use, functions that run at some point during the instance’s lifecyle, and more.
// New Vue instance
new Vue({
  // Vue instance options here
  el: '#appId', //
  data: someDataObject,
  template: 'App'
})
In our application’s case, we’re telling the Vue instance that we’ll be using the router, rendering the app with the App template (more on this soon), and then mounting it to the DOM element with the id of app.
index.html
Open up public/index.html and you’ll see a fairly standard index HTML file.
<!DOCTYPE html>
<html lang="en">
  <head>
    <meta charset="utf-8">
    <meta http-equiv="X-UA-Compatible" content="IE=edge">
    <meta name="viewport" content="width=device-width,initial-scale=1.0">
    <link rel="icon" href="<%= BASE_URL %>favicon.ico">
    <title>vue-events</title>
  </head>
  <body>
    <noscript>
      <strong>We're sorry but vue-events doesn't work properly without JavaScript enabled. Please enable it to continue.</strong>
    </noscript>
    <div id="app"></div>
    <!-- built files will be auto injected -->
  </body>
</html>
If you look toward the bottom of the file, you’ll see where that mysterious #app in the src/main.js file comes into play. That div is where our Vue instance will be injected.
App.vue
The next important file is src/App.vue. This is our first component.
We won’t go into the details of this file yet, just know that this is the next “building block” of our Vue application. When we reviewed the src/main.js file, we saw it was importing and rendering a template called App, which is what this file is.
Before we dive into the details of this file, let’s first learn about Vue’s component system.
Using Components in Vue
The concept of components in general is sometimes over-complicated, but in reality, it’s quite simple. A component is a modular and reusable block of code. It contains all of the HTML, JavaScript, and CSS that it requires in a single file.
Imagine you have a simple website that has two pages: a home page and a portfolio page. You have some images, basic information, and a carousel with some testimonials on your home page. Your portfolio page showcases your work, but you want to include those testimonials there as well.
In this scenario, you can copy/paste all of the code required for the testimonials onto both pages, but then you’d be breaking the golden DRY “Don’t Repeat Yourself” rule.
This is where the idea of components starts to make sense. Instead of creating duplicate code, you can pull that testimonial code out and package it into its own file. This standalone chunk of code will contain the HTML, the styles, and any JS needed to make the carousel work.
Now, whenever you want to insert that testimonial “component” somewhere, all you have to do is import that component! Your application will begin to take on a sort of tree structure. You’ll have your “root” component, which in our case is src/App.vue, and that component will import other components. All of these small chunks of code come together to build your application.
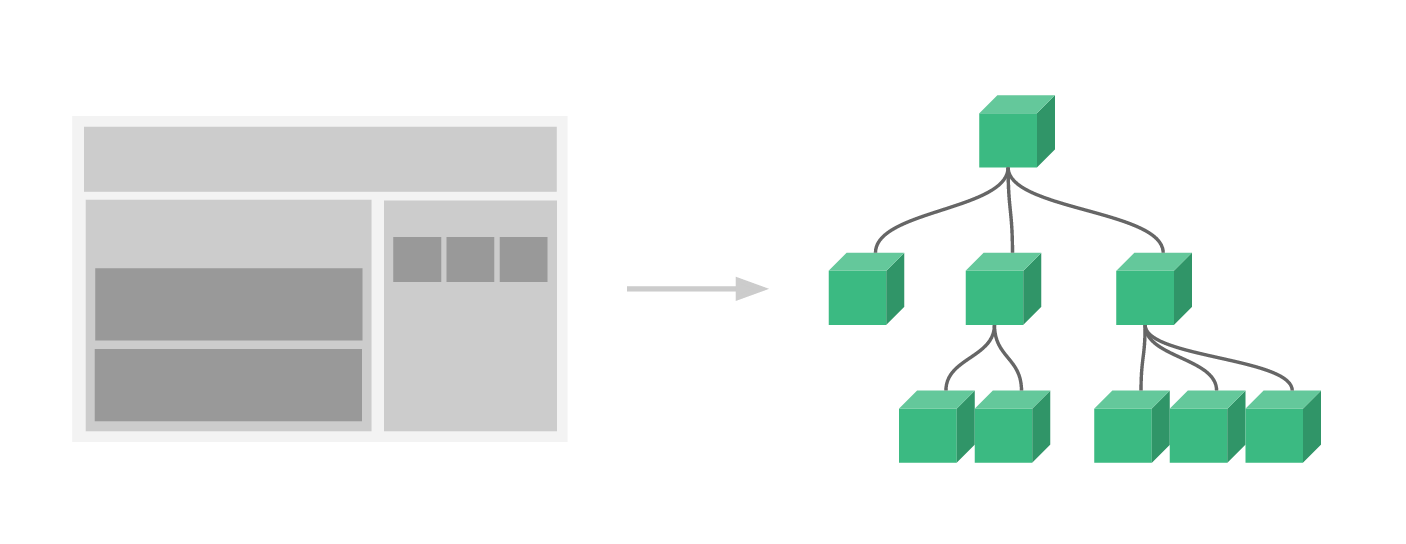
(Source: Vuejs.org)
Now that you have the idea of components down, let’s see what a Vue component looks like.
Vue components
There are a lot of ways to structure components in Vue, but for the sake of brevity, I’ll just focus on the most popular way: Single file components.
With single file components, we’re packaging the template, logic, and styles used by a component all in one file with a .vue extension. This method does require a build setup, but because we’re using the Vue CLI, we already have this set up for us. Let’s take a look at an example.
<template>
  <div class="our-component">
    <h1>I'm a component!</h1>
    <ChildComponent />
  </div>
</template>
<script>
import ChildComponent from '@/components/ChildComponent';
export default {
  name: 'MyComponent',
  components: {
    ChildComponent
  }
}
</script>
<style lang="scss" scoped>
  .our-component {
    text-align: center;
  }
</style>
First we have our HTML enclosed in a <template></template> tag. Inside of here, you’ll see <ChildComponent />. This is an example of how we can use another component inside of this one.
Note: There must always be a parent
<div>element that encloses the rest of the HTML after the template tag.
Next, we have our script tag, which includes:
- An
importstatement that allows us to import and use other components inside this component - An
exportobject that allows us to define and export this named component to reuse it across our application. - A
componentsobject inside the export where we can list all the child components used in this component
This is a pretty basic example, but there are loads of other options you can include in your component object. We’ll go over a couple more soon.
Finally, we have our <style> tag. The styles defined here will apply to this component and all its children, unless you add scoped, as is done here. Now the styles here will apply to that component alone. We’re also specifying that we’re using SCSS as the stylesheet language.
Let’s take a look at the that App.vue file again now that we have a little more background about component structure.
App.vue
Open up src/App.vue.
<template>
  <div id="app">
    <div id="nav">
      <router-link to="/">Home</router-link> |
      <router-link to="/about">About</router-link>
    </div>
    <router-view/>
  </div>
</template>
<style lang="scss">
#app {
  font-family: 'Avenir', Helvetica, Arial, sans-serif;
  -webkit-font-smoothing: antialiased;
  -moz-osx-font-smoothing: grayscale;
  text-align: center;
  color: #2c3e50;
}
#nav {
  padding: 30px;
  a {
    font-weight: bold;
    color: #2c3e50;
    &.router-link-exact-active {
      color: #42b983;
    }
  }
}
</style>
This is the first view template to be rendered in our application. The rest of our components will start from here.
Take a look at <router-link> and <router-view>. This is how our application will handle routing. Because we chose to have the router built-in using the CLI, we already have a nice template here to use!
We’ll go more in-depth on routing soon, but just know that when you click on one of those links, this same template will still be rendered, but <router-view /> will be replaced with whatever route is active. In this case, either the Home or About component. This is how we’ll be able to reuse this same layout and navbar across the entire application.
Try clicking those links to see for yourself!
Building Our Application Components
Now that you know the anatomy of a Vue application and how to build a component, let’s start building out ours.
Make sure you’re still in the events-app folder in the terminal and then create these files/folders:
cd src/views
touch EventSingle.vue
Now let’s make the components that will be shared among these pages:
cd ../components
touch EventsList.vue
touch EventCard.vue
mkdir partials
touch partials/Nav.vue
That should do it for now! Let’s start filling these files in and go over the purpose of each file.
Using Bulma for Styling
To make styling a little easier, we’re going to use Bulma, which is an open-source CSS framework.
Switch to the events-app folder and then enter the command below to install Bulma:
cd ../..
npm install bulma --save
Now open up src/main.js in your editor and import Bulma by adding this to the top of the file after all of the other imports:
// ...
import './../node_modules/bulma/css/bulma.css';
// ...
Let’s start the app up one more time so that we can see our work in progress as we continue building in the next section.
npm run serve
You can just leave this running in the background for the rest of this tutorial and you’ll always be able to view it in the browser at http://localhost:8080.
Home Component
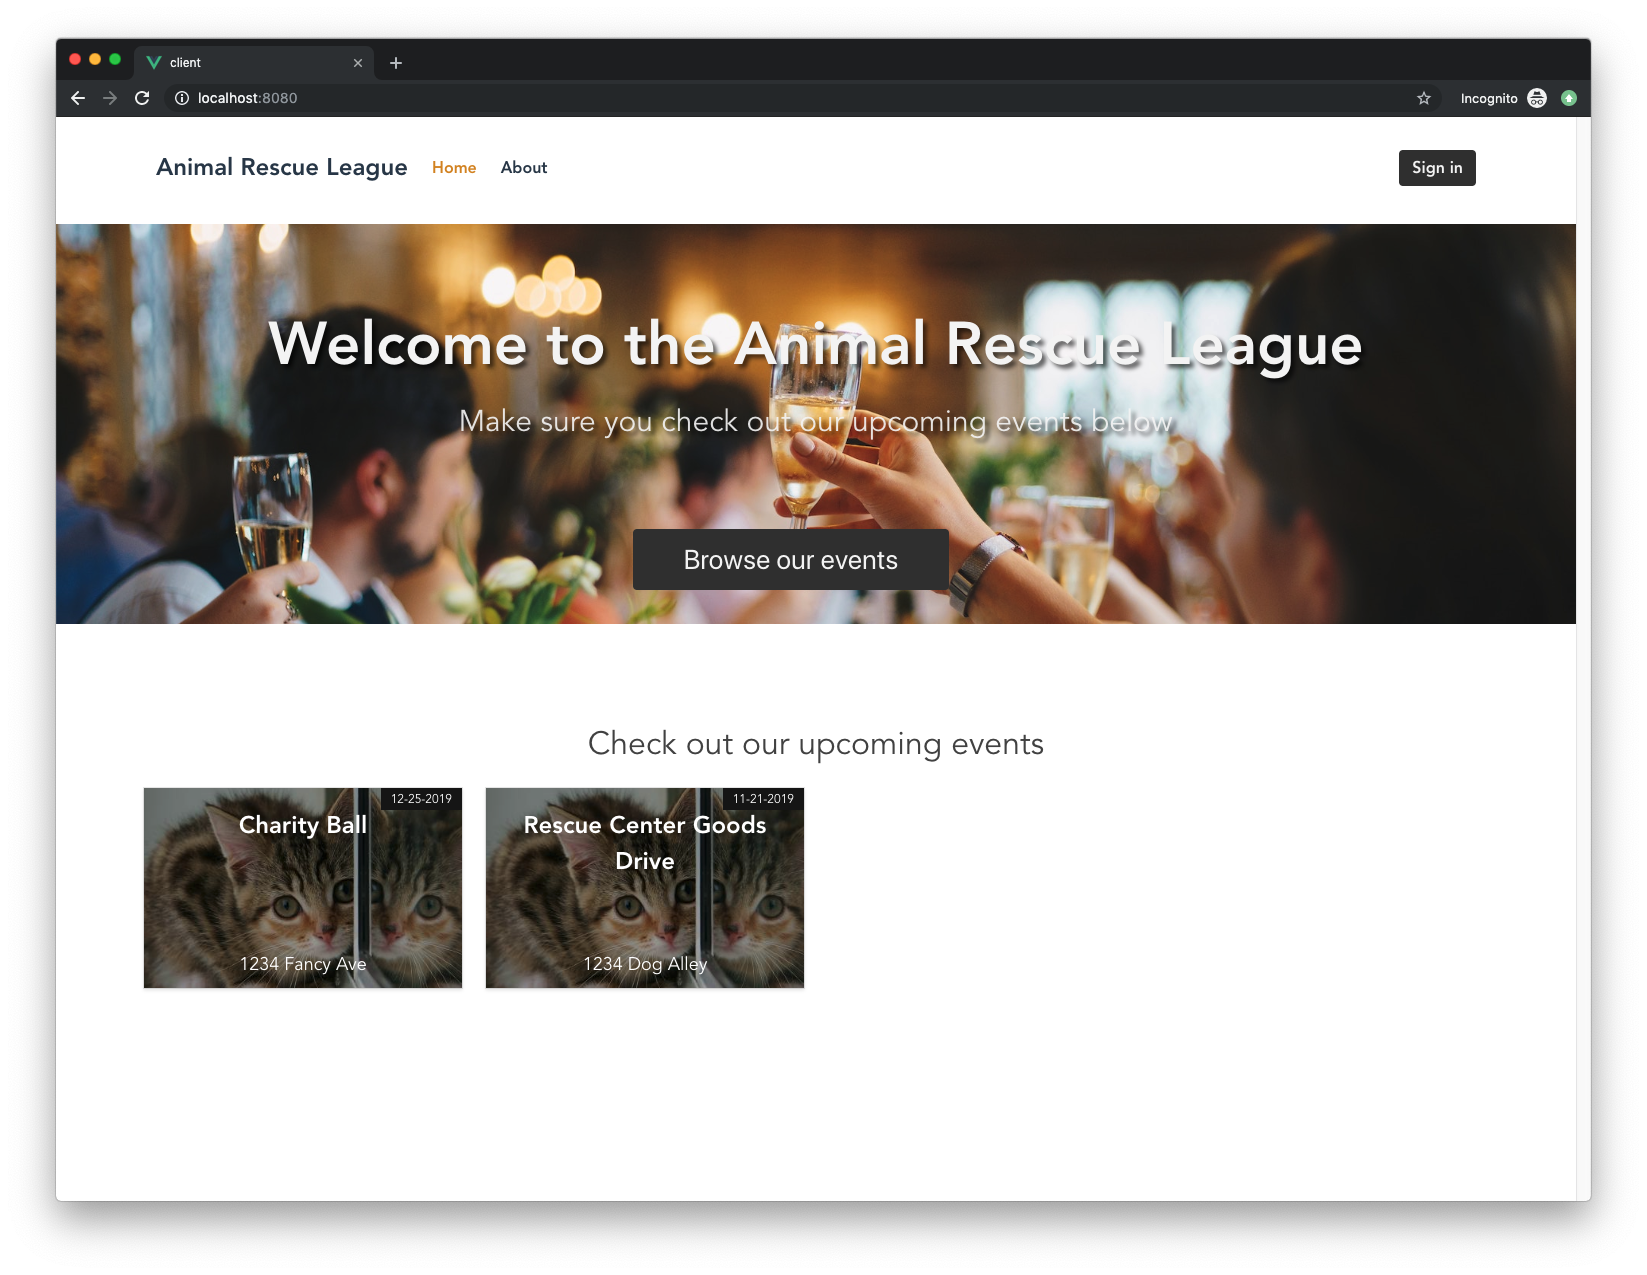
Now let’s start working on the components. Open up the Home Component in src/views/Home.vue and paste in the following:
<template>
<div class="home">
  <section class="hero is-dark">
    <div class="hero-body">
      <div class="container">
        <h1 class="title">
          Welcome to the Animal Rescue League
        </h1>
        <h2 class="subtitle">
          Make sure you check out our upcoming events below
        </h2>
        <div class="button-block">
          <button class="button is-xl is-dark">Sign Up to Browse Events</button>
        </div>
      </div>
    </div>
  </section>
</div>
</template>
<script>
export default {
  name: 'home',
  components: {
  }
}
</script>
<style lang="scss" scoped>
  .hero {
    text-align: center;
    background-image: url('https://cdn.auth0.com/blog/vue-meetup/event-banner.png');
    background-size: cover;
    background-position: center;
    background-repeat: no-repeat;
    height: 400px;
  }
  .hero-body .title {
    text-shadow: 4px 4px 4px rgba(0, 0, 0, 0.6);
    padding: 40px 0 20px 0;
    font-size: 60px;
  }
  .subtitle {
    text-shadow: 4px 4px 4px rgba(0, 0, 0, 0.7);
    font-size: 30px;
  }
  .button-block {
    text-align: center;
    margin-left: auto;
    margin-right: auto;
    width: 100%;
    position: absolute;
    bottom: -150px;
    .button {
      margin-right: 50px;
      padding-left: 50px;
      padding-right: 50px;
    }
    .welcome {
      width: 400px;
      padding: 10px;
      margin-left: auto;
      margin-right: auto;
    }
  }
  .is-xl {
    font-size: 1.7rem;
  }
</style>
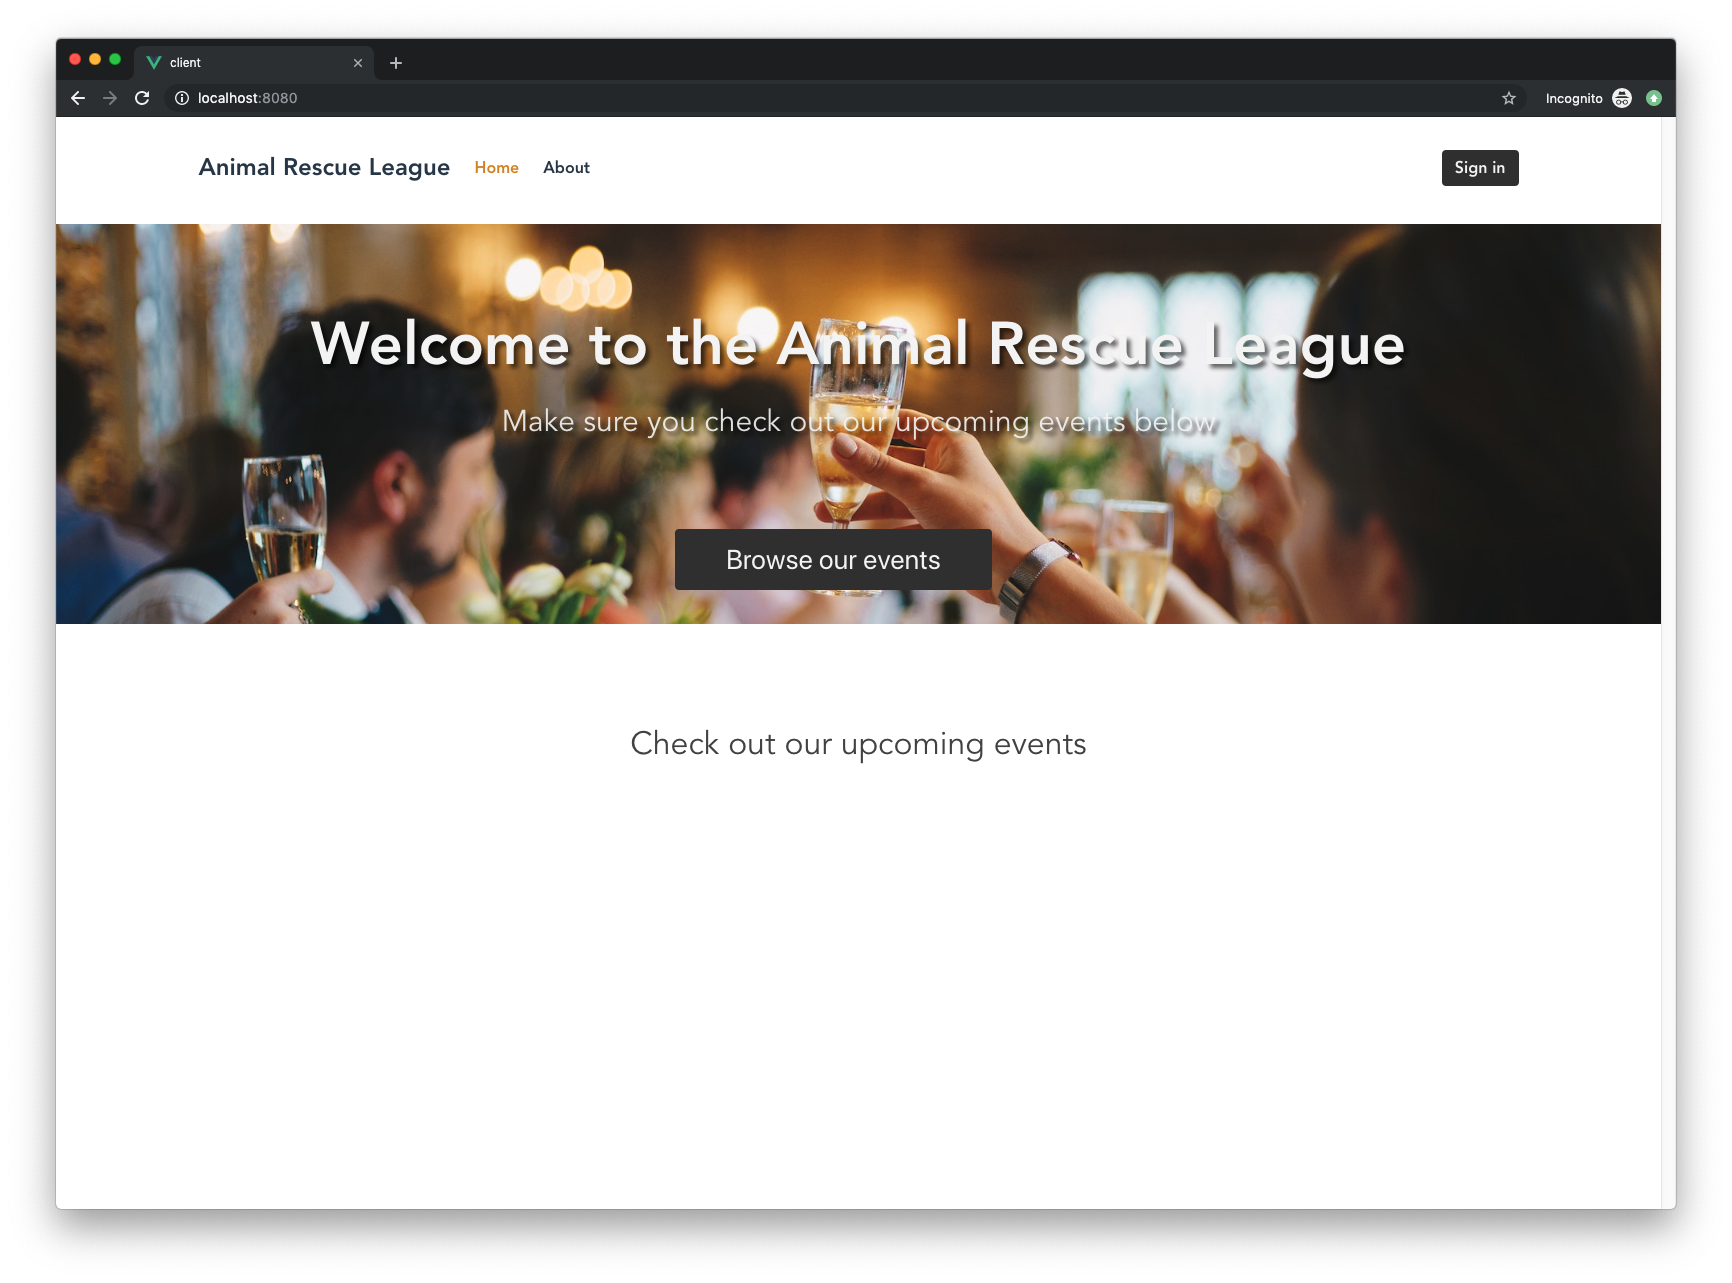
This will give us a big banner and button at the top of the page. The button will lead to the signup form, which we’ll wire up later.
About Component
The About component comes default with our Vue install, but let’s just spruce ours up a little. Open up src/views/About.vue, delete everything in there, and replace it with this:
<template>
  <div class="about">
    <div class="hero is-primary">
      <div class="hero-body">
        <div class="container">
          <h1 class="title is-size-1">About Animal Rescue League</h1>
        </div>
      </div>
    </div>
    <div class="container">
      <p class="org-description is-size-4">Lorem ipsum dolor sit amet consectetur adipisicing elit. Eius quia aperiam eligendi dolorum reprehenderit ea amet, aliquid dolorem beatae, iste aliquam ullam. Sequi ab eligendi consectetur neque laudantium, libero asperiores.</p>
      <p class="org-description is-size-4">Lorem ipsum dolor sit amet consectetur adipisicing elit. Eius quia aperiam eligendi dolorum reprehenderit ea amet, aliquid dolorem beatae, iste aliquam ullam. Sequi ab eligendi consectetur neque laudantium, libero asperiores.</p>
    </div>
  </div>
</template>
<style lang="scss" scoped>
  .org-description {
    margin-top: 50px;
  }
</style>
Nav Component
Now let’s fix up our nav. Open src/components/partials/Nav.vue and paste this in:
<template>
<nav class="navbar container" role="navigation" aria-label="main navigation">
  <div class="navbar-brand">
    <a class="navbar-item" href="/">
      <strong class="is-size-4">Animal Rescue League</strong>
    </a>
    <a role="button" class="navbar-burger burger" aria-label="menu" aria-expanded="false" data-target="navbarBasicExample">
      <span aria-hidden="true"></span>
      <span aria-hidden="true"></span>
      <span aria-hidden="true"></span>
    </a>
  </div>
  <div id="navbar" class="navbar-menu">
    <div class="navbar-start">
      <router-link to="/" class="navbar-item">Home</router-link>
      <router-link to="/about" class="navbar-item">About</router-link>
    </div>
    <div class="navbar-end">
      <div class="navbar-item">
        <div class="buttons">
          <a class="button is-dark">
            <strong>Sign In</strong>
          </a>
        </div>
      </div>
    </div>
  </div>
</nav>
</template>
<script>
export default {
    name: 'Nav'
}
</script>
<style lang="scss" scoped>
  nav {
    margin-top: 25px;
    margin-bottom: 30px;
    a {
      font-weight: bold;
      color: #2c3e50;
      &.router-link-exact-active {
        color: #d88d00;
      }
    }
  }
</style>
If you refresh, you’ll notice nothing changes. That’s because we’re not actually using this component anywhere. Open up src/App.vue and let’s replace the existing nav with our new component. Go ahead and get rid of those nav styles while you’re at it.
Since we’re defining the router links in the Nav component now, we can get rid of them in this file. All we need to do is import the Nav component.
<template>
  <div id="app">
    <Nav />
    <router-view/>
  </div>
</template>
<script>
import Nav from './components/partials/Nav.vue';
export default {
  name: 'app',
  components: {
    Nav
  }
}
</script>
<style lang="scss">
#app {
  font-family: 'Avenir', Helvetica, Arial, sans-serif;
  -webkit-font-smoothing: antialiased;
  -moz-osx-font-smoothing: grayscale;
  color: #2c3e50;
}
</style>
Now if you refresh you should see our new nav! You can even click around and it’ll open up the different routes we’ve specified in the Nav component.
Next up, let’s see how we can add a component to our Home page.
EventsList Component
Open src/components/EventsList.vue and paste this in:
<template>
  <div class="events container">
    <h2 class="subtitle is-3">
    Check out our upcoming events
    </h2>
    <div class="columns is-multiline">
      <div class="column is-one-quarter">
          <EventCard />
      </div>
    </div>
  </div>
</template>
<script>
  import EventCard from '@/components/EventCard';
  export default {
    name: 'EventsList',
    components : {
      EventCard
    }
  }
</script>
<style lang="scss" scoped>
  .events {
    margin-top: 100px;
    text-align: center;
  }
</style>
This will create a block of cards that takes up 1/4 of the row (by using Bulma’s column with is-one-quarter). Each of those 1/4 slots will be filled with the EventCard component.
For now, let’s just repeat that card code a couple of times so we can see how the structure will look.
<div class="columns is-multiline">
  <div class="column is-one-quarter">
    <EventCard />
  </div>
  <div class="column is-one-quarter">
    <EventCard />
  </div>
</div>
Now we need to:
- Import this into the Home component
- Add it to the list of components that Home uses in
export default {} - Slot it into the appropriate place in the Home template
Open up src/views/Home.vue and replace the script section with this:
<script>
import EventsList from '../components/EventsList';
export default {
  name: 'home',
  components: {
    EventsList
  }
}
</script>
Now in the template section, call the component with <EventsList />.
<template>
<div class="home">
  <section class="hero is-dark">
    <!-- ... -->
  </section>
  <EventsList />
</div>
</template>
You should see the subtitle text, “Check out our upcoming events”, rendered below the homepage banner now, but none of the individual cards are showing yet. That’s because we haven’t created them.
Event Card Component
Open up src/partials/EventCard.vue and paste in:
<template>
  <div class="event-card">
    <div class="card">
      <div class="card-content">
        <h2 class="is-size-4 has-text-weight-bold">Event name</h2>
        <small class="event-date">Event date</small>
        <span>Event location</span>
      </div>
    </div>
  </div>
</template>
<script>
  export default {
  }
</script>
<style lang="scss" scoped>
  .card {
    background-image: url('https://placekitten.com/400/400');
    height: 200px;
    background-position: center;
    background-size: cover;
    text-align: center;
  }
  .card-content {
    padding-top: 50px;
    position: absolute;
    color: #FFF;
    background-color: rgba(0, 0, 0, 0.35);
    top: 0;
    padding: 10px;
    height: 200px;
    width: 100%;
    span {
      font-size: 18px;
      text-align: center;
      width: 100%;
      position: absolute;
      bottom: 10px;
      right: 0;
    }
    h2 {
      margin-top: 10px;
    }
  }
  .event-date {
    background-color: #151515;
    color: #FFF;
    font-size: .75em;
    padding: 2px 10px;
    position: absolute;
    top: 0;
    right: 0;
  }
</style>
You should now see the two cards filled in with some mock content.
Of course, we’re going to want each card to be unique and represent an actual event. We’ll come back to this component soon to see how we can feed data in and accomplish this.
For now, let’s finish setting up the rest of our components.
Event Single Component
Open up src/views/EventSingle.vue and paste this in:
<template>
  <div class="event-single">
    <section class="hero is-primary">
      <div class="hero-body">
        <div class="container">
          <h1 class="title">
            Event name
          </h1>
          <h2 class="subtitle ">
            Event date
          </h2>
        </div>
      </div>
    </section>
    <section class="event-content">
      <div class="container">
        <p class="is-size-4 description">Event description</p>
        <p class="is-size-4">Location:</p>
        <p class="is-size-4">Category:</p>
        <div class="event-images columns is-multiline has-text-centered">
          <div class="column is-one-third">
            IMAGE PLACEHOLDER
          </div>
        </div>
      </div>
    </section>
  </div>
</template>
<script>
  export default {
  }
</script>
<style lang="scss" scoped>
  .event-single {
    margin-top: 30px;
  }
  .hero {
    margin-bottom: 70px;
  }
  .event-images {
    margin-top: 50px;
  }
  .description {
    margin-bottom: 30px;
  }
</style>
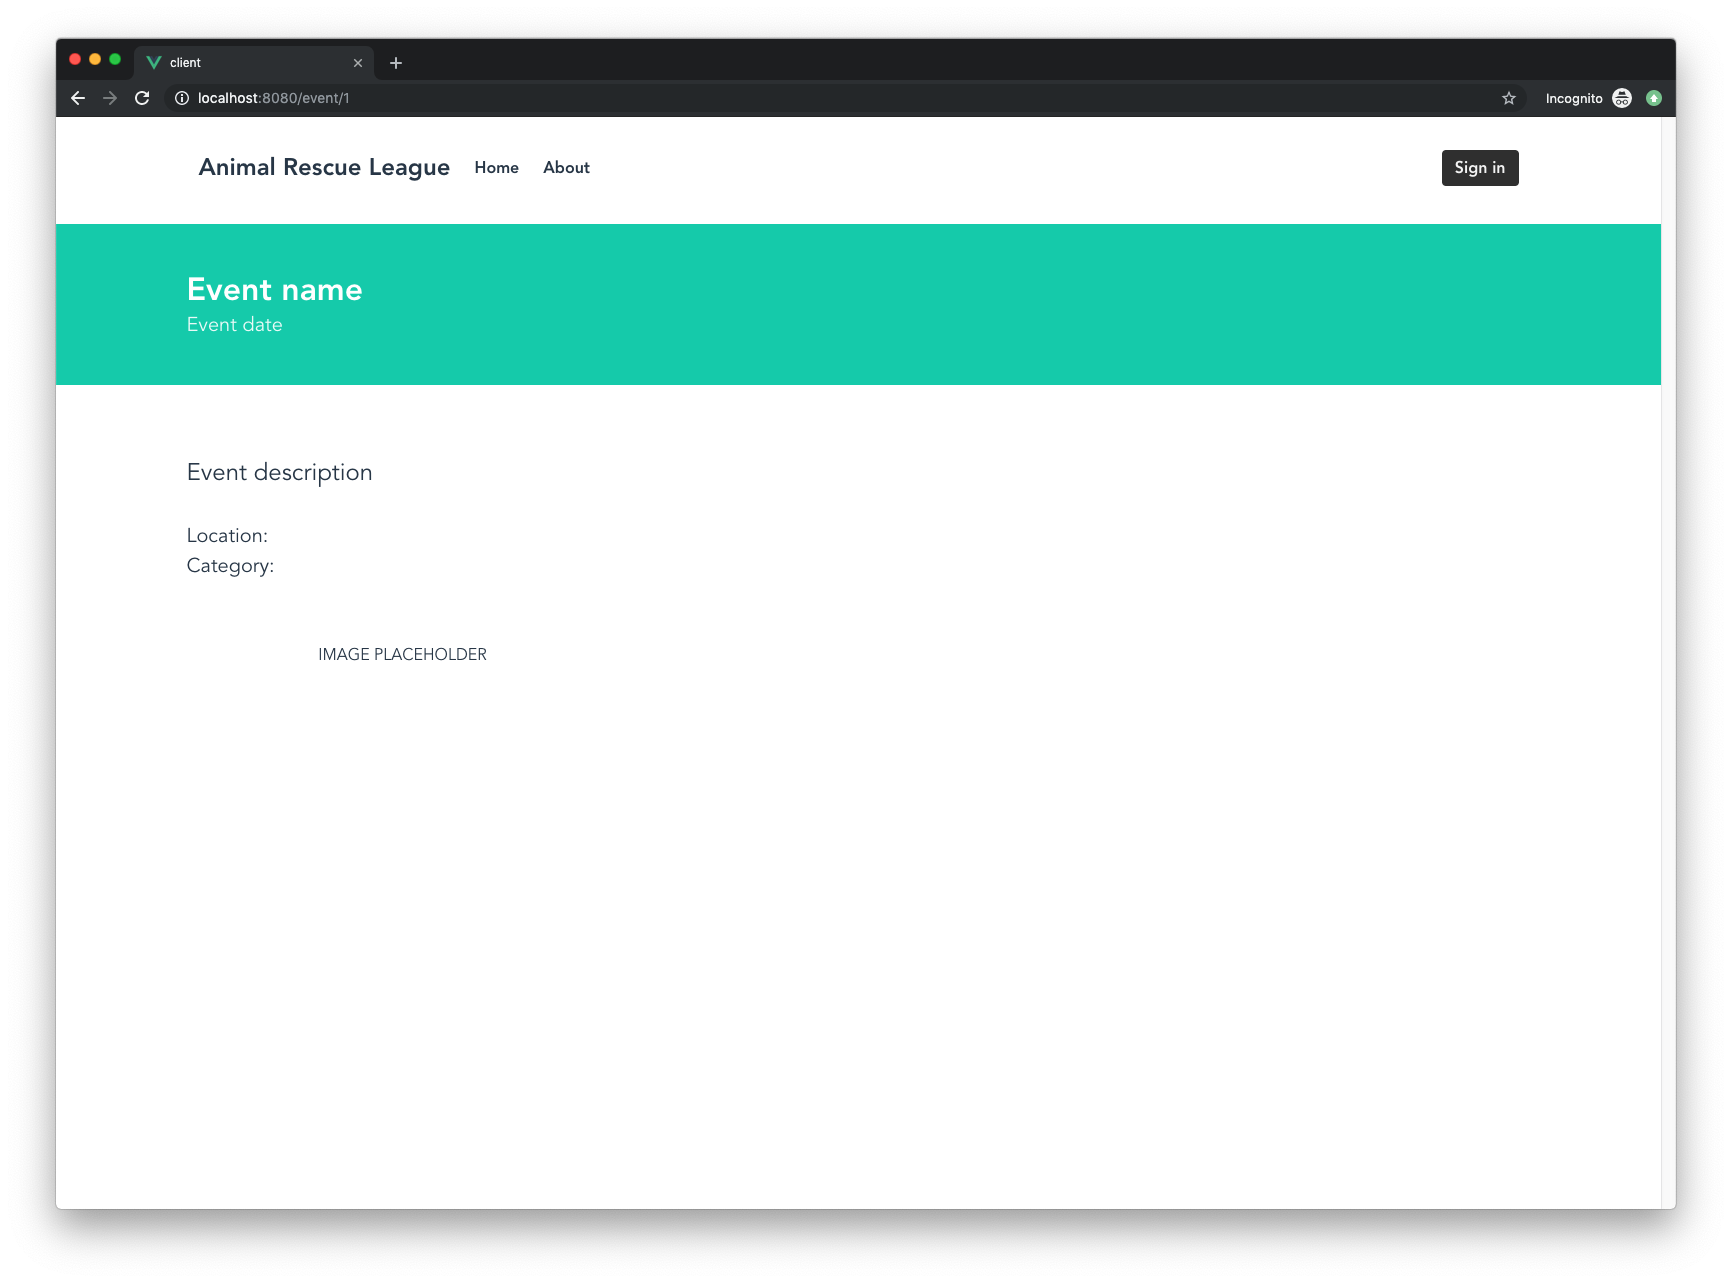
This will be the page that appears when a user clicks on an event from the list on the homepage. Because this page doesn’t actually exist yet, this is a great time to revisit our router.
Router paths
Open up src/router/index.js and replace the contents with this:
import Vue from 'vue'
import Router from 'vue-router'
import Home from '../views/Home.vue'

Vue.use(Router)

export default new Router({
  mode: 'history',
  base: process.env.BASE_URL,
  routes: [
    {
      path: '/',
      name: 'home',
      component: Home
    },
    {
      path: '/about',
      name: 'about',
      component: () => import('../views/About.vue')
    },
    {
      path: '/event/:id',
      name: 'eventSingle',
      component: () => import('../views/EventSingle.vue')
    }
  ]
})
Press save and navigate to http://localhost:8080/event/1 and you should now see the contents of the EventSingle component!
If you look under path in the router, you’ll see we’re using a route parameter, :id. This is how we’ll create separate pages for every event. Once we add in the data, you can navigate to any event by appending its id to the end of /event/.
Let’s work on adding data now.
Adding Data to Our Vue App
Since we want to focus on the basics of Vue, we’re going to just create an array of objects (where each object is an event) and store it in the component that needs it.
Ideally, you would want to pull data from an API to dynamically fill in the block of cards, but that’s a little outside the scope of this tutorial. If you’re interested in making calls to an API using Vue, there will actually be a part 2 to this tutorial where we do just that.
Let’s revisit those three components that were missing dynamic data and see how we can fill them in.
EventsList Component
Head back to the EventsList component in src/components/EventsList.vue and scroll down to the bottom where the <script> tag starts. Replace the entirety of <script></script> with this:
<script>
import EventCard from '@/components/EventCard';
export default {
  name: 'EventsList',
  components : {
    EventCard
  },
  data () {
    return {
      event: {},
      events: [
        {
          id: 1,
          name: 'Charity Ball',
          category: 'Fundraising',
          description: 'Spend an elegant night of dinner and dancing with us as we raise money for our new rescue farm.',
          featuredImage: 'https://placekitten.com/500/500',
          images: [
            'https://placekitten.com/500/500',
            'https://placekitten.com/500/500',
            'https://placekitten.com/500/500',
          ],
          location: '1234 Fancy Ave',
          date: '12-25-2019',
          time: '11:30'
        },
        {
          id: 2,
          name: 'Rescue Center Goods Drive',
          category: 'Adoptions',
          description: 'Come to our donation drive to help us replenish our stock of pet food, toys, bedding, etc. We will have live bands, games, food trucks, and much more.',
          featuredImage: 'https://placekitten.com/500/500',
          images: [
            'https://placekitten.com/500/500'
          ],
          location: '1234 Dog Alley',
          date: '11-21-2019',
          time: '12:00'
        }
      ]
    }
  }
}
</script>
The only thing that’s changing here is we’re adding a data() function that returns an empty object called event and an array called events.
- The
eventsarray holds 2 objects that each correspond to a different event - The
eventobject will hold a single event to be passed to the child component,EventCard
Now we’re going to modify the HTML portion of this file to loop through these events and then send each one down the chain to be rendered by the child component, EventCard.
Replace everything between the <template></template> tags with:
<template>
  <div class="events container">
    <h2 class="subtitle is-3">
    Check out our upcoming events
    </h2>
    <div class="columns is-multiline">
      <div v-for="event in events" :event="event" :key="event.id" class="column is-one-quarter">
        <router-link :to="'/event/' + event.id">
          <EventCard :event="event" />
        </router-link>
      </div>
    </div>
  </div>
</template>
Let’s take a closer look at the block of code that changed.
<div v-for="event in events" :event="event" :key="event.id" class="column is-one-quarter">
  <router-link :to="'/event/' + event.id">
    <EventCard :event="event" />
  </router-link>
</div>
We can loop over the events in our events array using the Vue directive v-for. This acts as a for loop and pulls out each event individually so that it can be rendered separately by the EventCard component.
This is also the first time we’re seeing a directive. A directive is a special type of markup that we can use to do something to a DOM element. In Vue, these all begin with v-. So in this case, we’re using the shorthand v-for to create a for loop. Another common example is v-if, which creates a conditional inside the template. You can see a full list of Vue directives here.
We’re using Vue’s :key attribute (note, the : is shorthand for v-bind) to bind a unique key (in this case, id) to each event.
We’re also binding the value of the current event in the for loop to the event object we created earlier with :event="event". This will allow us to send this object down to the child component to be rendered separately.
Next, we’re using <router-link> to make each card into a clickable link. Back in our router.js file, we created the route /event/:id with a route parameter of id. This route uses the EventSingle component, which will render the page for each specific event. We’re using the id from each event to make sure it links to the correct event page.
Go ahead and click one and you’ll see it links to the single event page that we created.
Finally, we’re calling the EventCard component to fill in each individual card. We’re sending a variable called event down to the card and then passing in the current event from the for loop.
Right now, our EventCard component isn’t prepared to accept data, so let’s fix that.
EventCard Component
Open the EventCard component in src/components/EventCard.vue. Scroll down to where you have the <script></script> tags and replace it with this:
<script>
export default {
  props: [
    'event'
  ]
}
</script>
We’re adding something new to our component here, props.
Whenever your component is expecting data, you should add that variable to the props option. props is kind of a funny word, but it actually just means property.
A prop is a property on a component.
This is where we define the data that the component should be expecting from its parent component.
This event prop was passed to our component from the parent component. We’re then able to display it in our HTML template using curly braces:
{{ event }}
This is known as interpolation. Using string interpolation, we’re able to display the value of event in our template. This is a form of data-binding, which means that whenever the value of event in data changes, the displayed value in the template will also change.
To see this in action, go ahead and update the template section with this:
<template>
  <div class="event-card">
    <div class="card">
      <div class="card-content">
        <h2 class="is-size-4 has-text-weight-bold">{{ event.name }}</h2>
        <small class="event-date">{{ event.date }}</small>
        <span>{{ event.location }}</span>
      </div>
    </div>
  </div>
</template>
If you go back to the homepage in your browser, you’ll see the cards now have the correct data!
Just to summarize, our parent component, EventsList, sent the event data down from the for loop two separate times. Each time our EventCard component was called it received the event data into props, which allowed us to render the name, date, and location.
EventSingle Component
The last part of our application that needs updated data is the EventSingle component. Open up src/views/EventSingle.vue.
You can see the current state of this component in the browser at http://localhost:8080/event/1. Everything is still hard-coded in and waiting for data.
This component is a great example of how passing data starts to get tricky.
Think back to the link we used to get to this page:
<router-link :to="'/event/' + event.id">
</router-link>
We’re using the event.id from the for loop to create the link for each card/event, but how do we send the actual data through? We can use a method similar to the one we used to fill in the data from EventCard and send some data down into a prop on EventSingle. But then we’d be using the router to manage data, which is a little strange.
You also have to consider what would happen if instead of clicking on the link, someone went directly to http://localhost:8080/event/1. How would it receive the props that it’s expecting if that specific <router-link> code was never fired?
It wouldn’t.
So for this application, our best option is to just pull the data again.
Here’s the gist of what needs to happen:
- Grab the
idfrom the route parameter (in the URL) - Use that to pull out the correct event from the list of all events
- Fill in the template with data from that specific event
So open up EventSingle.vue and replace it entirely with:
<template>
  <div class="event-single">
    <section class="hero is-primary">
      <div class="hero-body">
        <div class="container">
          <h1 class="title">
            {{ event.name }}
          </h1>
          <h2 class="subtitle ">
            <strong>Date:</strong> {{ event.date }}
            <br>
            <strong>Time:</strong> {{ event.time }}
          </h2>
        </div>
      </div>
    </section>
    <section class="event-content">
      <div class="container">
        <p class="is-size-4 description">{{ event.description }}</p>
        <p class="is-size-5"><strong>Location:</strong> {{ event.location }}</p>
        <p class="is-size-5"><strong>Category:</strong> {{ event.category }}</p>
        <div class="event-images columns is-multiline has-text-centered">
          <div v-for="image in event.images" :key="image.id" class="column is-one-third">
            <img :src="image" :alt="event.name">
          </div>
        </div>
      </div>
    </section>
  </div>
</template>
<script>
export default {
  name: 'EventSingle',
  data () {
    return {
      events: [
        {
          id: 1,
          name: 'Charity Ball',
          category: 'Fundraising',
          description: 'Spend an elegant night of dinner and dancing with us as we raise money for our new rescue farm.',
          featuredImage: 'https://placekitten.com/500/500',
          images: [
            'https://placekitten.com/500/500',
            'https://placekitten.com/500/500',
            'https://placekitten.com/500/500',
          ],
          location: '1234 Fancy Ave',
          date: '12-25-2019',
          time: '11:30'
        },
        {
          id: 2,
          name: 'Rescue Center Goods Drive',
          category: 'Adoptions',
          description: 'Come to our donation drive to help us replenish our stock of pet food, toys, bedding, etc. We will have live bands, games, food trucks, and much more.',
          featuredImage: 'https://placekitten.com/500/500',
          images: [
            'https://placekitten.com/500/500'
          ],
          location: '1234 Dog Alley',
          date: '11-21-2019',
          time: '12:00'
        }
      ],
      event: {}
    }
  },
  created() {
    const ID = Number(this.$route.params.id);
    let event = this.events.find(event => event.id === ID);
    this.event = event;
  }
}
</script>
Scroll down to the <script> section and you’ll see that we’ve added the same data as before into this component. But this time we have a new chunk of code:
created() {
  const ID = Number(this.$route.params.id);
  const event = this.events.find(event => event.id === ID);
  this.event = event;
}
First, let’s go over what created() is used for and when it’s run.
The Vue instance goes through many steps when it’s created. It sets up data observation, compiles the template, mounts the Vue instance to the DOM, and updates the DOM when changes are detected.
But what if you need to jump in at some point between these steps and run some code? Vue offers functions called lifecycle hooks that let you do just that.
We’re using the created() hook, which lets us run some code right after the instance is created.
There are quite a few lifecycle hooks available, as you can see in the image below.
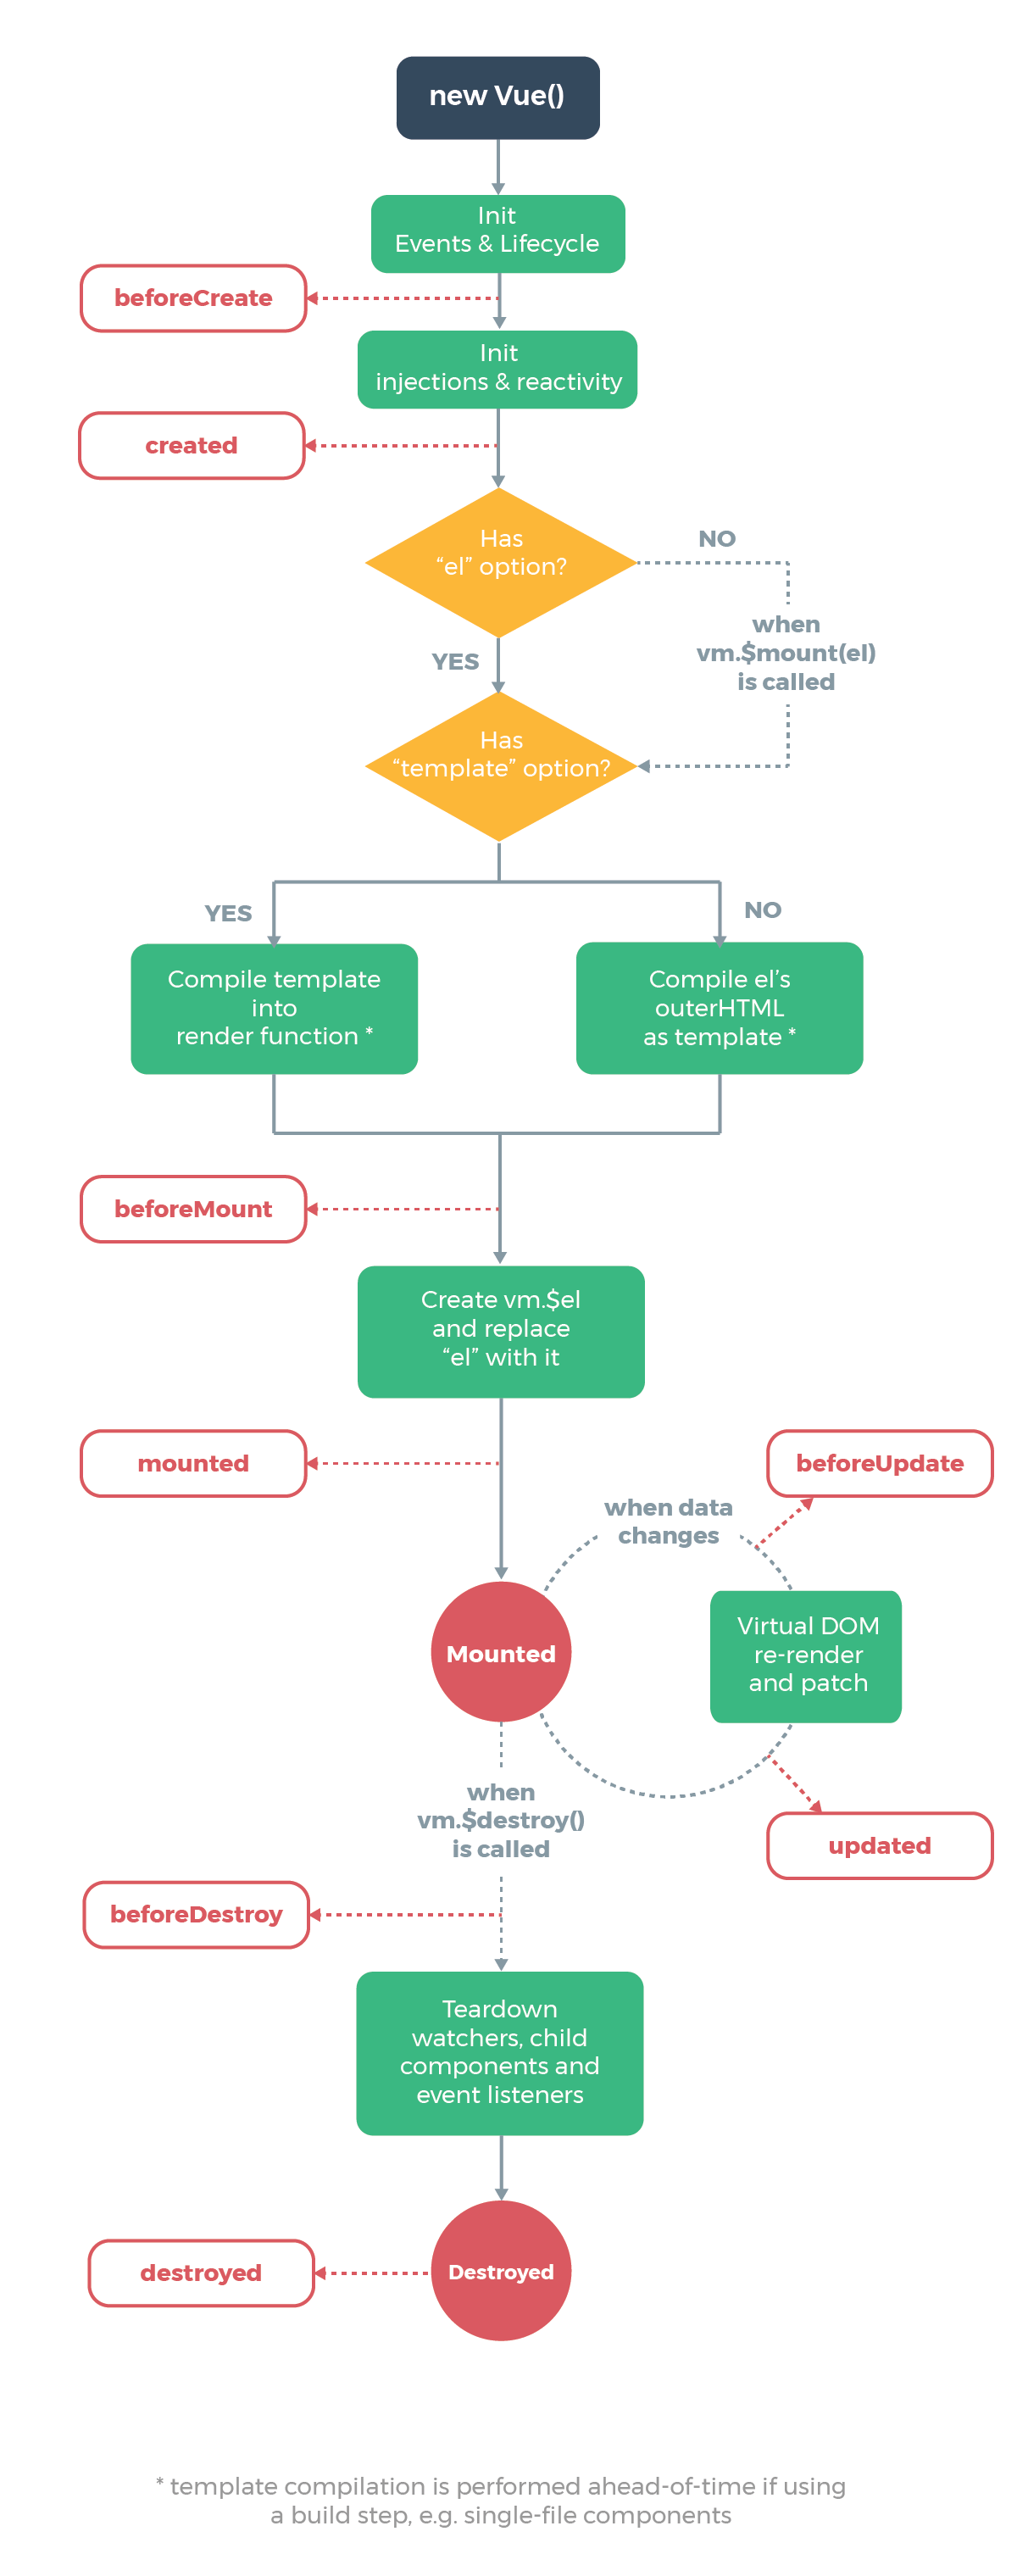
Image Source: Vue.js Guide - Instance
So right after the instance is created, we’re running the created() function.
created() {
  const ID = Number(this.$route.params.id);
  const event = this.events.find(event => event.id === ID);
  this.event = event;
}
This function creates a variable called ID that will hold the id of the event we want to render. We’re able to pull this id from the route parameter id that we set up earlier in src/router/index.js.
Next, we’re creating a variable called event, which will hold the event object. We’re using the JavaScript function find() on the events array, which will loop through the array until it finds an event with the id of ID (our route parameter).
Then we’re setting the event variable that we have in our data() function to the result of this. And now we have just the data we want to render for this specific event!
Ideally, you’d want to pull this data from an API. In a case like this, you would just hit the endpoint that returns the specific event we want using the route parameter, but since we don’t have an API yet, this method is fine. In the follow-up of this post, we’ll refactor this code to use an actual API.
Another cool thing we’re doing is looping over the images in the specific event. Let’s take a closer look at the block of code that displays our images.
<div v-for="image in event.images" :key="image.id" class="column is-one-third">
  <img :src="image" :alt="event.name">
</div>
We’re using Vue’s v-for directive again to loop through the images. Once we have a single image, we’re using the :src attribute (note, the : is shorthand for v-bind) to bind the image URL, image to the img tag. It’s also good practice to always set an alt attribute, so we can bind the value for event.name to the alt attribute of these images.

Now head back to the homepage and click around. All of our components are rendering the correct data, so it’s time to add authentication!
Adding Authentication to Our Vue App
The final thing we want to do is add the ability for users to log in to our application and hide event details to those who aren’t logged in. We’re going to use Auth0’s authentication service to do this.
First, sign up for a free Auth0 account here. Once you’re registered, you’ll be taken to the Auth0 management dashboard.
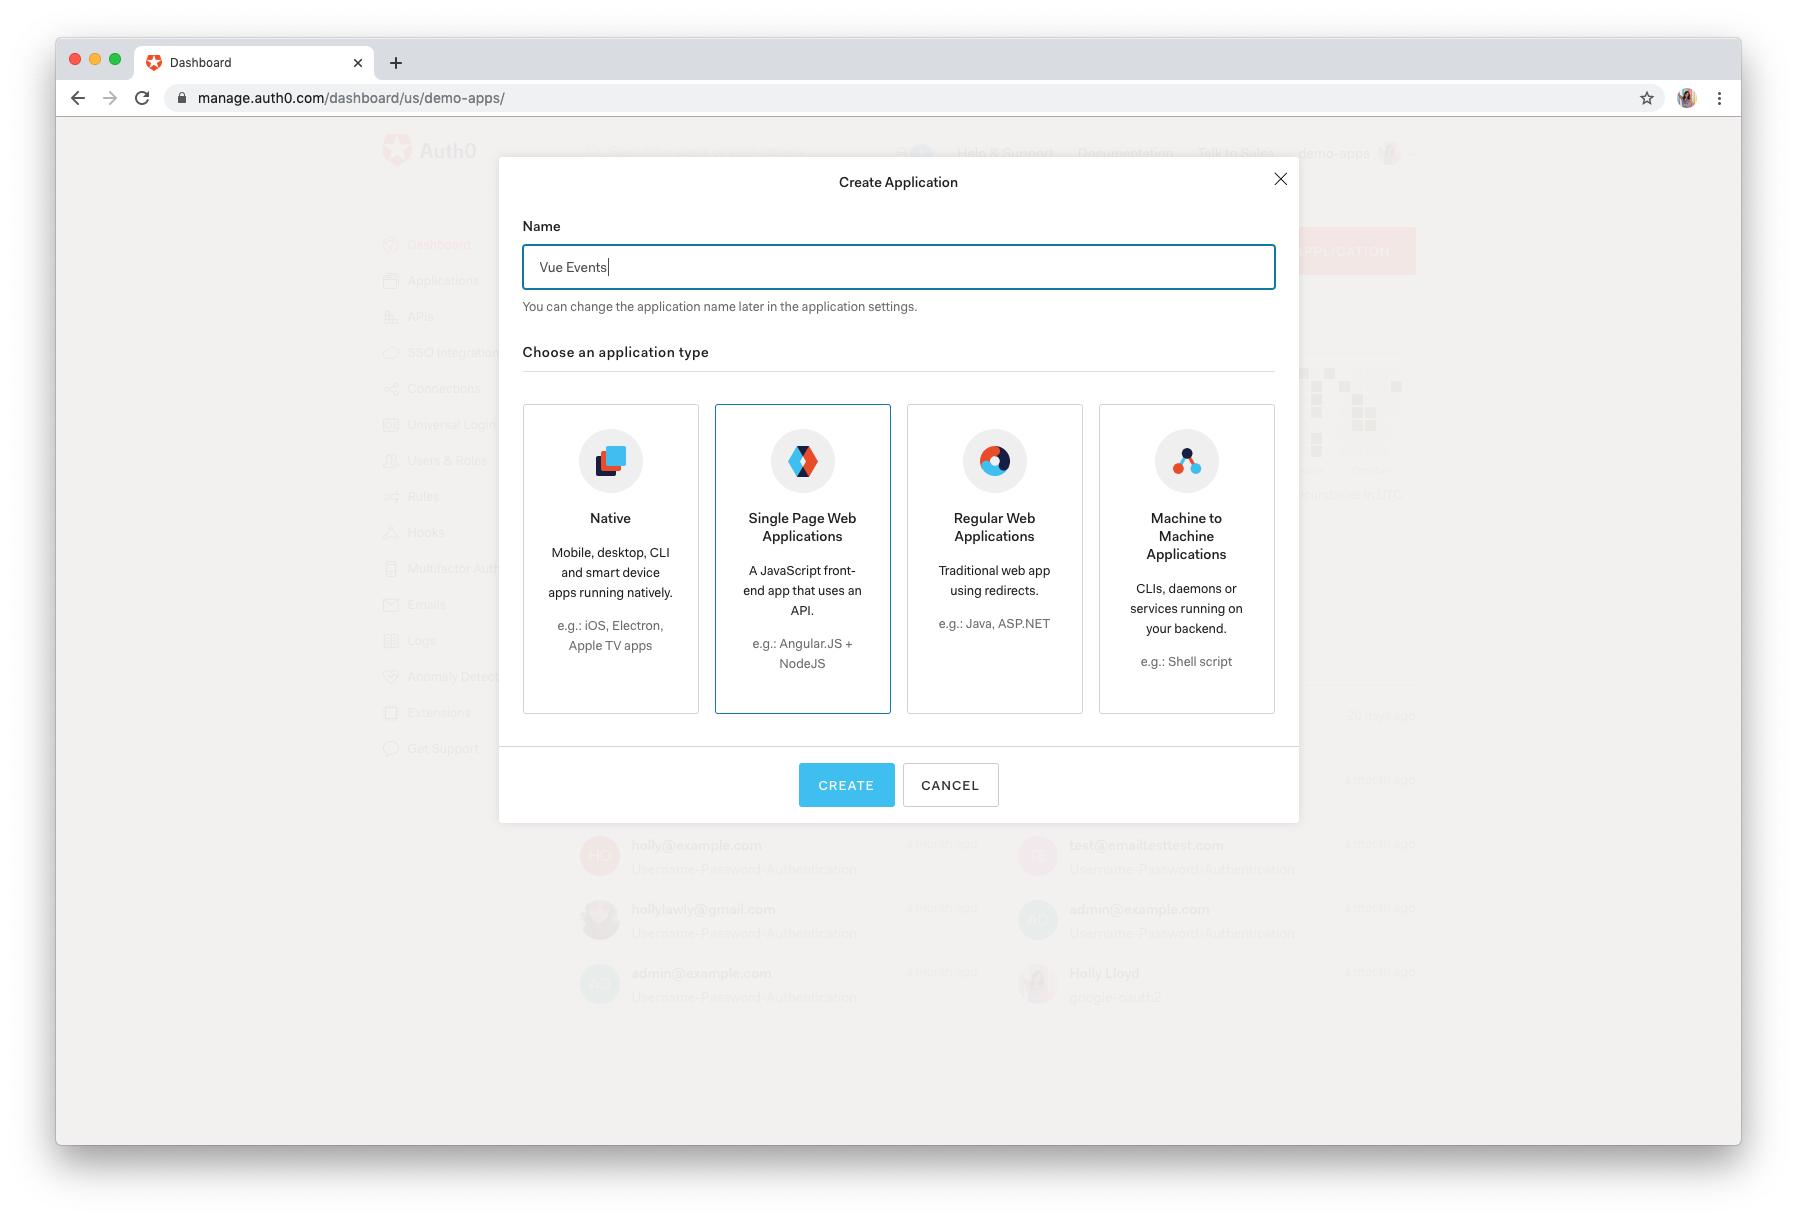
Click on the big red button that says “Create Application”.
Name it “Vue Events” (or anything you’d like), click on “Single Page Web Applications” for “application type”, and press “Create”.
Now click into “Settings” and we’re going to fill in some information that Auth0 needs to configure authentication for our application.
Allowed Callback URLs — http://localhost:8080
This is where Auth0 will redirect the user after they have authenticated.
Allowed Logout URLs — http://localhost:8080
This is the URL that users will return to after they log out of your application.
Allowed Web Origins — http://localhost:8080
This URL allows your application to automatically refresh the authentication tokens. Without this, the user will be logged out whenever they refresh or close the page.
That’s all we need from the dashboard for now, but don’t click out yet. We’ll need to pull some of these values from the dashboard into our application soon.
Install Auth0 SPA package
Head back to the terminal and install Auth0’s auth0-spa-js package.
npm install @auth0/auth0-spa-js
Create an authentication wrapper
Next, we’re going to create a reusable wrapper Vue object around the Auth0 SDK. We’ll also create a Vue plugin that exposes this wrapper to the rest of the application.
Let’s create a new file and folder for this. Make sure you’re still in the events-app directory and enter:
mkdir src/auth
touch src/auth/index.js
Now open up the newly created src/auth/index.js file and paste in:
import Vue from "vue";
import createAuth0Client from "@auth0/auth0-spa-js";

/** Define a default action to perform after authentication */
const DEFAULT_REDIRECT_CALLBACK = () =>
  window.history.replaceState({}, document.title, window.location.pathname);

let instance;

/** Returns the current instance of the SDK */
export const getInstance = () => instance;

/** Creates an instance of the Auth0 SDK. If one has already been created, it returns that instance */
export const useAuth0 = ({
  onRedirectCallback = DEFAULT_REDIRECT_CALLBACK,
  redirectUri = window.location.origin,
  ...options
}) => {
  if (instance) return instance;

  // The 'instance' is simply a Vue object
  instance = new Vue({
    data() {
      return {
        loading: true,
        isAuthenticated: false,
        user: {},
        auth0Client: null,
        popupOpen: false,
        error: null
      };
    },
    methods: {
      /** Authenticates the user using a popup window */
      async loginWithPopup(o) {
        this.popupOpen = true;

        try {
          await this.auth0Client.loginWithPopup(o);
        } catch (e) {
          // eslint-disable-next-line
          console.error(e);
        } finally {
          this.popupOpen = false;
        }

        this.user = await this.auth0Client.getUser();
        this.isAuthenticated = true;
      },
      /** Handles the callback when logging in using a redirect */
      async handleRedirectCallback() {
        this.loading = true;
        try {
          await this.auth0Client.handleRedirectCallback();
          this.user = await this.auth0Client.getUser();
          this.isAuthenticated = true;
        } catch (e) {
          this.error = e;
        } finally {
          this.loading = false;
        }
      },
      /** Authenticates the user using the redirect method */
      loginWithRedirect(o) {
        return this.auth0Client.loginWithRedirect(o);
      },
      /** Returns all the claims present in the ID token */
      getIdTokenClaims(o) {
        return this.auth0Client.getIdTokenClaims(o);
      },
      /** Returns the access token. If the token is invalid or missing, a new one is retrieved */
      getTokenSilently(o) {
        return this.auth0Client.getTokenSilently(o);
      },
      /** Gets the access token using a popup window */

      getTokenWithPopup(o) {
        return this.auth0Client.getTokenWithPopup(o);
      },
      /** Logs the user out and removes their session on the authorization server */
      logout(o) {
        return this.auth0Client.logout(o);
      }
    },
    /** Use this lifecycle method to instantiate the SDK client */
    async created() {
      // Create a new instance of the SDK client using members of the given options object
      this.auth0Client = await createAuth0Client({
        domain: options.domain,
        client_id: options.clientId,
        audience: options.audience,
        redirect_uri: redirectUri
      });

      try {
        // If the user is returning to the app after authentication...
        if (
          window.location.search.includes("code=") &&
          window.location.search.includes("state=")
        ) {
          // handle the redirect and retrieve tokens
          const { appState } = await this.auth0Client.handleRedirectCallback();

          // Notify subscribers that the redirect callback has happened, passing the appState
          // (useful for retrieving any pre-authentication state)
          onRedirectCallback(appState);
        }
      } catch (e) {
        this.error = e;
      } finally {
        // Initialize our internal authentication state
        this.isAuthenticated = await this.auth0Client.isAuthenticated();
        this.user = await this.auth0Client.getUser();
        this.loading = false;
      }
    }
  });

  return instance;
};

// Create a simple Vue plugin to expose the wrapper object throughout the application
export const Auth0Plugin = {
  install(Vue, options) {
    Vue.prototype.$auth = useAuth0(options);
  }
};
The comments in this file go over in detail what’s happening in the file, but to summarize, we are first creating (or returning) an instance of the Auth0 SDK. The instance is just a Vue object.
- The instance contains the following data:
loading,isAuthenticated,user,auth0Client,popupOpen, anderror - It also includes several methods that will be called later, but take note of them now:
loginWithPopup,handleRedirectCallback,loginWithRedirect,getIdTokenClaims,getTokenSilently,getTokenWithPopup, andlogout
During the created() lifecyle hook, we’re creating an instance of the SDK.
When a user clicks “Log in”, they’re redirected to the Auth0 Universal Login page (more on this later). They will enter their credentials there and then be redirected back to our application. This is where the “Allowed Callback URLs” from the Auth0 dashboard come into play. handleRedirectCallback() will run, which will get the authenticated user data, retrieve tokens, and update isAuthenticated to true.
This instance also contains an options object (pulled out and pasted below). This object will hold the values for the Auth0 clientId, domain, and audience from the Auth0 dashboard.
// Create a new instance of the SDK client using members of the given options object
this.auth0Client = await createAuth0Client({
  domain: options.domain,
  client_id: options.clientId,
  audience: options.audience,
  redirect_uri: redirectUri
});
These values aren’t sensitive, but it’s still a good practice to leave them out of your source control (e.g. GitHub). So let’s create a file that we can add to our .gitignore to be ignored by GitHub. Make sure you’re still in the events-app directory.
touch auth_config.json
If you’re using Git or some other version control, open up .gitignore or its equivalent. Paste in auth_config.json on any line. Now this file will be ignored the next time you push to your repo.
Next, open up auth_config.json and paste in:
{
  "domain": "your-domain.auth0.com",
  "clientId": "yourclientid"
}
Finding your auth_config values:
- Head to the Auth0 dashboard
- Click on “Applications” and select your application
- Click on “Settings”
- Copy the value for “Domain” and paste it into
domaininauth_config.json - Copy the value for “Client ID” and paste it into
clientIdinauth_config.json
The audience value is only used if we’re securing the API. Since we’re just adding authentication right now and we don’t have an API, we can skip that part.
Next, open src/main.js and install the plugin with Vue.use. This plugin will allow us to access the authentication state globally (from anywhere in the application). Vue.use is a global method used to call plugins and it must be placed before new Vue().
Replace all of src/main.js with:
import Vue from 'vue'
import App from './App.vue'
import router from './router'
import './../node_modules/bulma/css/bulma.css';

// Import the Auth0 configuration
import { domain, clientId } from "../auth_config.json";

// Import the plugin here
import { Auth0Plugin } from "./auth";

// Install the authentication plugin here
Vue.use(Auth0Plugin, {
  domain,
  clientId,
  onRedirectCallback: appState => {
    router.push(
      appState && appState.targetUrl
        ? appState.targetUrl
        : window.location.pathname
    );
  }
});

Vue.config.productionTip = false

new Vue({
  router,
  render: h => h(App)
}).$mount('#app')
Here we’re just importing the Auth0 configuration file that we created to get access to the domain and clientId values. Next, we’re importing the Auth0Plugin that we created earlier.
Finally, we install and configure the plugin.
Wiring up login and logout buttons
Now that we have our Auth0 authentication plugin configured, let’s fix up our “Sign in” button so that it actually does something.
Open up src/components/partials/Nav.vue. Find the block of code that starts with <div class="navbar-end"> and replace it with:
<div class="navbar-end">
  <div class="navbar-item">
    <div class="buttons">
      <!-- Check that the SDK client is not currently loading before accessing is methods -->
      <div v-if="!$auth.loading">
        <!-- show login when not authenticated -->
        <a v-if="!$auth.isAuthenticated" @click="login" class="button is-dark"><strong>Sign in</strong></a>
        <!-- show logout when authenticated -->
        <a v-if="$auth.isAuthenticated" @click="logout" class="button is-dark"><strong>Log out</strong></a>
      </div>
    </div>
  </div>
</div>
We’re wrapping the buttons in !$auth.loading to make sure that the SDK client has finished loading before we try to use it to access the user’s state. Next, we’re using @click, which will handle the click event by calling the login or logout methods when a user clicks on the respective button.
Let’s create those methods now. In that same file, scroll down to the <script> tag and replace it with:
<script>
export default {
  name: 'Nav',
  methods: {
  // Log the user in
  login() {
    this.$auth.loginWithRedirect();
  },
  // Log the user out
  logout() {
    this.$auth.logout({
      returnTo: window.location.origin
    });
  }
  }
}
</script>
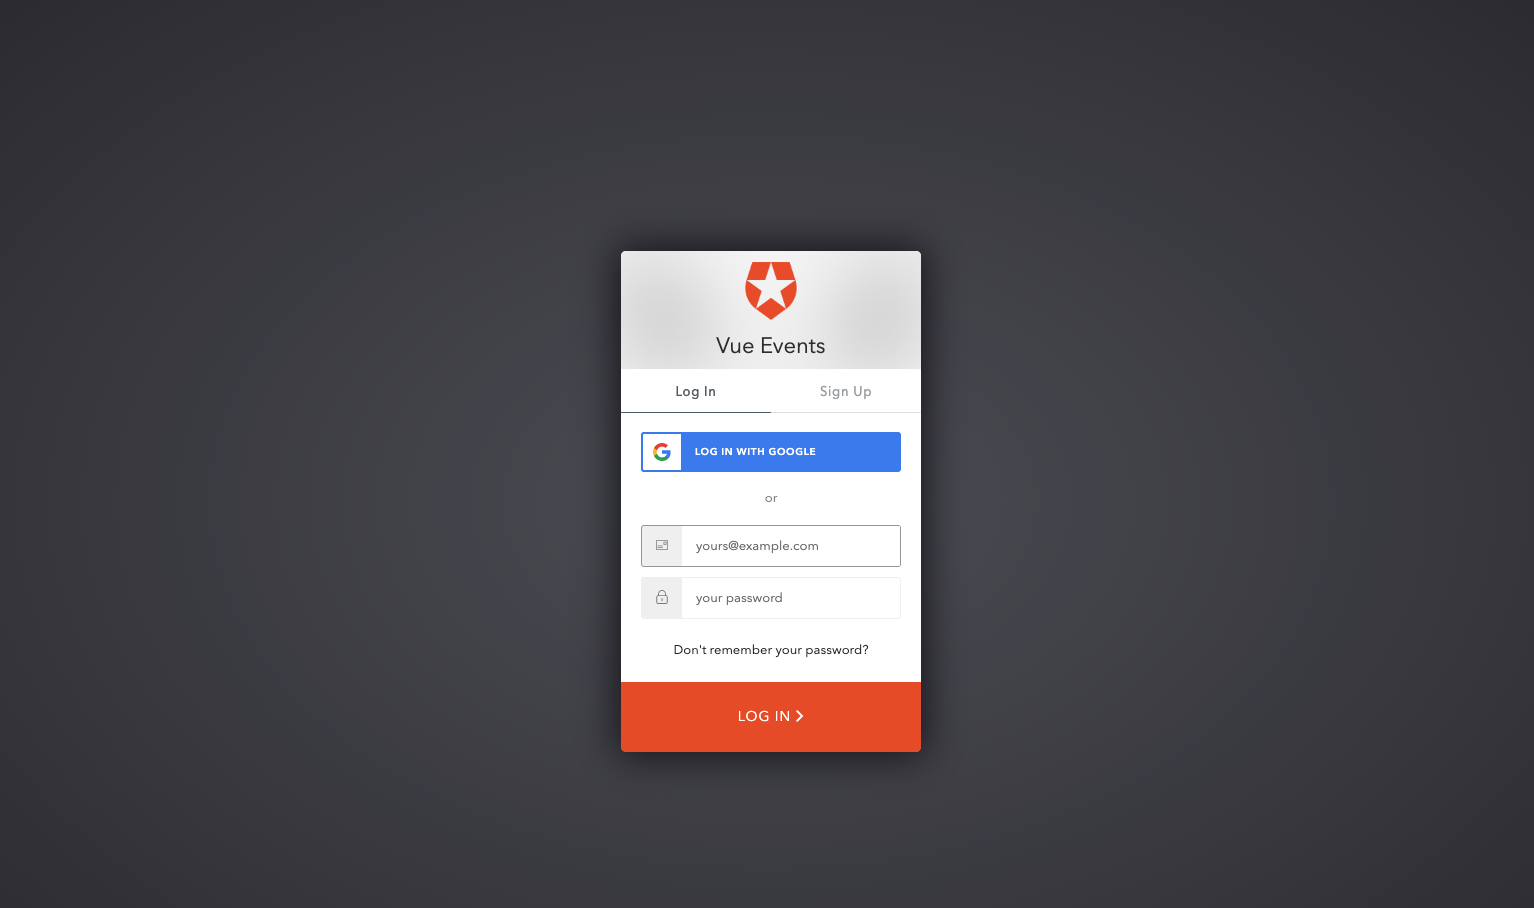
Now head back to the application and click “Sign In” and you should be redirected to the Auth0 Universal Login page. If you run into an issue, double-check that your values in auth_config.json are correct. If you’re still having issues, leave a comment below and I’ll help you work through it.
Once you’ve hit the Auth0 Universal Login page, sign up with a mock user account. You’ll then see a screen telling you that our application is requesting access to your profile and email.
Note: Auth0 offers [social login options] straight from the dashboard! Google is turned on by default and you can more turn more on individually in the Auth0 management dashboard. Just click on “Connections” in the left sidebar and then “Social”. Be sure to use your own dev keys if you’d like to integrate social sign-on. The default Auth0 dev keys are fine for testing, but may cause unexpected errors (such as being signed out on refresh), so we still recommend using your own.
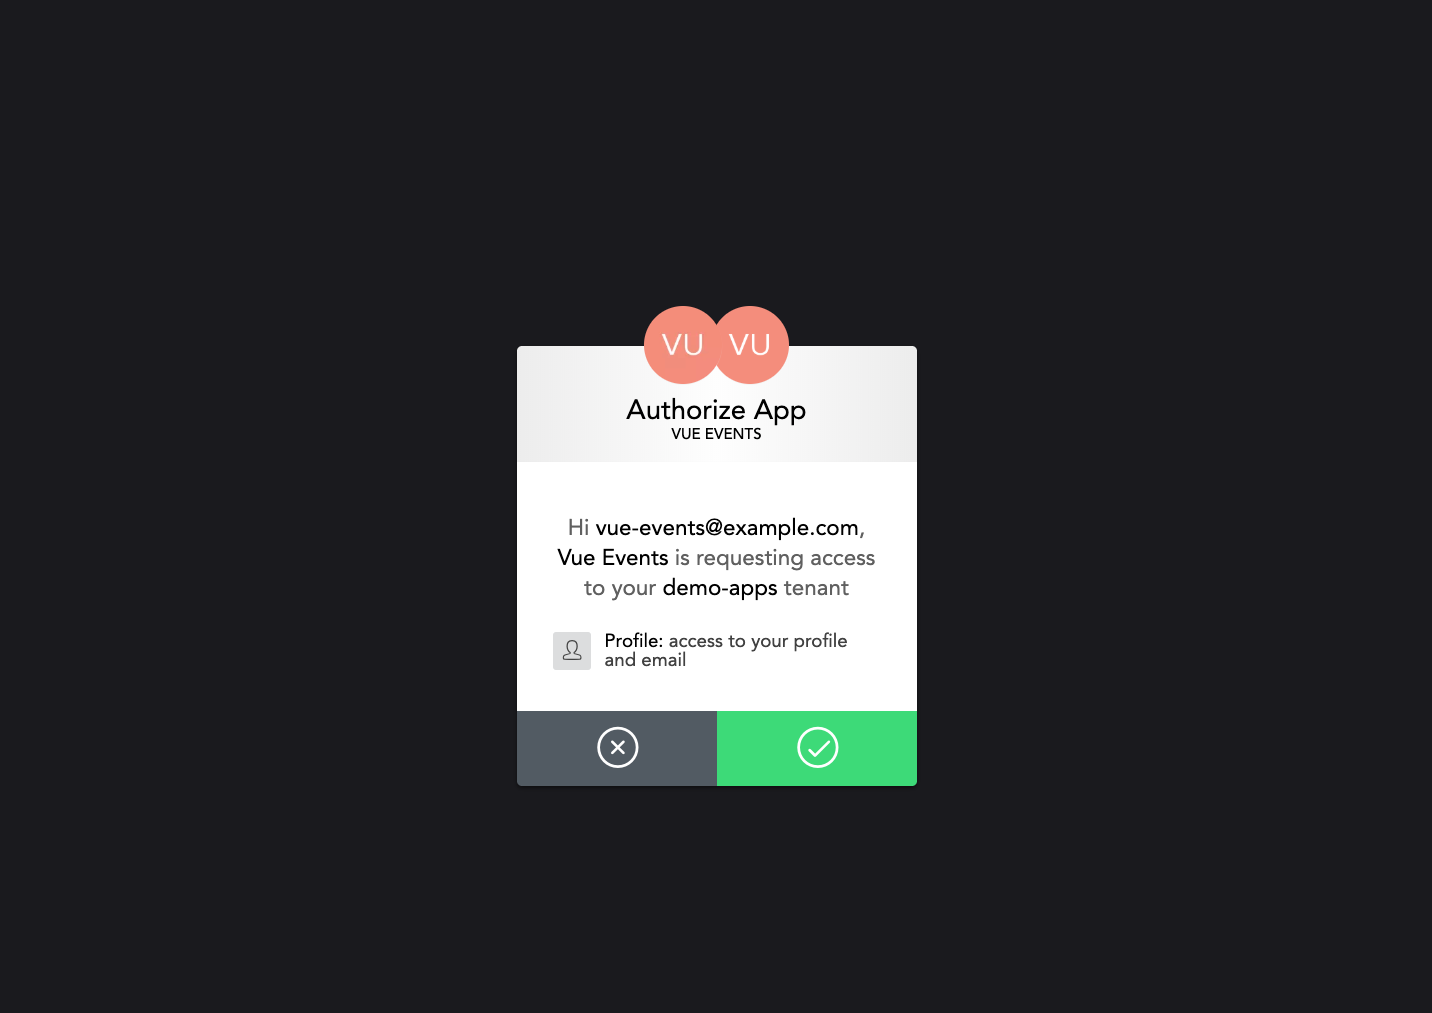
Click the checkmark and you’ll be redirected back to the “Allowed Callback URL” you specified in the dashboard, which is our application homepage. Now instead of the “Sign in” button, you should see a “Log out” button.
Auth0 gives us access to this user information in our templates by using:
{{ $auth.user }}
The contents of $auth.user look something like this:
{
  "nickname": "vue-events",
  "name": "vue-events@example.com",
  "picture": "https://gravatar.com/someimage.png",
  "updated_at": "2019-10-09T15:49:28.181Z",
  "email": "vue-events@example.com",
  "email_verified": false,
  "sub": "auth0|xxxxxxxxxxxxxxx"
}
So if perhaps you want to add a profile page in the future, you have access to this data (and more) to display.
Now that we know how to add a login button, let’s wire up that button on the homepage.
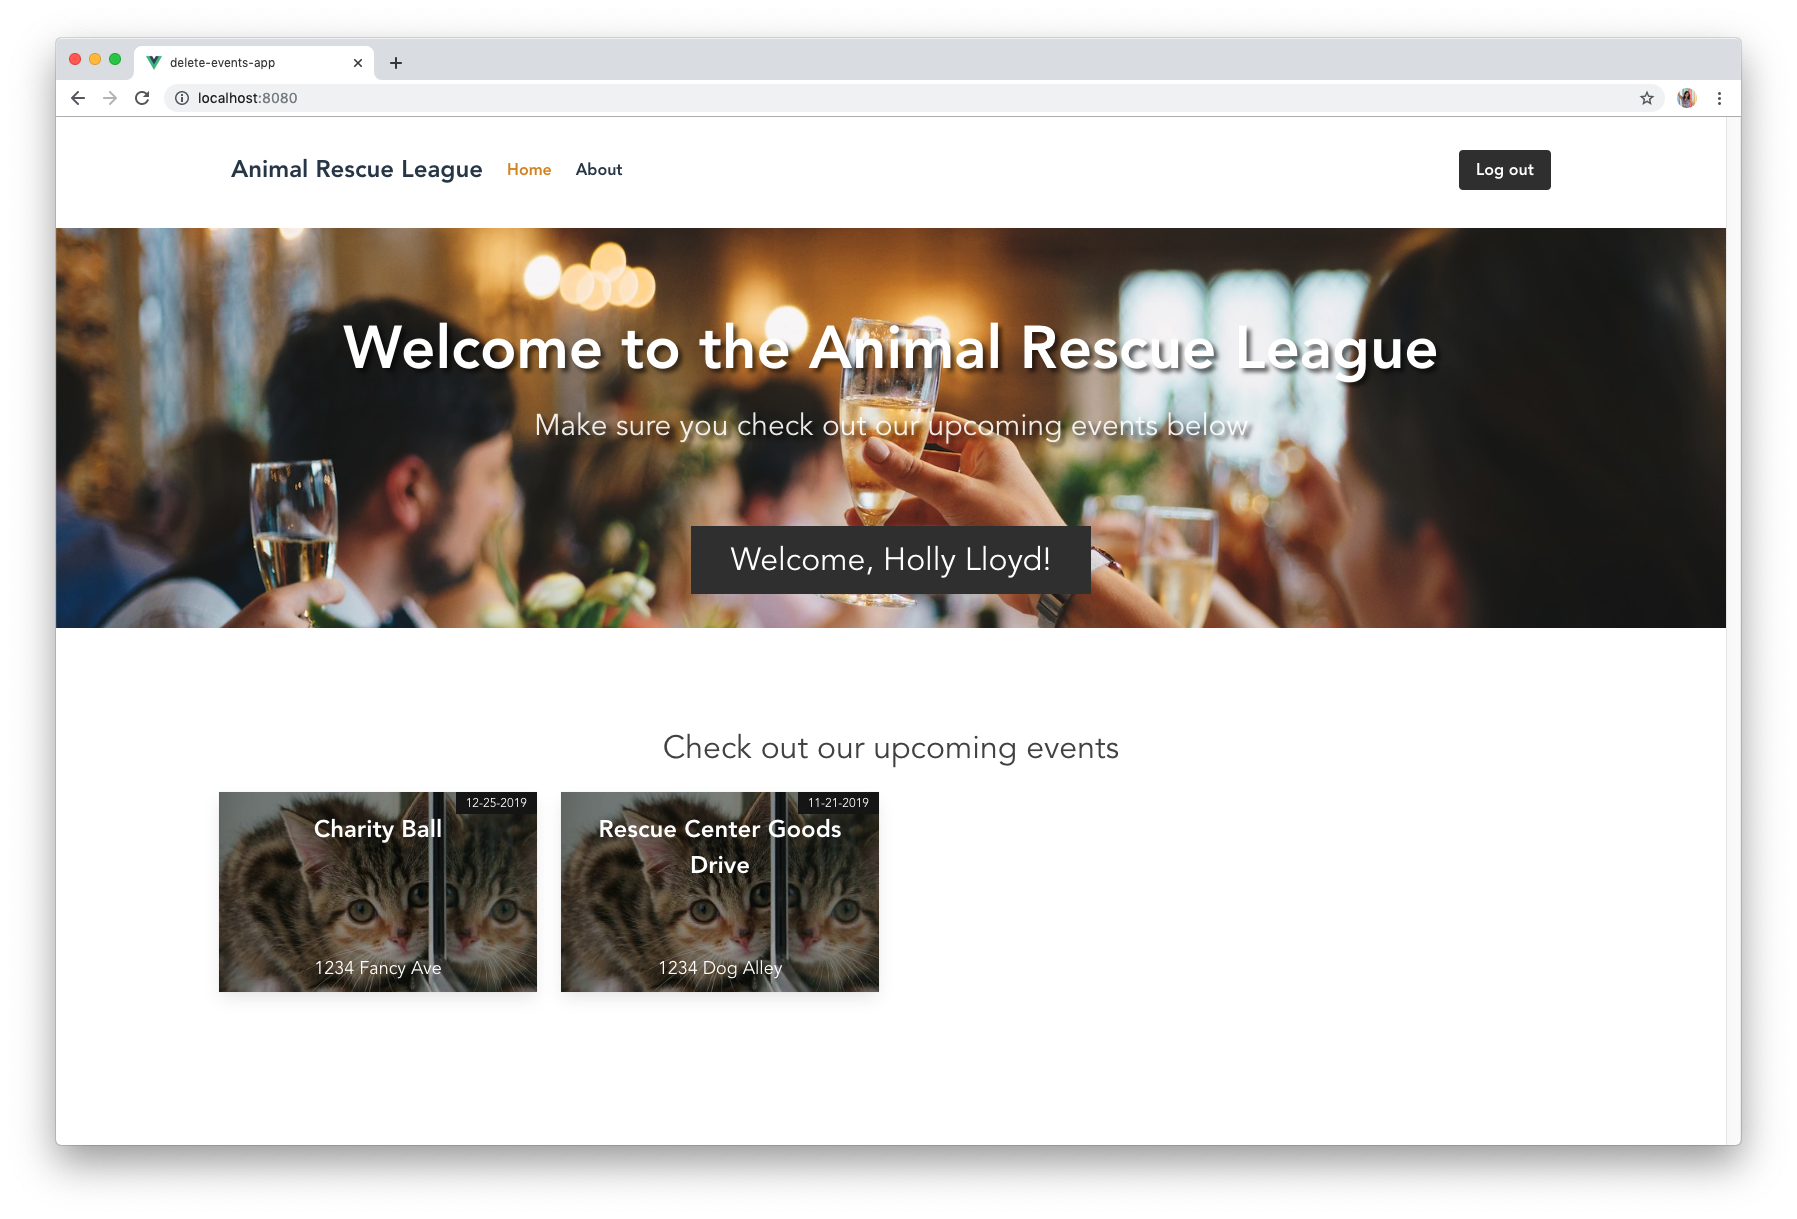
Open up src/views/Home.vue and replace everything between <div class="button-block"></div> with:
<div class="button-block">
  <button v-if="!$auth.isAuthenticated" @click="login" class="button is-xl is-dark">Sign Up to Browse Events</button>
  <h3 v-if="$auth.isAuthenticated" class="is-size-3 has-background-dark welcome">Welcome, {{ $auth.user.name }}!</h3>
</div>
Now we just need to add the methods section with the login() function. Scroll down to where the <script> tag is and replace export default {} with:
export default {
  name: 'home',
  components: {
    EventsList
  },
  methods: {
    // Log the user in
    login() {
      this.$auth.loginWithRedirect();
    }
  }
}
Now a user can also sign in with this button, and once they’re signed in, it will be replaced with a welcome message.
Require Users to Sign in to View Events
So now the final thing we need to do is prevent unauthenticated users from viewing these events in detail. This means they should be able to view the homepage with the list of cards/events, but as soon as they click through to the event detail page, they should be kicked to a login page.
Create a file called authGuard.js in the src/auth directory.
touch src/auth/authGuard.js
Open that up in your editor and paste in:
import { getInstance } from "./index";

export const authGuard = (to, from, next) => {
  const authService = getInstance();

  const fn = () => {
    // If the user is authenticated, continue with the route
    if (authService.isAuthenticated) {
      return next();
    }

    // Otherwise, log in
    authService.loginWithRedirect({ appState: { targetUrl: to.fullPath } });
  };

  // If loading has already finished, check our auth state using `fn()`
  if (!authService.loading) {
    return fn();
  }

  // Watch for the loading property to change before we check isAuthenticated
  authService.$watch("loading", loading => {
    if (loading === false) {
      return fn();
    }
  });
};
Here we’re using the getInstance method from the src/auth/index.js file, which will implement the function that prevents a route from being accessed if a user is not logged in.
If the user is authenticated, we return next(), which allows them to continue to the clicked route. If the user isn’t authenticated, we redirect them to the Auth0 Universal Login page.
We’re going to insert this auth guard into the router so that this runs before any view is returned.
if (authService.isAuthenticated) {
  return next();
}
authService.loginWithRedirect({ appState: { targetUrl: to.fullPath } });
We’ll simply check if the user is authenticated. If they are, we’ll let them through, if not, we send them to the login page.
Open up the router file in src/router/index.js and let’s add this auth guard in:
import Vue from 'vue'
import Router from 'vue-router'
import Home from '../views/Home.vue'
import { authGuard } from "../auth/authGuard";

Vue.use(Router)

export default new Router({
  mode: 'history',
  base: process.env.BASE_URL,
  routes: [
    {
      path: '/',
      name: 'home',
      component: Home
    },
    {
      path: '/about',
      name: 'about',
      component: () => import('./views/About.vue')
    },
    {
      path: '/event/:id',
      name: 'eventSingle',
      component: () => import('./views/EventSingle.vue'),
      beforeEnter: authGuard
    }
  ]
})
We’re importing the authGuard at the top and then since we only want to require authentication for the event details route, we’re going to add beforeEnter: authGuard to that route.
Now if you’ve already logged in previously, you can click on one of those event cards and you should still be able to see the event single page.
But if you open an incognito window and try to access that same route, you’ll be kicked to the login page, which is exactly what we wanted.
Wrap Up
If this was your first time working with Vue.js, hopefully this helped you understand how everything comes together in a small application. Just to recap, here are some of the topics we went over in this tutorial:
- Using the Vue CLI
- Creating reusable components
- Setting up routing with Vue Router
- Styling with Bulma
- Using props and data
- Adding authentication to a Vue.js app
- Protecting routes with Vue navigation guards
Stay tuned for the next tutorial on this topic where we take this existing Vue application, connect it to an Express API, and learn how to secure those API endpoints.
You can find the final code in this GitHub repository if you’d like to see the end result now.
Thanks for reading!
#vue-js #vuejs #vue #javascript