Testing Flutter UI with Flutter Driver
In this article, I am going to discuss how do we make use of Flutter Driver to test basic user interaction with the app.
Flutter provides various classes to test user interface of an app
Mobile apps have become an important part of everyone’s life. Be it a Twitter, Facebook, Instagram, most of the people would be browsing one app or another.
Mobile Developers implement features in an app and testing their code is limited to writing unit tests which usually is testing a particular method or a class, basically non-UI testing. But, when it comes to full fledged end to end testing for the app or a new feature, the dedicated QEs need to write automated tests to validate correct functioning of the flow. For instance, how the app responds to a tap, scroll, input, navigation and other interactions. Take any app for instance and just think about what are the most common or basic steps we perform while browsing any app.
Is it a tap ? Yes. In order to like a post or if you want to comment on a post, first action you perform is to tap on that widget (We are talking about Flutter, so it has to be about widget, correct?)
Is it scroll ? Yes. We scroll to keep reading an article, or to see all the tweets on our timeline.
Search for a keyword or person ? Yes. We type a name or a keyword and then press search to see the search results.
Flutter provides various classes to test user interface of an app. Flutter Driver class is one from the pack that helps to drive the application in another process (read: instrumented app) and exposes different helpful methods to test user interaction and interface of the app.
What is Flutter Driver ?
In simple terms, if you have read or used various testing frameworks for web or mobile platforms such as Selenium WebDriver, Protractor for AngularJS and Google Espresso for Android, on similar lines, Flutter Driver is for Flutter. You can read more about Flutter Driver here.
Demo app
we’ll use a simple input textfield followed by a button at center of the screen and will validate functioning of these two widgets as a flow using Flutter driver methods.
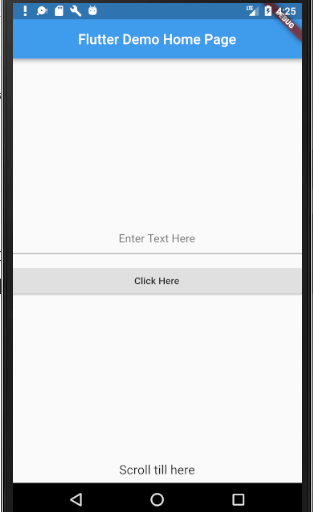
Simple UI under test
Flutter Driver setup
Before we could start using Flutter Driver class, we need to make 2 new test files under a predefined folder named test_driver. First file will contain the method that enables Flutter driver extension followed by calling the function which contains the widgets we need to test. So, the first file, let’s name it as app.dart will look like this:
void main() {
  // This line enables the extension
  enableFlutterDriverExtension();

  // Call the `main()` function of your app or call `runApp` with any widget you
  // are interested in testing.
  app.main();
}
The second file will contain the actual test scripts that we are going to write by using driver methods. Let’s name it app_test.dart which will contain methods to connect to Flutter driver and closing the connection once all tests are completed, followed by test scripts.
void main() {
  group('Flutter Driver demo', () {
    FlutterDriver driver;

    setUpAll(() async {
      driver = await FlutterDriver.connect();
    });

    tearDownAll(() async {
      if (driver != null) {
        await driver.close();
      }
    });
You can read about the driver setup in more details here.
Note: the above link shows how to add the flutter driver dependency in pubspec.yaml, so I am going to skip that part here.
Now that we have added the required files to connect to Flutter driver, we first need to check the status of the driver extension before writing and executing our test scripts. Enter checkHealth()
checkHealth(): This method verifies the status of Flutter Driver extension we use for our tests. It would be a good practice to execute this method first before we start running tests, because we don’t want our tests to fail due to unavailability or bad status of Flutter Driver.
In app_test.dart, let’s write our first test, as below:
test('check flutter driver health', () async {
  Health health = await driver.checkHealth();
  print(health.status);
});
Very simple method to implement. To see the status, we’ll need to run this test from command line. From terminal, go to the root path of your project and use this command to run our test:
$ flutter drive — target=test_driver/app.dart
00:01 +0: Flutter Driver demo check flutter driver health

HealthStatus.ok

00:01 +1: Flutter Driver demo (tearDownAll)

00:01 +1: All tests passed!

Stopping application instance.
Great ! we are now good to write actual test scripts to validate the UI.
Now, we will write a script to enter a text in input field, validate that the entered text is displayed in the field, update the input field with new text and then validate that the first text entered is not present, followed by tapping on the button and then scrolling to the widget present at the bottom of the screen. For this test, we’ll make use of following methods:
tap()
enterText()
waitFor()
waitForAbsent()
scrollIntoView()
Test script for above scenario will look like this:
test('Flutter drive methods demo', () async {

await driver.tap(find.byValueKey('inputKeyString'));
await driver.enterText('Hello !');
await driver.waitFor(find.text('Hello !'));
await driver.enterText('World');
await driver.waitForAbsent(find.text('Hello !'));
print('World');

await driver.waitFor(find.byValueKey('button'));
await driver.tap(find.byValueKey('button'));
print('Button clicked');

await driver.waitFor(find.byValueKey('text'));
await driver.scrollIntoView(find.byValueKey('text'));
await driver.waitFor(find.text('Scroll till here'));
print('I found you buddy !');

});
Let’s go through each line one by one.
**await** driver.tap(find.byValueKey(**‘inputKeyString’**));
When the instrumented app is launched, the input textfield and button widgets are rendered and in order to insert a text in input field, we first need to tell driver to find the input field and then tap on it to make the input field enabled.
inputKeyString is a key we need to declare in our main.dart file in order to uniquely identify each widget.
await driver.enterText('Hello !');
enterText as its name suggests, helps to enter the text-in-test to input in the given textfield. Since the textfield is now enabled, we instruct driver to enter the text Hello ! in it.
await driver.waitFor(find.text('Hello !'));
waitFor method tells the driver to wait till the given text is found.
Note: Ideally _getText()_ should work with all widgets like _TextField_, _RaisedButton_ and so on, but it seems it currently supports only _Text_ widget. Source: https://github.com/flutter/flutter/issues/16013
await driver.enterText('World');
Above line replaces the first text Hello ! with World
await driver.waitForAbsent(find.text('Hello !'));
waitForAbsent when used, tells driver to wait until the target specified in finder is no longer available.
await driver.waitFor(find.byValueKey('button'));
  await driver.tap(find.byValueKey('button'));
Before we could tap on the button, we first need to find it using find.byValueKey and then tap it.
await driver.waitFor(find.byValueKey('text'));
await driver.scrollIntoView(find.byValueKey('text'));
await driver.waitFor(find.text('Scroll till here'));
Now that we have validated button tap, we’ll need to find the text present at the bottom of the screen. For this, we’ll use scrollIntoView method, but before that we need to instruct driver to find the text widget then scroll into it using key and then validate the text displayed.
Let’s run the script and see the output:
00:01 +0: Flutter Driver demo Flutter drive methods demo

World

Button clicked

I found you buddy !

00:03 +1: Flutter Driver demo (tearDownAll)

00:03 +1: All tests passed!

Stopping application instance.
While running above tests or any instrumented test for that matter, I observed that the execution happens very fast, ie you hardly get to see what events occur on screen while these tests are being executed, so we rely on the command line execution result to see if a test has passed or failed. But it becomes tedious to debug when a test fails or to know why exactly a test failed.
Worry not. Flutter Driver provides another useful method screenshot to capture the screenshots while the tests are being executed. Moreover, we can make use of this method wherever we want throughout a test just like a breakpoint. Having screenshots is a great way to visualize the result and helps to analyze a test failure. Let’s see how to use this method.
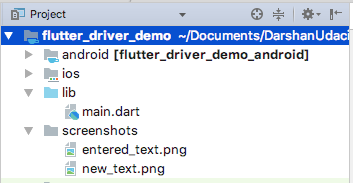
screenshot returns a PNG image. Since, we will be calling this method at runtime, driver need to have a path where it can put all the screenshots. For this, we need to create a directory and feed path of this directory to put all screenshots.
Under app_test.dart, inside setupAll() method, enter below line of code, that will create a physical directory named screenshots under your root project.
new Directory(‘screenshots’).create();
Next, we’ll create a custom method that will take the driver instance and path where the image will be stored. First, we convert the png image into integer array and then write that array as bytes into the file path provided. Here’s how:
takeScreenshot(FlutterDriver driver, String path) async {
final List<int> pixels = await driver.screenshot();
final File file = new File(path);
await file.writeAsBytes(pixels);
print(path);
Now, we call this method wherever we want in our test script, as:
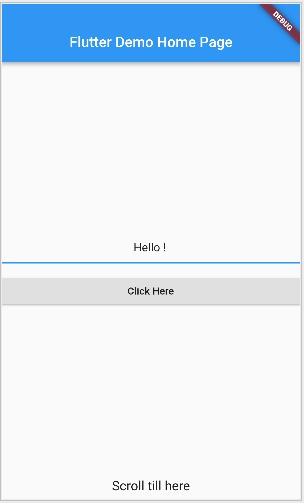
await driver.enterText('Hello !');
await takeScreenshot(driver, 'screenshots/entered_text.png');
await driver.waitFor(find.text('Hello !'));
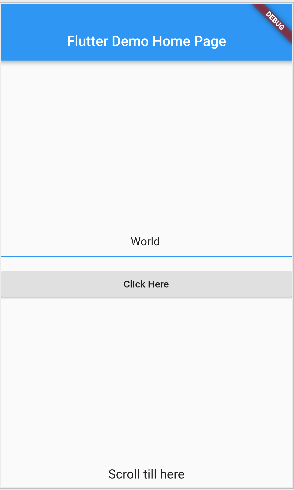
await driver.enterText('World');
await takeScreenshot(driver, 'screenshots/new_text.png');
Let’s run the test script again and see the output:
00:01 +0: Flutter Driver demo Flutter drive methods demo

screenshots/entered_text.png

screenshots/new_text.png

World

Button clicked

I found you buddy !

00:07 +1: Flutter Driver demo (tearDownAll)

00:07 +1: All tests passed!

Stopping application instance.
And we get to see the screenshots created under screenshots folder and the actual images:
With this, we covered various methods Flutter Driver class provides that can be used to test various UI interactions and how these methods can help to write more concise and robust automated tests to validate end-to-end feature flows.
The entire code is available here.
Thanks for reading and feel free to comment below your thoughts or any suggestions / feedback on this article.
#flutter #mobile-apps