Create a PHP and Mysql App in Azure
Note
This article deploys an app to App Service on Windows. To deploy to App Service on Linux, see Build a PHP and MySQL app in Azure App Service on Linux.
Azure App Service provides a highly scalable, self-patching web hosting service. This tutorial shows how to create a PHP app in Azure and connect it to a MySQL database. When you’re finished, you’ll have a Laravel app running on Azure App Service.
In this tutorial, you learn how to:
- Create a MySQL database in Azure
- Connect a PHP app to MySQL
- Deploy the app to Azure
- Update the data model and redeploy the app
- Stream diagnostic logs from Azure
- Manage the app in the Azure portal
If you don’t have an Azure subscription, create a free account before you begin.
Prerequisites
To complete this tutorial:
- Install Git
- Install PHP 5.6.4 or above
- Install Composer
- Enable the following PHP extensions Laravel needs: OpenSSL, PDO-MySQL, Mbstring, Tokenizer, XML
- Install and start MySQL
Prepare local MySQL
In this step, you create a database in your local MySQL server for your use in this tutorial.
Connect to local MySQL server
In a terminal window, connect to your local MySQL server. You can use this terminal window to run all the commands in this tutorial.
mysql -u root -p
If you’re prompted for a password, enter the password for the root account. If you don’t remember your root account password, see MySQL: How to Reset the Root Password.
If your command runs successfully, then your MySQL server is running. If not, make sure that your local MySQL server is started by following the MySQL post-installation steps.
Create a database locally
At the mysql prompt, create a database.
CREATE DATABASE sampledb;
Exit your server connection by typing quit.
quit
Create a PHP app locally
In this step, you get a Laravel sample application, configure its database connection, and run it locally.
Clone the sample
In the terminal window, cd to a working directory.
Run the following command to clone the sample repository.
git clone https://github.com/Azure-Samples/laravel-tasks
cd to your cloned directory. Install the required packages.
cd laravel-tasks
composer install
Configure MySQL connection
In the repository root, create a text file named .env. Copy the following variables into the .env file. Replace the <root_password> placeholder with the MySQL root user’s password.
APP_ENV=local
APP_DEBUG=true
APP_KEY=

DB_CONNECTION=mysql
DB_HOST=127.0.0.1
DB_DATABASE=sampledb
DB_USERNAME=root
DB_PASSWORD=<root_password>
For information on how Laravel uses the .env file, see Laravel Environment Configuration.
Run the sample locally
Run Laravel database migrations to create the tables the application needs. To see which tables are created in the migrations, look in the database/migrations directory in the Git repository.
php artisan migrate
Generate a new Laravel application key.
php artisan key:generate
Run the application.
php artisan serve
Navigate to http://localhost:8000 in a browser. Add a few tasks in the page.

To stop the PHP server, type Ctrl + C in the terminal.
Use Azure Cloud Shell
Azure hosts Azure Cloud Shell, an interactive shell environment that you can use through your browser. You can use either Bash or PowerShell with Cloud Shell to work with Azure services. You can use the Cloud Shell preinstalled commands to run the code in this article without having to install anything on your local environment.
To start Azure Cloud Shell:
| Option | Example/Link |
|---|---|
| Select Try It in the upper-right corner of a code block. Selecting Try It doesn’t automatically copy the code to Cloud Shell. |  |
| Go to https://shell.azure.com, or select the Launch Cloud Shell button to open Cloud Shell in your browser. |  |
| Select the Cloud Shell button on the menu bar at the upper right in the Azure portal. |  |
To run the code in this article in Azure Cloud Shell:
-
Start Cloud Shell.
-
Select the Copy button on a code block to copy the code.
-
Paste the code into the Cloud Shell session by selecting Ctrl+Shift+V on Windows and Linux or by selecting Cmd+Shift+V on macOS.
-
Select Enter to run the code.
Create MySQL in Azure
In this step, you create a MySQL database in Azure Database for MySQL. Later, you configure the PHP application to connect to this database.
Create a resource group
A resource group is a logical container into which Azure resources like web apps, databases, and storage accounts are deployed and managed. For example, you can choose to delete the entire resource group in one simple step later.
In the Cloud Shell, create a resource group with the az group create command. The following example creates a resource group named myResourceGroup in the West Europe location. To see all supported locations for App Service in Free tier, run the az appservice list-locations --sku FREE command.
az group create --name myResourceGroup --location "West Europe"
You generally create your resource group and the resources in a region near you.
When the command finishes, a JSON output shows you the resource group properties.
Create a MySQL server
In the Cloud Shell, create a server in Azure Database for MySQL with the az mysql server create command.
In the following command, substitute a unique server name for the <mysql_server_name> placeholder, a user name for the <admin_user>, and a password for the <admin_password> placeholder. The server name is used as part of your MySQL endpoint (https://<mysql_server_name>.mysql.database.azure.com), so the name needs to be unique across all servers in Azure.
az mysql server create --resource-group myResourceGroup --name <mysql_server_name> --location "West Europe" --admin-user <admin_user> --admin-password <admin_password> --sku-name B_Gen5_1
Note
Since there are several credentials to think about in this tutorial, to avoid confusion,
--admin-userand--admin-passwordare set to dummy values. In a production environment, follow security best practices when choosing a good username and password for your MySQL server in Azure.
When the MySQL server is created, the Azure CLI shows information similar to the following example:
{
  "location": "westeurope",
  "name": "<mysql_server_name>",
  "resourceGroup": "myResourceGroup",
  "sku": {
    "additionalProperties": {},
    "capacity": 1,
    "family": "Gen5",
    "name": "B_Gen5_1",
    "size": null,
    "tier": "GeneralPurpose"
  },
  "sslEnforcement": "Enabled",
  ...	+
  -  < Output has been truncated for readability >
}
Configure server firewall
In the Cloud Shell, create a firewall rule for your MySQL server to allow client connections by using the az mysql server firewall-rule create command. When both starting IP and end IP are set to 0.0.0.0, the firewall is only opened for other Azure resources.
az mysql server firewall-rule create --name allAzureIPs --server <mysql_server_name> --resource-group myResourceGroup --start-ip-address 0.0.0.0 --end-ip-address 0.0.0.0
In the Cloud Shell, run the command again to allow access from your local computer by replacing <your_ip_address> with your local IPv4 IP address.
az mysql server firewall-rule create --name AllowLocalClient --server <mysql_server_name> --resource-group myResourceGroup --start-ip-address=<your_ip_address> --end-ip-address=<your_ip_address>
Connect to production MySQL server locally
In the local terminal window, connect to the MySQL server in Azure. Use the value you specified previously for <mysql_server_name>. When prompted for a password, use the password you specified when you created the database in Azure.
mysql -u <admin_user>@<mysql_server_name> -h <mysql_server_name>.mysql.database.azure.com -P 3306 -p
Create a production database
At the mysql prompt, create a database.
CREATE DATABASE sampledb;
Create a user with permissions
Create a database user called phpappuser and give it all privileges in the sampledb database. Again, for simplicity of the tutorial, use MySQLAzure2017 as the password.
CREATE USER 'phpappuser' IDENTIFIED BY 'MySQLAzure2017';
GRANT ALL PRIVILEGES ON sampledb.* TO 'phpappuser';
Exit the server connection by typing quit.
quit
Connect app to Azure MySQL
In this step, you connect the PHP application to the MySQL database you created in Azure Database for MySQL.
Configure the database connection
In the repository root, create an .env.production file and copy the following variables into it. Replace the placeholder <mysql_server_name> in both DB_HOST and DB_USERNAME.
APP_ENV=production
APP_DEBUG=true
APP_KEY=

DB_CONNECTION=mysql
DB_HOST=<mysql_server_name>.mysql.database.azure.com
DB_DATABASE=sampledb
DB_USERNAME=phpappuser@<mysql_server_name>
DB_PASSWORD=MySQLAzure2017
MYSQL_SSL=true
Save the changes.
Configure SSL certificate
By default, Azure Database for MySQL enforces SSL connections from clients. To connect to your MySQL database in Azure, you must use the .pem certificate supplied by Azure Database for MySQL.
Open config/database.php and add the sslmode and options parameters to connections.mysql, as shown in the following code.
'mysql' => [
    ...
    'sslmode' => env('DB_SSLMODE', 'prefer'),
    'options' => (env('MYSQL_SSL')) ? [
        PDO::MYSQL_ATTR_SSL_KEY    => '/ssl/BaltimoreCyberTrustRoot.crt.pem',
    ] : []
],
The certificate BaltimoreCyberTrustRoot.crt.pem is provided in the repository for convenience in this tutorial.
Test the application locally
Run Laravel database migrations with .env.production as the environment file to create the tables in your MySQL database in Azure Database for MySQL. Remember that .env.production has the connection information to your MySQL database in Azure.
php artisan migrate --env=production --force
.env.production doesn’t have a valid application key yet. Generate a new one for it in the terminal.
php artisan key:generate --env=production --force
Run the sample application with .env.production as the environment file.
php artisan serve --env=production
Navigate to http://localhost:8000. If the page loads without errors, the PHP application is connecting to the MySQL database in Azure.
Add a few tasks in the page.
To stop PHP, type Ctrl + C in the terminal.
Commit your changes
Run the following Git commands to commit your changes:
git add .
git commit -m "database.php updates"
Your app is ready to be deployed.
Deploy to Azure
In this step, you deploy the MySQL-connected PHP application to Azure App Service.
Configure a deployment user
FTP and local Git can deploy to an Azure web app by using a deployment user. Once you configure your deployment user, you can use it for all your Azure deployments. Your account-level deployment username and password are different from your Azure subscription credentials.
To configure the deployment user, run the az webapp deployment user set command in Azure Cloud Shell. Replace <username> and <password> with a deployment user username and password.
- The username must be unique within Azure, and for local Git pushes, must not contain the ‘@’ symbol.
- The password must be at least eight characters long, with two of the following three elements: letters, numbers, and symbols.
az webapp deployment user set --user-name <username> --password <password>
The JSON output shows the password as null. If you get a 'Conflict'. Details: 409 error, change the username. If you get a 'Bad Request'. Details: 400 error, use a stronger password.
Record your username and password to use to deploy your web apps.
Create an App Service plan
In the Cloud Shell, create an App Service plan with the az appservice plan create command.
The following example creates an App Service plan named myAppServicePlan in the Free pricing tier:
az appservice plan create --name myAppServicePlan --resource-group myResourceGroup --sku FREE
When the App Service plan has been created, the Azure CLI shows information similar to the following example:
{
  "adminSiteName": null,
  "appServicePlanName": "myAppServicePlan",
  "geoRegion": "West Europe",
  "hostingEnvironmentProfile": null,
  "id": "/subscriptions/0000-0000/resourceGroups/myResourceGroup/providers/Microsoft.Web/serverfarms/myAppServicePlan",
  "kind": "app",
  "location": "West Europe",
  "maximumNumberOfWorkers": 1,
  "name": "myAppServicePlan",
  < JSON data removed for brevity. >
  "targetWorkerSizeId": 0,
  "type": "Microsoft.Web/serverfarms",
  "workerTierName": null
}
Create a web app
Create a web app in the myAppServicePlan App Service plan.
In the Cloud Shell, you can use the az webapp create command. In the following example, replace <app-name> with a globally unique app name (valid characters are a-z, 0-9, and -). The runtime is set to PHP|7.0. To see all supported runtimes, run az webapp list-runtimes.
# Bash
az webapp create --resource-group myResourceGroup --plan myAppServicePlan --name <app-name> --runtime "PHP|7.0" --deployment-local-git
# PowerShell
az --% webapp create --resource-group myResourceGroup --plan myAppServicePlan --name <app-name> --runtime "PHP|7.0" --deployment-local-git
When the web app has been created, the Azure CLI shows output similar to the following example:
Local git is configured with url of 'https://<username>@<app-name>.scm.azurewebsites.net/<app-name>.git'
{
  "availabilityState": "Normal",
  "clientAffinityEnabled": true,
  "clientCertEnabled": false,
  "cloningInfo": null,
  "containerSize": 0,
  "dailyMemoryTimeQuota": 0,
  "defaultHostName": "<app-name>.azurewebsites.net",
  "deploymentLocalGitUrl": "https://<username>@<app-name>.scm.azurewebsites.net/<app-name>.git",
  "enabled": true,
  < JSON data removed for brevity. >
}
You’ve created an empty new web app, with git deployment enabled.
Note
The URL of the Git remote is shown in the
deploymentLocalGitUrlproperty, with the formathttps://<username>@<app-name>.scm.azurewebsites.net/<app-name>.git. Save this URL as you need it later.
Configure database settings
As pointed out previously, you can connect to your Azure MySQL database using environment variables in App Service.
In the Cloud Shell, you set environment variables as app settings by using the az webapp config appsettings set command.
The following command configures the app settings DB_HOST, DB_DATABASE, DB_USERNAME, and DB_PASSWORD. Replace the placeholders _<appname>_ and _<mysql_server_name>_.
az webapp config appsettings set --name <app_name> --resource-group myResourceGroup --settings DB_HOST="<mysql_server_name>.mysql.database.azure.com" DB_DATABASE="sampledb" DB_USERNAME="phpappuser@<mysql_server_name>" DB_PASSWORD="MySQLAzure2017" MYSQL_SSL="true"
You can use the PHP getenv method to access the settings. the Laravel code uses an env wrapper over the PHP getenv. For example, the MySQL configuration in config/database.php looks like the following code:
'mysql' => [
    'driver'    => 'mysql',
    'host'      => env('DB_HOST', 'localhost'),
    'database'  => env('DB_DATABASE', 'forge'),
    'username'  => env('DB_USERNAME', 'forge'),
    'password'  => env('DB_PASSWORD', ''),
    ...
],
Configure Laravel environment variables
Laravel needs an application key in App Service. You can configure it with app settings.
In the local terminal window, use php artisan to generate a new application key without saving it to .env.
php artisan key:generate --show
In the Cloud Shell, set the application key in the App Service app by using the az webapp config appsettings set command. Replace the placeholders _<appname>_ and _<outputofphpartisankey:generate>_.
az webapp config appsettings set --name <app_name> --resource-group myResourceGroup --settings APP_KEY="<output_of_php_artisan_key:generate>" APP_DEBUG="true"
APP_DEBUG="true" tells Laravel to return debugging information when the deployed app encounters errors. When running a production application, set it to false, which is more secure.
Set the virtual application path
Set the virtual application path for the app. This step is required because the Laravel application lifecycle begins in the public directory instead of the application’s root directory. Other PHP frameworks whose lifecycle start in the root directory can work without manual configuration of the virtual application path.
In the Cloud Shell, set the virtual application path by using the az resource update command. Replace the _<appname>_ placeholder.
az resource update --name web --resource-group myResourceGroup --namespace Microsoft.Web --resource-type config --parent sites/<app_name> --set properties.virtualApplications[0].physicalPath="site\wwwroot\public" --api-version 2015-06-01
By default, Azure App Service points the root virtual application path (/) to the root directory of the deployed application files (sites\wwwroot).
Push to Azure from Git
Back in the local terminal window, add an Azure remote to your local Git repository. Replace _<deploymentLocalGitUrl-from-create-step>_ with the URL of the Git remote that you saved from Create a web app.
git remote add azure <deploymentLocalGitUrl-from-create-step>
Push to the Azure remote to deploy your app with the following command. When Git Credential Manager prompts you for credentials, make sure you enter the credentials you created in Configure a deployment user, not the credentials you use to sign in to the Azure portal.
git push azure master
This command may take a few minutes to run. While running, it displays information similar to the following example:
Counting objects: 3, done.
Delta compression using up to 8 threads.
Compressing objects: 100% (3/3), done.
Writing objects: 100% (3/3), 291 bytes | 0 bytes/s, done.
Total 3 (delta 2), reused 0 (delta 0)
remote: Updating branch 'master'.
remote: Updating submodules.
remote: Preparing deployment for commit id 'a5e076db9c'.
remote: Running custom deployment command...
remote: Running deployment command...
...
< Output has been truncated for readability >
Note
You may notice that the deployment process installs Composer packages at the end. App Service does not run these automations during default deployment, so this sample repository has three additional files in its root directory to enable it:
.deployment- This file tells App Service to runbash deploy.shas the custom deployment script.deploy.sh- The custom deployment script. If you review the file, you will see that it runsphp composer.phar installafternpm install.composer.phar- The Composer package manager.You can use this approach to add any step to your Git-based deployment to App Service. For more information, see Custom Deployment Script.
Browse to the Azure app
Browse to http://<app_name>.azurewebsites.net and add a few tasks to the list.
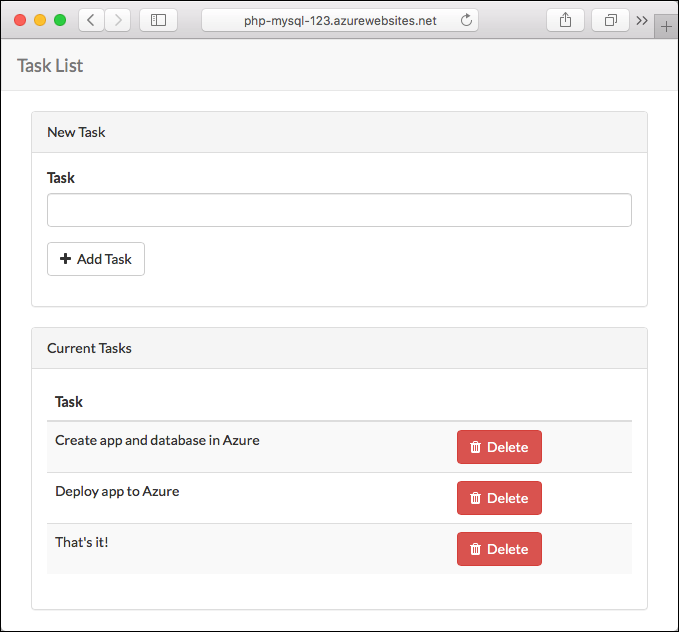
Congratulations, you’re running a data-driven PHP app in Azure App Service.
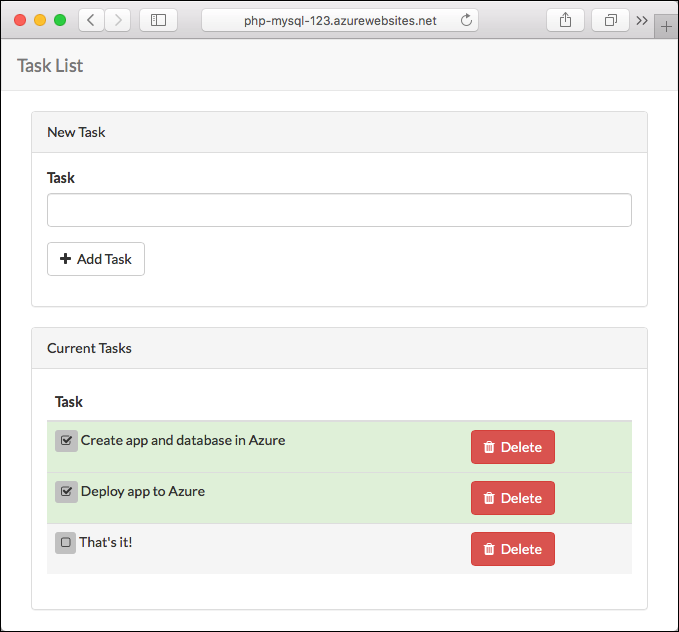
Update model locally and redeploy
In this step, you make a simple change to the task data model and the webapp, and then publish the update to Azure.
For the tasks scenario, you modify the application so that you can mark a task as complete.
Add a column
In the local terminal window, navigate to the root of the Git repository.
Generate a new database migration for the tasks table:
php artisan make:migration add_complete_column --table=tasks
This command shows you the name of the migration file that’s generated. Find this file in database/migrations and open it.
Replace the up method with the following code:
public function up()
{
    Schema::table('tasks', function (Blueprint $table) {
        $table->boolean('complete')->default(False);
    });
}
The preceding code adds a boolean column in the tasks table called complete.
Replace the down method with the following code for the rollback action:
public function down()
{
    Schema::table('tasks', function (Blueprint $table) {
        $table->dropColumn('complete');
    });
}
In the local terminal window, run Laravel database migrations to make the change in the local database.
php artisan migrate
Based on the Laravel naming convention, the model Task (see app/Task.php) maps to the tasks table by default.
Update application logic
Open the routes/web.php file. The application defines its routes and business logic here.
At the end of the file, add a route with the following code:
/**
 * Toggle Task completeness
 */
Route::post('/task/{id}', function ($id) {
    error_log('INFO: post /task/'.$id);
    $task = Task::findOrFail($id);

    $task->complete = !$task->complete;
    $task->save();

    return redirect('/');
});
The preceding code makes a simple update to the data model by toggling the value of complete.
Update the view
Open the resources/views/tasks.blade.php file. Search for the <tr> opening tag and replace it with:
<tr class="{{ $task->complete ? 'success' : 'active' }}" >
The preceding code changes the row color depending on whether the task is complete.
In the next line, you have the following code:
<td class="table-text"><div>{{ $task->name }}</div></td>
Replace the entire line with the following code:
<td>
    <form action="{{ url('task/'.$task->id) }}" method="POST">
        {{ csrf_field() }}

        <button type="submit" class="btn btn-xs">
            <i class="fa {{$task->complete ? 'fa-check-square-o' : 'fa-square-o'}}"></i>
        </button>
        {{ $task->name }}
    </form>
</td>
The preceding code adds the submit button that references the route that you defined earlier.
Test the changes locally
In the local terminal window, run the development server from the root directory of the Git repository.
php artisan serve
To see the task status change, navigate to http://localhost:8000 and select the checkbox.

To stop PHP, type Ctrl + C in the terminal.
Publish changes to Azure
In the local terminal window, run Laravel database migrations with the production connection string to make the change in the Azure database.
php artisan migrate --env=production --force
Commit all the changes in Git, and then push the code changes to Azure.
git add .
git commit -m "added complete checkbox"
git push azure master
Once the git push is complete, navigate to the Azure app and test the new functionality.
If you added any tasks, they are retained in the database. Updates to the data schema leave existing data intact.
Stream diagnostic logs
While the PHP application runs in Azure App Service, you can get the console logs piped to your terminal. That way, you can get the same diagnostic messages to help you debug application errors.
To start log streaming, use the az webapp log tail command in the Cloud Shell.
az webapp log tail --name <app_name> --resource-group myResourceGroup
Once log streaming has started, refresh the Azure app in the browser to get some web traffic. You can now see console logs piped to the terminal. If you don’t see console logs immediately, check again in 30 seconds.
To stop log streaming at anytime, type Ctrl+C.
Manage the Azure app
Go to the Azure portal to manage the app you created.
From the left menu, click App Services, and then click the name of your Azure app.
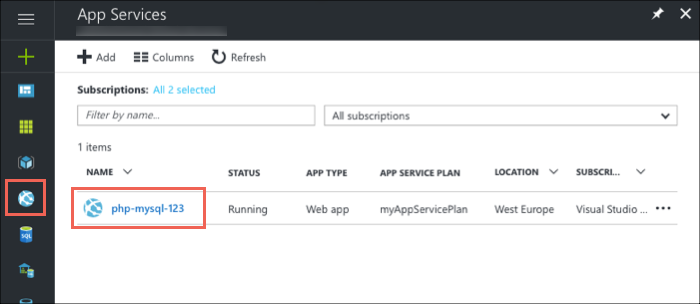
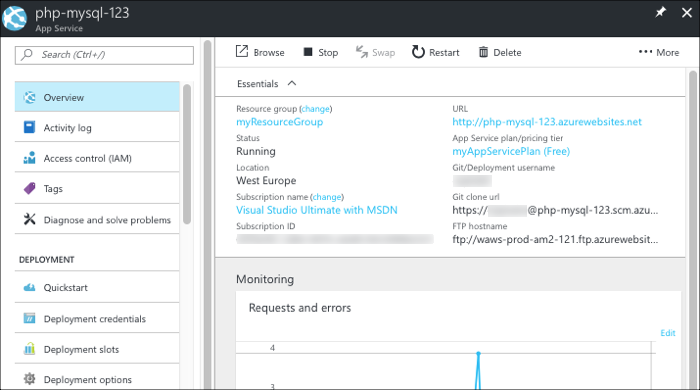
You see your app’s Overview page. Here, you can perform basic management tasks like stop, start, restart, browse, and delete.
The left menu provides pages for configuring your app.
Clean up resources
In the preceding steps, you created Azure resources in a resource group. If you don’t expect to need these resources in the future, delete the resource group by running the following command in the Cloud Shell:
az group delete --name myResourceGroup
This command may take a minute to run.
#php #mysql #azure #laravel
