Vue vs. Svelte: The differences when created the exact same app
Having used Vue at work, I had a fairly solid understanding of it. I had, however, heard of Svelte — a new JavaScript framework that has recently started gaining attention amongst the web development scene. And as a curious Web Developer, I had been curious to know what the grass was like on the other side of the fence — the grass in this scenario being Svelte.
I’d read the Svelte docs and watched a couple videos and, while they were useful, what I really wanted to know was how different Svelte was from Vue. By “different”, I didn’t mean things such as whether Svelte used a virtual DOM or how it went about rendering pages. I wanted someone to take the time to explain how my Vue code might look if I had written the same thing in Svelte! I wanted to find an article that took the time to explain this so that someone new to either Vue or Svelte (or Web Development as a whole) could gain a better understanding of the differences between the two.
Unfortunately, I couldn’t find anything that tackled this. So I came to the realisation that I would have to go ahead and build this myself in order to see the similarities and differences. In doing so, I thought I’d document the whole process so that an article on this will finally exist.
I decided to try and build a fairly standard To Do App that allows a user to add and delete items from the list. Both apps were built using CLIs (@vue/cli for Vue, and sveltejs/template for Svelte).
CLI stands for Command Line Interface by the way. 🤓
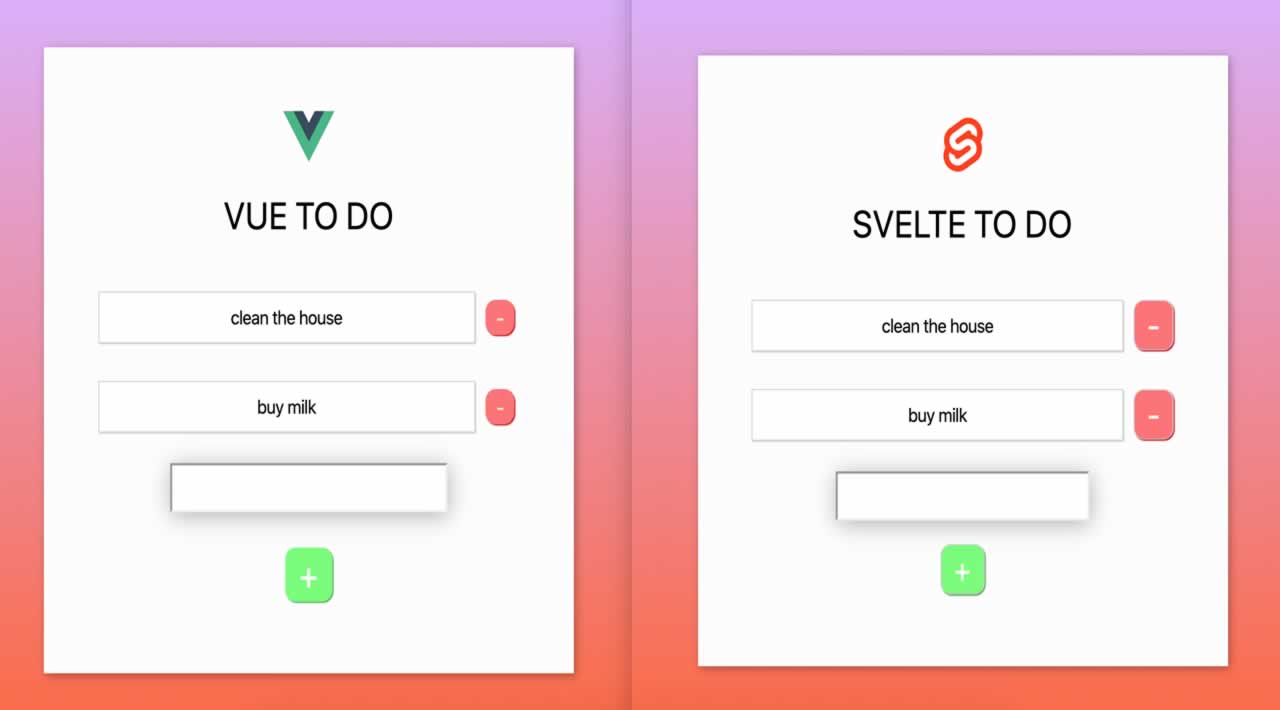
Anyway, this intro is already longer than I’d anticipated. So let’s start by having a quick look at how the two apps look:

Vue vs Svelte: A new challenger approaches!
The CSS code for both apps are exactly the same, but there are differences in where these are located. With that in mind, let’s next have a look at the file structure of both apps:

Vue on the left. Svelte on the right.
You’ll see that their structures are quite different here.
Vue has all of the components, styles and assets inside of the src folder, while Svelte requires the assets to sit directly in the public folder. Both do not have any .css files as the styles are defined within the actual .vue and .svelte files.
You will also notice that — for Svelte — there are some config files for Rollup. For those unaware, Rollup is basically a Webpack equivalent, which Svelte opts to use instead.
Finally, you’ll notice that Svelte already some bundle files inside of the public folder. These were created after I tried serving up the Svelte ToDo app to my localhost. Unlike Vue, Svelte’s CLI automatically generates these files as soon as you try starting up a local server. These are effectively the files that are being served to you, which are the compilations of all of the code from the .svelte files.
This is one key thing that Svelte does differently to Vue. In Vue, you would typically end up with a similar structure in your public file if you were to compile your code in order to get it ready to send to production and put live online, but whilst developing, if you were to serve your Vue ToDo app to the local server, you wouldn’t see these bundle files, as your code gets compiled by Webpack and then served to you in your localhost — and effectively sits somewhere in cache, whereas Rollup compiles the Svelte code and makes it visible for you in the public folder. Another difference caused here is that Vue’s setup with Webpack allows for hot module reloading (which basically means that the code will quite quickly update in your browser as you are making updates during development. With Svelte’s setup with Rollup, this isn’t possible by default, as those bundle files are effectively being recompiled, albeit quickly, every time you hit the save button to make an update in your code. There are some packages out there that will help you achieve hot-module reloading if required, but this doesn’t come ‘out of the box’ for Svelte at the time of writing.
Ultimately, both file structures and approach to compilation achieve the same thing, just by different means.
Before we go any further, let’s take a quick look at what a typical Vue and Svelte component looks like:

Now that’s out of the way, let’s get into the nitty gritty detail!
Creating a new application
Vue
Using npm, run the following command in your terminal/command line to install the Vue CLI:
npm install -g @vue/cli
Once installed, you can then run:
vue create vue-todo
That will create a project for you called ‘vue-todo’ that will contain everything you need to get started. We used the same process for the app created for this article.
Svelte
Using npm, run the following command in your terminal/command line:
npx degit your-name/template svelte-todo
That will create a project for you called ‘svelte-todo’ that will contain everything you need to get started. We used the same process for the app created for this article.
How do we mutate data?
But first, what do we even mean by “mutate data”? Sounds a bit technical doesn’t it? It basically just means changing the data that we have stored. So if we wanted to change the value of a person’s name from John to Mark, we would be ‘mutating the data’. Vue and Svelte handle mutation in the same way, essentially allowing data to be freely be updated (eg. we can push items into an array of data, reassign our data etc).
Let’s take a look at the set up for both in the images below, then we will explain what is going on after:

Vue on the left. Svelte on the right.
So you can see that we have passed the same data into both, but the structure is a bit different.
In Vue, you would typically place all of your mutable data for a component inside of a data() function that returns an object with your data inside of it.
Now with Svelte, you will notice that we have two variables that we are exporting. These were located inside of our ToDo.svelte file, but can be placed higher up inside of our route App.svelte file if we wanted to.
Anyway, let’s just take another look at them, then we’ll explain what is going on:
export let todo = "";
export let list = [
  { id: 1, text: "clean the house" },
  { id: 2, text: "buy eggs" }
];
So with Svelte, if we want to refer to things such as todo and list in our file, we need to have created a reference to them somewhere in the same file.
This is no different to Vue, or most other JavaScript, whether it be through creating a variable, importing a variable, or passing a variable down to a component as props. The different here is that we’re effectively creating new variables (with _let_, not _const_ as that would prevent us from being able to mutate it — or reassign it if we want to get technical about how _const_ works). The reason why I mention that we have to create new variables is because you’ll later notice that we have to do this in every file that we want to refer to them, even if they’ve already been passed down as props. Basically what happens is that Svelte will then pass the values down to those newly created variables. If you’re confused, just continue reading on and you’ll see how this works when we refer to it again later.
So how do we reference our mutable data in our Vue and Svelte apps?
Well, let’s say that we have some piece of data called name that has been assigned a value of ‘Sunil**’**.
In Vue, this would be sitting inside of the data() object and would have been called name: ‘Sunil'. In our app, we would reference this by callingthis.name. We can also go about updating this by calling this.name = ‘John’. This would change my name to John. I’m not sure how I feel about being called John, but hey ho, things happen! 😅
In Svelte, this let name = Sunil, will have either been created in a component and passed down to another as a prop, or just gets used inside of the component it was created in. Regardless of how we use name, we can update it by simply reassigning name. So I could write name = ‘John' and we would see the update in our screen in the UI.
Now that we have mutations out of the way, let’s get into the nitty, gritty by looking at how we would go about adding new items to both of our To Do Apps.
How do we create new To Do Items?
Vue:
createNewToDoItem() {
  const newId = this.list.length ?
                Math.max.apply(null, this.list.map(t => t.id)) + 1 :
                1;

  this.list.push({ id: newId, text: this.todo });
  this.todo = "";
}
How did Vue do that?
In Vue, our input field has a handle on it called v-model. This allows us to do something known as two-way binding. Let’s just quickly look at our input field, then we’ll explain what is going on:
<input type="text" v-model="todo"/>
V-Model ties the input of this field to a key we have in our data object called toDoItem. When the page loads, we have toDoItem set to an empty string, as such: todo: ‘’. If this had some data already in there, such as todo: ‘add some text here’, our input field would load with add some text here already inside the input field. Anyway, going back to having it as an empty string, whatever text we type inside the input field gets bound to the value for todo. This is effectively two-way binding (the input field can update the data object and the data object can update the input field).
So looking back at the createNewToDoItem() code block from earlier, we see that we push the contents of todo into the list arrayand then update todo to an empty string.
Svelte:
createNewToDoItem() {
  const newId = list.length ?
                Math.max.apply(null, list.map(t => t.id)) + 1 :
                1;

  list.push({ id: newId, text: todo });
  todo = "";
}
How did Svelte do that?
In Svelte, our input field has a handle on it called bind:value. This allows us to do something known as two-way binding. Let’s just quickly look at our input field, then we’ll explain what is going on:
<input type="text" bind:value={todo} />
bind:value ties the input of this field to a variable we have called todo. When the page loads, we have todo set to an empty string, as such: let todo = ‘’. If this had some data already in there, such as let todo = ‘add some text here’, our input field would load with add some text here already inside the input field. Anyway, going back to having it as an empty string, whatever text we type inside the input field gets bound to the value for todo. This is effectively two-way binding (the input field can update todo and todo can update the input field).
So looking back at the createNewToDoItem() code block from earlier, we see that we push the contents of todointo the listarrayand then update todoto an empty string.
We also used the same newId() function as used in the Vue example.
What’s that newId variable?
Essentially the newId variable is assigned to the result of a function that is basically creating a new ID that we will give to our new toDo item. We used the same function for both Vue and Svelte.
How do we delete from the list?
Vue:
onDeleteItem(id){
  this.list = this.list.filter(todo => todo.id !== id);
}
How did Vue do that?
A slightly different approach is required in Vue. We essentially have to do three things here:
Firstly, on the element we want to call the function:
<div class=”ToDoItem-Delete” @click=”deleteItem(item)”>-</div>
Then we have to create an emit function as a method inside the child component (in this case, ToDoItem.vue), which looks like this:
deleteItem(id) {
    this.$emit('delete', id)
}
Along with this, you’ll notice that we actually reference a function when we add ToDoItem.vue inside of ToDo.vue:
<ToDoItem v-for="todo in list"
          :todo="todo"
          @delete="onDeleteItem" // <-- this :)
          :key="todo.id" />
This is what is known as a custom event-listener. It listens out for any occasion where an emit is triggered with the string of ‘delete’. If it hears this, it triggers a function called onDeleteItem. This function sits inside of ToDo.vue, rather than ToDoItem.vue. This function, as listed earlier, simply filters the todo array insidethe data object to remove the item that was clicked on.
It’s also worth noting here that in the Vue example, I could have simply written the $emit part inside of the @click listener, as such:
<div class=”ToDoItem-Delete” @click=”$emit(‘delete’, item)”>-</div>
This would have reduced the number of steps down from 3 to 2, and this is simply down to personal preference.
Svelte:
const deleteItem = event => {
  const { id } = event.detail;
  list = list.filter(item => item.id !== id);
};
How did Svelte do that?
Quite a similar approach is required in Svelte. We essentially have to do three things here:
If we start from the top down, we first have the deleteItem function that you saw just a moment ago. This sits inside of ToDo.svelte. As you can see, we destructed the event object to pass in event.detail.id to const id. You can think of this part as similar to trying to get the event.target.value from an input field. The difference here is that the event was passed in as the parameter (or payload/data) when the deleteItem function was called. But this deleteItem was called in ToDoItem.svelte. So how did we achieve this?
Well we then pass our deleteItem function down as a prop, like so:
<ToDoItem {item} on:deleteItem={deleteItem} />
But inside of ToDoItem.svelte, we can’t just simply call deleteItem. You may have even noticed that on the code block just above that rather than passing our deleteItem function with the same prop name, we passed it as a prop with the name of on:deleteItem. This basically creates an event listener with the name deleteItem. So in order to call it, we now need to ‘dispatch’ a call back to deleteItem, at which point we can also pass a payload (some data) if required. So how do we do this bit?
Inside of ToDoItem.svelte, we have to first import createEventDispatcher from Svelte, like so:
import { createEventDispatcher } from "svelte";
We then create a const dispatch and assign it to createEventDispatcher(), like so:
const dispatch = createEventDispatcher();
We then can create a function that calls our newly created dispatch function, like so:
const handleDelete = id => {
  dispatch("deleteItem", { id });
};
Finally, we can then call our handleDelete function from our ‘delete’ button, like so:
<button class="ToDoItem-Delete"
        on:click={() => handleDelete(item.id)}>
-
</button>
If we wanted to, we could have skipped creating the handleDelete function by writing the following instead:
<button class="ToDoItem-Delete"
        on:click={() => dispatch("deleteItem", { item.id })}>
-
</button>
That bit is down to personal preference really.
In short, child components in Vue and Svelte have access to parent components in mostly the same manner. The difference is simply semantic, with Vue referring to this as “emitting” data, while Svelte refers to it as “dispatching” data.
With Svelte, there was another way that we could have passing functions down as props that would have resembled a similar approach taken by React. However, we opted to make this similar to Vue for the purposes of this tutorial.
How do we pass DOM event listeners?
Vue:
In Vue it is super straight-forward. We simply use the @ symbol, and then the type of event-listener we want to do. So for example, to add a click event listener, we could write the following:
<button class=”ToDo-Add” @click=”createNewToDoItem()”>+</div>
Note: @click is actually shorthand for writing v-on:click. The cool thing with Vue event listeners is that there are also a bunch of things that you can chain on to them, such as .once which prevents the event listener from being triggered more than once. There are also a bunch of shortcuts when it comes to writing specific event listeners for handling key strokes. In Vue, I was able to simply write:
<input type=”text” v-on:keyup.enter=”createNewToDoItem”/>Svelte:
In Svelte it is also pretty straight-forward. We simply use the on: handle, and then the type of event-listener we want to do. So for example, to add a click event listener, we could write on:click, as we have in the following example:
<button class="ToDo-Add" on:click={createNewToDoItem}>+</button>
One cool thing with Svelte event listeners is that there are also a bunch of things that you can chain on to them, such as once which prevents the event listener from being triggered more than once.
How do we pass data/props to a child component?
Vue:
In Vue, we pass props onto the child component at the point where it is created. Such as:
<ToDoItem v-for="item in list"
  :item="item"
  @delete="onDeleteItem"
  :key="item.id" />
Once this is done, we then pass them into the props array in the child component, as such: props: [ ‘todo’ ]. These can then be referenced in the child by their name — so in our case, ‘todo’.
Svelte:
In Svelte, it’s pretty much the same:
<ToDoItem {item} on:deleteItem={deleteItem} />
One difference here is that we didn’t have to pass a key to our ToDoItem, but hold that thought for a moment as we’ll cover that later.
Another difference is that we can pass item down by simply writing {item}. This is because the prop name and the actual prop have the same name. Writing item={item} would also work the same, but my Svelte setup automatically amended it to simply {item}.
Once this is done, we have to create a variable inside of our ToDoItem.svelte file called item, by writing export let item; towards the top of the **** part of the file. This is so that we can refer to item in our file without getting any errors for trying to reference a variable that doesn’t exist. What you have to remember here is that during compilation, Svelte will then check to see if our ToDoItem was passed a prop with the name of item. In our case, it has, so the value of item that was passed down as a prop, will be assigned to our export let item;. This then allows our app to work as we would expect it to. These can then be referenced in the child by their name — so in our case, ‘todo’.
How do we emit data back to a parent component?
Vue:
In our child component, we simply write a function that emits a value back to the parent function. In our parent component, we write a function that listens for when that value is emitted, which can then trigger a function call. We can see an example of this entire process in the section ‘How do we delete from the list’.
Svelte:
In our child component, we simply write a dispatch function that emits a value back to the parent function. In our parent component, we write a function that listens for when that value is emitted, which can then trigger a function call. We can see an example of this entire process in the section ‘How do we delete from the list’.
How do we loop through data inside of our components?
Vue
In Vue we use v-for, which is specific to Vue. It is a means by which to loop through data. You can see here that as we are just looping through our data to output multiple ToDoItems, we can actually use the v-for directly on the `` component. This is how we implemented it in our code:
<ToDoItem v-for="item in list"
          :item="item" @delete="onDeleteItem"
          :key="item.id" />
Svelte
In Svelte, we use #each, which is specific to Svelte. It is a means by which to loop through data. This is how we implemented it in our code:
{#each list as item, i (item.id)}
  <ToDoItem {item} on:deleteItem={deleteItem} />
{/each}
You’ll notice that we then take our list variable and follow it with as item. This is basically saying, take our list, and break it down to individual items which we will refer to as item. We then give each item an index which we call i and then write in brackets immediately after what we want to use as the index, which in this case, is our item.id. You will also notice that we did not have to pass a key to our `` here as Svelte assigns it anyway.
And there we have it!
We’ve looked at how we add, remove and change data, pass data in the form of props from parent to child, and send data from the child to the parent in the form of event listeners. There are, of course, lots of other little differences and quirks between Vue and Svelte, but hopefully the contents of this article has helped to serve as a bit of a foundation for understanding how they both handle stuff.
If you’re interested in forking the styles used in this article and want to make your own equivalent piece, please feel free to do so!
Github links to both apps:
Vue ToDo: Github
Svelte ToDo: Github
Thank you so much !
#Vuejs #JavaScript #Programming #Coding #Svelte