Git Cheat Sheet for Beginners and Advanced Users
This cheat sheet provides a comprehensive overview of the most essential Git commands for beginners and advanced users alike. It covers everything from basic commands such as git add, git commit, and git push to more advanced concepts such as branching, merging, and conflict resolution. Whether you're just getting started with Git or you're looking for a quick reference guide, this cheat sheet is a valuable resource for mastering Git.
Introduction: What is GIT?
Git is a free and open-source distributed version control system, which is designed to handle everything from small to very large projects with speed and efficiency.
So Why Git? What are the advantages?
Imagine a scenario without using Git.
There is a large project and 100 developers are working on the project.

- Developers used to submit their codes to the central server without having a copy of their own.
- Any changes made to the source code were not known to the other developers.
- There was no communication between any of the developers.
Now, let's analyse the scenario after using Git.
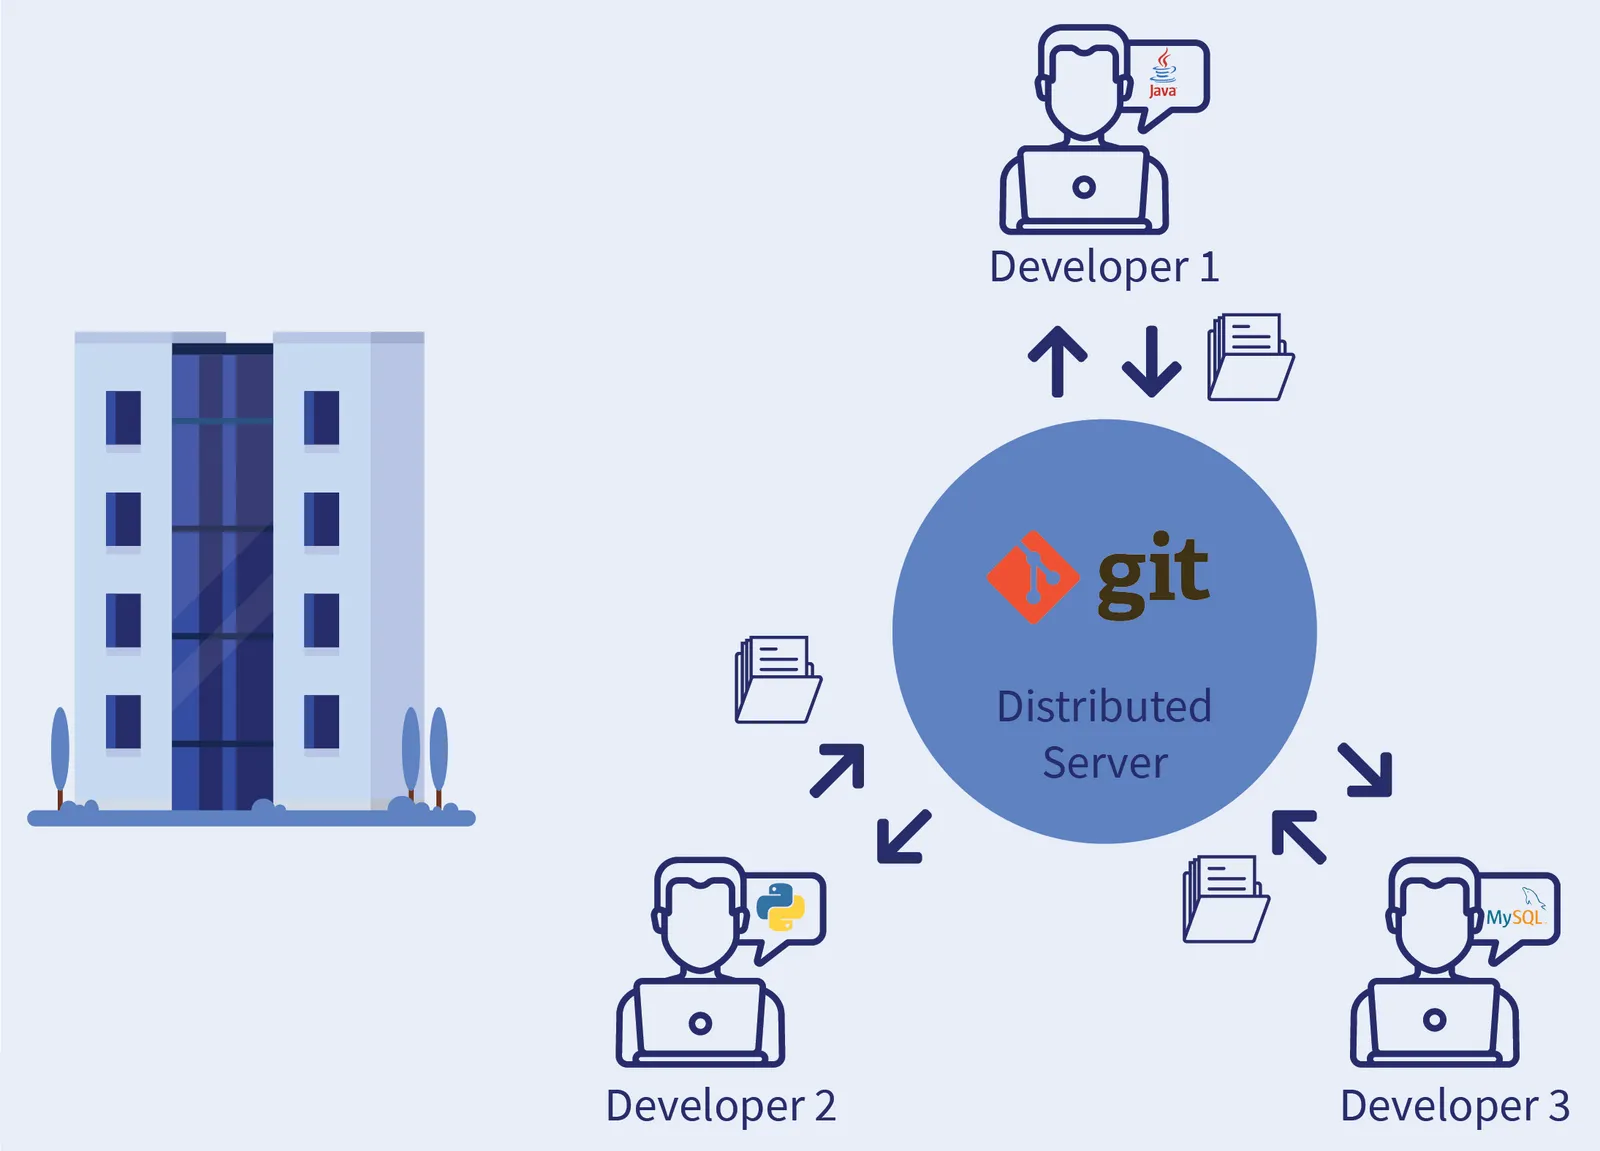
- Every developer has an entire copy of the code on their local system.
- Any change made to the source code can be tracked by others.
- There is regular communication between the developers.
Learn GIT: Basics to Advanced Concepts
1. Uses of Git
- Git is used to tracking changes in the source code.
- Distributed version control tool used for source code management.
- Allows multiple developers to work together.
- Supports non-linear development because of its thousands of parallel branches.
2. Features of Git
- Free and open-source
- Tracks history
- Supports non-linear development
- Creates backup
- Scalable
- Supports collaboration
- Branching is easier
- Distributed development.
3. Git WorkFlow
The following image shows the git workflow diagram:
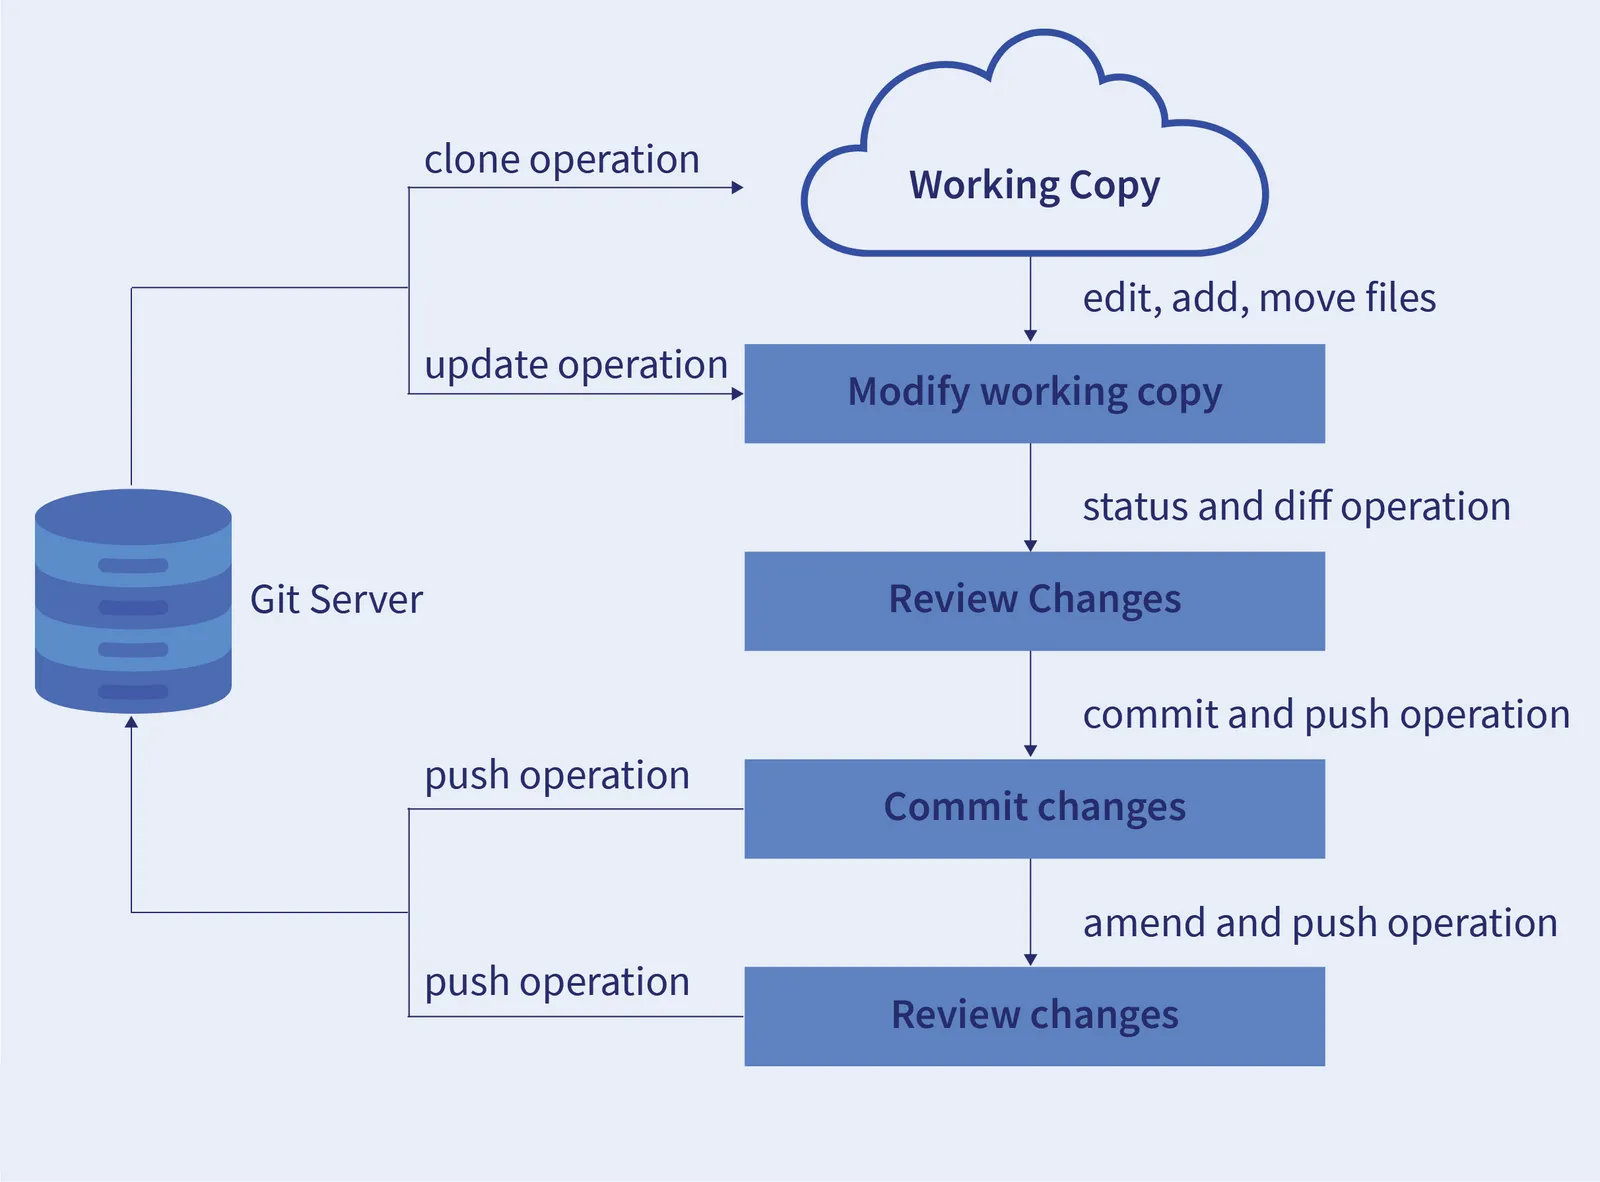
In Git, the workflow is mainly divided into three areas -
- Working directory - This is the area where you modify your existing files.
- Staging area (Index) - In this, the files in your working directory are staged and snapshots are added.
- Git directory or repository - It is basically where you perform all the changes that need to be made i.e. perform commits to branch, checkout branch, make changes etc.
4. Install Git: Installation in Windows/Linux/Mac OS X
Install Git on Windows -
- Download the latest version of Git from here.
- After starting the installer, follow the command on the screen and press Next to complete the installation.
- Open Command Prompt and run the following command to configure Git on your PC using your username and email.
$ git config --global user.name "username"
$ git config --global user.email "user_emails@interviewbit.com"
This configures Git on your PC with your username and email.
Install Git on Linux -
- You can install Git on Linux using the command apt-get :
$ sudo apt-get update
$ sudo apt-get install git- Configure your username and email using the following command:
$ git config --global user.name "user_name"
$ git config --global user.email "user_email@interviewbit.com"
Install Git on Mac OS -
- Download the latest version of Git from here.
- Open the installer and follow the instructions.
- Now since Git is installed, open command line and configure your username and user email.
$ git config --global user.name "user_name"
$ git config --global user.email "user_email@interviewbit.com"
5. Git Clone
git clone is a command which is used to clone or copy a target repository.
The following image shows an illustration of the git clone command. Using the command, a copy of the original repository is created.

How to clone a repository?
- Open Github and navigate to the target repository which needs to be cloned.
- Under the repo name, click on the tab Clone or Download.
- An option named Clone with HTTPS appears.
- Copy the Clone URL.
- Open a command line and use the command: git clone <repo_URL>
In this way, a clone of the target repository can be made.
Clone a specific branch from the repository.
A very useful feature of the git clone is that it allows cloning a specific branch of the target repository without having to clone the entire repository.
To clone a specific branch, you need to use the command -b to specify the branch. The following command is used:
git clone -b <Branch_name> <Repo_URL>6. Git Branch
- A branch in Git is used to keep your changes until they are ready.
- You can do your work on a branch while the main branch(main) remains stable. After you are done with your work, you can merge it to the main branch.
For creating a new branch, the following command is used :
git branch <branch_name>For example -
git branch demoThis command creates a new branch named demo from the Main branch:

- The diagram shows there is the main branch.
- There are two more branches small feature and large feature working separately.
- Once the work is complete for the two separate branches, you can merge it into the main branch.
7. Git Switch Branch
Using the git checkout command, we can switch from one branch to another.
Command :
git checkout <branch_name>8. Create Remote Branches
Git doesn’t allow creating a new and isolated branch on a remote repository. But, you to make a branch remote, we can push an existing local branch.
The steps to create a remote branch is as follows:
- Create a local branch and switch to that branch:
git checkout -b <branch_name>- Push in the local branch:
git push -u origin <branch_name>Note: origin is the default name of remote
Now, if someone wants to fetch some information, one can simply run:
git fetchgit checkout <branch_name>9. Delete Branches
Once the work is done on a branch and merged with the Main branch, one can delete the branch.
The following command is used to delete branches:
git delete -d <branch_name>Note: This command deletes a copy of the branch, but the original branch can still exist in remote repositories.
To delete remote branches, use the following command:
git push origin --delete <branch_name>10. Git Checkout
The Git checkout is used to command Git on which branch changes have to be made. Checkout is simply used to change branches in repositories. It can also be used to restore files.
The following image describes the scenario of creating different branches and switching to a brach when needed, i.e. we can switch from the main brach to a different branch and vice versa.

- Git Checkout Branch
To checkout or create a branch, the following command can be used:
git checkout -b <branch_name>This will simply switch to the new branch branch_name.
- Git Checkout Tag
While working on a large codebase, it because easy to have some reference point. That is where the checkout tag is used.
The following command is used to specify the tagname as well as the branch that will be checked out.
git checkout tag</tag> <branch_name>11. GIT Status
git status is mainly used to display the state of the staging area and the repository. It helps us to track all the changes made, point out untracked files.
Command:
git statusgit status after a file is added
- Add files to the repo using the following command:
touch file.txt- Execute git status.
- A message would be displayed, describing the changes done to the repository.
git status after a file is deleted after commit
- Delete the file using the following command:
git rm file.txt- Execute
git status. - A message would be displayed, describing the file has been deleted.
12. Git Commit
Git commit is used to record all the changes in the repository. The git commit will commit all the changes and make a commit-id for the same for tracking down the changes made as shown in the image below.
As shown in the image, the command git commit creates a commit-id to track down changes and commits all the changes to the git repository.

Command:
git commit- git commit -m
The -m along with the command lets us write the commit message on the command line.
Command:
git commit -m "Commit message"- git commit -am
The -am along with the command is to write the commit message on the command line for already staged files.
Command:
git commit -am "Commit message"- git commit -amend
The amend is used to edit the last commit. In case we need to change the last committed message, this command can be used.
Command:
git commit -amend- git rm
rm stands for remove. It is used to remove a collection of files. The git rm command is used to remove or delete files from the working tree and index.
Command:
git rm <file_name>Now, if you use the command git status, it would show, that the file has been deleted.
13. Git Merge
Git merge is a command that allows you to merge branches from Git. It preserves the complete history and chronological order and maintains the context of the branch.
The following image demonstrates how we can create different features by branching from the main branch and how we can merge the newly created features after the final review to the main branch.

The command git merge is used to merge the branches.
Command :
git merge <branch_name>14. GIT Rebase
Git Rebase is a process of combining a sequence of commits to a new base commit.
- The primary reason for rebasing is to maintain a linear project history.
- When you rebase, you ‘unplug’ a branch and ‘replug’ it on the tip of another branch(usually main).
- The goal of rebasing is to take all the commits from a feature branch and put it on the main branch.
The following rebase command is used for rebasing the commits:
git rebase <branch_name>15. Git Fetch
Git Fetch only downloads the latest changes into the local repository. It downloads fresh changes that other developers have pushed to the remote repository since the last fetch and allows you to review and merge manually at a later time using Git Merge. As it doesn’t change the working directory or the staging area, it is safe to use.
The below illustration shows the working of the command git fetch. It fetches all the latest changes that have been made in the remote repository and lets us make changes accordingly.

The command used is :
git fetch <branch_name>16. Git Pull Remote Branch
You can pull in any changes that have been made from your forked remote repository to the local repository.
As shown in the below image, using the git pull command, all the changes and content can be fetched from the remote repository and can be immediately updated in the local repository to match the content.

We can simply pull a remote repository by using the git pull command. The syntax is as follows:
git pullThis command is equivalent to
git fetch origin headUse the following command to check if there has been any change:
git pull <RemoteName> <BranchName>If there is no change, it will show “Already up to date”. Else, it will simply merge those changes in the local repository.
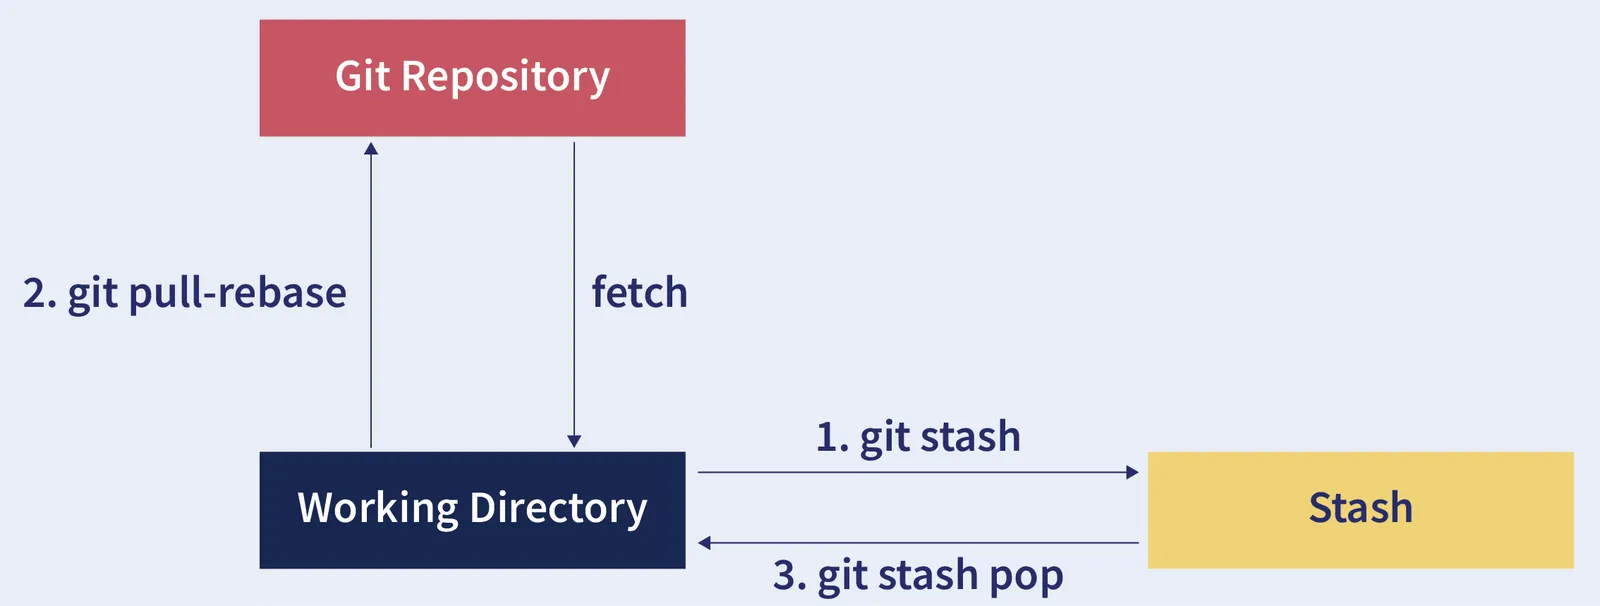
17. Git Stash
Sometimes in large codebases, there might be some cases when we do not want to commit our code, but at the same time don’t want to lose the unfinished code. This is where git stash comes into play. The git stash command is used to record the current state of the working directory and index in a stash.
It stores the unfinished code in a stash and cleans the current branch from any uncommitted changes. Now, we can work on a clean working directory.
If in the future, we again need to visit that code, we can simply use the stash and apply those changes back to the working repository.
As shown below, using the command git stash, we can temporarily stash the changes we have made on the working copy and can work on something else. Later, when needed, we can git stash pop and again start working on it.
How to stash changes in Git?
The syntax for stashing is as follows:
git stashSuppose, you are working on a website and the code is stored in a repository.
Now let's say, you have some files named design.css and design.js. Now you want to stash these files so that you can again use them later, while you work on something else.
Therefore, later you can use the git stash list command to view all the changes.
Drop Stash
In case, you no longer require a stash, you can delete it with the following command:
git stash drop <stash_id>If you want to delete all the stashes, simply use:
git stash clear18. Git-Ignore
At times, there are some files that we might want Git to ignore while commiting. For example, private files or folders containing passwords, APIs etc. These files are user-specific and hence, we can ignore these using the .gitignore.
.gitignore is generated automatically inside the project directory and ignores the files to get committed to the repositories.
How to use the .gitignore?
Follow the below steps to use add the files you want Git to ignore.
- Open your project directory on your PC.
- Create a .gitignore file inside it.
- Inside the .gitignore write the names of all the files you want Git to ignore.
- Now add the .gitignore in your repository.
Now, if you check the status of your repo, you will see, all the files which were written in the .gitignore file have been ignored.
19. Advanced Git Concepts
- git pull --rebase
Git rebase is used to rewrite commits from one branch to another branch. In order to combine unpublished local changes with the published remote changes, git pull is performed.
With git pull --rebase, the unpublished changes will be again applied on the published changes and no new commit will be added to history.
- git merge --squash
The squash along with git merge produces the working tree. It indexes in the same way as that of the real merge but discards the merge history.
Command:
git merge --squash origin/mainWhen to use git merge --squash?
- When you have merged main into your branch and resolved conflicts.
- When you need to overwrite the original commits.
- git reflog
The reflog records every change that is made in the repository. Apart from this, if some branch is lost from the repo, the recovery can be done using this command.
Command:
git reflog- git revert
Revert simply means to undo the changes. Therefore, it is an undo command in Git. Unlike traditional undo operation, the revert command does not delete any data. git revert is a commit operation, as it undo the specified commit.
Command:
git revertOptions:
- Revert commit:
This option is used to revert back a commit.
Command:
git revert <commit_id>- Edit commit message before reverting commit:
In case, we want to edit the commit message before reverting, -e is used for the same.
Command:
git revert -e <commit_id>- git bisect
Git bisect is a git tool used for debugging. Suppose, you have a large codebase and some commit causes a bug, but you are not sure of which commit causes it.
Git bisect goes through all the previous commits and uses binary search to find the bugged commit.
The git bisect command is used to find the bisect position as shown. It bisects (divides) your history between the good and the bad commit range. It then moves through every commit id between this range and at each snapshot it allows you to test the code.

It is applied as follows:
git bisect start- Starts the bisectgit bisect good v1.0- Mention the last working commit.git bisect bad- Mentioning that the current commit has a bug.
It will return the commit which causes the bug and one can debug the issue efficiently.
- git blame
git blame is used to know who/which commit is responsible for the latest changes in the repository. The author/commit of each line is visible through this.
Command:
git blame <file_name>This command shows the commits which are responsible for changes of all lines of code.
- git cherry-pick
Choosing a commit from one branch and applying it to another is known as cherry picking in Git. Following are the steps to cherry pick a commit:
- Visit the branch you want to apply to commit and use the following command:
git switch master- Run the following command:
git cherry-pick <commit_idGit Submodules
Submodules are a tool that allows attaching an external repository inside another repository at a specific path. It allows us to keep a git repository as a subdirectory of another git repository.
Commands:
- Add git submodule: This takes the git URL as the parameter and clones the pointer repo as a submodule. The syntax to add git submodule is:
git submodule add <URL_link>- git submodule init
git submodule init is to copy the mapping from .gitmodules file into ./.git/config file. git submodule init has extend behavior in which it accepts a list of explicit module names.
This enables a workflow of activating only specific submodules that are needed for work on the repository.
Command:
git submodule initGit Subtrees
git subtreelets you nest one repository inside another as a sub-directory. It is one of several ways Git projects can manage project dependencies.- git-subtree is a wrapper shell script to facilitate a more natural syntax. This is actually still a part of contrib and not fully integrated into git with the usual man pages.
- A subtree is just a subdirectory that can be committed to, branched from, and merged along with your project in any way you want.
Commands:
- add: Let’s assume that you have a local repository that you would like
to add an external vendor library to. In this case we will add the git-subtree repository as a subdirectory of your already existing git-extensions repository in ~/git-extensions/:
git subtree add --prefix=git-subtree --squash \<Git_repo_link>- pull : It is similar to pull from the repository with added prefix.
Command:
git subtree pull --prefix <URL_link>Git Submodules VS Subtrees
| Git Submodules | Git Subtrees |
|---|---|
| It is a link to a commit ref in another repository | Code is merged in the outer repository’s history |
| Requires the submodule to be accessible in a server (like GitHub) | Git subtree is decentralised, which basically means that its components are shared across a bunch of linked computers. |
| Git submodule is a better fit for component-based development, where your main project depends on a fixed version of another component (repo). | Git subtree is more like a system-based development, where your all repo contains everything at once, and you can modify any part. |
| Suitable for smaller repository size | Suitable for bigger repository size |
20. Git Commands
The following table shows the most commonly used Git Commands:
| S. No | Command Name | Use |
|---|---|---|
| 1 | git init | Initialise a local Git Repository |
| 2 | git add. | Add one or more files to the staging area |
| 3 | git commit -m “Commit Message” | Commit changes to the head but not to the remote repository. |
| 4 | git status | Check the status of your current repository and list the files you have changed. |
| 5 | git log | Provides a list of all commits made on a branch |
| 6 | git diff | View the changes you have made to the file |
| 7 | git push origin <branch name> | Push the branch to the remote repository so that others can use it. |
| 8 | git config --global user.name “Name” | Tell Git who you are by configuring the author name |
| 9 | git config --global user.email user@email.com | Tell Git who you are by configuring the author email id. |
| 10 | git clone <repository_name> | Creates a Git repository copy from a remote source |
| 11 | git remote add origin <server> | Connect your local repository to the remote server and add the server to be able to push it. |
| 12 | git branch <branch_name> | Create a new branch |
| 13 | git checkout <branch_name> | Switch from one branch to another |
| 14 | git merge <branch_name> | Merge the branch into the active branch |
| 15 | git rebase | Reapply commits on top of another base tip |
| 16 | git checkout -b <branch_name> | Creates a new branch and switch to it |
| 17 | git stash | Stash changes into a dirty working directory |
| 18 | git pull | Update local repository to the newest commit |
| 19 | git revert <commit_id> | Revert commit changes |
| 20 | git clean -n | Shows which files would be removed from working directory. Use the -f flag in place of the -n flag to execute the clean. |
| 21 | git log --summary | View changes (detailed) |
| 22 | git diff HEAD | Show difference between working directory and last commit. |
| 23 | git log --oneline | View changes (briefly) |
| 24 | git reflog | Show a log of changes to the local repository’s HEAD. Add --relative-date flag to show date info or --all to show all refs. |
| 25 | git rebase -i <base> | Interactively rebase current branch onto <base>. Launches editor to enter commands for how each commit will be transferred to the new base. |
| 26 | git restore --staged <file_name> | Resetting a staged file |
| 27 | git rm -r [File_name] | Remove a file (or folder) |
| 28 | git config --list | List all variables set in config file, along with their values |
| 29 | git branch -d <local_branch> | Delete local branch in Git |
| 30 | git push -d <remote_name> <branch_name> | Delete remote branch in Git |
| 31 | git stash pop | Unstash the changes |
| 32 | git commit -am | The -am along with the command is to write the commit message on the command line for already staged files. |
| 33 | git commit -ammend | The amend is used to edit the last commit. Incase we need to change the last committed message, this command can be used. |
| 34 | git rm | The git rm command is used to remove or delete files from working tree and index. |
| 35 | git pull --rebase | Git rebase is used to rewrite commits from one branch to another branch. |
| 36 | git merge --squash | The squash along with git merge produces the working tree. It indexes in the same way as that of the real merge, but discards the merge history. |
| 37 | git revert -e <commit_id> | edit the commit mesage before reverting, -e is used for the same. |
| 38 | git bisect | Git bisect goes through all the previous commit and uses binary search to find the bugged commit. |
| 39 | git blame | git blame is used to know who/which commit is responsible for the lastest changes in the repository. |
| 40 | git cherry-pick | Choosing a commit from one branch and applying it to another is known as cherry picking in Git. |
Conclusion
So, we learnt how Git makes managing large software codebases easier, how you can commit changes, clone the repository, how branches work and many git commands that reduce the burden from the lives of developers.
#git #github
