In this tutorial, we will be learning how to create a simple Twitter bot that automatically tweets a response to a user when they follow the account.
We will write the bot in JavaScript using Node.js and it will be awesome!
Table of Contents
- Prerequisites
- Installing Node and NPM
- Initilizing our Project and Installing twit
- Creating a new Twitter Application
- Starting the Bot
- Streams
- Listening to Events
- Automatically Tweeting with Twit
- Running your Twitter Bot
- Conclusion
- Resources
Here’s a look at the finished bot in action:
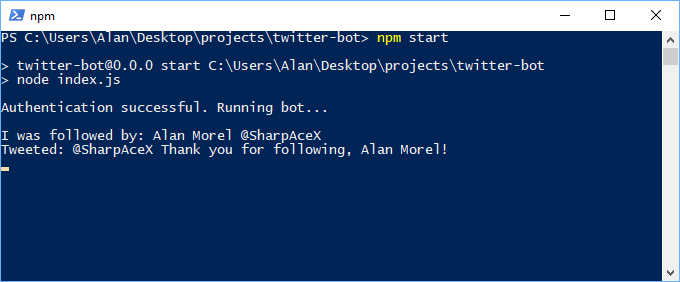 A look at the Twitter bot we will be building.
Before we dive in, let’s ensure you meet the prerequisites for this tutorial.
Prerequisites
- Since the bot is written in JavaScript, basic knowledge of JavaScript would be helpful
- A Twitter account
- A valid phone number that you can verify via SMS
If you have everything you need, let’s get the show started.
Installing Node and NPM
To install the npm module we need for our bot, we will first need Node.js, a JavaScript runtime.
- Visit the official Node.js website to get the installer.
- After it downloads, run the installer until the end.
- Restart your computer to ensure the changes can take effect.
 The Node.js installer.
The Node.js installer should have also installed NPM for you. To confirm that you have installed both properly, you’ll need to open Windows Command Prompt if you’re on Windows, or Terminal if you’re on Mac or Linux.
To check if you installed node:
node -v
To check if you installed NPM:
npm -v
If both of these commands return a version number, you’re good to go.
Initilizing our Project and Installing twitter
Create a folder to serve as the home of your bot. Inside that folder, initialize a new project by running this command:
npm init
Feel free to enter anything you’d like or nothing at all. Once that is complete, you should see a file called package.json. To simplify our interactions with the powerful Twitter API, we will be using an npm module called twit. Twit will serve as our Twitter API client and you can install it by running this command in the same folder as your files:
npm install twit --save
After that is finished, we are ready to use twit in our code. Let’s hop on Twitter!
Creating a new Twitter Application
After you are logged in to your Twitter account, ensure you have a verified phone number tied to the account. Twitter requires this to register any new applications. After your Twitter account has a verified phone number, head on over to the Twitter Application page to start creating a new Twitter application.
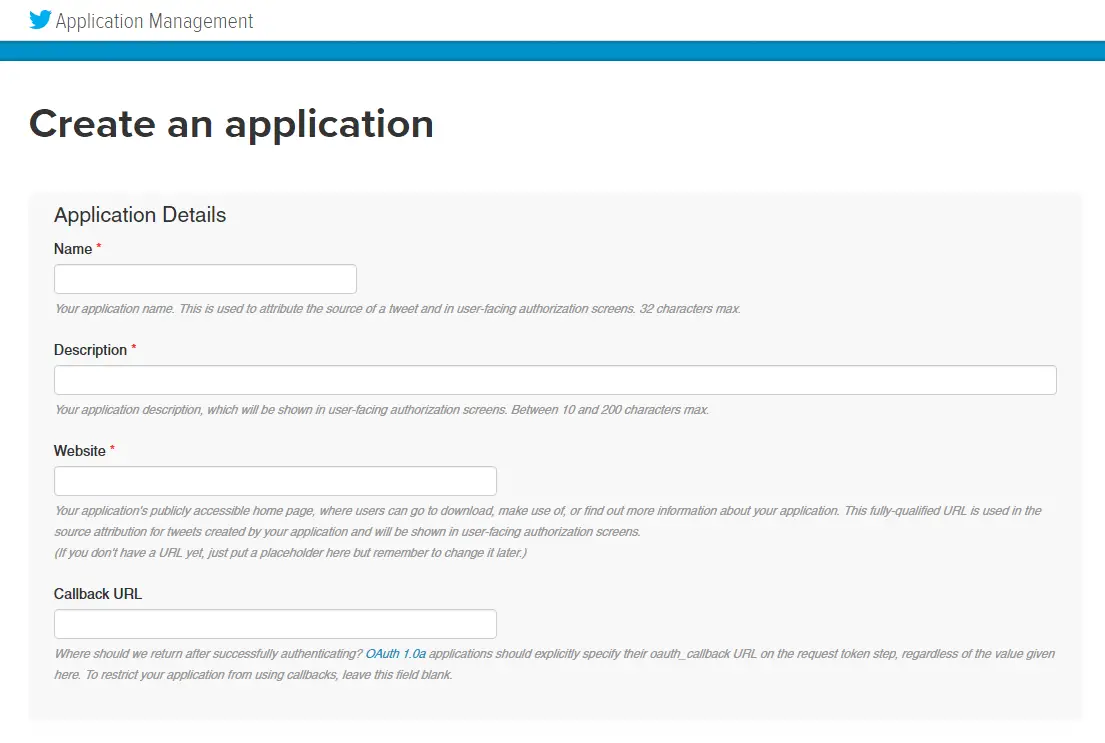 The page where you can create a new Twitter application.
Give your application a name, description, website (it can be anything really), check the checkbox, and hit “Create your Twitter Application”. Once created, head to your bot from this page and then click on the tab that says “Keys and Access Tokens”. On this page you can get the four things you need for your bot:
- Consumer Key
- Consumer Secret
- Access Token
- Access Token Secret
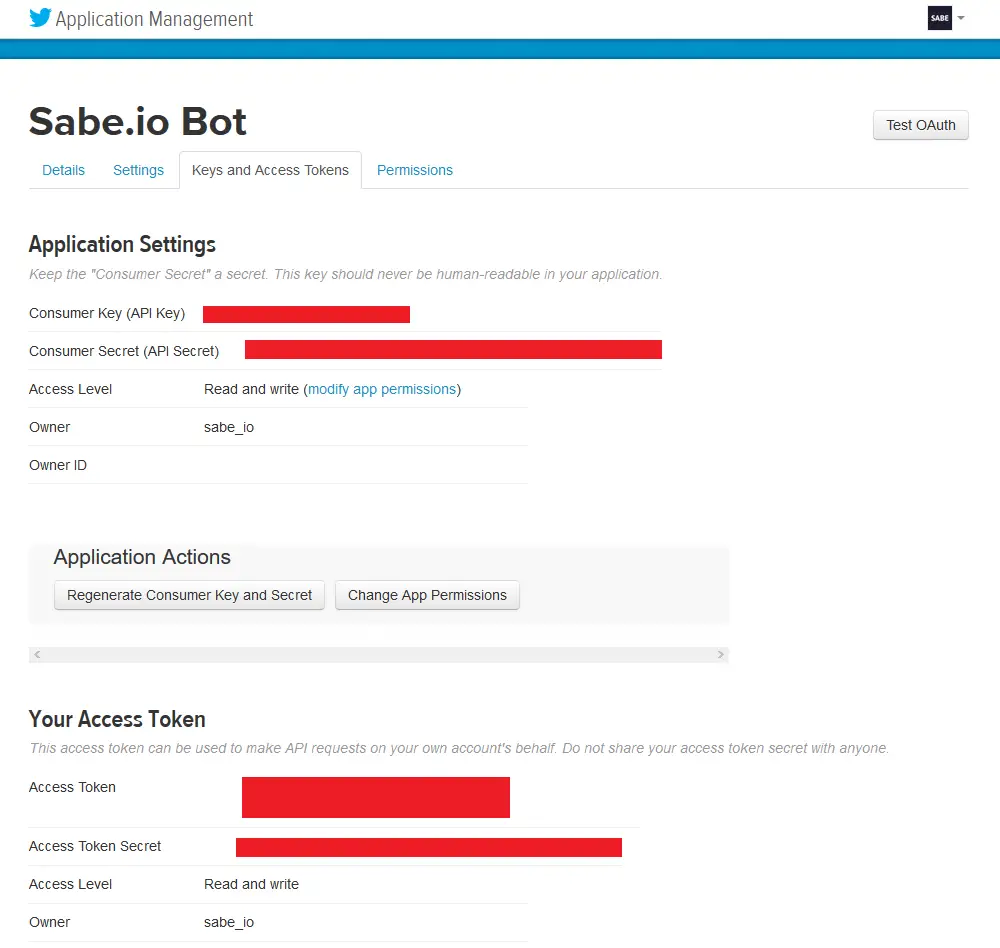 The page where can get your keys and access tokens.
With all the information you need from Twitter on-hand, we can begin coding!
Starting the Bot
Inside the same folder as your package.json, create a file called index.js and let’s set up authentication:
    var Twit = require('twit')

    var T = new Twit({
        consumer_key: '',
        consumer_secret: '',
        access_token: '',
        access_token_secret: ''
    })
Import the twit module as the variable Twit and then initialize an instance of it by calling the constructor for it and passing in the credentials you obtained earlier. Let’s test and see if Twitter recognizes this information by attempting to authenticate:
    T.get('account/verify_credentials', {
        include_entities: false,
        skip_status: true,
        include_email: false
    }, onAuthenticated)

    function onAuthenticated(err, res) {
        if (err) {
            throw err
        }

        console.log('Authentication successful. Running bot...\r\n')
    }
What this code does is take our twit instance and attempt to authenticate using it. We pass in a callback function to be called after we get a response from Twitter. If Twitter returned an error, we just throw it immediately. If not, and if our credentials are valid, we should see a success message printed.
To start the bot, run this command:
npm start
If you see:
Authentication successful. Running bot...
Then the credentials are valid and we can now authorize things like tweets, likes, and retweets.
Streams
We can establish a long-term connection to Twitter’s Streaming API by creating a stream using twit. With streams, we can let Twitter do the filtering of events for us, and then only do something when an event that we care about does occur, like, say, a follow of our account.
Creating a stream is simple, and we should do it right after we successfully authenticate:
    function onAuthenticated(err, res) {
        if (err) {
            throw err
        }

        console.log('Authentication successful. Running bot...\r\n')

        var stream = T.stream('user')
    }
That’s all you need to create a stream. We’re connecting to the user endpoint because the events we care about for this tutorial will only affect us as a user. Here are all the endpoints you could connect to:
statuses/filterstatuses/samplestatuses/firehoseusersite
They each offer different functionality so definitely read up on the Twitter documentation if you’d like to expand the functionality of your bot.
Listening to Events
For the purposes of this tutorial, the only event we want to listen for is the follow event. Remember that we want to automatically reply to the user thanking them for following our account. Let’s attach listeners:
    function onAuthenticated(err, res) {
        if (err) {
            throw err
        }

        console.log('Authentication successful. Running bot...\r\n')

        var stream = T.stream('user')

        stream.on('follow', onFollowed)
        stream.on('error', onError)
    }
After passing in the name of the event you want to listen to, you also pass in a callback function to be called when the event occurs. We also added in a listener on errors so that we can handle them if they occur.
Now let’s define those two callback functions:
    function onFollowed(event) {
        var name = event.source.name
        var screenName = event.source.screen_name
        var response = '@' + screenName + ' Thank you for following, ' + name + '!'

        // tweet response to user here

        console.log('I was followed by: ' + name + ' @' + screenName)
    }

    function onError(error) {
        throw error
    }
When a follow event occurs, it fires the onFollowed callback function. Inside it we extract the information that we know we will need which is the user’s name and screen name, or Twitter handle. From there we construct our response message which is simply a generic thank you message with their screen name and name embedded in it.
If an error occurs at any point, we simply throw the error immediately. However, you could totally handle this another way if you’d like.
At the end there, we do a simple console.log so that we can see in real-time if we were just followed in the time the bot was running. You could perhaps improve this by adding a timestamp to the log so you also know exactly when you gained a new follower, but that’s completely optional!
Now to finish this bot we must tweet a reply to the user that followed.
Automatically Tweeting with Twitter
Tweeting using twit is extremely simple. We just have to call the post method on our twit instance, tell it what we want to post (in this case, a tweet/status), pass in what we want to tweet (our response text), and then finally a callback function.
This looks like this:
    T.post('statuses/update', {
        status: response
    }, onTweeted)
If you’re curious where statuses/update comes from, the Twitter docs for it does a great job explaining it! For example, if you wanted to instead send a direct message to a user, you would instead use direct_messages/new.
Now that we have told twit to tweet out our response, we just to need to define the onTweeted callback function and our bot is complete:
    function onTweeted(err, reply) {
        if (err !== undefined) {
            console.log(err)
        } else {
            console.log('Tweeted: ' + reply.text)
        }
    }
If an error occurred, then we log it to our console, otherwise we log the exact thing we tweeted. This is useful if you decide you want to go from a static thank you message to a more dynamic one. By logging what you tweeted, you can ensure your bot is sending the messages you intend for it to send because the response is coming straight from Twitter itself.
Running your Twitter Bot
After you have saved all your files, run this command to start your bot:
npm start
As like before, if successful you should see:
Authentication successful. Running bot...
Our Twitter bot in action.
Here is the entire index.js file for our twit-powered Twitter bot:
    var Twit = require('twit')

    var T = new Twit({
        consumer_key: '',
        consumer_secret: '',
        access_token: '',
        access_token_secret: ''
    })

    T.get('account/verify_credentials', {
        include_entities: false,
        skip_status: true,
        include_email: false
    }, onAuthenticated)

    function onAuthenticated(err, res) {
        if (err) {
            throw err
        }

        console.log('Authentication successful. Running bot...\r\n')

        var stream = T.stream('user')

        stream.on('follow', onFollowed)
        stream.on('error', onError)
    }

    function onFollowed(event) {
        var name = event.source.name
        var screenName = event.source.screen_name
        var response = '@' + screenName + ' Thank you for following, ' + name + '!'

        T.post('statuses/update', {
            status: response
        }, onTweeted)

        console.log('I was followed by: ' + name + ' @' + screenName)
    }

    function onError(error) {
        throw error
    }

    function onTweeted(err, reply) {
        if (err !== undefined) {
            console.log(err)
        } else {
            console.log('Tweeted: ' + reply.text)
        }
    }
Conclusion
In this tutorial we have seen how we can use Node.js and the twit npm module to create a simple Twitter bot that automatically responds to users that follow an account. Twit is powerful and can do much more than simply tweet out, including retweeting and liking other tweets. For more information, check out their docs and see how you can take this simple bot and make something more advanced and intricate.
We hope this tutorial has been helpful to you.
#node-js #javascript