Configure Multi-Camera for Video Recording in iOS App
Apple announced a new version of OS (iOS13), updates (for instance Siri;'s Voice Experiences), and new technologies and features during the Apple Worldwide Developers Conference (WWDC), 2019. After getting a few queries from our clients about configuring dual recording in their iPhone apps, we decided to write this blog. It is a complete tutorial on how to configure this feature seamlessly.
What You Will Learn
In this tutorial, we have explained how to configure a dual camera for video recording in an iPhone app.
It’s been a little while since WWDC in June. Just like every year, Apple released a lot of exciting features. Let’s check some of the newest features in iOS13 out:
-
Dark Mode
-
Camera Capture.
-
Swipe Keyboard.
-
Revamped Reminder App.
-
ARKit 3.
-
Siri (Voice Experiences. Shortcuts app).
-
Sign In with Apple.
-
Multiple UI Instances.
-
Camera Capture.
-
Combine framework.
-
Core Data - Sync Core Data to Cloud kit.
-
Background Tasks.
In this iOS tutorial, we will be talking about the Camera Capture functionality, where we have used AVMultiCamPiP to capture and record from multiple cameras (front and back).
Multi-Camera Recording Using Camera Capture
Before iOS 13, Apple did not allow users to record videos using the front and back cameras simultaneously. Now, users can perform dual camera recording using both cameras at the same time. This is done with Camera Capture
PiP in AVMultiCamPiP stands for ‘Picture in Picture.’ This functionality helps to view the video output in full screen for the recording from one side of the device and as the small screen for the recording from the other side of the device. At any time in between, the user can change the focus.
Let’s see the step by step guide to configure this feature.
Steps to configure the multi-camera recording feature in an iOS app
Step 1
Create a new project in XCode 11.
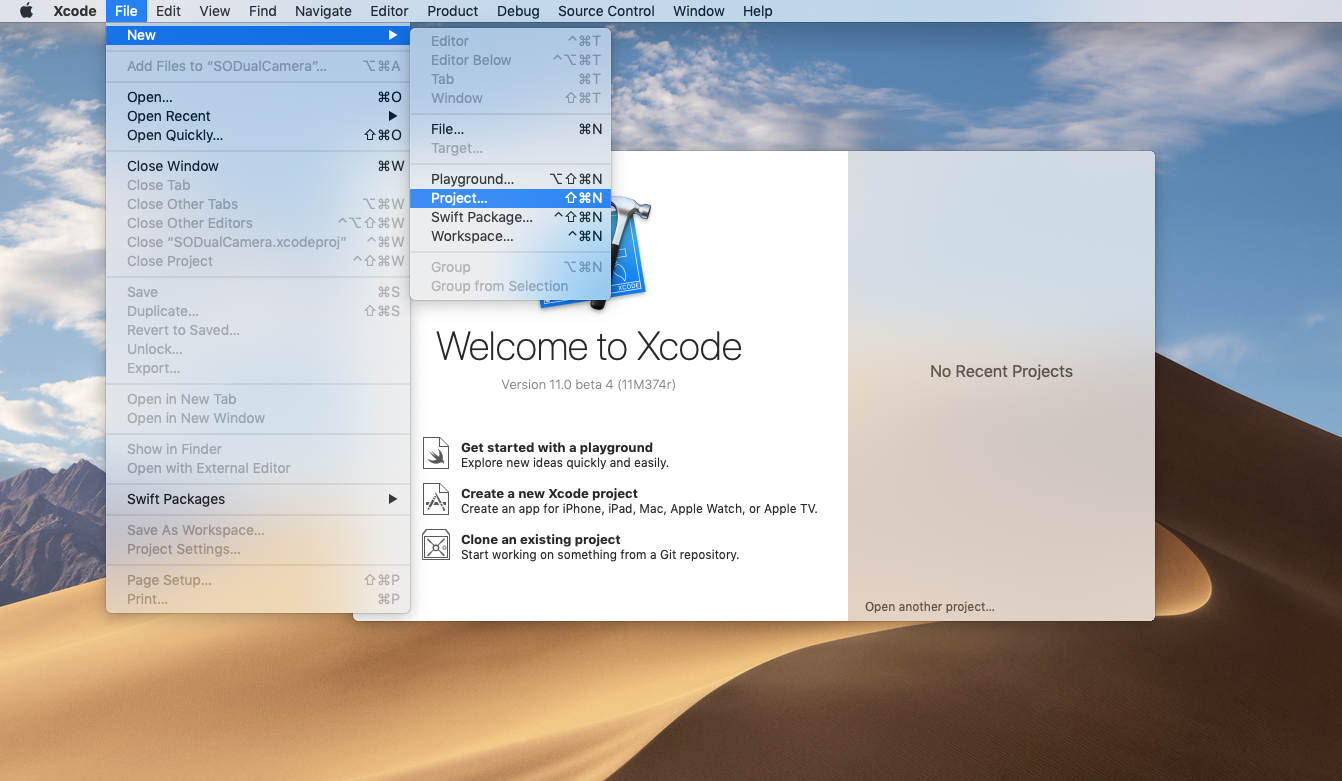
Creating a new project in XCode 11
Step 2
Select “Single View App” in the iOS section and enter the project name. We have kept it as “SODualCamera.”
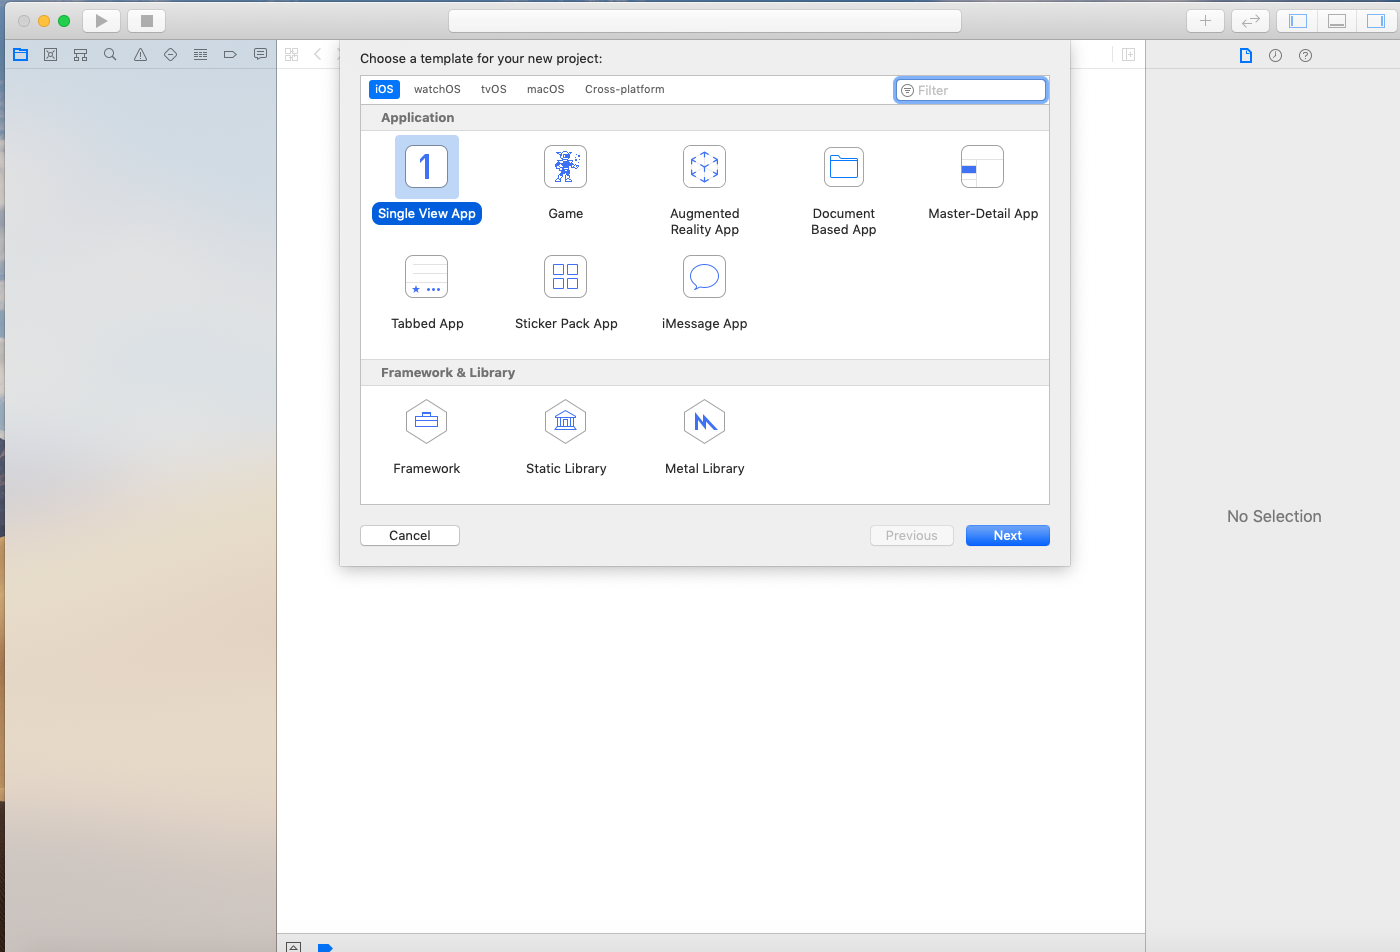
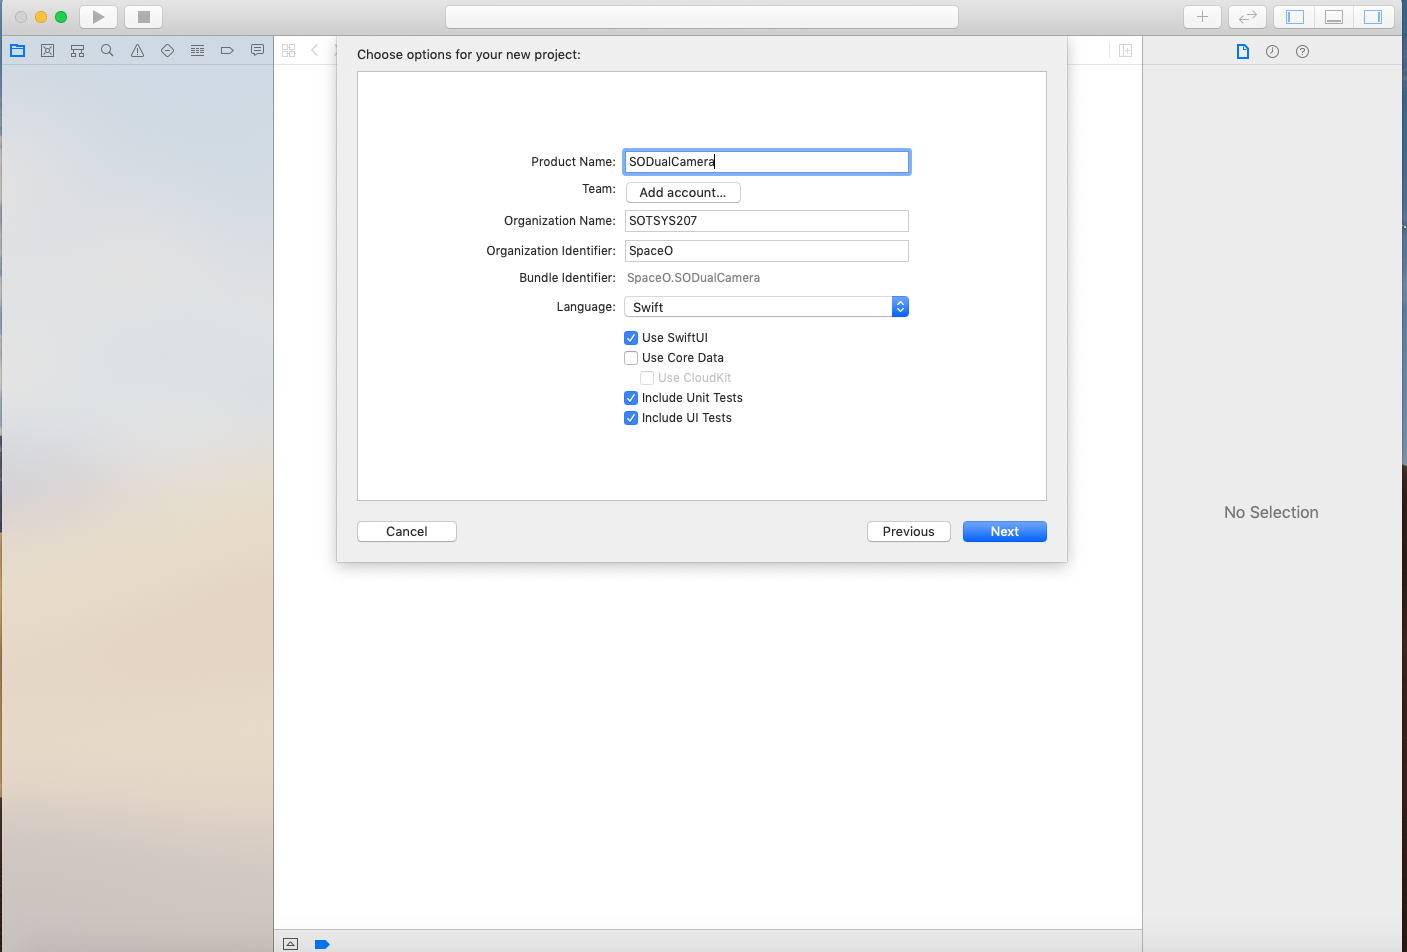
Single View Application Type
Step 3
Go to your Project Name folder and open the Main.storyboard file. Add a Stackview as shown in the figure. In the StackView, add two UIViews with labels inside each of them.
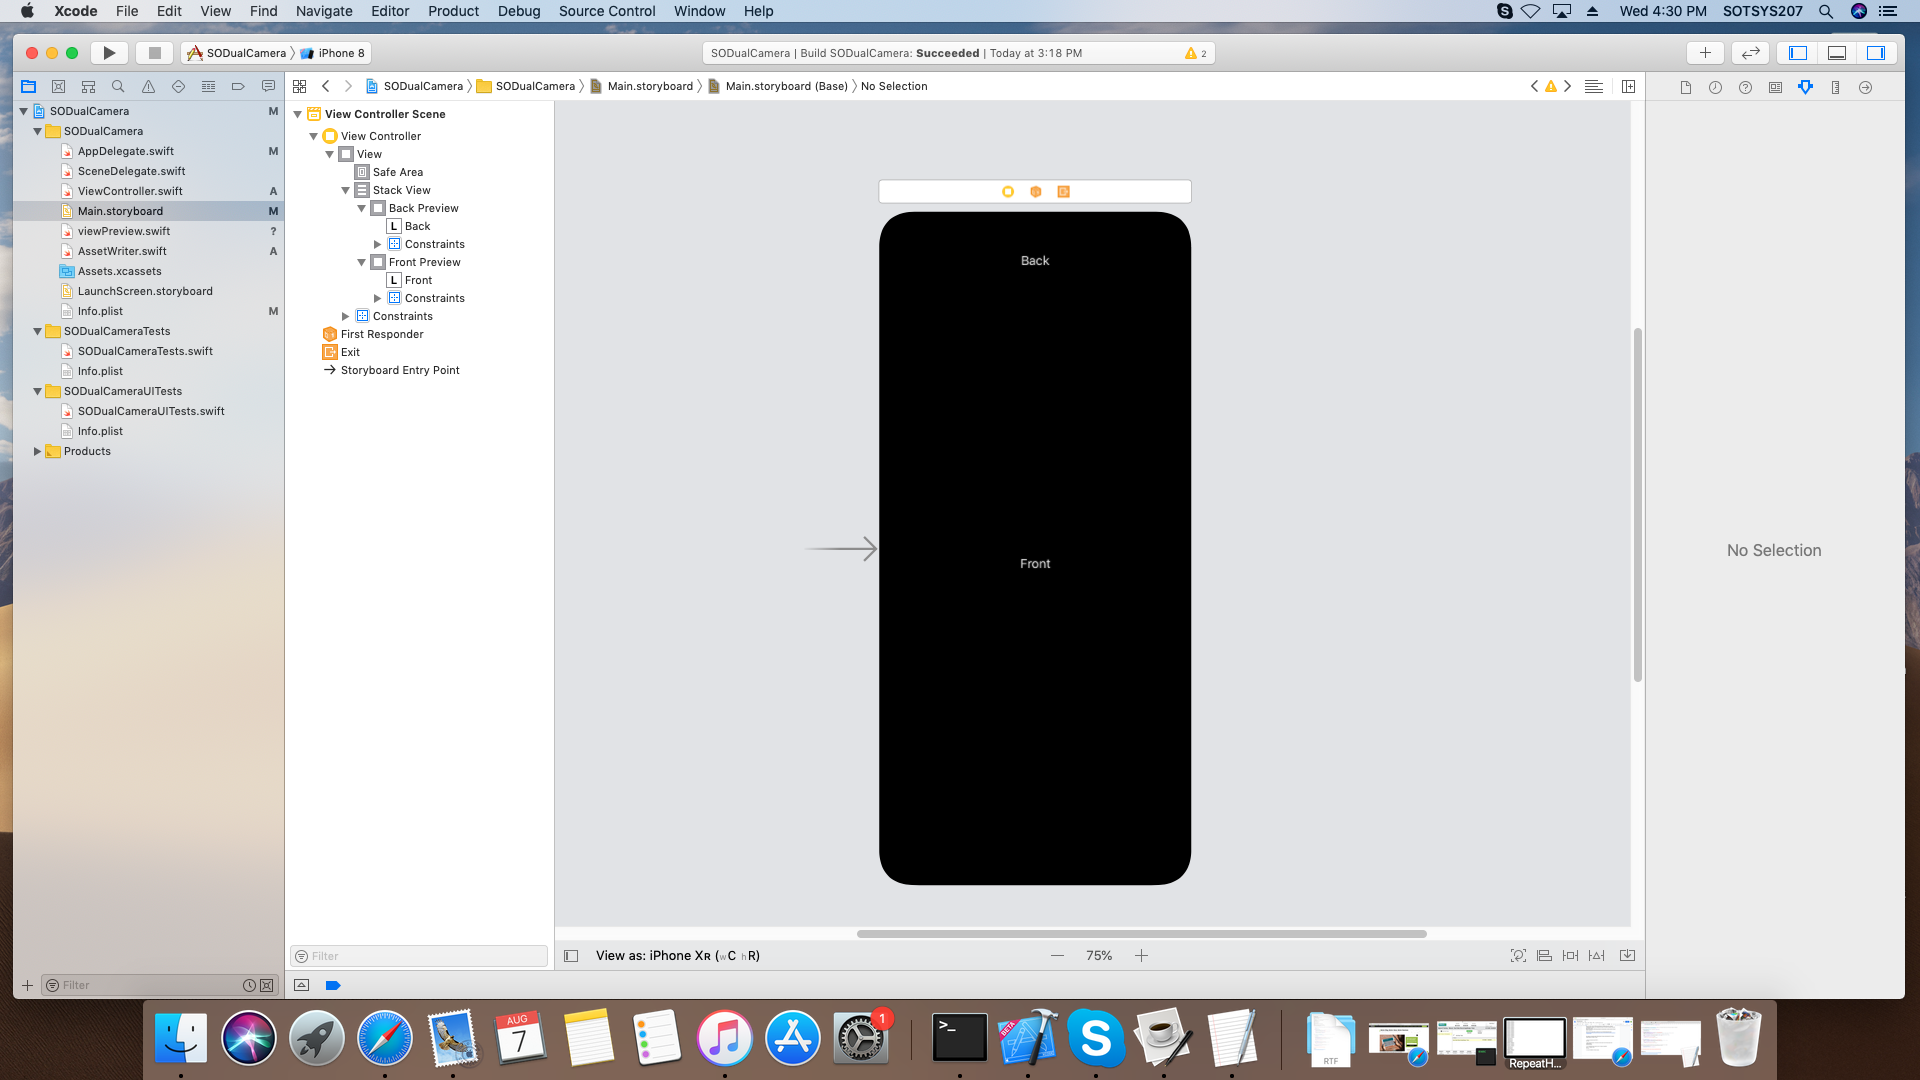
Add Stackview in Storyboard
Step 4
Go to Xcode File Menu and select New, Select File, select Swift files, as shown in the figure, and click the Next button.
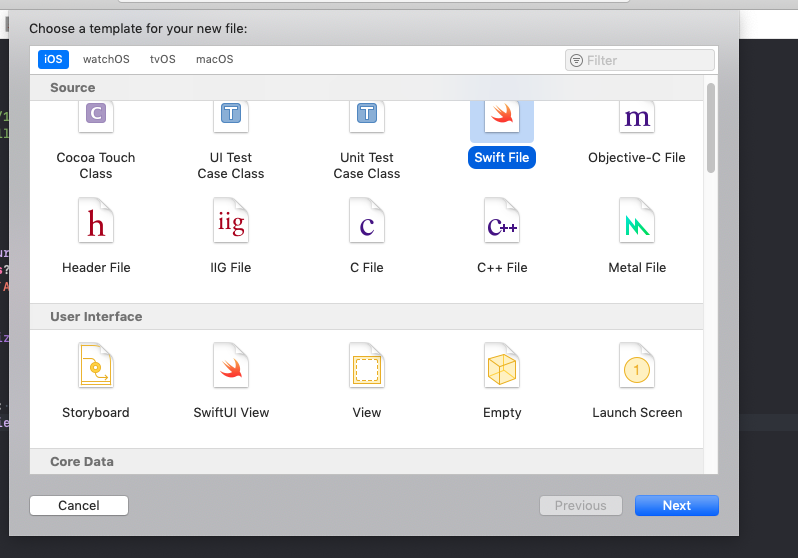
Choose Swift Template
Step 5
Now, enter the file name as ViewPreview.swift.
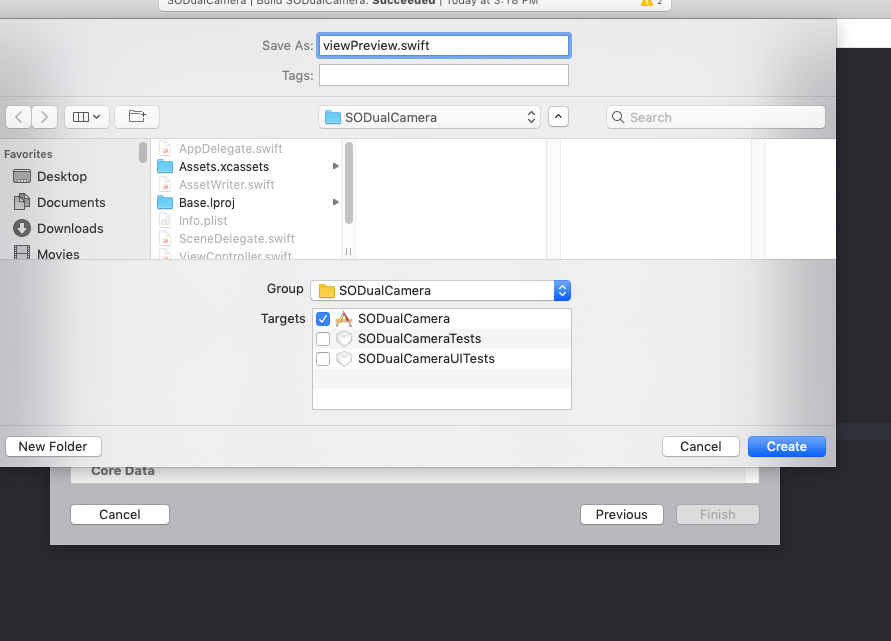
Save as ViewPreview
Step 6
Now, open ViewPreview.swift and add code as shown below
import AVFoundation

class ViewPreview: UIView {
	varvideoPreviewLayer: AVCaptureVideoPreviewLayer {

		guardlet layer = layeras? AVCaptureVideoPreviewLayer else {
			fatalError("Expected `AVCaptureVideoPreviewLayer` type for layer. Check PreviewView.layerClass implementation.")
		}

		layer.videoGravity = .resizeAspect

		return layer

	}

	overrideclassvarlayerClass: AnyClass {

		return AVCaptureVideoPreviewLayer.self
	}
}
Step 7
Go to Main.storyboard and select StackView. Under StackView, select UIView, and add custom class, ViewPreview, as shown in figure below
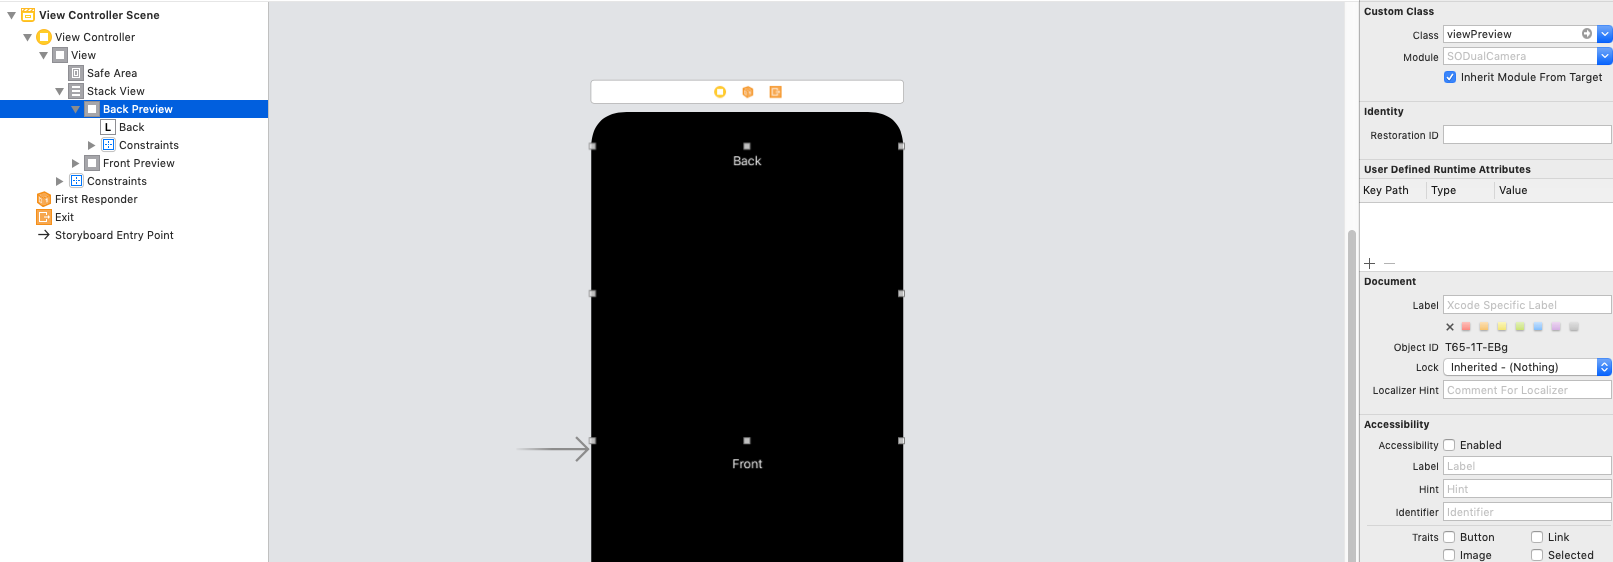
Add custom class, ViewPreview
Repeat the same process for the second view.
Step 8
Create outlets for both views. We are going to use this view as a preview of camera output.
@IBOutletweakvarbackPreview: ViewPreview!

@IBOutletweakvarfrontPreview: ViewPreview!
Step 9
As we are aiming to capture video, we need to import the AVFoundation Framework. We are saving output video to the user’s photo library; we also need to import the Photos framework in ViewController.swift.
import AVFoundation

import Photos
Step 10
Declare a variable to perform dual video session.
vardualVideoSession = AVCaptureMultiCamSession()
Step 11
Create an object of AVCaptureMultiCamSession to execute camera session.
varaudioDeviceInput: AVCaptureDeviceInput?
Step 12
For audio device input to record audio while running dual video session, you need to declare the following variables:
varbackDeviceInput:AVCaptureDeviceInput?

varbackVideoDataOutput = AVCaptureVideoDataOutput()

varbackViewLayer:AVCaptureVideoPreviewLayer?

varbackAudioDataOutput = AVCaptureAudioDataOutput()

varfrontDeviceInput:AVCaptureDeviceInput?

varfrontVideoDataOutput = AVCaptureVideoDataOutput()

varfrontViewLayer:AVCaptureVideoPreviewLayer?

varfrontAudioDataOutput = AVCaptureAudioDataOutput()
Step 13
In ViewDidAppear add the following code to detect if the app is running on Simulator.
overridefuncviewDidAppear(_ animated: Bool) {

super.viewDidAppear(animated)

#if targetEnvironment(simulator)

let alertController = UIAlertController(title: "SODualCamera", message: "Please run on physical device", preferredStyle: .alert)

alertController.addAction(UIAlertAction(title: "OK",style: .cancel, handler: nil))

self.present(alertController, animated: true, completion: nil)

return

#endif

}
Step 14
Create a Setup method to configure the video sessions and also manage user permission. If app is running on Simulator then return immediately.
#if targetEnvironment(simulator)

return

#endif
Step 15
Now, check for video recording permission using this code:
switchAVCaptureDevice.authorizationStatus(for: .video) {

case .authorized:

// The user has previously granted access to the camera.

configureDualVideo()

break


case .notDetermined:


AVCaptureDevice.requestAccess(for: .video, completionHandler: { granted in

if granted{

self.configureDualVideo()

}

})

break


default:

// The user has previously denied access.

DispatchQueue.main.async {

let changePrivacySetting = "Device doesn't have permission to use the camera, please change privacy settings"

let message = NSLocalizedString(changePrivacySetting, comment: "Alert message when the user has denied access to the camera")

let alertController = UIAlertController(title: "Error", message: message, preferredStyle: .alert)


alertController.addAction(UIAlertAction(title: "OK", style: .cancel, handler: nil))

alertController.addAction(UIAlertAction(title: "Settings", style: .`default`,handler: { _in

iflet settingsURL = URL(string: UIApplication.openSettingsURLString) {

UIApplication.shared.open(settingsURL, options: [:], completionHandler: nil)

}

}))


self.present(alertController, animated: true, completion: nil)

}

}
Step 16
After getting the user permission to record video, we configure the video session parameters. First, we need to check whether the device supports MultiCam session.
if!AVCaptureMultiCamSession.isMultiCamSupported{

DispatchQueue.main.async {

let alertController = UIAlertController(title: "Error", message: "Device is not supporting multicam feature", preferredStyle: .alert)

alertController.addAction(UIAlertAction(title: "OK",style: .cancel, handler: nil))

self.present(alertController, animated: true, completion: nil)

}

return

}
Step 17
Now, we set up the front camera first.
func setUpBackCamera() -> Bool{

//start configuring dual video session

dualVideoSession.beginConfiguration()

defer {

//save configuration setting

dualVideoSession.commitConfiguration()

}

//search back camera

guardlet backCamera = AVCaptureDevice.default(.builtInWideAngleCamera, for: .video, position: .back) else {

print("no back camera")

returnfalse

}

// append back camera input to dual video session

do {

backDeviceInput = tryAVCaptureDeviceInput(device: backCamera)

guardlet backInput = backDeviceInput,dualVideoSession.canAddInput(backInput) else {

print("no back camera device input")

returnfalse

}

dualVideoSession.addInputWithNoConnections(backInput)

} catch {

print("no back camera device input: \(error)")

returnfalse

}

// seach back video port

guardlet backDeviceInput = backDeviceInput,

let backVideoPort = backDeviceInput.ports(for: .video, sourceDeviceType: backCamera.deviceType, sourceDevicePosition: backCamera.position).firstelse {

print("no back camera input's video port")

returnfalse

}

// append back video output

guard dualVideoSession.canAddOutput(backVideoDataOutput) else {

print("no back camera output")

returnfalse

}

dualVideoSession.addOutputWithNoConnections(backVideoDataOutput)

backVideoDataOutput.videoSettings = [kCVPixelBufferPixelFormatTypeKey asString: Int(kCVPixelFormatType_32BGRA)]

backVideoDataOutput.setSampleBufferDelegate(self, queue: dualVideoSessionOutputQueue)

// connect back output to dual video connection

let backOutputConnection = AVCaptureConnection(inputPorts: [backVideoPort], output: backVideoDataOutput)

guard dualVideoSession.canAddConnection(backOutputConnection) else {

print("no connection to the back camera video data output")

returnfalse

}

dualVideoSession.addConnection(backOutputConnection)

backOutputConnection.videoOrientation = .portrait

// connect back input to back layer

guardlet backLayer = backViewLayer else {

returnfalse

}

let backConnection = AVCaptureConnection(inputPort: backVideoPort, videoPreviewLayer: backLayer)

guard dualVideoSession.canAddConnection(backConnection) else {

print("no a connection to the back camera video preview layer")

returnfalse

}

dualVideoSession.addConnection(backConnection)

returntrue

}
We have now successfully configured the front camera for a video session. Now, let’s follow the process to configure the back camera.
Step 18
We need to follow the same process for the back camera setup.
func setUpBackCamera() -> Bool{

//start configuring dual video session

dualVideoSession.beginConfiguration()

defer {

//save configuration setting

dualVideoSession.commitConfiguration()

}

//search back camera

guardlet backCamera = AVCaptureDevice.default(.builtInWideAngleCamera, for: .video, position: .back) else {

print("no back camera")

returnfalse

}

// append back camera input to dual video session

do {

backDeviceInput = tryAVCaptureDeviceInput(device: backCamera)

guardlet backInput = backDeviceInput,dualVideoSession.canAddInput(backInput) else {

print("no back camera device input")

returnfalse

}

dualVideoSession.addInputWithNoConnections(backInput)

} catch {

print("no back camera device input: \(error)")

returnfalse

}

// search back video port

guardlet backDeviceInput = backDeviceInput,

let backVideoPort = backDeviceInput.ports(for: .video, sourceDeviceType: backCamera.deviceType, sourceDevicePosition: backCamera.position).firstelse {

print("no back camera input's video port")

returnfalse

}

// append back video output

guard dualVideoSession.canAddOutput(backVideoDataOutput) else {

print("no back camera output")

returnfalse

}

dualVideoSession.addOutputWithNoConnections(backVideoDataOutput)

backVideoDataOutput.videoSettings = [kCVPixelBufferPixelFormatTypeKey asString: Int(kCVPixelFormatType_32BGRA)]

backVideoDataOutput.setSampleBufferDelegate(self, queue: dualVideoSessionOutputQueue)

// connect back output to dual video connection

let backOutputConnection = AVCaptureConnection(inputPorts: [backVideoPort], output: backVideoDataOutput)

guarddualVideoSession.canAddConnection(backOutputConnection) else {

print("no connection to the back camera video data output")

returnfalse

}

dualVideoSession.addConnection(backOutputConnection)

backOutputConnection.videoOrientation = .portrait

// connect back input to back layer

guardlet backLayer = backViewLayerelse {

returnfalse

}

let backConnection = AVCaptureConnection(inputPort: backVideoPort, videoPreviewLayer: backLayer)

guarddualVideoSession.canAddConnection(backConnection) else {

print("no connection to the back camera video preview layer")

returnfalse

}

dualVideoSession.addConnection(backConnection)

returntrue

}

func setUpFrontCamera() -> Bool{

//start configuring dual video session

dualVideoSession.beginConfiguration()

defer {

//save configuration setting

dualVideoSession.commitConfiguration()

}

//search front camera for dual video session

guardlet frontCamera = AVCaptureDevice.default(.builtInWideAngleCamera, for: .video, position: .front) else {

print("no front camera")

returnfalse

}

// append front camera input to dual video session

do {

frontDeviceInput = tryAVCaptureDeviceInput(device: frontCamera)

guardlet frontInput = frontDeviceInput, dualVideoSession.canAddInput(frontInput) else {

print("no front camera input")

returnfalse

}

dualVideoSession.addInputWithNoConnections(frontInput)

} catch {

print("no front input: \(error)")

returnfalse

}

// search front video port for dual video session

guardlet frontDeviceInput = frontDeviceInput,

let frontVideoPort = frontDeviceInput.ports(for: .video, sourceDeviceType: frontCamera.deviceType, sourceDevicePosition: frontCamera.position).firstelse {

print("no front camera device input's video port")

returnfalse

}

// append front video output to dual video session

guard dualVideoSession.canAddOutput(frontVideoDataOutput) else {

print("no the front camera video output")

returnfalse

}

dualVideoSession.addOutputWithNoConnections(frontVideoDataOutput)

frontVideoDataOutput.videoSettings = [kCVPixelBufferPixelFormatTypeKey asString: Int(kCVPixelFormatType_32BGRA)]

frontVideoDataOutput.setSampleBufferDelegate(self, queue: dualVideoSessionOutputQueue)

// connect front output to dual video session

let frontOutputConnection = AVCaptureConnection(inputPorts: [frontVideoPort], output: frontVideoDataOutput)

guarddualVideoSession.canAddConnection(frontOutputConnection) else {

print("no connection to the front video output")

returnfalse

}

dualVideoSession.addConnection(frontOutputConnection)

frontOutputConnection.videoOrientation = .portrait

frontOutputConnection.automaticallyAdjustsVideoMirroring = false

frontOutputConnection.isVideoMirrored = true

// connect front input to front layer

guardlet frontLayer = frontViewLayerelse {

returnfalse

}

let frontLayerConnection = AVCaptureConnection(inputPort: frontVideoPort, videoPreviewLayer: frontLayer)

guarddualVideoSession.canAddConnection(frontLayerConnection) else {

print("no connection to front layer")

returnfalse

}

dualVideoSession.addConnection(frontLayerConnection)

frontLayerConnection.automaticallyAdjustsVideoMirroring = false

frontLayerConnection.isVideoMirrored = true

returntrue

}
Step 19
After Setting up the front and back cameras, we need to configure for audio. First, we need to find the Audio Device Input and then add it to Session. Then, we can find the Audio port for front and back camera and add that port to the front audio output and video output respectively.
The code looks like this:
func setUpAudio() -> Bool{

//start configuring dual video session

dualVideoSession.beginConfiguration()

defer {

//save configuration setting

dualVideoSession.commitConfiguration()

}

// search audio device for dual video session

guardlet audioDevice = AVCaptureDevice.default(for: .audio) else {

print("no the microphone")

returnfalse

}

// append audio to dual video session

do {

audioDeviceInput = tryAVCaptureDeviceInput(device: audioDevice)

guardlet audioInput = audioDeviceInput,

dualVideoSession.canAddInput(audioInput) else {

print("no audio input")

returnfalse

}

dualVideoSession.addInputWithNoConnections(audioInput)

} catch {

print("no audio input: \(error)")

returnfalse

}

//search audio port back

guardlet audioInputPort = audioDeviceInput,

let backAudioPort = audioInputPort.ports(for: .audio, sourceDeviceType: audioDevice.deviceType, sourceDevicePosition: .back).firstelse {

print("no front back port")

returnfalse

}

// search audio port front

guardlet frontAudioPort = audioInputPort.ports(for: .audio, sourceDeviceType: audioDevice.deviceType, sourceDevicePosition: .front).firstelse {

print("no front audio port")

returnfalse

}

// append back output to dual video session

guard dualVideoSession.canAddOutput(backAudioDataOutput) else {

print("no back audio data output")

returnfalse

}

dualVideoSession.addOutputWithNoConnections(backAudioDataOutput)

backAudioDataOutput.setSampleBufferDelegate(self, queue: dualVideoSessionOutputQueue)

// append front output to dual video session

guard dualVideoSession.canAddOutput(frontAudioDataOutput) else {

print("no front audio data output")

returnfalse

}

dualVideoSession.addOutputWithNoConnections(frontAudioDataOutput)

frontAudioDataOutput.setSampleBufferDelegate(self, queue: dualVideoSessionOutputQueue)

// add back output to dual video session

let backOutputConnection = AVCaptureConnection(inputPorts: [backAudioPort], output: backAudioDataOutput)

guarddualVideoSession.canAddConnection(backOutputConnection) else {

print("no back audio connection")

returnfalse

}

dualVideoSession.addConnection(backOutputConnection)

// add front output to dual video session

let frontutputConnection = AVCaptureConnection(inputPorts: [frontAudioPort], output: frontAudioDataOutput)

guarddualVideoSession.canAddConnection(frontutputConnection) else {

print("no front audio connection")

returnfalse

}

dualVideoSession.addConnection(frontutputConnection)

returntrue

}
Now, we have successfully configured the front and back cameras and audio.
Step 20
Now, when we start a session, our program will send output in the form of a CMSampleBuffer. We have to collect this sample buffer output and perform the required operation on it.
For this, we need to set the sample delegate method for camera and audio. We have already set up delegates for the front and back cameras and audio using the following code:
frontVideoDataOutput.setSampleBufferDelegate(self, queue: dualVideoSessionOutputQueue)

backVideoDataOutput.setSampleBufferDelegate(self, queue: dualVideoSessionOutputQueue)

backAudioDataOutput.setSampleBufferDelegate(self, queue: dualVideoSessionOutputQueue)
Step 21
To handle runtime error for the session, we need to add an observer as follows:
NotificationCenter.default.addObserver(self, selector: #selector(sessionRuntimeError), name: .AVCaptureSessionRuntimeError,object: dualVideoSession)

NotificationCenter.default.addObserver(self, selector: #selector(sessionWasInterrupted), name: .AVCaptureSessionWasInterrupted, object: dualVideoSession)

NotificationCenter.default.addObserver(self, selector: #selector(sessionInterruptionEnded), name: .AVCaptureSessionInterruptionEnded, object: dualVideoSession)
Step 22
So, now, we are ready to launch the session. We are going to use a different queue for the session, as when we run the session on the main thread, it causes performance issues, lagging, and memory leaking.
Start the session using this code
dualVideoSessionQueue.async {

self.dualVideoSession.startRunning()

}
Step 23
Now, we will add a Gesture recognizer for starting and stopping the recording in the setup method as follows:
func addGestures(){

let tapSingle = UITapGestureRecognizer(target: self, action: #selector(self.handleSingleTap(_:)))

tapSingle.numberOfTapsRequired = 1

self.view.addGestureRecognizer(tapSingle)

let tapDouble = UITapGestureRecognizer(target: self, action: #selector(self.handleDoubleTap(_:)))

tapDouble.numberOfTapsRequired = 2

self.view.addGestureRecognizer(tapDouble)

tapSingle.require(toFail: tapDouble)

//differentiate single tap and double tap recognition if the user do both gestures simultaneously.

}
So with this step, we have successfully configured the front and back camera for recording the video in an iOS app.
In the second part of this tutorial, we will check how to capture a video using a ReplayKit Framework and a function called screenRecorder.
Thank for reading! Please share if you liked it!
#tutorial #webdev #swift #ios #xcode
