This article was originally published at https://www.blog.duomly.com/node-js-course-with-building-a-fintech-banking-app-lesson-3-user-registration-response
In the previous week, I’ve published the second lesson of the Node.js Course, where we created registration and saved new users in our database.
If you would like to be updated, feel free to go back to the lesson one and follow up or get the first lesson code from our Github.
Today I’m going to refactor the code we’ve created for user registration to create a response which our API will send as a result.
We are going to create objects where we will select the data we would like to send as the response in case of successful registration and in case of the error.
And of course, as always, we’ve got a video version for you!
Before, we will start open the code from the previous lesson to be able to write it with me.Let’s start!
1. Refactoring UserService
We will start by refactoring ouruser.service.ts file, so please open it, and let's start by refactoring the code in our if statement.
if (newUser) {
  const account = await this.accountsService.create(newUser.id);
  const accounts = [account];
  const response = {
    user: {
      id: newUser.id,
      username: newUser.Username.trim(),
      email: newUser.Email.trim(),
      accounts,
    },
    token: jwtToken,
    success: true,
  }
  return response;
}
return {
  success: false,
  message: 'Creating new user went wrong.',
}
Now, let me explain what we are doing it and why. When the user is saved to the database, API needs to send us the response, if the call was successful or not. Also, we need to get some data as a result of the successful request.
According to the safety reasons, we shouldn’t send the whole user from the database, because values like password or salt shouldn’t be accessible for others. That’s why we define the new response object, where we are passing values like user id, username, user email, accounts, and token for authentication.
If the user will be created in our database, then the object is returned. Otherwise, our API will return the error message with information that something went wrong.
In the same file, we will also change the error handling when our user email already exists.
if (exists) {
      return {
        success: false,
        message: 'This email already exists.'
      }
} else {
  ...
}
So, right now if the user will try to create the account using the same email twice, we will see the response with the message like that.
Okay, we’ve done with refactoring in the user.service.ts file and now we should jump to the accounts.service.ts file to do similar refactoring and create an object with the values we want to return.
2. Refactoring AccountsService
As I mentioned above now we will be refactoring theaccounts.service.ts file and we will be creating the object, that will be returned with the user. So, let's open the file and let's start at the bottom of our code.
if (newAccount) {
    return {
      ...account,
      id: newAccount.id,
    }
 }
And here that's all that we need to change. The next step is UserController.
3. Refactoring UserController
The next step in our refactoring is changing theuser.controller.ts file, so we will get the proper response with the proper status.
We need to import Res from '@nestjs/common' and implement it into our return statement.
import { UsersService } from './users.service';
import { Controller, Post, Body, HttpException, HttpStatus, Res } from '@nestjs/common';
import { IUser } from './interfaces/user.interface';
@Controller(‘users’)

export class UsersController {

constructor(private usersService: UsersService) { }
@Post(‘register’)

public async register(@Res() res, @Body() user: IUser): Promise<any> {

const result: any = await this.usersService.create(user);

if (!result.success) {

throw new HttpException(result.message, HttpStatus.BAD_REQUEST);

}

return res.status(HttpStatus.OK).json(result);

}

}
Great, we are ready to test our backend right now. So let’s start our backend and we will test it with Postman.
4. Testing the API
When your backend is running, please open the Postman or any similar software and we are going to make a POST call. In my case backend is working onhttp://localhost:3000 and the full endpoint is http://localhost:3000/users/register . We are going to post our params as a JSON object. Here's what I'm posting:
{
  "Username": "John",
  "Email": "john@test.com",
  "Password": "johntest"
}
And voila! We should see the following response right now!
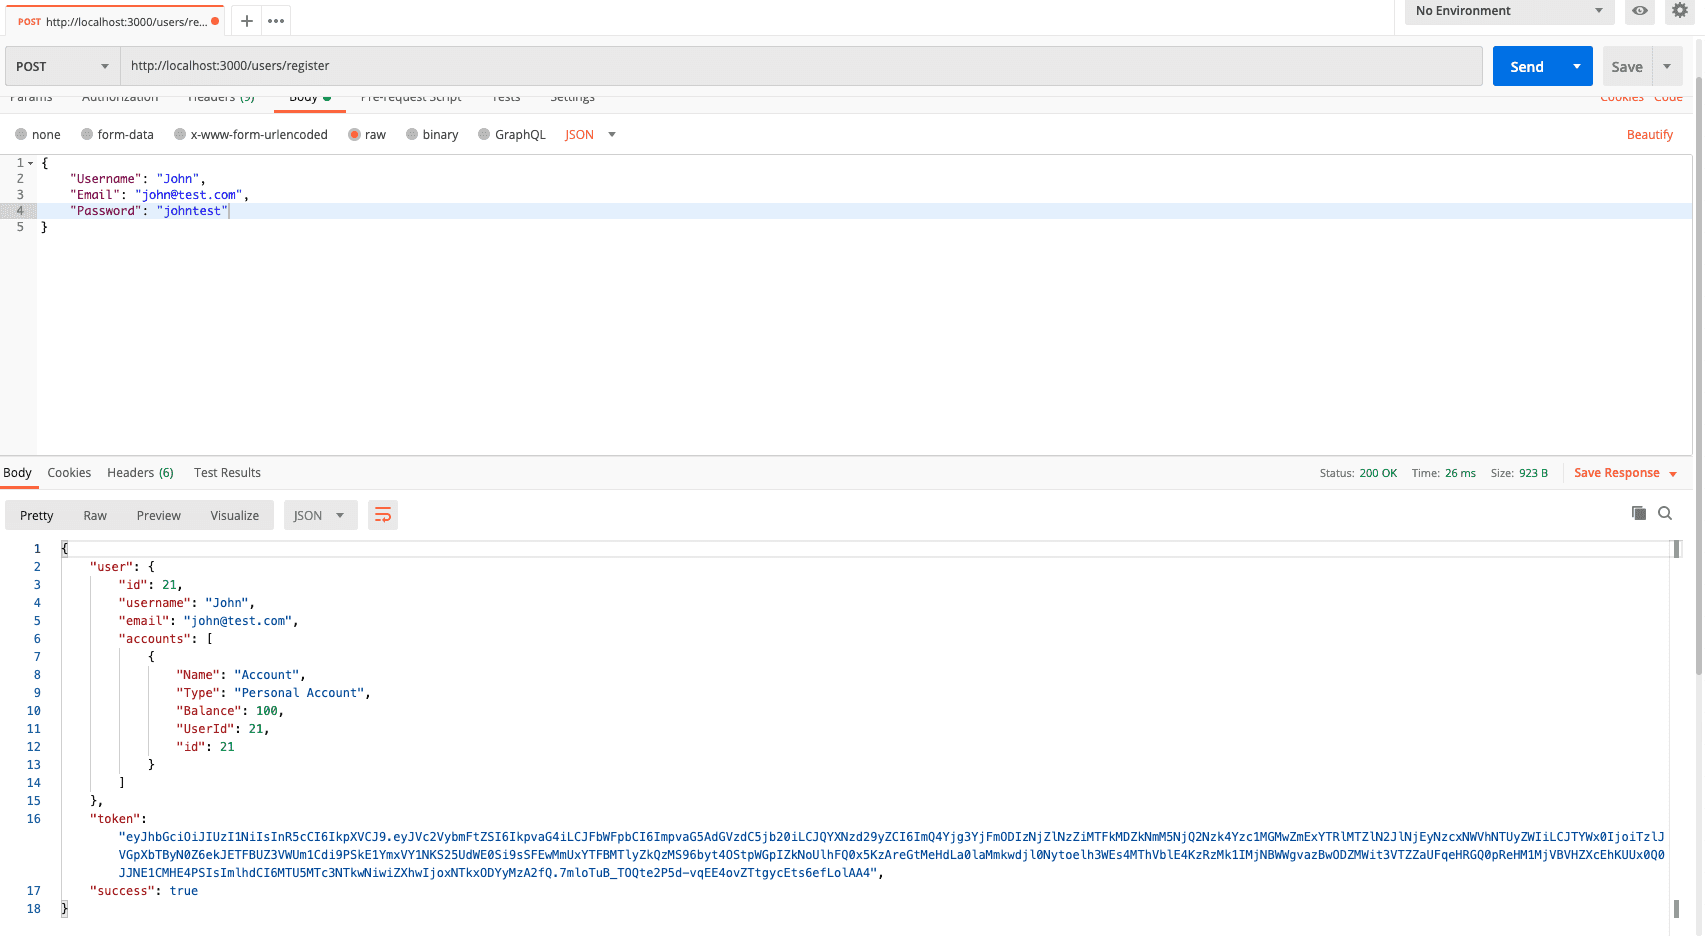
If you’ve got the response similar to the one above it seems like everything works. Also, feel free to try posting the existing email and see if you’ve got the expected message.
5. Comment the AccountsController
In the previous lesson, we've created anAccountsController where we set up the endpoint for creating a new account. But we didn't do any guard which would prevent unauthorized users by creating an account for another user. That's why we need to comment this code for now, until we will create the guard for this endpoint.
So, let’s open accounts.controller.ts file and let’s comment out the code like below.
import { AccountsService } from './accounts.service';
import { Controller, Post, Body, HttpException, HttpStatus } from '@nestjs/common';

@Controller('accounts')
export class AccountsController {
  constructor(private accountsService: AccountsService) { }

  // @Post('create-account')
  //   public async register(@Body() UserId: number): Promise<any> {
  //   const result: any = await this.accountsService.create(UserId);
  //   if (!result.success) {
  //     throw new HttpException(result.message, HttpStatus.BAD_REQUEST);
  //   }
  //   return result;
  // }
}
So, now our application is working and prepared for the next steps.
Conclusion
In the second part of our User Registration lesson of the Node.js Course we've created the right response from our API, so now the registration is fully functional.I’ve also taken care of handling errors and sending the right message, and also we’ve commented on the code that is not safe right now.
In the next lessons, we will go through login, user authentication, and guards.
If you didn’t manage to get the code properly, take a look at our Github where you can find the code for the Node.js Course.
Thank you for reading,
Anna from Duomly
#node #web-development #nestjs #rest #typescript