This article provides an introduction to GitHub Actions, which is GitHub’s native CI/CD and automation system.
The article first explains the basic concepts of GitHub Actions, such as workflows, jobs, and steps, and then presents several simple example workflows to get you started quickly. You can run all of these workflows in your own repository.
Contents
- What is GitHub Actions?
- Basic concepts
- Important references
- Example workflow 1 — Hello World!
- Example workflow 2 — Issue Greeter
- Example workflow 3 — Release Asset Creator
- Conclusion
What is GitHub Actions?
GitHub Actions is a CI/CD and general automation system introduced by GitHub in 2018. It is integrated right into GitHub and enabled by default in every GitHub repository. GitHub Actions is completely free of charge.
With GitHub Actions, you can do similar things as with tools such as Jenkins, Travis CI, Circle CI, Drone CI, Bamboo, TeamCity, or AppVeyor. However, in contrast to these tools, GitHub Actions runs directly on GitHub, which means that your CI/CD and automation logic lives at the same place where your code lives. This has several advantages:
- You don’t need to sign up for a separate CI/CD service (e.g. Travis CI, Circle CI, Drone CI, AppVeyor).
- You don’t need to install and manage your own CI/CD service (e.g. Jenkins, Bamboo, TeamCity).
- You don’t need to set up webhooks and access tokens for connecting your CI/CD service to GitHub — because GitHub Actions is already in GitHub!
All these advantages make it worthwhile to have a look at what GitHub Actions has to offer and how to use it. This is what this article is about!
Basic concepts
Let’s start with the basics. Here’s an overview of the most important concepts of GitHub Actions:
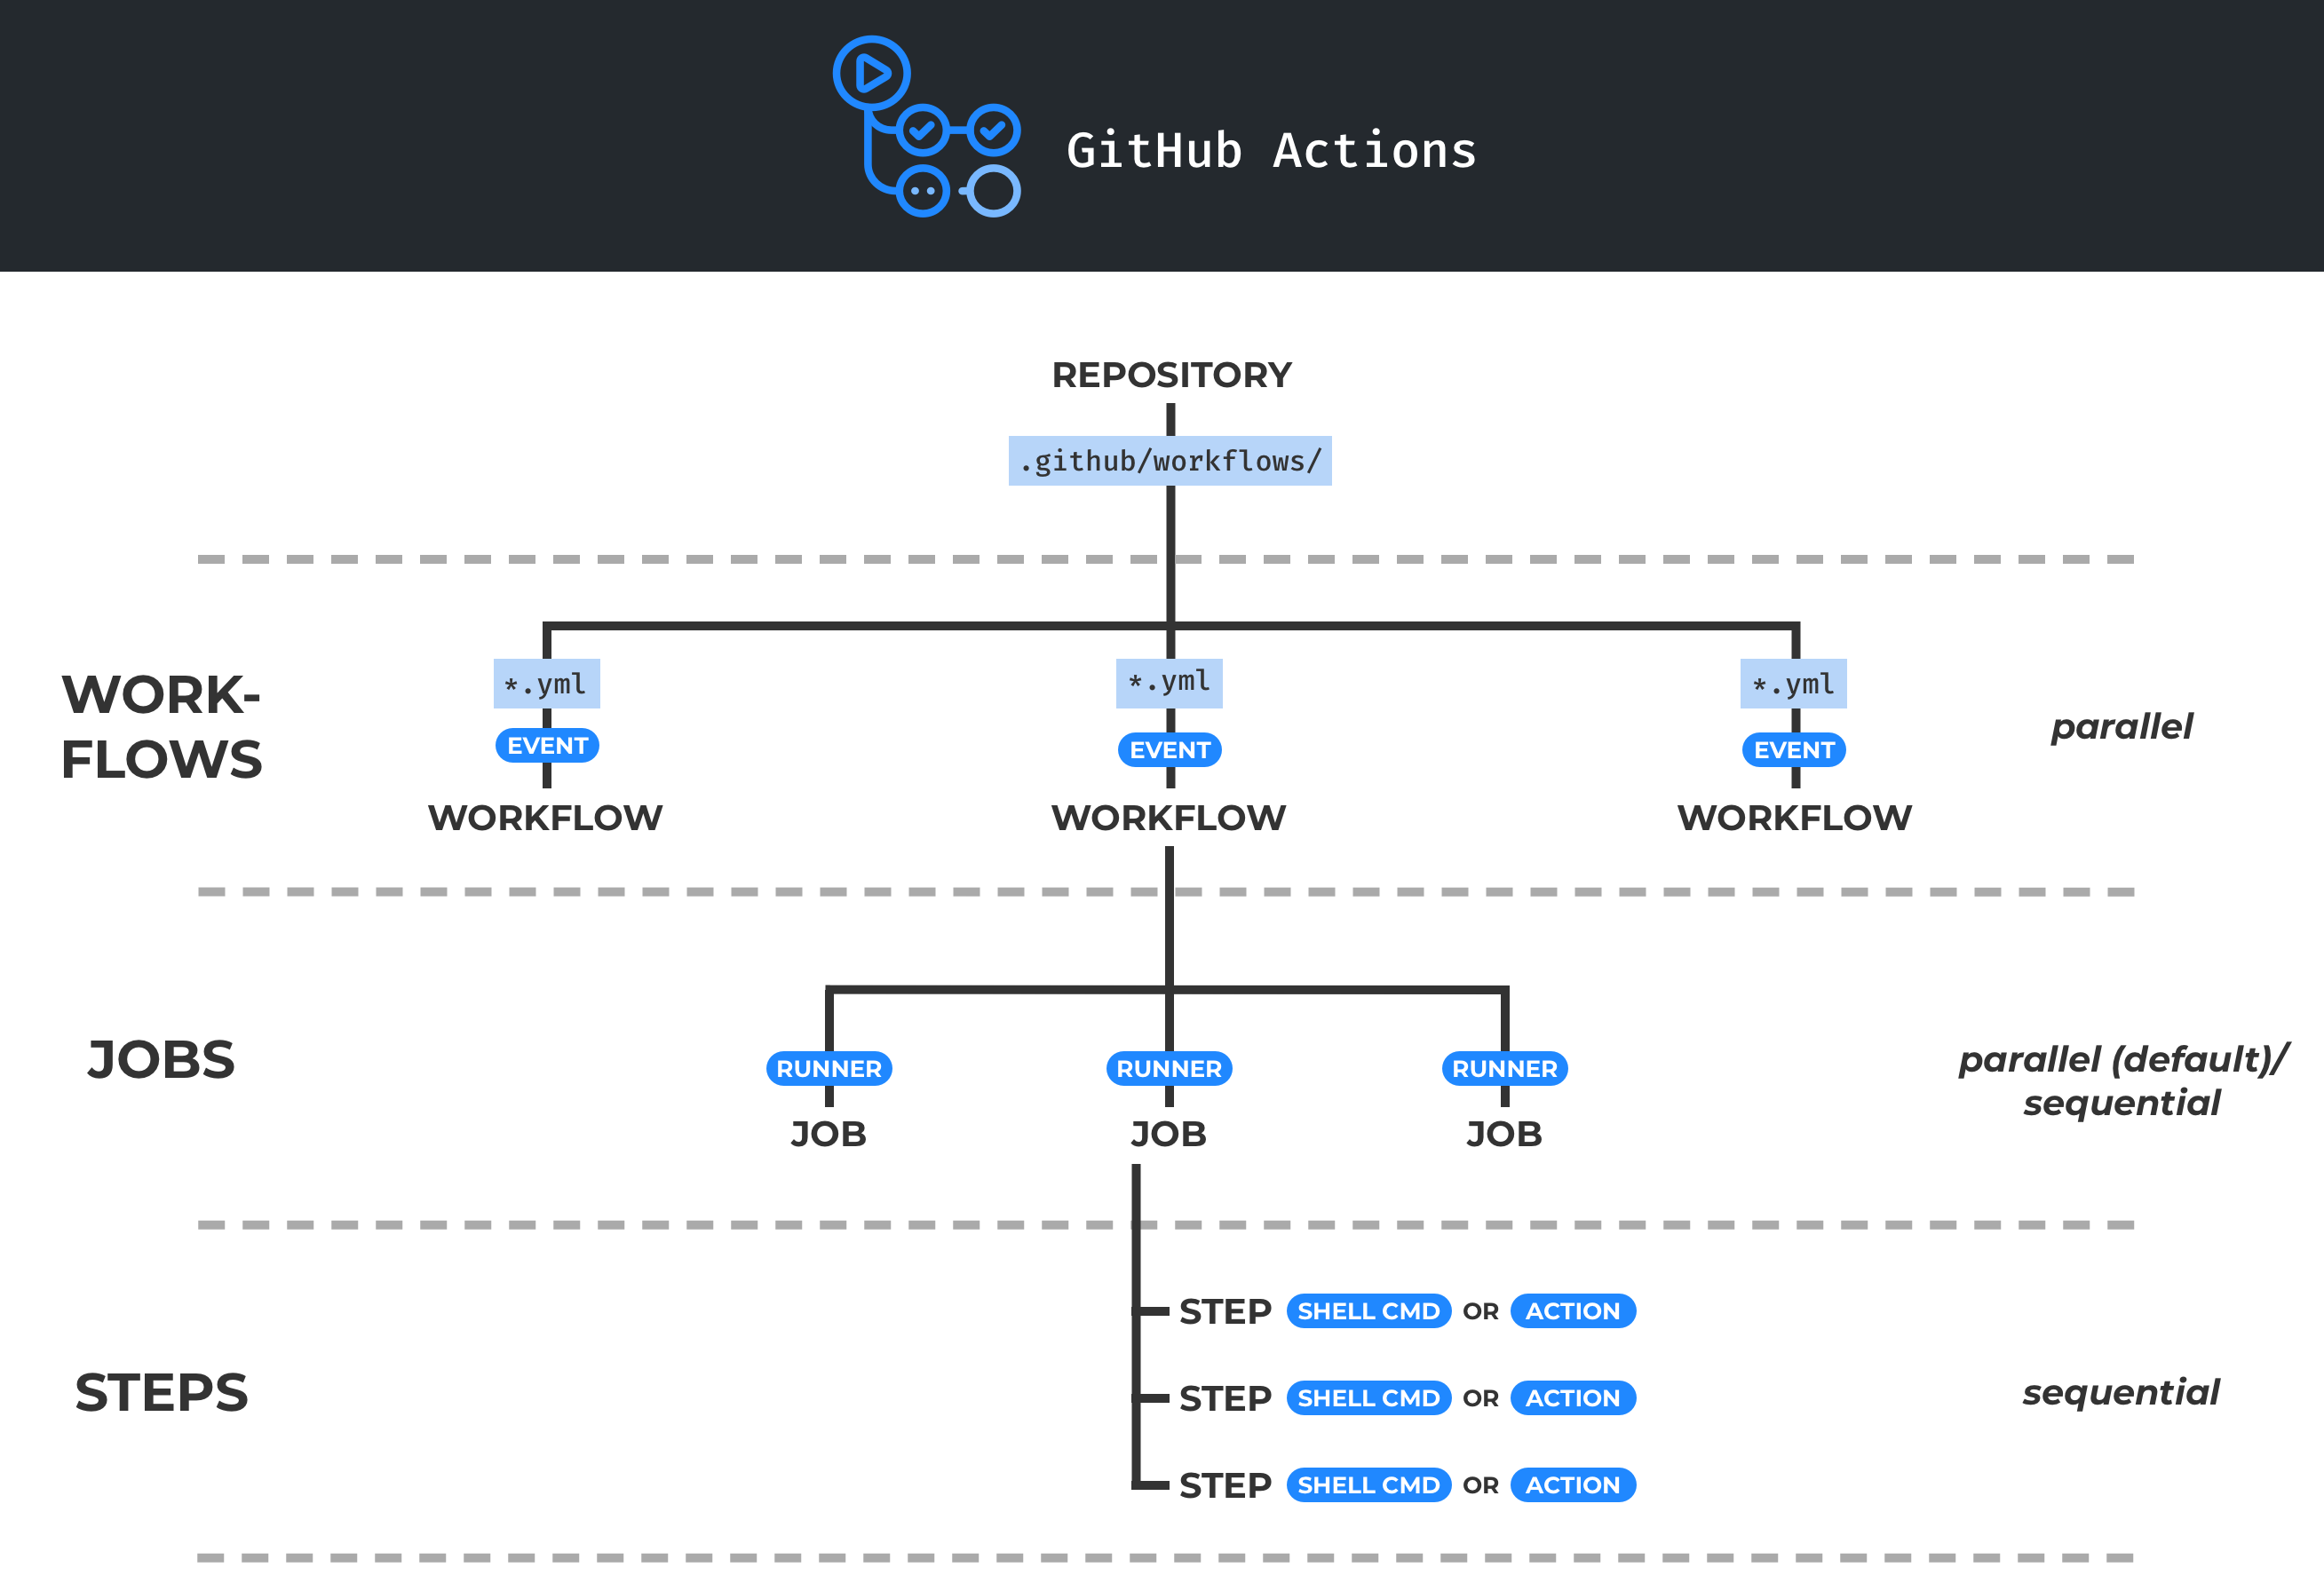
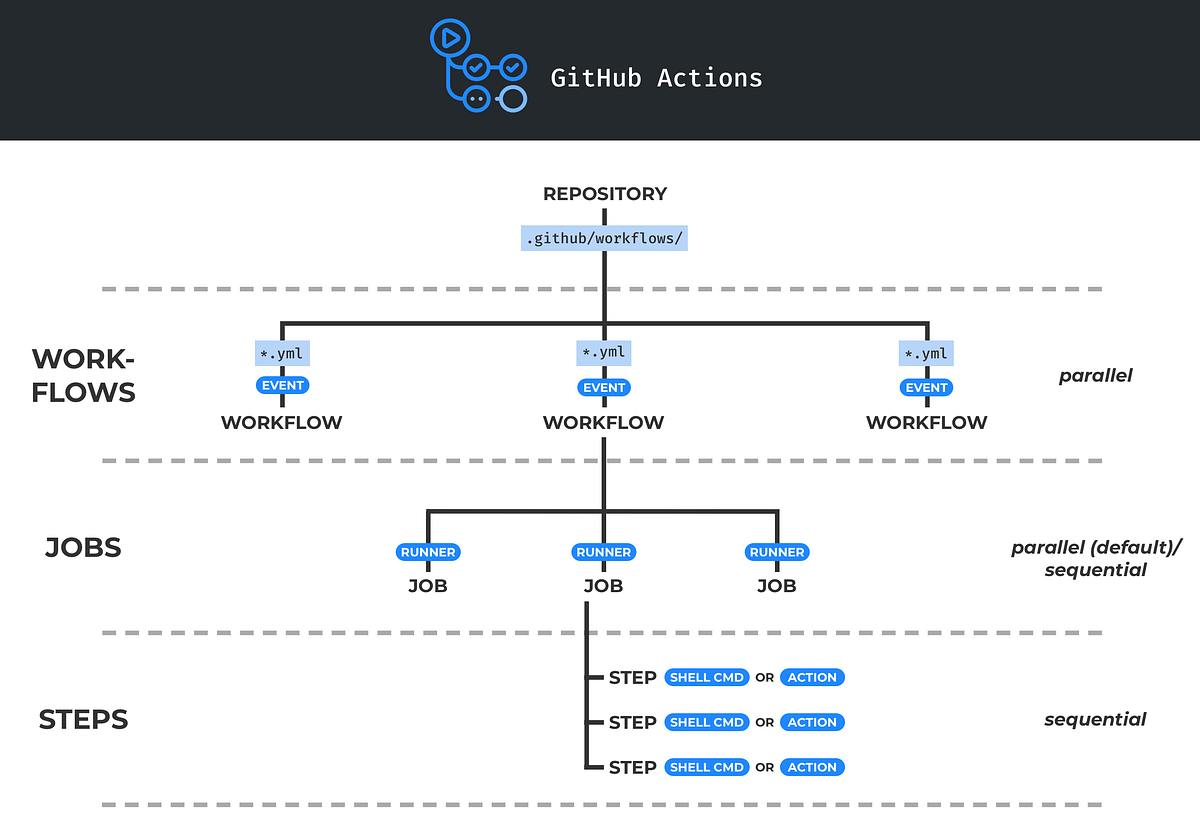
Workflows
Every GitHub repository can contain one or more workflows. Each workflow is defined in a separate YAML in the .github/workflows directory of the repo. Multiple workflows may run at the same time in parallel.
Events
A workflow is triggered by one or more events. An event may be an internal GitHub event (such as a push, a release, or a pull request), a scheduled event (triggered at a specific time, like a cron job), or an arbitrary external event (triggered by a webhook call to the GitHub API).
Jobs
A workflow consists of one or more jobs. A job contains a set of commands that will be run when the workflow is triggered (see steps below). By default, when a workflow is triggered, all of its jobs run in parallel. However, you can define dependencies between selected jobs to make them run sequentially.
Runners
Each job runs on a specific runner. A runner is a virtual machine hosted by GitHub with an operating system of your choice (Linux, macOS, or Windows). You can also use a self-hosted runner, in which case you have full control of the runner’s hardware and software.
Steps
A job consists of a sequence of steps. A step is either a shell command or an action (see actions below). All the steps of a job run sequentially on the runner associated with the job. By default, if a step fails, the subsequent steps of the job are skipped.
Actions
An action is a reusable unit of code which can be included as a step of a job. Actions can have inputs and outputs. You can create your own actions or use actions shared by the GitHub community. Shared actions are distributed on the GitHub Marketplace, and there exist several thousands of them.
Important references
Now that you know the basic concepts of GitHub Actions, let’s look at some documentation that you will use often when working with GitHub Actions:
- Workflow syntax reference — contains the complete syntax specification for workflow files.
- Events that trigger workflows — contains the complete list of events that you can use as the triggers for your workflows.
- Software installed on GitHub-hosted runners — contains the complete list of tools that are installed on the various runners provided by GitHub.
- Context and expression syntax — contains the specification of the so-called contexts that are available to every workflow run. The contexts include various contextual information such as the outputs of previous steps, secrets, and the payload of the event which triggered the workflow.
- Webhook events and payloads — contains the specification of the payloads of the events which can trigger your workflows. The event payloads are contained in the context available to the workflows.
- GitHub REST API reference — event payloads may contain one or more GitHub API objects. For example, the payload of the
[pull_request](https://docs.github.com/en/developers/webhooks-and-events/webhook-events-and-payloads#pull_request)event contains a pull request API object. The GitHub REST API reference contains the specifications of these API objects.
With these references, you are armed to get started with GitHub Actions!
In the following, you will create three example GitHub Actions workflows that you can try out in your own GitHub repository right away.
Example workflow 1 — Hello World!
This workflow does nothing but printing “Hello World!” to the standard output of the runner whenever a push to the repository occurs. Here’s the complete code for this workflow:
Let’s go through the definition of this workflow:
- The name of the workflow is
**hello-world**(defined by the[name](https://docs.github.com/en/actions/reference/workflow-syntax-for-github-actions#name)field). - The workflow is triggered by the
[push](https://docs.github.com/en/actions/reference/events-that-trigger-workflows#push)event (defined by the[on](https://docs.github.com/en/actions/reference/workflow-syntax-for-github-actions#on)field). - The workflow contains a single job with an ID of
**my-job**(this is also the name of the job). - The
my-jobjob uses the**ubuntu-latest**GitHub-hosted runner (defined by the[runs-on](https://docs.github.com/en/actions/reference/workflow-syntax-for-github-actions#jobsjob_idruns-on)field). At the time of this writing, theubuntu-latestrunner corresponds to Ubuntu 18.04 LTS. - The
my-jobjob contains a single step named**my-step**. This step executes the shell command**echo "Hello World!"**.
Remember that you can look up all syntax elements for a workflow definition on the workflow syntax reference page in the GitHub Actions docs.
To add this workflow to your GitHub repository, first create a directory named .github/workflows in your repository (you can either use an existing GitHub repository or create a new one). Then save the above workflow file in this directory and push the change to GitHub.
Now, on GitHub, click on the Actions tab:

On the left side, you should see your hello-world workflow. And since this workflow is triggered by pushes, and you just pushed to GitHub, the workflow has already been triggered and run. You can see this workflow run on the right side of the screen:

From now on, whenever someone pushes to your GitHub repository, this workflow will be triggered and a new run will be added on the right side of the above screen.
To inspect the existing run of your workflow, click on it. This should take you to a new screen where you can see all the jobs of the workflow on the left side. Click on the my-job job and you should see all the steps of the job:
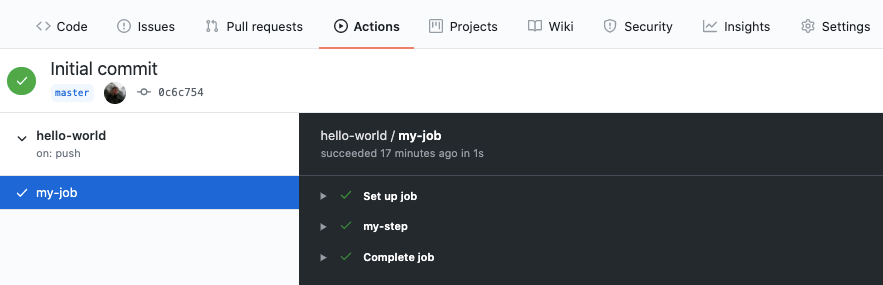
You can see three steps there, Set up job, my-step, and Complete job. The first and the last step have been automatically added by GitHub Actions. The my-step step is the step you defined in your workflow file.
#github-actions #ci-cd-pipeline #github #automation #devops