Deploying a Spring Boot Application with Docker
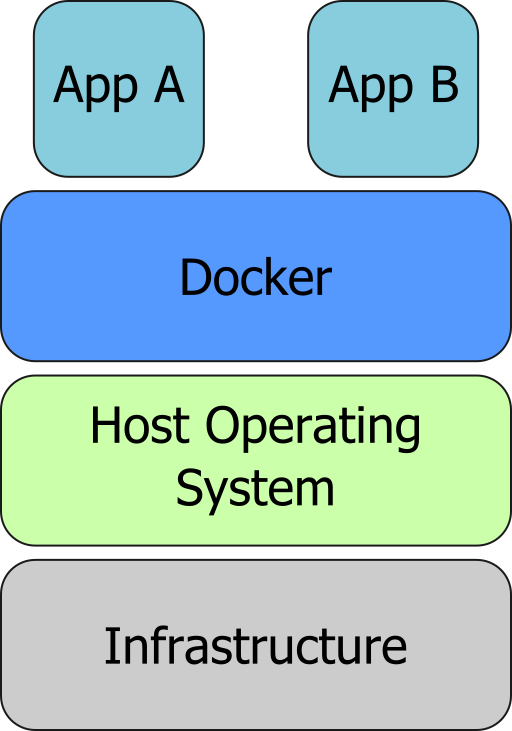
Docker enables you to deploy a server environment in containers. A container is a standardized unit of software that assembles code, runtime, dependencies, settings, and initialization in a single package that you can run reliably from one computing environment to another. Deploying your app as a Docker container is not hard, and can alleviate a lot of problems that you may encounter when moving your app around the multiple environments it has to go, like development machines, QA environment, staging, and production.
In this tutorial, you’ll see how to leverage Docker to deploy your Spring Boot application.
First, let’s build a sample Spring Boot app to use.
Create A Spring Boot App
You’ll use Spring Initializr to generate your Spring Boot project with the help of HTTPie, a simple command-line HTTP client.
You may use the Spring Initializr website directly if you don’t want to use the command line.
From the command line simply enter:
http https://start.spring.io/starter.zip \
 dependencies==web,okta \
 groupId==com.okta.spring-docker.demo \
 packageName==com.okta.spring-docker.demo \
 --download
And then unzip the downloaded file.
unzip demo.zip -d spring-boot-docker
cd spring-boot-docker
You’ll next add a web controller by creating file src/main/java/com/okta/springdocker/demo/WebController.java:
package com.okta.springdocker.demo;

import org.springframework.web.bind.annotation.RequestMapping;
import org.springframework.web.bind.annotation.ResponseBody;
import org.springframework.web.bind.annotation.RestController;

@RestController
public class WebController {

    @RequestMapping("/")
    public String home() {
        return "Welcome!";
    }
}
You also need to configure the security settings for this project. For the moment, you’ll want to allow all requests, so update your DemoApplication.java file to the following:
package com.okta.springdocker.demo;

import org.springframework.boot.SpringApplication;
import org.springframework.boot.autoconfigure.SpringBootApplication;
import org.springframework.context.annotation.Configuration;
import org.springframework.security.config.annotation.web.builders.HttpSecurity;
import org.springframework.security.config.annotation.web.configuration.WebSecurityConfigurerAdapter;

@SpringBootApplication
public class DemoApplication {

    public static void main(String[] args) {
        SpringApplication.run(DemoApplication.class, args);
    }

    @Configuration
    static class OktaOAuth2WebSecurityConfigurerAdapter extends WebSecurityConfigurerAdapter {

        @Override
        protected void configure(HttpSecurity http) throws Exception {
            http.authorizeRequests().anyRequest().permitAll();
        }
    }
}
You may compile and run your app with:
./mvnw package
java -jar target/demo-0.0.1-SNAPSHOT.jar
Then if you hit [http://localhost:8080](http://localhost:8080) you should see a “Welcome!” message.
Run Your Spring Boot App as a Docker Container
To run your app as a Docker container, the very first step is to install Docker.
After installing, it’s time to build your container. For that, Docker uses a file that describes how to assemble the container, which is called a Dockerfile. The Dockerfile consists of step-by-step instructions to execute in a container.
For your Spring Boot app, you’ll use a simple Dockerfile file:
FROM openjdk:8-jdk-alpine (1)

COPY target/demo-0.0.1-SNAPSHOT.jar app.jar (2)

EXPOSE 8080  (3)

ENTRYPOINT ["java", "-jar", "/app.jar"] (4)
| 1 | You’ll start your Dockerfile with a FROM declaration that defines a source container image to build upon. In this way you can leverage an existing container definition that contains JDK 8. |
| 2 | The second instruction is COPY. Here you are telling Docker to copy a local file into the container, in this case, your built application will be available in the container as /app.jar. |
| 3 | The EXPOSE part shows you that the app will listen on port 8080. Although it is not required to make the Docker container work properly, it acts as documentation for future readers. |
| 4 | The last command, ENTRYPOINT, tells Docker what it should execute when you run that container. As you are building a Spring Boot application, this is a simple java -jar of your app. |
Now you can build the container on your command line. Execute the following while replacing okta:spring_boot_docker with a tag of your liking, it will serve as a name to reference the container you are building:
docker build . -t okta:spring_boot_docker
If all went well, you may now run your Dockerized app (using the same tag as you used before):
docker run --publish=8080:8080 okta:spring_boot_docker
To stop the container, hit CTRL-C. Verify the container isn’t running, execute:
docker ps
This will list all the containers running on your machine. If your Spring Boot app is still running, you can terminate the container with (use the Container ID printed by docker ps):
docker kill <CONTAINER_ID>
As your JAR file is copied into the container when you build it, you will need to rebuild your container each time you want to use a newer version of the app. So the cycle would be:
-
Change your code
-
Build the app
./mvnw package -
Build the container
docker build . -t okta:spring_boot_docker -
Run the container
docker run --publish=8080:8080 okta:spring_boot_docker -
Stop the container
-
Loop
Now you know the basics of using Docker containers to run your app! In the future, you can publish your built container into Docker registries (like DockerHub), so others can fetch the container and it’ll be ready to run.
Next, we will secure the app with Okta and understand how we can pass sensitive data to the container.
Secure Your Spring Boot and Docker App
You’ll need a free developer account with Okta. Okta is a SaaS (software-as-service) identity management provider. We make it easy to add features like single sign-on, social login, and OAuth 2.0 to your application. Sign up for an account on our website if you haven’t already.
Complete the steps below to create an OpenID Connect (OIDC) app.
-
Log in to your developer account at developer.okta.com
-
Navigate to Applications and click on Add Application
-
Select Web and click Next
-
Give the application a name (.e.g.,
Java Spring Boot Docker) -
Add the following as Login redirect URI:
[http://localhost:8080/login/oauth2/code/okta](http://localhost:8080/login/oauth2/code/okta) -
Click Done
Okta requires some properties to work correctly, we will send those through Docker as environment variables.
Change the DemoApplication class, replacing .authorizeRequests().anyRequest().permitAll() with .authorizeRequests().anyRequest().authenticated(). This will tell Spring that all the endpoints of your app will require an authenticated user.
@Override
protected void configure(HttpSecurity http) throws Exception {
    http.authorizeRequests().anyRequest().authenticated();
}
Let’s give it a try!
First compile and build your container. For the build process to work correctly, you will need to provide your Okta information as part of the command line, replacing <org_url>, <client_id> and <client_secret>. You will find those values in your Okta account. The org_url is shown at the top right corner of the dashboard. The client_id and client_secret are shown in your app settings.
./mvnw package
Then build the container:
docker build . -t okta:spring_boot_docker
In order to run the container now, you will pass your Okta info to the container as environment variables. This is done by using the -e command line parameter. Like so:
docker run --publish=8080:8080 \
 -e OKTA_OAUTH2_ISSUER=<org_url>/oauth2/default \
 -e OKTA_OAUTH2_CLIENT_ID=<client_id> \
 -e OKTA_OAUTH2_CLIENT_SECRET=<client_secret> \
 okta:spring_boot_docker
Now if you hit [http://localhost:8080](http://localhost:8080) you will see a login form, and after providing your username and password you should be able to see the welcome page again. A dependency and a couple of properties are it takes to secure your application with OIDC/OAuth 2.0!
#docker #java #spring-boot #devops