A step-by-step guide to setting up Python for Deep Learning and Data Science for a complete beginner
You can code your own Data Science or Deep Learning project in just a couple of lines of code these days. This is not an exaggeration; many programmers out there have done the hard work of writing tons of code for us to use, so that all we need to do is plug-and-play rather than write code from scratch.
You may have seen some of this code on Data Science / Deep Learning blog posts. Perhaps you might have thought: “Well, if it’s really that easy, then why don’t I try it out myself?”
If you’re a beginner to Python and you want to embark on this journey, then this post will guide you through your first steps. A common complaint I hear from complete beginners is that it’s pretty difficult to set up Python. How do we get everything started in the first place so that we can plug-and-play Data Science or Deep Learning code?
This post will guide you through in a step-by-step manner how to set up Python for your Data Science and Deep Learning projects. We will:
- Set up Anaconda and Jupyter Notebook
- Create Anaconda environments and install packages (code that others have written to make our lives tremendously easy) like tensorflow, keras, pandas, scikit-learn and matplotlib.
Once you’ve set up the above, you can build your first neural network to predict house prices in this tutorial here:
Build your first Neural Network to predict house prices with Keras
Setting up Anaconda and Jupyter Notebook
The main programming language we are going to use is called Python, which is the most common programming language used by Deep Learning practitioners.
The first step is to download Anaconda, which you can think of as a platform for you to use Python “out of the box”.
Visit this page: https://www.anaconda.com/distribution/ and scroll down to see this:

This tutorial is written specifically for Windows users, but the instructions for users of other Operating Systems are not all that different. Be sure to click on “Windows” as your Operating System (or whatever OS that you are on) to make sure that you are downloading the correct version.
This tutorial will be using Python 3, so click the green Download button under “Python 3.7 version”. A pop up should appear for you to click “Save” into whatever directory you wish.

Once it has finished downloading, just go through the setup step by step as follows:

Click Next

Click “I Agree”

Click Next

Choose a destination folder and click Next

Click Install with the default options, and wait for a few moments as Anaconda installs

Click Skip as we will not be using Microsoft VSCode in our tutorials

Click Finish, and the installation is done!
Once the installation is done, go to your Start Menu and you should see some newly installed software:

You should see this on your start menu
Click on Anaconda Navigator, which is a one-stop hub to navigate the apps we need. You should see a front page like this:

Anaconda Navigator Home Screen
Click on ‘Launch’ under Jupyter Notebook, which is the second panel on my screen above. Jupyter Notebook allows us to run Python code interactively on the web browser, and it’s where we will be writing most of our code.
A browser window should open up with your directory listing. I’m going to create a folder on my Desktop called “Intuitive Deep Learning Tutorial”. If you navigate to the folder, your browser should look something like this:

Navigating to a folder called Intuitive Deep Learning Tutorial on my Desktop
On the top right, click on New and select “Python 3”:

Click on New and select Python 3
A new browser window should pop up like this.
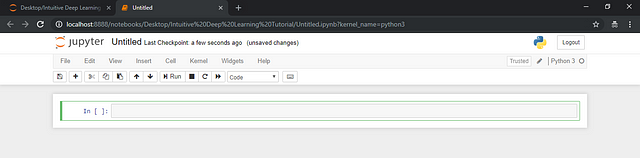
Browser window pop-up
Congratulations — you’ve created your first Jupyter notebook! Now it’s time to write some code. Jupyter notebooks allow us to write snippets of code and then run those snippets without running the full program. This helps us perhaps look at any intermediate output from our program.
To begin, let’s write code that will display some words when we run it. This function is called print. Copy and paste the code below into the grey box on your Jupyter notebook:
print("Hello World!")
Your notebook should look like this:

Entering in code into our Jupyter Notebook
Now, press Alt-Enter on your keyboard to run that snippet of code:

Press Alt-Enter to run that snippet of code
You can see that Jupyter notebook has displayed the words “Hello World!” on the display panel below the code snippet! The number 1 has also filled in the square brackets, meaning that this is the first code snippet that we’ve run thus far. This will help us to track the order in which we have run our code snippets.
Instead of Alt-Enter, note that you can also click Run when the code snippet is highlighted:

Click Run on the panel
If you wish to create new grey blocks to write more snippets of code, you can do so under Insert.

Jupyter Notebook also allows you to write normal text instead of code. Click on the drop-down menu that currently says “Code” and select “Markdown”:

Now, our grey box that is tagged as markdown will not have square brackets beside it. If you write some text in this grey box now and press Alt-Enter, the text will render it as plain text like this:

If we write text in our grey box tagged as markdown, pressing Alt-Enter will render it as plain text.
There are some other features that you can explore. But now we’ve got Jupyter notebook set up for us to start writing some code!
Setting up Anaconda environment and installing packages
Now we’ve got our coding platform set up. But are we going to write Deep Learning code from scratch? That seems like an extremely difficult thing to do!
The good news is that many others have written code and made it available to us! With the contribution of others’ code, we can play around with Deep Learning models at a very high level without having to worry about implementing all of it from scratch. This makes it extremely easy for us to get started with coding Deep Learning models.
For this tutorial, we will be downloading five packages that Deep Learning practitioners commonly use:
- Set up Anaconda and Jupyter Notebook
- Create Anaconda environments and install packages (code that others have written to make our lives tremendously easy) like tensorflow, keras, pandas, scikit-learn and matplotlib.
The first thing we will do is to create a Python environment. An environment is like an isolated working copy of Python, so that whatever you do in your environment (such as installing new packages) will not affect other environments. It’s good practice to create an environment for your projects.
Click on Environments on the left panel and you should see a screen like this:

Anaconda environments
Click on the button “Create” at the bottom of the list. A pop-up like this should appear:

A pop-up like this should appear.
Name your environment and select Python 3.7 and then click Create. This might take a few moments.
Once that is done, your screen should look something like this:

Notice that we have created an environment ‘intuitive-deep-learning’. We can see what packages we have installed in this environment and their respective versions.
Now let’s install some packages we need into our environment!
The first two packages we will install are called Tensorflow and Keras, which help us plug-and-play code for Deep Learning.
On Anaconda Navigator, click on the drop down menu where it currently says “Installed” and select “Not Installed”:

A whole list of packages that you have not installed will appear like this:

Search for “tensorflow”, and click the checkbox for both “keras” and “tensorflow”. Then, click “Apply” on the bottom right of your screen:

A pop up should appear like this:

Click Apply and wait for a few moments. Once that’s done, we will have Keras and Tensorflow installed in our environment!
Using the same method, let’s install the packages ‘pandas’, ‘scikit-learn’ and ‘matplotlib’. These are common packages that data scientists use to process the data as well as to visualize nice graphs in Jupyter notebook.
This is what you should see on your Anaconda Navigator for each of the packages.
Pandas:
![]()
Installing pandas into your environment
Scikit-learn:

Installing scikit-learn into your environment
Matplotlib:

Installing matplotlib into your environment
Once it’s done, go back to “Home” on the left panel of Anaconda Navigator. You should see a screen like this, where it says “Applications on intuitive-deep-learning” at the top:

Now, we have to install Jupyter notebook in this environment. So click the green button “Install” under the Jupyter notebook logo. It will take a few moments (again). Once it’s done installing, the Jupyter notebook panel should look like this:

Click on Launch, and the Jupyter notebook app should open.
Create a notebook and type in these five snippets of code and click Alt-Enter. This code tells the notebook that we will be using the five packages that you installed with Anaconda Navigator earlier in the tutorial.
import tensorflow as tf

import keras

import pandas

import sklearn

import matplotlib
If there are no errors, then congratulations — you’ve got everything installed correctly:

A sign that everything works!
If you have had any trouble with any of the steps above, please feel free to comment below and I’ll help you out!
*Originally published by Joseph Lee Wei En at *medium.freecodecamp.org
===================================================================
Thanks for reading :heart: If you liked this post, share it with all of your programming buddies! Follow me on Facebook | Twitter
Learn More
☞ A Complete Machine Learning Project Walk-Through in Python
☞ Machine Learning In Node.js With TensorFlow.js
☞ An A-Z of useful Python tricks
☞ Top 10 Algorithms for Machine Learning Newbies
☞ Automated Machine Learning on the Cloud in Python
☞ Introduction to PyTorch and Machine Learning
☞ Python Tutorial for Beginners (2019) - Learn Python for Machine Learning and Web Development
☞ Machine Learning A-Z™: Hands-On Python & R In Data Science
☞ Python for Data Science and Machine Learning Bootcamp
☞ Data Science, Deep Learning, & Machine Learning with Python
☞ Deep Learning A-Z™: Hands-On Artificial Neural Networks
☞ Artificial Intelligence A-Z™: Learn How To Build An AI
#deep-learning #data-science #machine-learning #python