The goal this tutorial is to give you a basic understanding of state management using Vuex by creating a relatable example. By the end of this total I hope you have a better understanding of state management using Vuex!
State management terminology
In short: your state is stored in an object called the store. To modify the state you use actions and mutations, which are also stored in the store.
State
State is the data stored in your application. You components can “receive” this data and when it changes your component will update itself. This is the “single source of truth” in your application.
Store
The store manages the state. It should only be mutated from within, so outside components can not directly modify the state. To mutate the state, components can dispatch an action or commit a mutation.
Getters
Getters compute properties based on the store state. You can use these in your actions or directly in your component. This is useful if several components need to calculate the same thing based on the store data, you can do it in one place instead of having to do it separately for each component.
Actions
An action contains business logic and it does not care about updating the state directly. The reason is that actions are asynchronous (your code can continue to run even if the action is not finished yet), this is useful if you need to wait to receive data from an API for example. An action will dispatch a mutation, which will directly update the state.
Mutations
To update a state you will need to commit a mutation. A mutation does not care about business logic, it’s only purpose is updating the state. A mutation is synchronous (your code has to wait until the mutation is done). Mutations should be the only way used to update your state, to keep your state management predictable.
Let’s get started with the example!
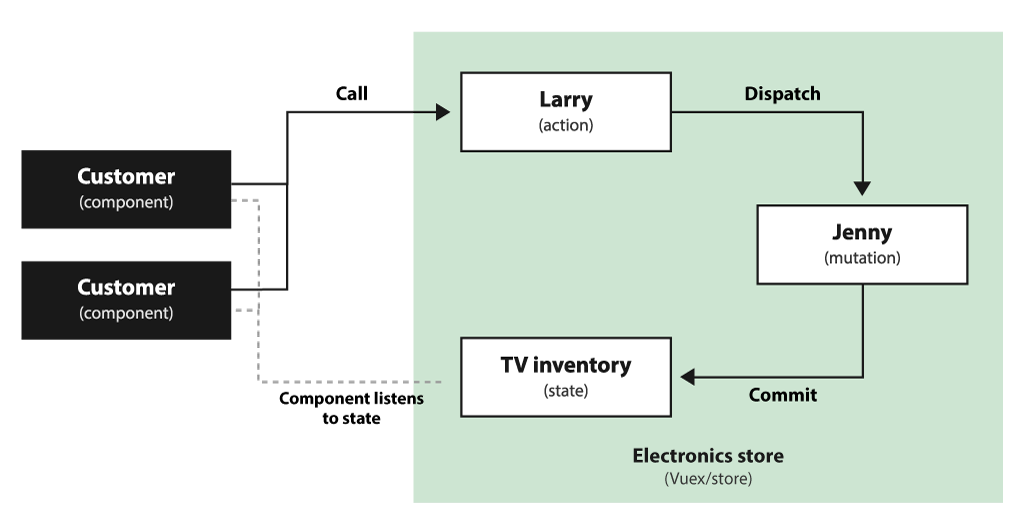
Let’s take a look at “Lee’s Electronic Shop”. Larry (the action) works at the TV department. He supervises Jenny (the mutation) whose only job it is to pick up TVs from the inventory (the state).
For example: Currently there are 10 TVs in stock. A customer (the component) comes into the store to buy a new TV. She talks to Larry (the action) who asks Jenny (the mutation) to get a TV from the shelf. Customers who walk in can now see there are only 9 TVs left (the state).

Simple overview of our (electronics) store using actions and mutations
Just like a real store we can have multiple customers looking at the TV inventory, as well as multiple customers calling to Larry.
For example: another customer (another component) buys 9 TVs, Larry asks Jenny (the mutation) to remove the TVs from the inventory shelf. Other costumers looking at the TVs now notice there a no TVs left, so they wait until they get notified that the TV inventory got restocked.
Simple overview of two components listening to the same state
Oke, but why is this important?
To make sure the store is operating smoothly we must have a structured buying process. If costumers just start coming in and taking TV of the shelves it will become chaotic. Jenny can directly access and update the TVs (synchronous), while Larry might needs to find some more information about the TV (asynchronous) before asking Jenny.
The same is true for your application. You would want to have a clear structure for modifying data so there aren’t any surprises. It’s important to have both actions and mutations, because sometimes you need to wait before you receive data (for example when calling an API) and you don’t want everything to wait with executing until this action is complete.
Let’s build our store!
Now that you, hopefully, understand the basic principle of a store it is time to start using it. We will stick to our example and build a simple representation of “Lee’s Electronic Shop” using Vuex. I’m assuming you already know how to create a Vue project and have some basic knowledge about Vue, so I will start by using an empty template created with Vue CLI.
Let’s start by installing Vuex: yarn add vuex
In src/store create a new folder called store and in this folder create a new files called store.js. In this file we will set up the base of our store:
import Vuex from 'vuex' import Vue from 'vue'Vue.use(Vuex)
export default new Vuex.Store({
state: {
totalTvCount: 10 // The TV inventory
},getters: {
// Here we will create a getter
},mutations: {
// Here we will create Jenny
},actions: {
// Here we will create Larry
}
});
Now we have a basic Vuex store with our one state, the total count of TVs. To make this work we need to modify main.js to import our store into Vue.
import Vue from ‘vue’
import App from ‘./App.vue’
import store from ‘./store/store’Vue.config.productionTip = false;
new Vue({
store,
render: h => h(App),
}).$mount(‘#app’);
Now our store should be working an we can “receive” states from it! There are two ways to do this. If you are only receiving one state the easiest way is to use a computed property. If you want to receive multiple states it is easiest to use a Object Spread Operator, which looks something like this:
computed: {

…mapState([‘someState’, ‘anotherState’]),

}
To see if our store if working create a new component called Customer (don’t forget to import this component in the main App component):
<template>
<div class=“customer”>
<h1>I’m a customer</h1>
<p>I see {{ totalTvCount }} TVs!</p>
</div>
</template><script>
export default {
name: ‘Customer’,
computed: {
totalTvCount () {
return this.$store.state.totalTvCount
}
}
}
</script><style scoped>
</style>
Now the Customer can see how many TVs we have left our store! However, he can’t really do anything with them. We will need to create the action (Larry) and mutation (Jenny) to remove a TV from the store. Let’s add them to our store:
export default new Vuex.Store({

state: {

totalTvCount: 10 // The TV inventory

},
getters: {

},
mutations: {

// Jenny

removeTv(state) {

// For now we allow Jenny just to remove

// one TV at a time.

state.totalTvCount–

}

},
actions: {

// Larry

removeTv(context) {

// For now we only remove a tv,

// but this action can contain logic

// so we could expand it in the future.

if(context.state.totalTvCount >= amount) {

// If we enough TVs, ask Jenny to remove it

context.commit(‘removeTv’, amount)

}

}

}

});
Now that Larry and Jenny have arrived in the store we can modify the costumer so he can buy TVs:
<template>
<div class=“customer”>
<h1>I’m a customer</h1>
<p>I see {{ totalTvCount }} TVs!</p>
<p v-show=“!totalTvCount”>I can’t buy any…</p>
<button
:disabled=“!totalTvCount”
@click=“buyTv”>
Buy TV
</button>
</div>
</template><script>
export default {
name: ‘Customer’,
computed: {
totalTvCount () {
return this.$store.state.totalTvCount
}
},
methods: {
buyTv() {
// Dispatch the action to buy a TV
this.$store.dispatch(‘removeTv’)
}
}
}
</script><style scoped>
</style>
He can see if there are any TVs left to buy, if not we will disable the button and he cannot buy any TV.
Adding additional load
Now our customer can only buy one TV at a time, but maybe he just moved and wants to buy two TVs for his new house. Luckily we can pass additional load as a second parameter. Let’s adjust our store so the amount of TVs removed is more flexible.
<template>
<div class=“customer”>
<h1>I’m a customer</h1>
<p>I see {{ totalTvCount }} TVs!</p>
<p v-show=“!totalTvCount”>I can’t buy any…</p>
<button
:disabled=“!totalTvCount”
@click=“buyTv”>
Buy TV
</button>
<button
:disabled=“totalTvCount < 2”
@click=“buyTwoTvs”>
Buy Two TVs
</button>
</div>
</template><script>
export default {
name: ‘Customer’,
computed: {
totalTvCount () {
return this.$store.state.totalTvCount
}
},
methods: {
buyTv() {
// Dispatch the action to buy a TV
this.$store.dispatch(‘removeTv’, 1)
},
buyTwoTvs() {
// Dispatch the action to buy two TVs
this.$store.dispatch(‘removeTv’, 2)
}
}
}
</script><style scoped>
</style>
We can now set the amount of TVs we want to buy! And if we have multiple costumers of components receiving the same state, they will all be updated every time some one buys a TV!
Creating a getter
Larry and Jenny are not always in a good mood, if they are not happy our customers don’t want to buy a TV. Let’s create a getter to see if both Larry and Jenny are happy:
export default new Vuex.Store({

state: {

totalTvCount: 10, // The TV inventory

isLarryHappy: true,

isJennyHappy: true

},
getters: {

// Check if both Larry and Jenny are happy

happyStaff: state => {

return state.isLarryHappy && state.isJennyHappy

}

},
mutations: {

// Jenny

removeTv(state, amount) {

state.totalTvCount -= amount

}

},
actions: {

// Larry

removeTv(context, amount) {

// If we enough TVs, ask Jenny to remove it

if(context.state.totalTvCount >= amount) {

// If we enough TVs, ask Jenny to remove it

context.commit(‘removeTv’, amount)

}

}

}

});
Now we can use getter as a computed property in our customer to see if the staff is happy. We can reuse this getter in multiple components without having to do this calculation in every single one!
<template>
<div class=“customer”>
<h1>I’m a customer</h1>
<p>I see {{ totalTvCount }} TVs!</p>
<p v-show=“happyStaff”>The staff seems happy!</p>
<p v-show=“!totalTvCount”>I can’t buy any…</p>
<button
:disabled=“!totalTvCount”
@click=“buyTv”>
Buy TV
</button>
<button
:disabled=“totalTvCount < 2”
@click=“buyTwoTvs”>
Buy Two TVs
</button>
</div>
</template><script>
export default {
name: ‘Customer’,
computed: {
totalTvCount () {
return this.$store.state.totalTvCount
},
happyStaff () {
// Check in the getter if the staff is happy
return this.$store.getters.happyStaff
}
},
methods: {
buyTv() {
// Dispatch the action to buy a TV
this.$store.dispatch(‘removeTv’, 1)
},
buyTwoTvs() {
// Dispatch the action to buy two TVs
this.$store.dispatch(‘removeTv’, 2)
}
}
}
</script><style scoped>
</style>
Note: If you are not doing the same calculation in multiple components, generally you shouldn’t make a getter but just compute it you component directly.
Using object spread operators
Our customer can now receive information from the store and dispatch action, but the code if getting a little long. We can improve this using object spread operators. This allows us to map states, mutations and actions and access them more easier using this. Let’s import them from vuex and make our code a bit shorter:
<template>
<div class=“customer”>
<h1>I’m a customer</h1>
<p>I see {{ totalTvCount }} TVs!</p>
<p v-show=“happyStaff”>The staff seems happy!</p>
<p v-show=“!totalTvCount”>I can’t buy any…</p>
<button
:disabled=“!totalTvCount”
@click=“buyTv”>
Buy TV
</button>
<button
:disabled=“totalTvCount < 2”
@click=“buyTwoTvs”>
Buy Two TVs
</button>
</div>
</template><script>
import { mapState, mapGetter, mapActions } from ‘vuex’
export default {
name: ‘Customer’,
computed: {
// If you have only one state/getter object spread operators are not necessarily needed
// But we’ll use it for now, so you can see how they are used
// mapState/mapGetter accepts an array of strings as parameter
…mapState([‘totalTvCount’]),
…mapGetter([‘totalTvCount’])
},
methods: {
…mapActions([‘removeTv’]),
buyTv() {
this.removeTv(1) // Remove 1 TV
},
buyTwoTvs() {
this.removeTv(2) // Remove 2 TVs
}
}
}
</script><style scoped>
</style>
Much better! Our code is a lot shorter and easier to understand. Now in the future we can easily map more stats/actions/mutation by just updating the array we use as the parameter.
Time to make something cool!
There is a lot more we can do with Vuex, but I hope this tutorial gave you a basic understanding how state management with Vuex works! Now it’s up to you to go and build something cool with it.
#vue-js