10 Most used Git Commands that Every Developer Should Know
Git is an important part of daily programming (especially if you’re working with a team) and is widely used in the software industry.
Since there are many various commands to use, mastering Git takes time but some commands are being used more frequently (mostly daily) and in this post, I will share & explain 10 most used Git commands that every developer should know.
Note: To understand this article, you need to know the basics of Git.
1. Git clone
Git clone is a command for downloading existing source code from a remote repository like Github for example. In other words, Git clone basically makes an identical copy of the latest version of a project in a repository and saves it to your computer.
There are a couple of ways to download the source code, but mostly I prefer the clone with https way:
git clone <https://name-of-the-repository-link>
For example, if we want to download a project from Github, all we need to do is to click on the green button (Clone or download), copy the URL in the box and paste it after the git clone command that I’ve shown right above.
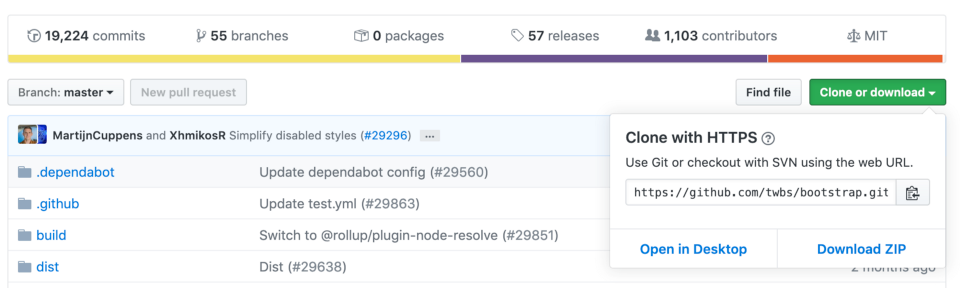
Bootstrap source code example from Github
This will make a copy of the project to your local workspace and then you can start working with it.
2. Git branch
Branches are highly important in the git world. By using branches, several developers are able to work parallel in the same project simultaneously. We can use the git branch command for creating, listing and deleting branches.
Creating a new branch:
git branch <branch-name>
This command will create a branch locally. To push the new branch into the remote repository, you need to use the following command:
git push -u <remote> <branch-name>
Viewing branches:
git branch or git branch --list
Deleting a branch:
git branch -d <branch-name>
3. Git checkout
This one is also one of the most used Git commands. To work in a branch, first, you need to switch it. We use git checkout mostly for switching from one branch to another. We can also use it for checking out files and commits.
git checkout <name-of-your-branch>
There are some steps you need to follow for successfully switching between branches:
- The changes in your current branch must be committed or stashed before you switch
- The branch you want to check out should exist in your local
There is also a shortcut command that you can create and switch to a branch at the same time:
git checkout -b <name-of-your-branch>
This command creates a new branch in your local (-b stand for branch) and checks out to new the branch right after it has been created.
4. Git status
The Git status command gives us all the necessary information about the current branch.
git status
We can gather information like:
- Whether the current branch is up to date
- Whether there is anything to commit, push or pull
- Whether there are files staged, unstaged or untracked
- Whether there are files created, modified or deleted
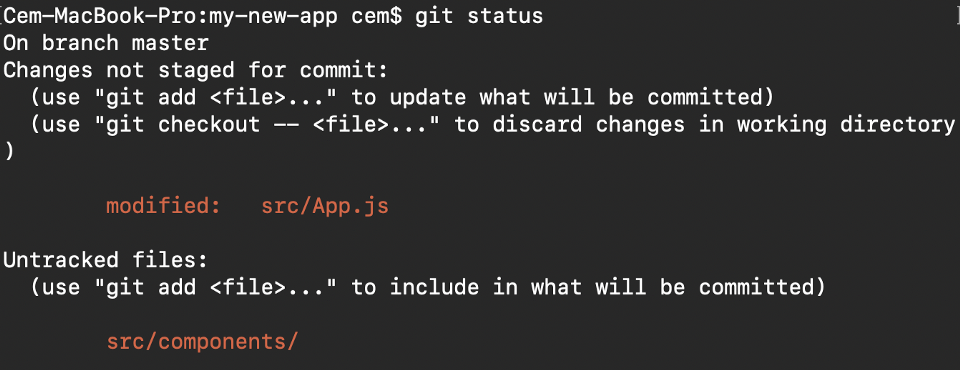
Git status gives information about the branch & files
5. Git add
When we create, modify or delete a file, these changes will happen in our local and won’t be included in the next commit (unless we change the configurations).
We need to use the git add command to include the changes of a file(s) into our next commit.
To add a single file:
git add <file>
To add everything at once:
git add -A
When you visit the screenshot above in the 4th section, you will see that there are file names with red color, which means that they’re unstaged files. The unstaged files won’t be included in your commits.
To include them, we need to use git add:
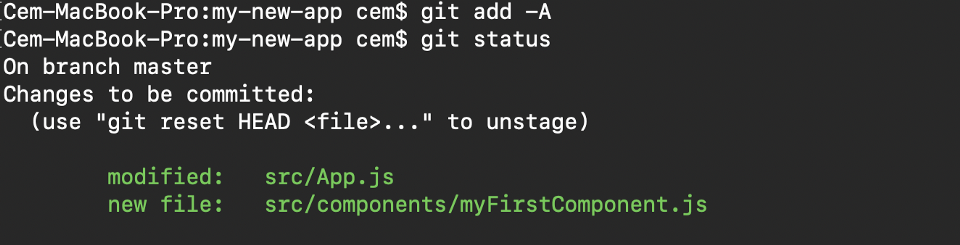
Files with green are now staged with git add
Important: The git add command doesn’t change the repository and the changes are not saved until we use git commit.
6. Git commit
This is maybe the most-used command of Git. Once we reach a point in development, we have a feeling like we should save our changes (maybe after a specific task or issue).
Git commit is like setting a checkpoint in the development process which you can go back later if needed.
We also need to write a short message to explain what we have developed or changed in the source code.
git commit -m "commit message"
Important: Git commit saves your changes only locally.
7. Git push
After committing your changes, the next thing you want to do is sending your changes to the remote server. Git push uploads your commits to the remote repository.
git push <remote> <branch-name>
However, if your branch is newly created, then you also need to upload the branch too with the following command:
git push --set-upstream <remote> <name-of-your-branch>
or
git push -u origin <branch_name>
Important: Git push only uploads changes that are committed.
8. Git pull
The git pull command is being used to get the updates from the remote repo. This command is a combination of git fetch and git merge commands which means that, when we use git pull, it gets the updates from remote repository (git fetch) and immediately applies the latest changes in your local (git merge).
git pull <remote>
This operation may cause conflicts that you need to solve manually.
9. Git revert
Sometimes we need to undo the changes that we’ve made. There are various ways to undo our changes locally or remote (depends on what we need), but we must carefully use these commands for unwanted deletions.
A safer way that we can undo our commits is by using git revert. To see our commit history, first, we need to use git log – oneline:

commit history of my master branch
Then, we just need to specify the hash code next to our commit that we would like to undo:
git revert 3321844
After this, you will see a screen like this and press shift + q to exit:
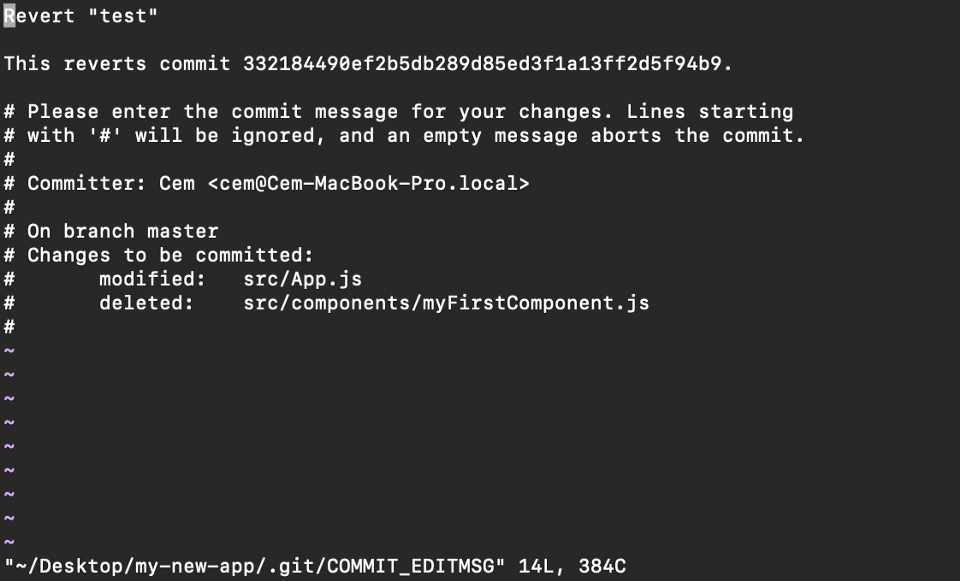
Git revert command will undo the given commit, but will create a new commit without deleting the older one:

new “revert” commit
The advantage of using git revert is that it doesn’t touch the commit history so we can still see all of the commits in our history even the reverted ones.
What also safe here is that everything happens in our local system unless we push them to the remote repo. That’s why git revert is safe to use and a preferred way to undo our commits.
10. Git merge
When your development is completed in your branch and everything works fine, the final step to finalize the development is merging the branch with the parent branch (dev or master), which is being done with the git merge command.
Git merge basically integrates your feature branch with all of its commits back to the dev (or master) branch. The important thing to remember is that, you need to be first on the specific branch that you want to merge your feature branch.
For example, when you want to merge your feature branch into dev branch:
Firstly, you should switch to dev branch:
git checkout dev
Before merging, you should update your local dev branch:
git fetch
Finally, you can merge your feature branch into dev:
git merge <branch-name>
Hint: Make sure your dev branch has the latest version before you merge your branches, otherwise you may face conflicts or other unwanted problems.
So these are the 10 most-used git commands (at least I use them a lot:)) in daily programming. There are many more things to cover about Git and I will explain them later in separate articles.
Thank you for reading!
Originally published by Cem Eygi https://www.freecodecamp.org
#git #github #web-development
