Database migrations help a developer to keep database schema up-to-date with the code. It is a core mechanism, that keeps changes in code and applies them in the database. Entity Framework Core 5 migrations are designed to keep track of DbContext class and generate migrations when you update it.
Installing the tools
To add EF Core migrations, you need to have Entity Framework Core already set up in your project. You can check how to go through that process in this post: PrimeHotel – adding Entity Framework Core 5 in .NET
The easiest way to add and manage migrations is to use .NET Core CLI tools, which you should have already installed. Type this command to check it out:
dotnet tool install –global dotnet-ef
You can also update the tool, once installed:

Adding a migration
Adding first migration doesn’t differ much from adding the next ones. You need to open a terminal window in the location of the project and execute the command:
1
dotnet ef migrations add InitialCreate
When this command executes successfully, it will generate a Migrations directory. InitialCreate file represents individual migration to match the DbContext. PrimeDbContextModelSnapshot represents the current state of the model. It is added to the project when the first migration is created and updated with each subsequent migration. It enables the migrations framework to calculate the changes required to bring the database up to date with the model.
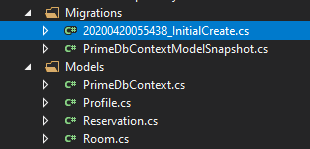
In the InitialCreate file you will find two methods: Up and Down. Those will represent the changes when migration will be applied and when it would be rolled back.
#asp.net core for .net 5 & ef core 5 #ef core 5 #ef core migrations #primehotel