Implement file uploads and likes in a React chatroom
In this tutorial, we’ll add the ability to upload image attachments to a chatroom, and also the ability to like any attachment uploaded to the room.
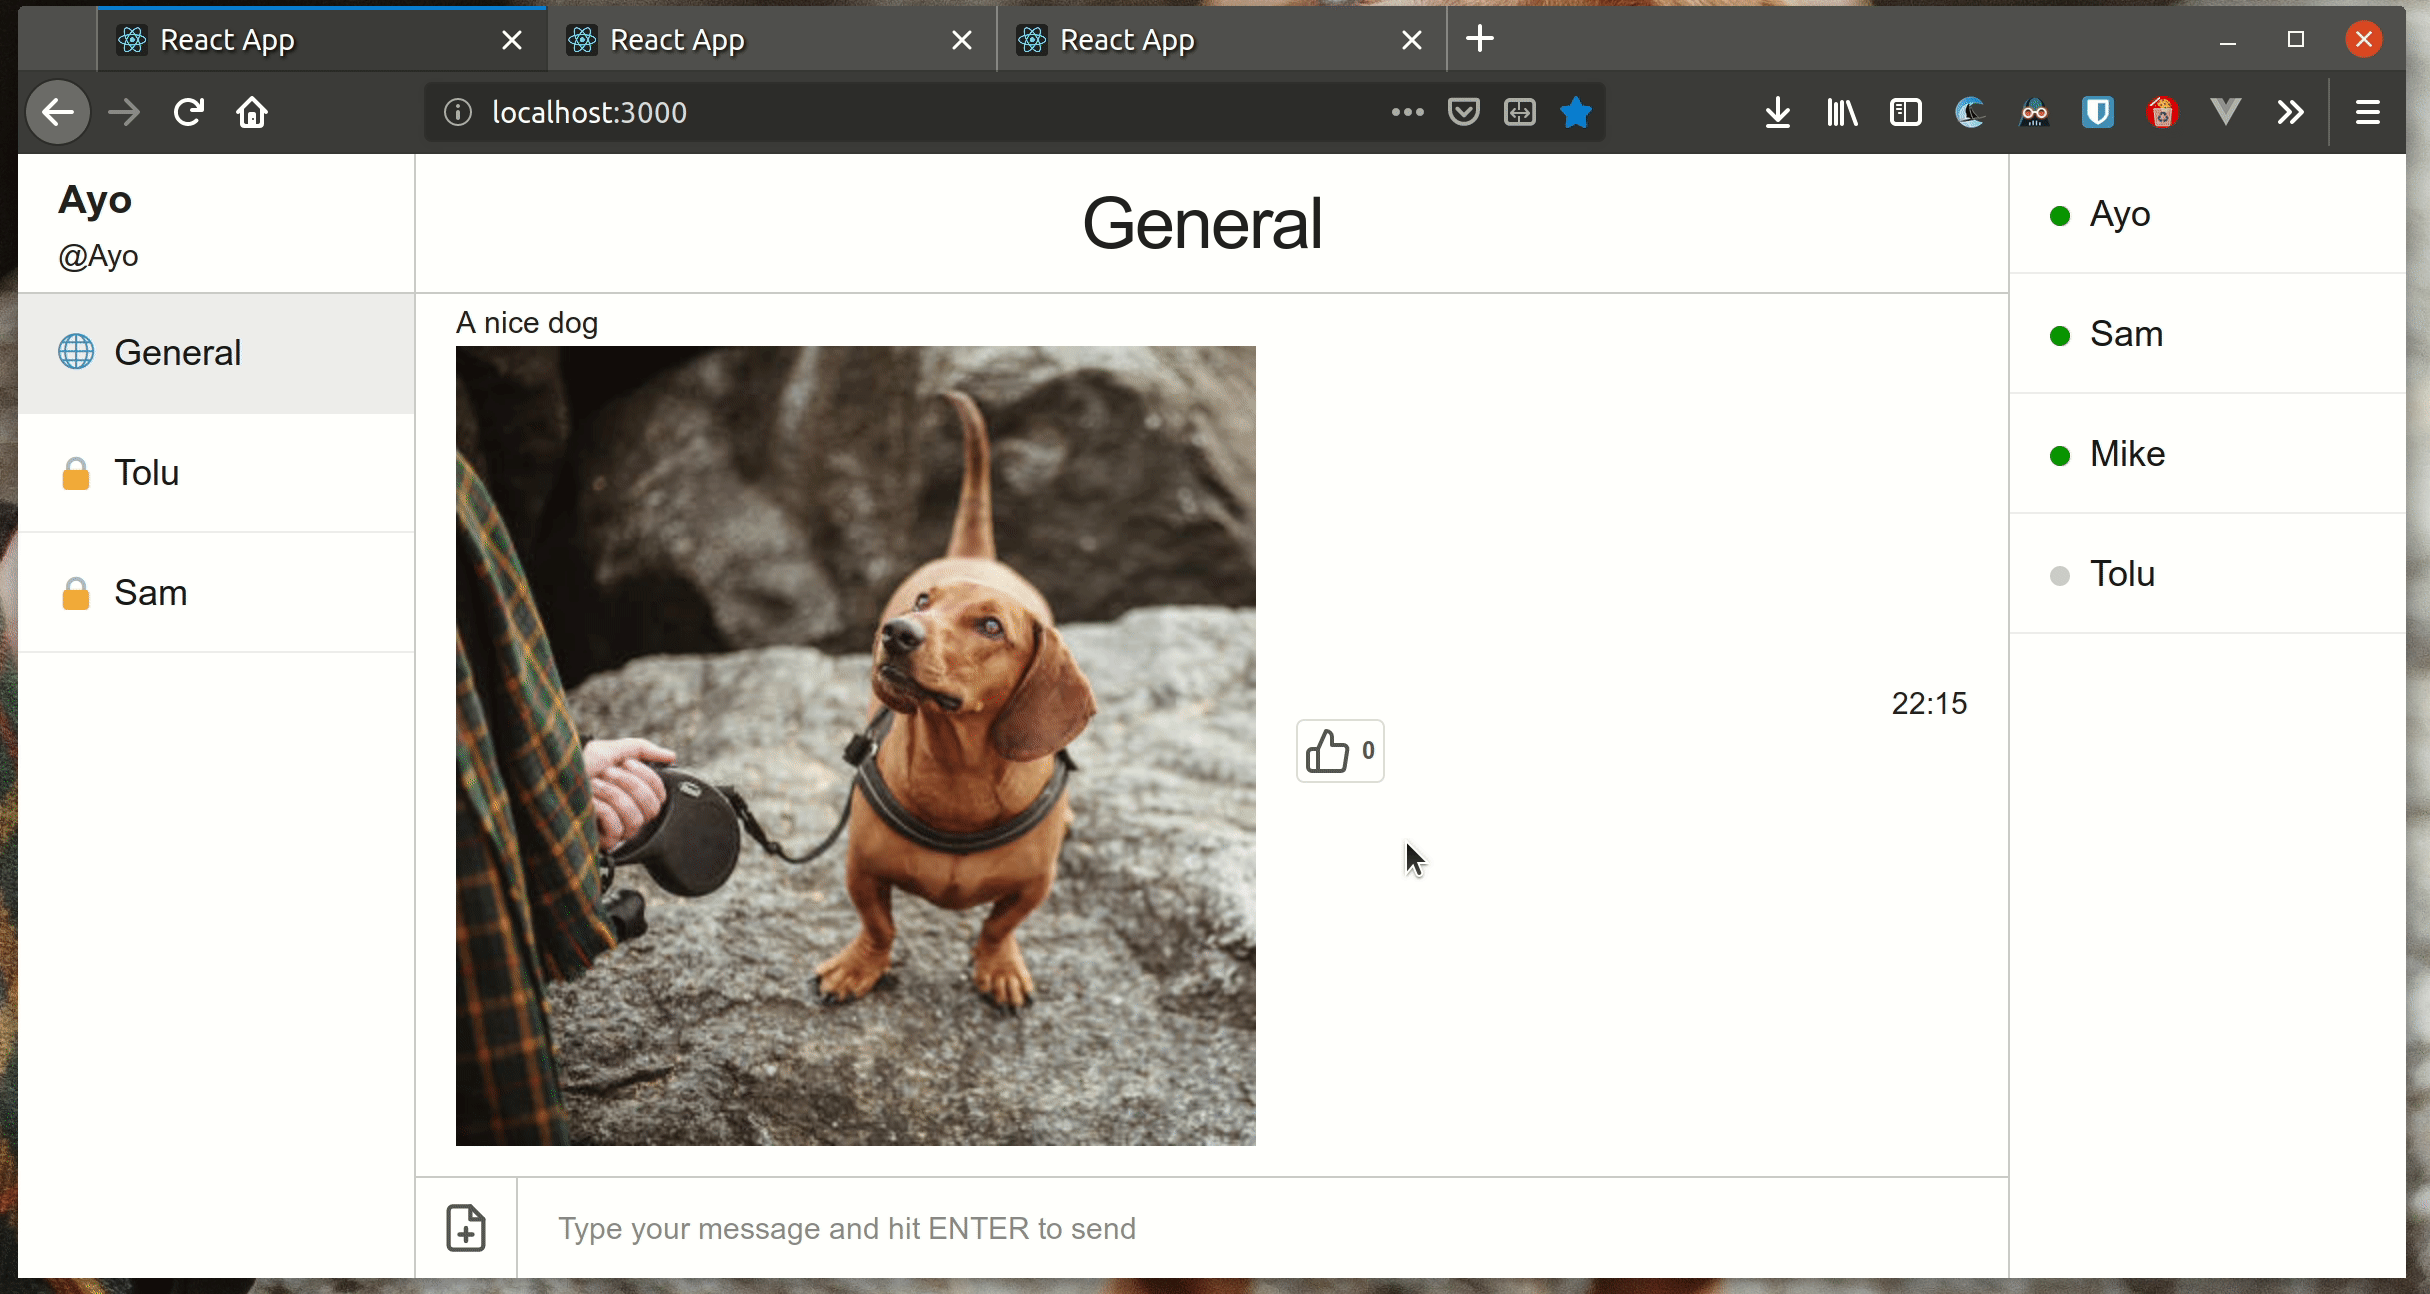
Here’s a live demo of what we’ll be building:
This article builds upon what was covered in the tutorial on sending direct messages with Chatkit, so you need to go over that one first before moving on to this one. You can clone this GitHub repository and follow the instructions in the README file to get set up.
Install additional dependencies
We’ll be making use of the MIT Licensed Feather Icons for iconography while building this project, so I’ve added the react-feather package as an added dependency to make using the icons as easy as possible. Before you continue, make sure your Node installation is up to version 8 or later.
Install react-feather by navigating to the client directory and running the command below in the terminal:
npm install react-feather --save
Update the styles for the app
To account for the new features and components we’ll be adding to the app, I’ve made some changes to App.css. Open it up in your text editor and change its contents to look like this:
    // client/src/App.css

    html {
      box-sizing: border-box;
    }

    *, *::before, *::after {
      box-sizing: inherit;
      margin: 0;
      padding: 0;
    }

    ul {
      list-style: none;
    }

    h4 {
      padding-left: 20px;
      margin-bottom: 10px;
    }

    .App {
      width: 100vw;
      height: 100vh;
      display: grid;
      grid-template-columns: 1fr 4fr 1fr;
    }

    .right-sidebar {
      border-left: 1px solid #ccc;
    }

    .left-sidebar {
      border-right: 1px solid #ccc;
    }

    .user-profile {
      height: 70px;
      display: flex;
      align-items: flex-start;
      padding-right: 20px;
      padding-left: 20px;
      justify-content: center;
      flex-direction: column;
      border-bottom: 1px solid #ccc;
    }

    .user-profile span {
      display: block;
    }

    .user-profile .username {
      font-size: 20px;
      font-weight: 700;
    }

    .chat-rooms li, .room-member {
      display: flex;
      align-items: center;
      padding: 15px 20px;
      font-size: 18px;
      color: #181919;
      cursor: pointer;
      border-bottom: 1px solid #eee;
      margin-bottom: 0;
    }

    .room-member {
      justify-content: space-between;
      padding: 0 20px;
      height: 60px;
    }

    .send-dm {
      opacity: 0;
      pointer-events: none;
      font-size: 20px;
      border: 1px solid #eee;
      border-radius: 5px;
      margin-bottom: 0;
      padding: 0 10px;
      line-height: 1.4;
      height: auto;
    }

    .room-member:hover .send-dm {
      opacity: 1;
      pointer-events: all;
    }

    .presence {
      display: inline-block;
      width: 10px;
      height: 10px;
      background-color: #ccc;
      margin-right: 10px;
      border-radius: 50%;
    }

    .presence.online {
      background-color: green;
    }

    .chat-rooms .active {
      background-color: #eee;
      color: #181919;
    }

    .chat-rooms li:hover {
      background-color: #D8D1D1;
    }

    .room-icon {
      display: inline-block;
      margin-right: 10px;
    }

    .chat-screen {
      display: flex;
      flex-direction: column;
      height: 100vh;
    }

    .chat-header {
      height: 70px;
      flex-shrink: 0;
      border-bottom: 1px solid #ccc;
      padding-left: 10px;
      padding-right: 20px;
      display: flex;
      flex-direction: column;
      justify-content: center;
    }

    .chat-header h3 {
      margin-bottom: 0;
      text-align: center;
    }

    .chat-messages {
      flex-grow: 1;
      overflow-y: auto;
      display: flex;
      flex-direction: column;
      justify-content: flex-end;
      margin-bottom: 0;
      min-height: min-content;
    }

    .message {
      padding-left: 20px;
      padding-right: 20px;
      margin-bottom: 10px;
      display: flex;
      justify-content: space-between;
      align-items: center;
    }

    .message span {
      display: block;
      text-align: left;
    }

    .message .user-id {
      font-weight: bold;
    }

    .media-image {
      display: flex;
      align-items: center;
    }

    svg.liked {
      stroke: #fff;
      fill: #0084ff;
    }

    .image-attachment {
      max-width: 600px;
      margin-bottom: 5px;
      margin-right: 20px;
    }

    .like-image {
      display: flex;
      align-items: center;
      border: 1px solid #ddd;
      border-radius: 4px;
      padding: 3px;
      font-size: 12px;
      margin-bottom: 0;
      height: auto;
      line-height: 1.4;
    }

    .media-likes svg {
      margin-right: 5px;
    }

    .message-form {
      border-top: 1px solid #ccc;
      width: 100%;
      display: flex;
      align-items: center;
    }

    .message-form, .message-input {
      margin-bottom: 0;
    }

    input[type="text"].message-input {
      height: 50px;
      border: none;
      padding-left: 20px;
      flex-grow: 1;
      border-left: 1px solid #ccc;
      border-top-left-radius: 0;
      border-bottom-left-radius: 0;
    }

    .toggle-upload {
      border: none;
      width: 50px;
      height: auto;
      padding: 0;
      margin-bottom: 0;
      display: flex;
      align-items: center;
      justify-content: center;
    }

    .toggle-upload svg {
      width: 26px;
      height: 26px;
    }

    svg {
      pointer-events: none;
    }

    .dialog-container {
      position: absolute;
      top: 0;
      right: 0;
      bottom: 0;
      left: 0;
      background-color: rgba(0, 0, 0, 0.8);
      display: flex;
      justify-content:center;
      align-items: center;
    }

    .dialog {
      width: 500px;
      background-color: white;
      display: flex;
      align-items:  center;
      flex-direction: column;
    }

    .dialog-form {
      width: 100%;
      margin-bottom: 0;
      padding: 20px;
    }

    .dialog-form > * {
      display: block;
    }

    .dialog-label {
      text-align: left;
      font-size: 16px;
    }

    .dialog-input, .username-input {
      width: 100%;
    }

    .dialog-header {
      width: 100%;
      padding-top: 10px;
      display: flex;
      justify-content: space-between;
    }

    .dialog-header svg {
      width: 36px;
      height: 36px;
    }

    .dialog-header button {
      border: none;
      width: auto;
      padding-right: 10px;
    }

    input[type="text"]:focus {
      border-color: #5C8436;
    }

    .submit-btn {
      color: #5C8436;
      background-color: #181919;
      width: 100%;
    }

    .submit-btn:hover {
      color: #5C8436;
      background-color: #222;
    }
Add support for image attachments
Before we can ‘like’ an attachment, we need a way to upload them to the chat first. This section will cover how attachments work in Chatkit. First, let’s create a dialog which the user will make use of when uploading attachments.
Create a new FileUploadDialog.js file in the components directory, and change its contents to look like this:
    // client/src/components/FileUploadDialog.js

    import React from 'react';
    import Proptypes from 'prop-types';
    import { XSquare } from 'react-feather';

    const FileUploadDialog = props => {
      const {
        fileMessage,
        toggleFileUploadDialog,
        fileAttachment,
        handleInput,
        uploadAttachment,
      } = props;

      return (
        <div className="dialog-container">
          <div className="dialog">
            <header className="dialog-header">
              <h4>Upload a file</h4>
              <button onClick={toggleFileUploadDialog}>
                <XSquare />
              </button>
            </header>
            <form className="dialog-form" onSubmit={uploadAttachment}>
              <input
                type="file"
                ref={fileAttachment}
                accept="image/png, image/jpeg"
              />
              <label className="dialog-label" htmlFor="new-message">
                Add a message about the file
              </label>
              <input
                id="new-message"
                className="dialog-input"
                autoFocus
                type="text"
                name="fileMessage"
                value={fileMessage}
                onChange={handleInput}
                placeholder="Enter your message"
              />
              <button type="submit" className="submit-btn">
                Upload
              </button>
            </form>
          </div>
        </div>
      );
    };

    FileUploadDialog.propTypes = {
      fileMessage: Proptypes.string.isRequired,
      handleInput: Proptypes.func.isRequired,
      uploadAttachment: Proptypes.func.isRequired,
      toggleFileUploadDialog: Proptypes.func.isRequired,
    };

    export default FileUploadDialog;
Then update the methods.js file with the following new functions:
    // client/src/methods.js

    import Chatkit from '@pusher/chatkit-client';
    import axios from 'axios';

    function toggleFileUploadDialog() {
      this.setState({
        showFileUploadDialog: !this.state.showFileUploadDialog,
      });
    }

    function uploadAttachment(event) {
      event.preventDefault();
      const { fileMessage, currentUser, currentRoom } = this.state;
      const file = this.fileAttachment.current.files[0];

      currentUser
        .sendMessage({
          text: fileMessage || file.name,
          roomId: currentRoom.id,
          attachment: {
            file,
            name: file.name,
          },
        })
        .then(messageId => {
          const roomData = currentRoom.customData || {};

          const roomAttachments = roomData.attachments || {};
          roomAttachments[messageId] = {
            likes: [],
          };

          roomData.attachments = roomAttachments;

          return currentUser.updateRoom({
            roomId: currentRoom.id,
            customData: roomData,
          });
        })
        .catch(console.error);

      this.setState({
        showFileUploadDialog: false,
        fileMessage: '',
      });
    }

    // [..]

    export {
      sendMessage,
      handleInput,
      connectToRoom,
      connectToChatkit,
      sendDM,
      toggleFileUploadDialog,
      uploadAttachment,
    };
Finally, update App.js to look like this:
    // client/src/App.js

    import React, { Component } from 'react';
    import { FilePlus } from 'react-feather';

    import {
      handleInput,
      connectToChatkit,
      connectToRoom,
      sendDM,
      sendMessage,
      toggleFileUploadDialog,
      uploadAttachment,
    } from './methods';
    import Dialog from './components/Dialog';
    import RoomList from './components/RoomList';
    import RoomUsers from './components/RoomUsers';
    import ChatSession from './components/ChatSession';
    import FileUploadDialog from './components/FileUploadDialog';

    import 'skeleton-css/css/normalize.css';
    import 'skeleton-css/css/skeleton.css';
    import './App.css';

    class App extends Component {
      constructor() {
        super();
        this.state = {
          // [..]
          showFileUploadDialog: false,
          fileMessage: '',
        };

        // [..]
        this.sendMessage = sendMessage.bind(this);
        this.toggleFileUploadDialog = toggleFileUploadDialog.bind(this);
        this.uploadAttachment = uploadAttachment.bind(this);

        this.fileAttachment = React.createRef();
      }

      render() {
        const {
          userId,
          showLogin,
          rooms,
          currentUser,
          currentRoom,
          messages,
          newMessage,
          roomUsers,
          roomName,
          showFileUploadDialog,
          fileMessage,
        } = this.state;

        return (
          <div className="App">
            // [..]
             <footer className="chat-footer">
                <form onSubmit={this.sendMessage} className="message-form">
                  <button
                    className="toggle-upload"
                    onClick={this.toggleFileUploadDialog}
                    type="button"
                  >
                    <FilePlus />
                  </button>
                  <input
                    type="text"
                    value={newMessage}
                    name="newMessage"
                    className="message-input"
                    placeholder="Type your message and hit ENTER to send"
                    onChange={this.handleInput}
                  />
                </form>
              </footer>
            // [..]
            {showFileUploadDialog ? (
              <FileUploadDialog
                fileMessage={fileMessage}
                handleInput={this.handleInput}
                uploadAttachment={this.uploadAttachment}
                fileAttachment={this.fileAttachment}
                toggleFileUploadDialog={this.toggleFileUploadDialog}
              />
            ) : null}
          </div>
        );
      }
    }

    export default App;
We’ve added a new upload button to the footer which toggles the file upload dialog via the toggleFileUploadDialog() method. Once the upload dialog is open, the user can add a file and an optional message about the file to the room. Note that while only JPEG and PNG files are supported in this example, Chatkit supports files of any type.
Once the user hits the UPLOAD button, the uploadAttachment() method is triggered. This method uploads the attachment to the current room, creates an entry for the file in the room’s custom data property under the attachments key, and creates a likes array for the attachment. You’ll see how we’ll use this array when we add the ability to like an attachment.
Notice that we’re updating the custom data on the room using the currentUser.updateRoom() method. This will not work unless the current user must has the room:update permission.
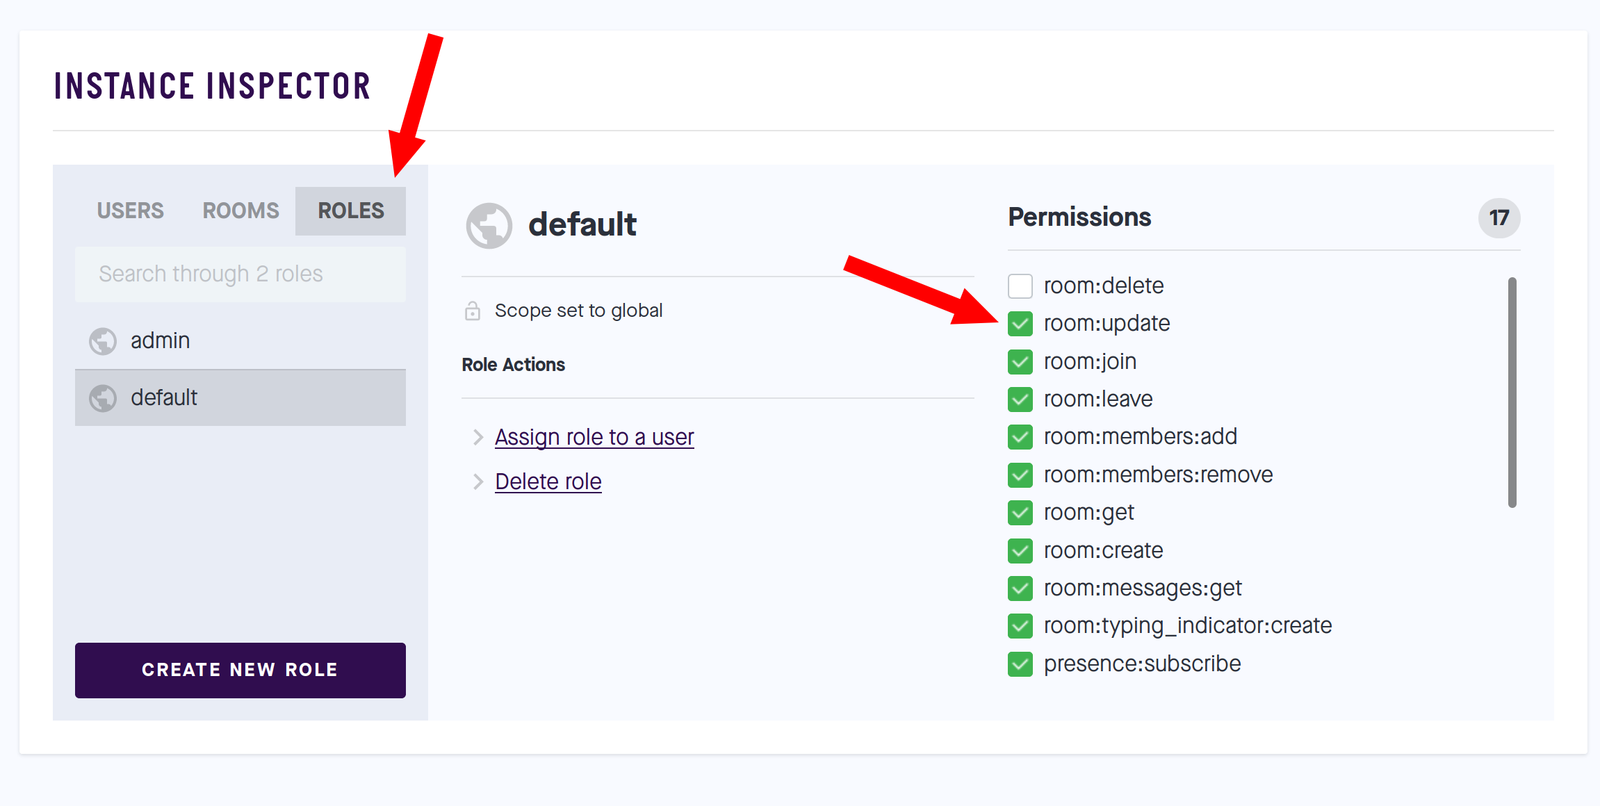
To ensure that every user has this permission, head over to the ROLES tab under Console in your Chatkit instance and update the permissions under the default role to include room:update.

If you try to upload an attachment now, you will notice that although the message associated with the file is displayed, the image itself isn’t. This is because we have not added support for viewing images within the chat yet. Let’s go ahead and take care of that in the next section.
Viewing images inline in the chatroom
Open up ChatSession.js and change it to look like this:
    // client/src/components/ChatSession.js

    import React from "react";
    import Proptypes from "prop-types";
    import { format } from "date-fns";

    const ChatSession = props => {
      const { messages } = props;
      return messages.map(message => {
        const time = format(new Date(`${message.updatedAt}`), "HH:mm");

        return (
          <li className="message" key={message.id}>
            <div>
              <span className="user-id">{message.senderId}</span>
              <span>{message.text}</span>
              {message.attachment ? (
                <div className="media">
                  <div className="media-image">
                    <img
                      className="image-attachment"
                      src={message.attachment.link}
                      alt={message.attachment.name}
                    />
                  </div>
                </div>
              ) : null}
            </div>
            <span className="message-time">{time}</span>
          </li>
        );
      });
    };

    ChatSession.propTypes = {
      messages: Proptypes.arrayOf(Proptypes.object).isRequired
    };

    export default ChatSession;
If a message has an attachment, we’ll display the attachment inline with an img tag. Uploaded images should display just fine now.
Like an attachment
To like an attachment, we’ll be making use of the likes array that is present on the attachment ID in the room’s custom data object. If a user likes the image, we’ll add the user’s ID to the likes array and if a user unlikes the image, the ID will be removed from the array. We’ll also be able to show the number of likes an attachment has using the length property of the array.
The first thing to do is add a like button to each attachment. Open up ChatSession.js and update its contents to look like this:
    // client/src/ChatSession.js

    import React from 'react';
    import Proptypes from 'prop-types';
    import { format } from 'date-fns';
    import { ThumbsUp } from 'react-feather';

    const ChatSession = props => {
      const { messages, likeImage, currentUser, currentRoom } = props;
      return messages.map(message => {
        const time = format(new Date(`${message.updatedAt}`), 'HH:mm');
        let isLiked = false;
        let attachmentLikes = [];
        if (
          message.attachment &&
          currentRoom.customData &&
          currentRoom.customData.attachments &&
          currentRoom.customData.attachments[message.id]
        ) {
          const roomAttachments = currentRoom.customData.attachments;
          attachmentLikes = roomAttachments[message.id].likes;
          isLiked = roomAttachments[message.id].likes.includes(currentUser.id);
        }

        return (
          <li className="message" key={message.id}>
            <div>
              <span className="user-id">{message.senderId}</span>
              <span>{message.text}</span>
              {message.attachment ? (
                <div className="media">
                  <div className="media-image">
                    <img
                      className="image-attachment"
                      src={message.attachment.link}
                      alt={message.attachment.name}
                    />
                    <button
                      className="media-likes like-image"
                      onClick={() => likeImage(message.id)}
                      title={`Liked by ${attachmentLikes.join(', ')}`}
                    >
                      <ThumbsUp className={isLiked ? 'liked' : ''} />
                      <span className="likes-number">{attachmentLikes.length}</span>
                    </button>
                  </div>
                </div>
              ) : null}
            </div>
            <span className="message-time">{time}</span>
          </li>
        );
      });
    };

    ChatSession.propTypes = {
      messages: Proptypes.arrayOf(Proptypes.object).isRequired,
      likeImage: Proptypes.func.isRequired,
      currentUser: Proptypes.object.isRequired,
      currentRoom: Proptypes.object.isRequired,
    };

    export default ChatSession;
Then create the likeImage function in methods.js as follows:
    // client/src/methods.js

    import Chatkit from '@pusher/chatkit-client';
    import axios from 'axios';

    function likeImage(id) {
      const { currentRoom, currentUser } = this.state;
      const roomAttachments = currentRoom.customData.attachments;
      const userId = currentUser.id;

      const index = roomAttachments[id].likes.indexOf(userId);
      if (index !== -1) {
        roomAttachments[id].likes.splice(index, 1);
      } else {
        roomAttachments[id].likes.push(userId);
      }

      const roomData = currentRoom.customData || {};
      roomData.attachments = roomAttachments;

      return currentUser.updateRoom({
        roomId: currentRoom.id,
        customData: roomData,
      });
    }

    // [..]

    export {
      sendMessage,
      handleInput,
      connectToRoom,
      connectToChatkit,
      sendDM,
      toggleFileUploadDialog,
      uploadAttachment,
      likeImage,
    };
Also, update the connectToChatkit() function in method.js by adding the onRoomUpdated connection hook:
    // client/src/methods.js

    // [..]

    function connectToChatkit(event) {
      // [..]
      axios
        .post('http://localhost:5200/users', { userId })
        .then(() => {
           // [..]

          return chatManager
            .connect({
              onAddedToRoom: room => {
                const { rooms } = this.state;
                this.setState({
                  rooms: [...rooms, room],
                });
              },
              onRoomUpdated: room => {
                const { rooms, currentRoom } = this.state;
                const index = rooms.findIndex(e => e.id === room.id);

                rooms[index] = room;

                this.setState({
                  rooms,
                });

                if (currentRoom.id === room.id) {
                  this.setState({
                    currentRoom: room,
                  });
                }
              },
            })
            .then(currentUser => {
              // [..]
            });
        })
        .catch(console.error);
    }

    // [..]
Finally, make the following changes to App.js:
    // client/src/App.js

    // [..]

    import {
      handleInput,
      connectToChatkit,
      connectToRoom,
      sendDM,
      sendMessage,
      toggleFileUploadDialog,
      uploadAttachment,
      likeImage,
    } from './methods';

    // [..]

    class App extends Component {
      constructor() {

        // [..]
        this.likeImage = likeImage.bind(this);

        this.fileAttachment = React.createRef();
      }

      render() {

       // [..]

        return (
          <div className="App">
            // [..]
            <section className="chat-screen">
              // [..]
              <ul className="chat-messages">
                {currentRoom ? (
                  <ChatSession
                    currentRoom={currentRoom}
                    currentUser={currentUser}
                    likeImage={this.likeImage}
                    messages={messages}
                  />
                ) : null}
              </ul>
              // [..]
            </section>
             // [..]
          </div>
        );
      }
    }

    export default App;
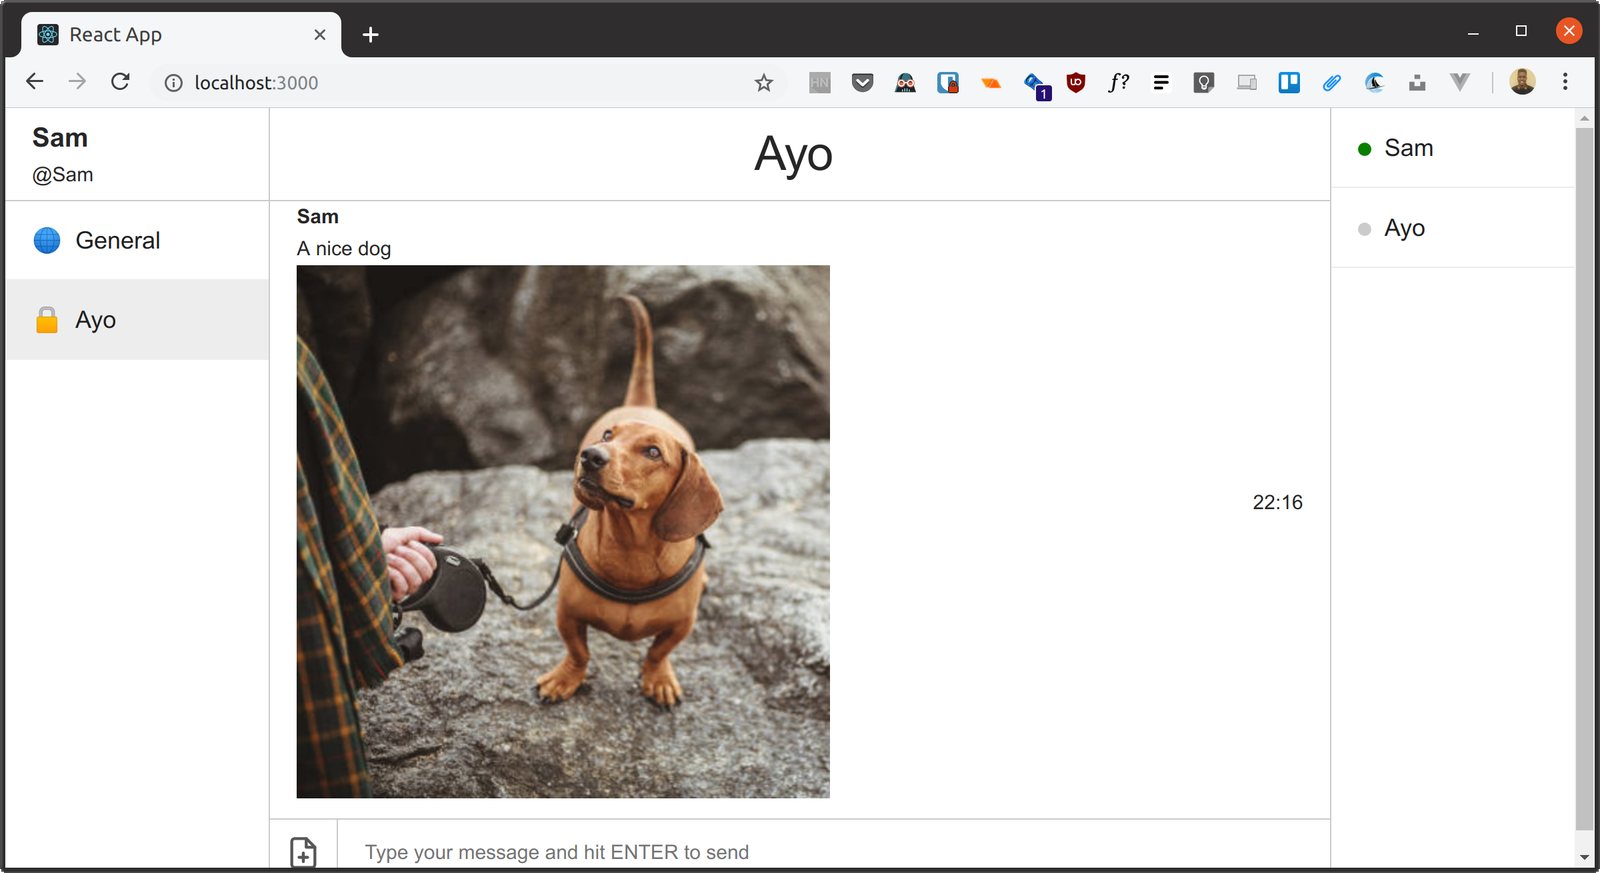
Once, the user clicks on the like button on an image attachment, the ID of the attachment is passed to the likeImage() method and the user’s ID is added to the likes array that was created earlier when the image was originally uploaded. This causes the like button to turn blue and the number of likes to increase on the button.
Wrap up
In this tutorial, we added the ability to upload image attachments, while also making it possible to like the attachments and synchronize the number of likes in realtime across all members of the chatroom.
Thanks for reading. The complete source used for this tutorial can be found in this GitHub repository.
Learn More
☞ Full Stack Developers: Everything You Need to Know
☞ Learn React.js for Beginners
☞ React Hooks Tutorial for Beginners: Getting Started With React Hooks
☞ Learn React - React Crash Course 2019 - React Tutorial with Examples
☞ Create and use private rooms in an Angular 7 chat app with Chatkit
☞ Getting started with Flutter
☞ Building a mobile chat app with Nest.js and Ionic 4
☞ React Router: Add the Power of Navigation
☞ The Complete React Web Developer Course (2nd Edition)
☞ Node with React: Fullstack Web Development
☞ Beginner Full Stack Web Development: HTML, CSS, React & Node
☞ React JS and Redux - Mastering Web Apps
#javascript #reactjs