Computer Vision Using OpenCV. This article has all the basics you need to get started with Computer Vision.
OpenCV Python Tutorial
In this OpenCV Python tutorial, we will be covering various aspects of computer vision using OpenCV in Python. OpenCV has been a vital part in the development of software for a long time. Learning OpenCV is a good way for developers to improve aspects of coding and help them build a software development career.
What Is Computer Vision?
To simplify the answer to this, let’s consider a scenario.
Let’s say you and your friends went on a vacation and you uploaded a bunch of pictures to Facebook. But now it’s going to take time to find your friends’ faces and tag them in each and every picture. Actually, Facebook is intelligent enough to tag people for you.
So, how do you think the auto-tag feature works? In simple terms, it works through computer vision.
Computer vision is an interdisciplinary field that deals with how computers can be made to gain a high-level understanding from digital images or videos.
The idea here is to automate tasks that the human visual systems can do. So, a computer should be able to recognize objects like the face of a human being or a lamppost or even a statue.
How Does A Computer Read An Image?
Consider the below image:
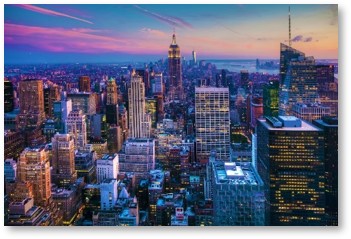
We can figure out that it is an image of the New York skyline. But can a computer find this out all on its own? The answer is no!
The computer reads any image as a range of values between 0 and 255.
For any color image, there are 3 primary channels — red, green and blue. How it works is pretty simple.
A matrix is formed for every primary color, and later, these matrices combine to provide a pixel value for the individual R, G, and B colors.
Each element of the matrices provides data pertaining to the intensity of brightness of the pixel.
Consider the following image:

As shown, the size of the image here can be calculated as B x A x 3.
Note: For a black and white image, there is only one single channel.
Now let’s look at what OpenCV actually is.
What Is OpenCV?
OpenCV is a Python library that was designed to solve computer vision problems. OpenCV was originally developed in 1999 by Intel, but later, it was supported by Willow Garage. It supports a wide variety of programming languages such as C++, Python, Java, etc. Support for multiple platforms including Windows, Linux, and MacOS.
OpenCV Python is nothing but a wrapper class for the original C++ library to be used with Python. Using this, all of the OpenCV array structures gets converted to/from NumPy arrays. This makes it easier to integrate it with other libraries that use NumPy. For example, libraries such as SciPy and Matplotlib.
Basic Operations With OpenCV?
Let’s look at various concepts ranging from loading images to resizing them and so on.
Loading an Image Using OpenCV
Import cv2

# colored Image

Img = cv2.imread ("Penguins.jpg",1)

# Black and White (gray scale)

Img_1 = cv2.imread ("Penguins.jpg",0)
As seen in the above piece of code, the first requirement is to import the OpenCV module.
Later, we can read the image using imread module. The 1 in the parameters denotes that it is a color image. If the parameter was 0 instead of 1, it would mean that the image being imported is a black and white image. The name of the image here is “Penguins.” Pretty straightforward, right?
Image Shape/Resolution:
We can make use of the shape sub-function to print out the shape of the image. Check out the below image:
Import cv2

# Black and White (gray scale)

Img = cv2.imread ("Penguins.jpg",0)

Print(img.shape)
By shape of the image, we mean the shape of the NumPy array. As you see from executing the code, the matrix consists of 768 rows and 1024 columns.
Displaying the image:
Displaying an image using OpenCV is pretty simple and straightforward. Consider the below image:
import cv2

# Black and White (gray scale)

Img = cv2.imread ("Penguins.jpg",0)

cv2.imshow("Penguins", img)

cv2.waitKey(0)

# cv2.waitKey(2000)

cv2.destroyAllWindows()
As you can see, we first import the image using imread. We require a window output to display the images, right?
Later, we wait for a user event. waitKey makes the window static until the user presses a key. The parameter passed to it is the time in milliseconds.
And lastly, we use destroyAllWindows to close the window based on the waitForKey parameter.
Resizing the image:
Similarly, resizing an image is very easy. Here’s another code snippet:
import cv2

# Black and White (gray scale)

img = cv2.imread ("Penguins.jpg",0)

resized_image = cv2.resize(img, (650,500))

cv2.imshow("Penguins", resized_image)

cv2.waitKey(0)

cv2.destroyAllWindows()
Here, the resize function is used to resize an image to the desired shape. The parameter here is the shape of the new resized image.
The rest of the code is pretty simple compared to the previous one, correct?
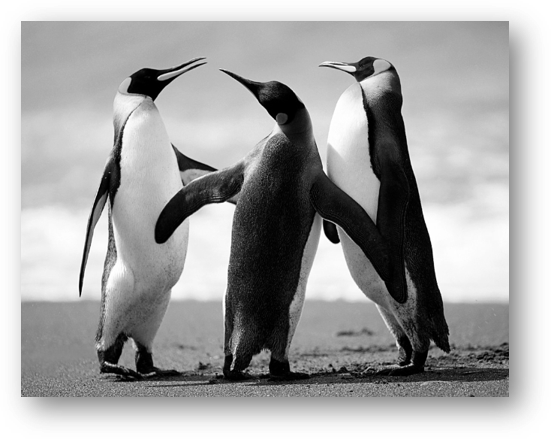
I am sure you guys are curious to look at the penguins, right? This is the image we were looking to output all this while!
There is another way to pass the parameters to the resize function. Check out the following representation:
Resized_image = cv2.resize(img, int(img.shape[1]/2), int(img.shape[0]/2)))
Here, we get the new image shape to be half of that of the original image.
Face Detection Using OpenCV
This seems complex at first, but it is very easy. Let me walk you through the entire process, and you will feel the same.
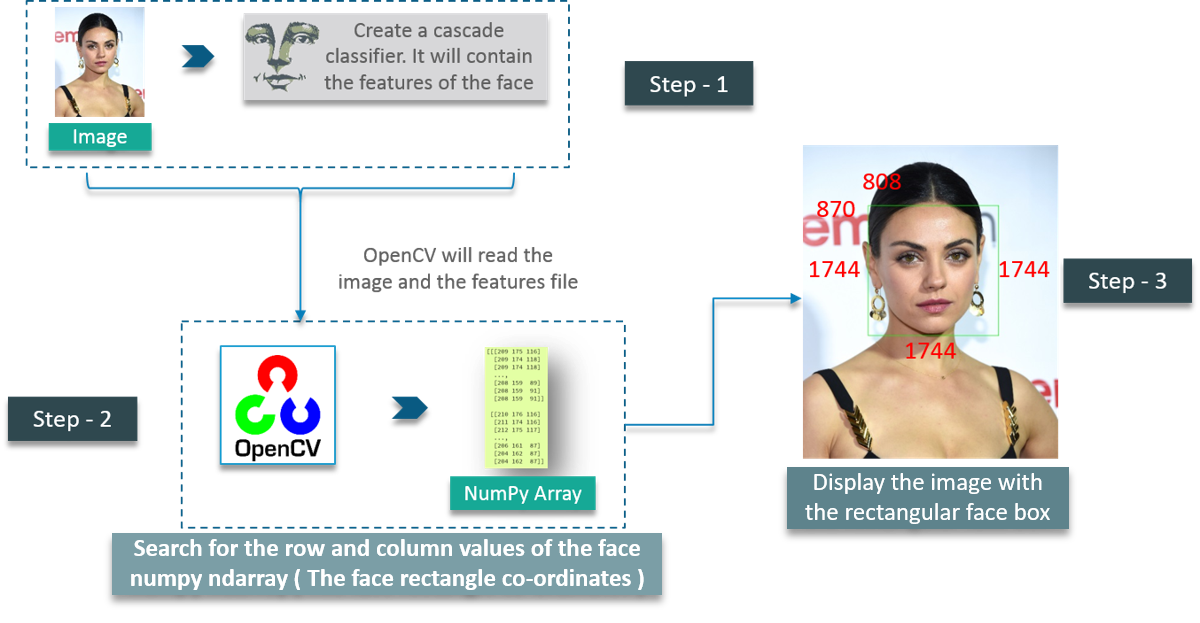
Step 1: Considering our prerequisites. We will require an image, to begin with. Later, we need to create a cascade classifier that will eventually give us the features of the face.
Step 2: This step involves making use of OpenCV, which will read the image and the features file. So at this point, there are NumPy arrays at the primary data points.
All we need to do is to search for the row and column values of the face NumPy ndarray. This is the array with the face rectangle coordinates.
Step 3: This final step involves displaying the image with the rectangular face box.
Check out the following image, here I have summarized the 3 steps in the form of an image for easier readability:
Pretty straightforward, right?
First, we create a CascadeClassifier object to extract the features of the face as explained earlier. The path to the XML file that contains the face features is the parameter here.
The next step would be to read an image with a face on it and convert it into a black and white image using COLOR_BGR2GREY. Followed by this, we search for the coordinates for the image. This is done using detectMultiScale.
What coordinates, you ask? It’s the coordinates for the face rectangle. The scaleFactor is used to decrease the shape value by 5 percent until the face is found. So, on the whole, the smaller the value, the greater the accuracy.
Finally, the face is printed on the window.
Adding the Rectangular Face Box:
This logic is very simple — as simple as making use of a for loop statement. Check out the following image:
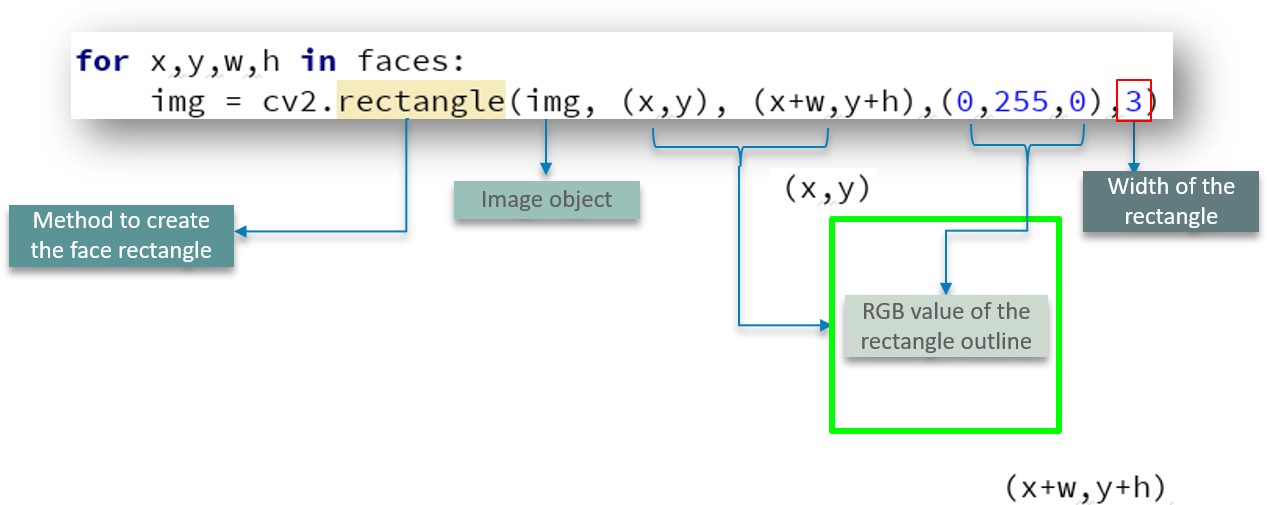 We define the method to create a rectangle using **cv2.rectangle ** by passing parameters such as the image object, RGB values of the box outline and the width of the rectangle.
Let us check out the entire code for face detection:
import cv2

# Create a CascadeClassifier Object
face_cascade = cv2.CascadeClassifier("haarcascade_frontalface_default.xml")

# Reading the image as it is
img = cv2.imread("photo.jpg")

# Reading the image as gray scale image
gray_img = cv2.cvtColor(img,cv2.COLOR_BGR2GRAY)

# Search the co-ordintes of the image
faces = face_cascade.detectMultiScale(gray_img, scaleFactor = 1.05,
                                      minNeighbors=5)
for x,y,w,h in faces:
    img = cv2.rectangle(img, (x,y), (x+w,y+h),(0,255,0),3)

resized = cv2.resize(img, (int(img.shape[1]/7),int(img.shape[0]/7)))

cv2.imshow("Gray", resized)

cv2.waitKey(0)

cv2.destroyAllWindows()
Capturing Videos Using OpenCV
Capturing videos using OpenCV is pretty simple as well. The following loop will give you a better idea. Check it out:
The images are read one-by-one, hence videos are produced due to fast processing of frames, which makes the individual images move.
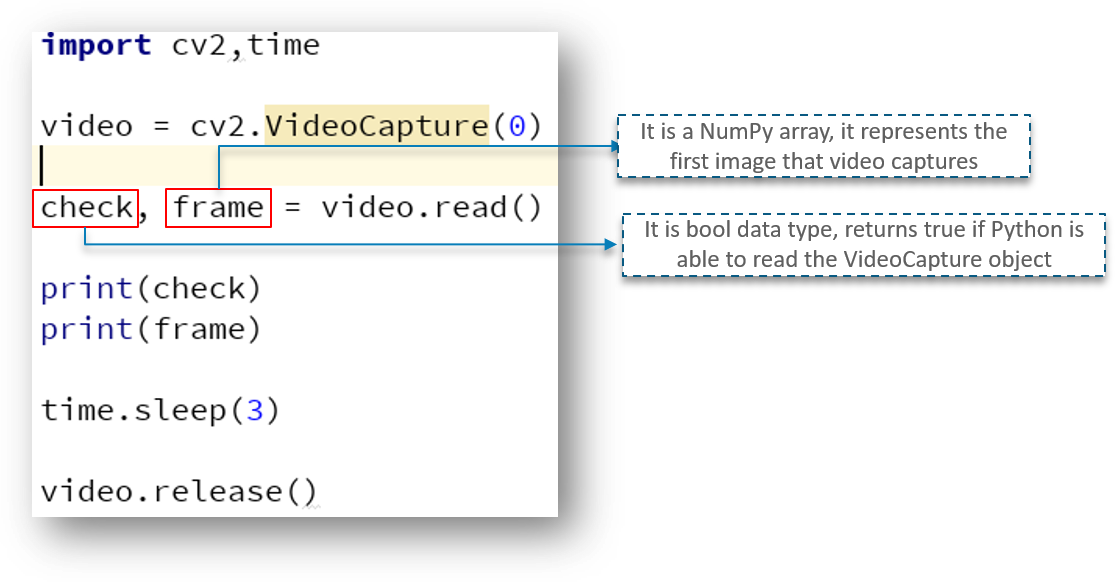
Check out the following image:
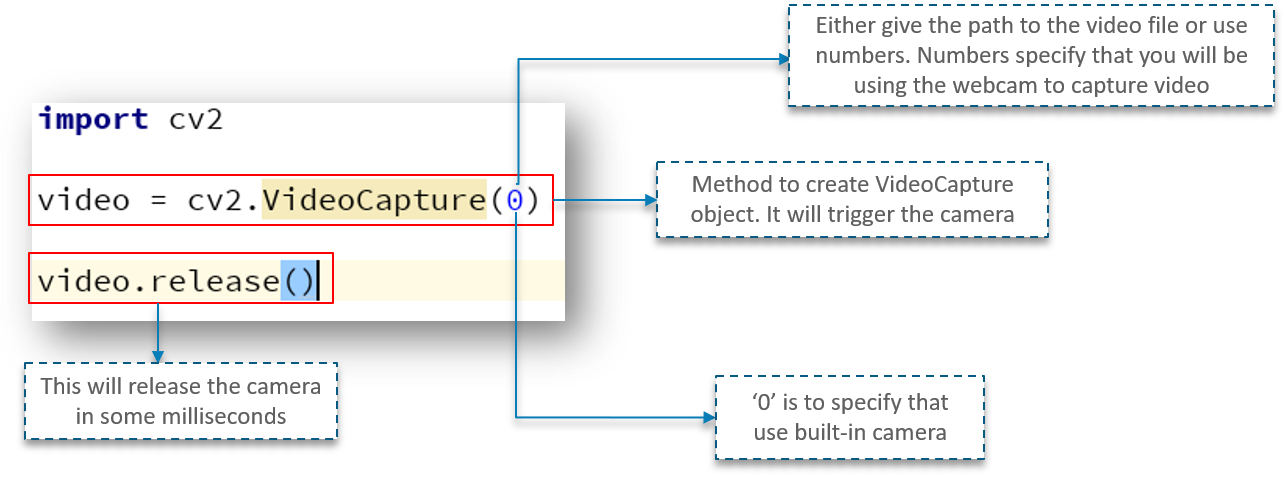
First, we import the OpenCV library as usual. Next, we have a method called VideoCapture, which is used to create the VideoCapture object. This method is used to trigger the camera on the user’s machine. The parameter to this function denotes if the program should make use of the built-in camera or an add-on camera. ‘0’ denotes the built-in camera in this case.
And lastly, the release method is used to release the camera in a few milliseconds.
When you go ahead and type in and try to execute the above code, you will notice that the camera light switches on for a split second and turns off later. Why does this happen?
This happens because there is no time delay to keep the camera functional.
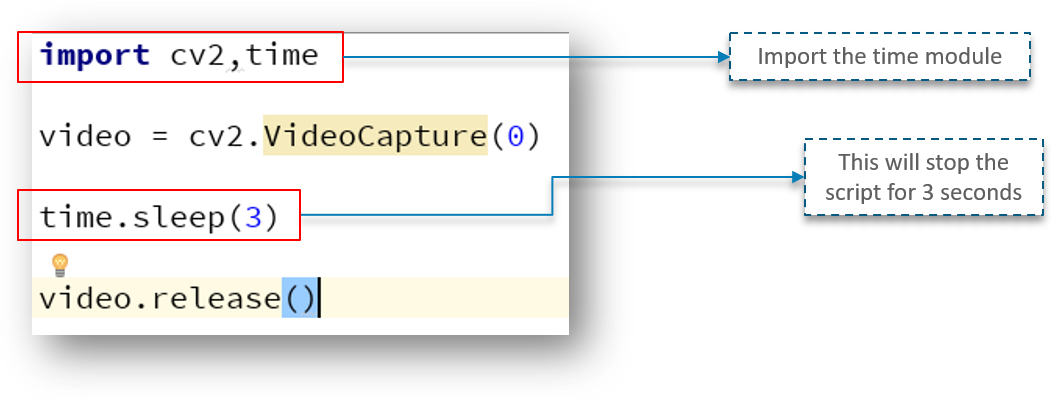
Looking at the above code, we have a new line called time.sleep(3). This makes the script stop for 3 seconds. Note that the parameter passed is the time in seconds. So, when the code is executed, the webcam will be turned on for 3 seconds.
Adding the Window:
Adding a window to show the video output is pretty simple and can be compared to the same methods used for images. However, there is a slight change. Check out the following code:
I am pretty sure you can make the most sense from the above code apart from one or two lines.
Here, we have defined a NumPy array that we use to represent the first image that the video captures. This is stored in the frame array.
We also have check. This is a boolean datatype that returns True if Python is able to access and read the VideoCapture object.
Check out the output below:
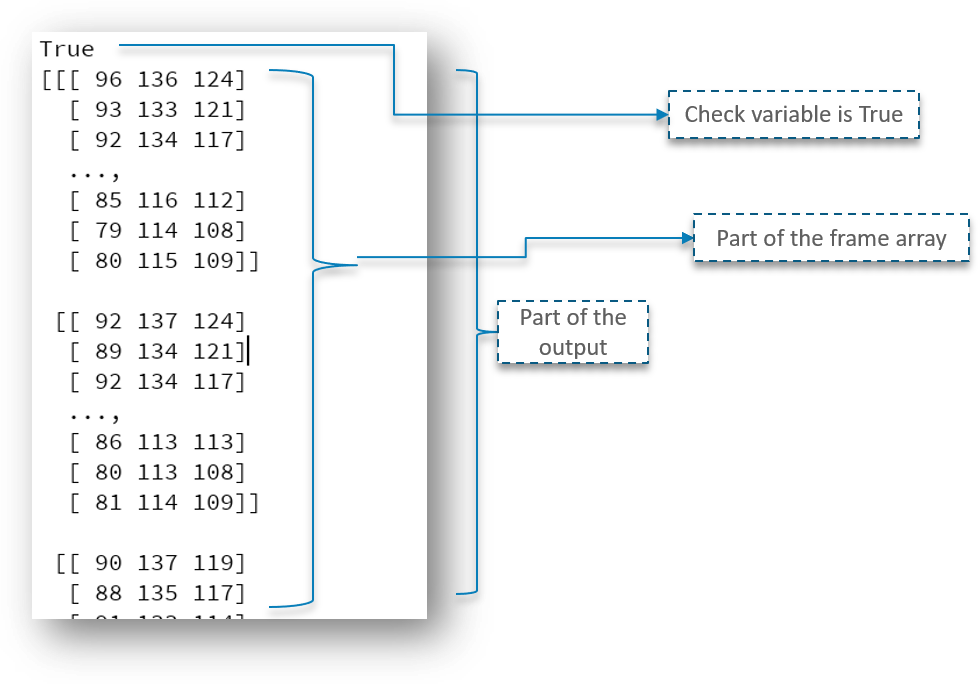
As you can see, we got the output as True and the part of the frame array is printed.
But we need to read the first frame/image of the video to begin, correct?
To do exactly that, we need to first create a frame object that will read the images of the VideoCapture object.
As seen above, the imshow method is used to capture the first frame of the video.
All this while, we have tried to capture the first image/frame of the video.
So how do we go about capturing the video instead of the first image in OpenCV?
Capturing Video Directly:
In order to capture the video, we will be using the while loop. The while condition will be such that unless ‘check’ is True, then Python will display the frames.
Here’s the code snippet image:
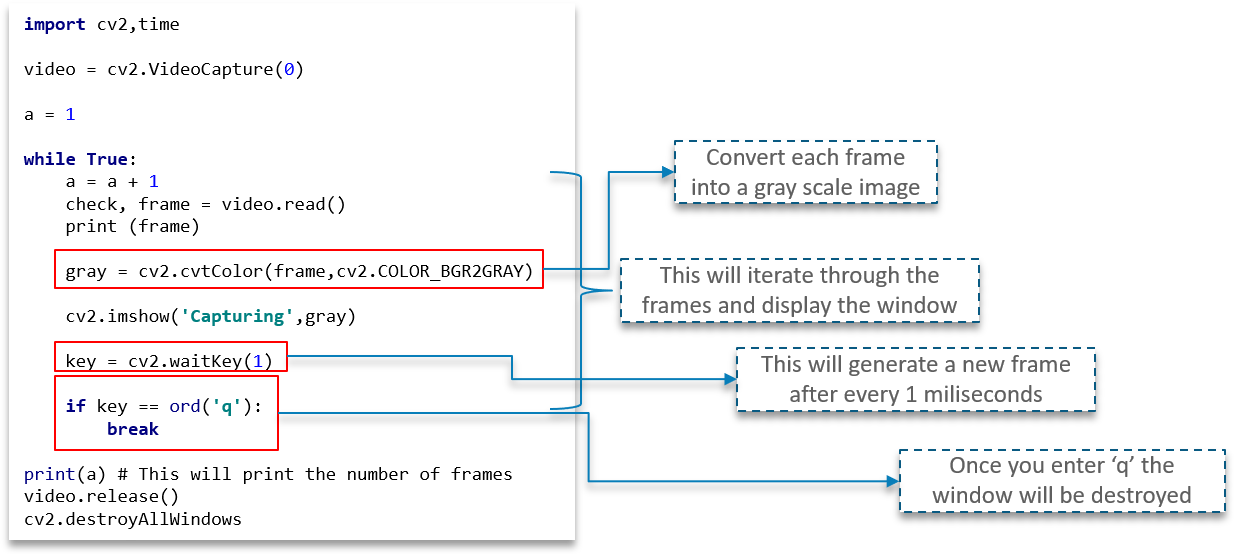
We make use of the cvtColor function to convert each frame into a grey-scale image as explained earlier.
waitKey(1) will make sure to generate a new frame after every millisecond of a gap.
It is important to note that the while loop is completely in play to help iterate through the frames and eventually display the video.
There is a user event trigger here as well. Once the ‘q’ key is pressed by the user, the program window closes.
OpenCV is pretty easy to grasp, right? I personally love how good the readability is and how quickly a beginner can get started working with OpenCV.
Use Case: Motion Detector Using OpenCV
Problem Statement
You have been approached by a company that is studying human behavior. Your task is to give them a webcam that can detect motion in front of it. This should return a graph, and this graph should contain how long the human/object was in front of the camera.
So, now that we have defined our problem statement, we need to build a solution logic to approach the problem in a structured way.
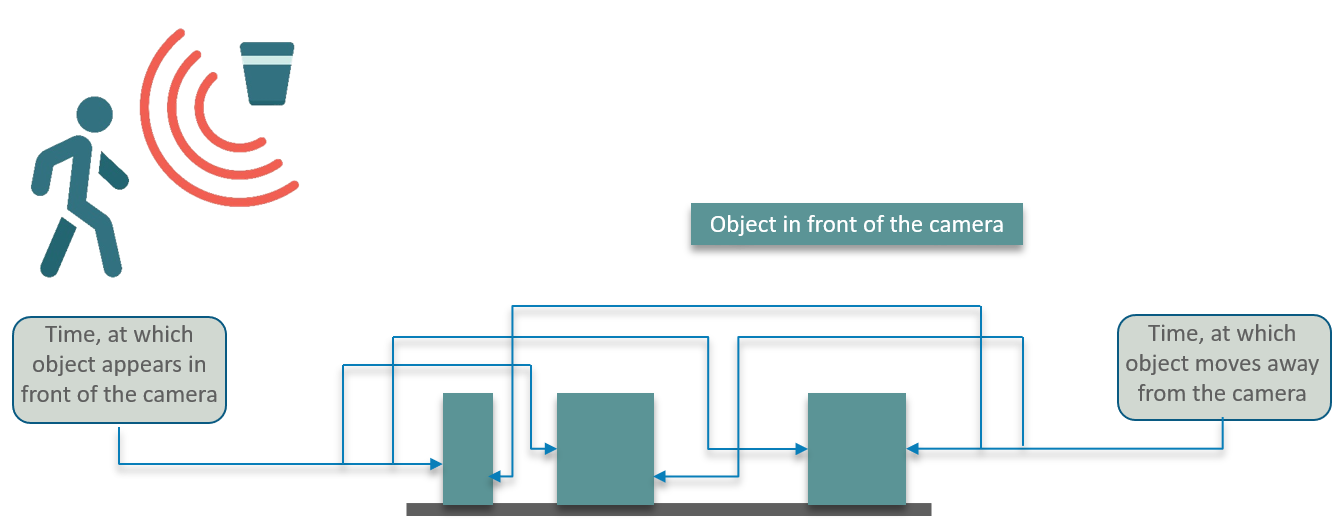
Consider the below diagram:
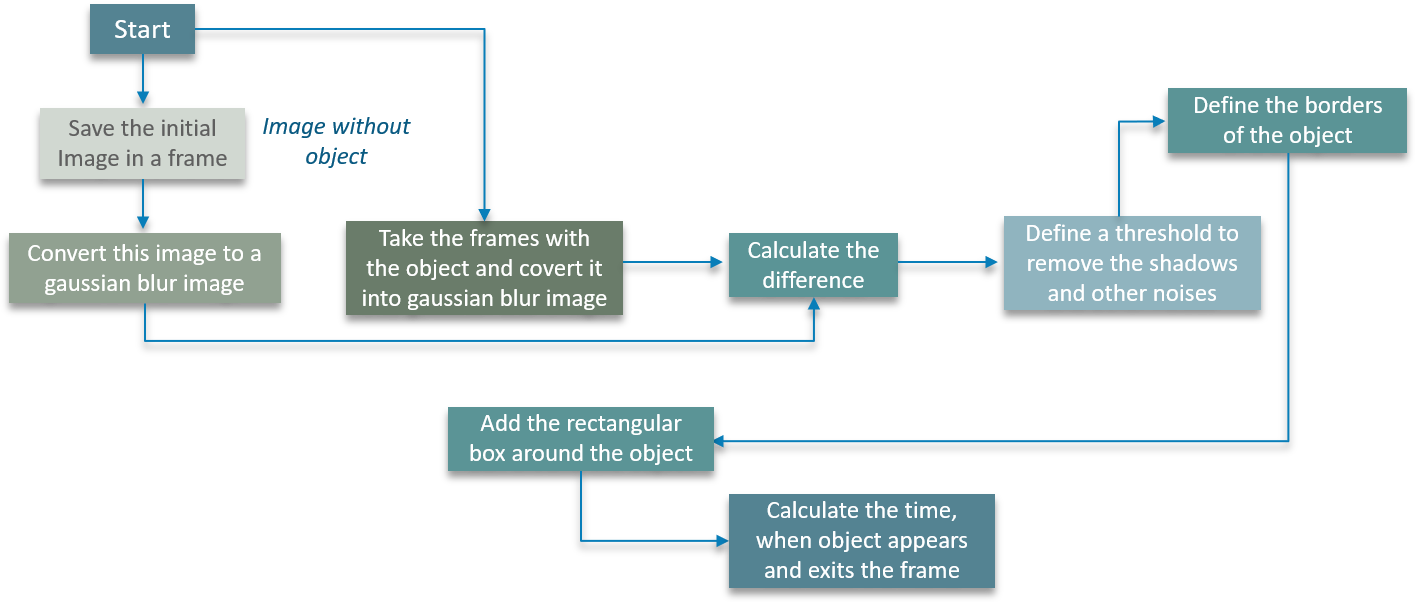
Initially, we save the image in a particular frame.
The next step involves converting the image to a Gaussian blur image. This is done to ensure we calculate a palpable difference between the blurred image and the actual image.
At this point, the image is still not an object. We define a threshold to remove blemishes, such as shadows and other noises in the image.
Borders for the object are defined later and we add a rectangular box around the object as we discussed earlier on in the tutorial.
Lastly, we calculate the time at which the object appears and exits the frame.
Pretty easy, right?
Here’s the code snippet:
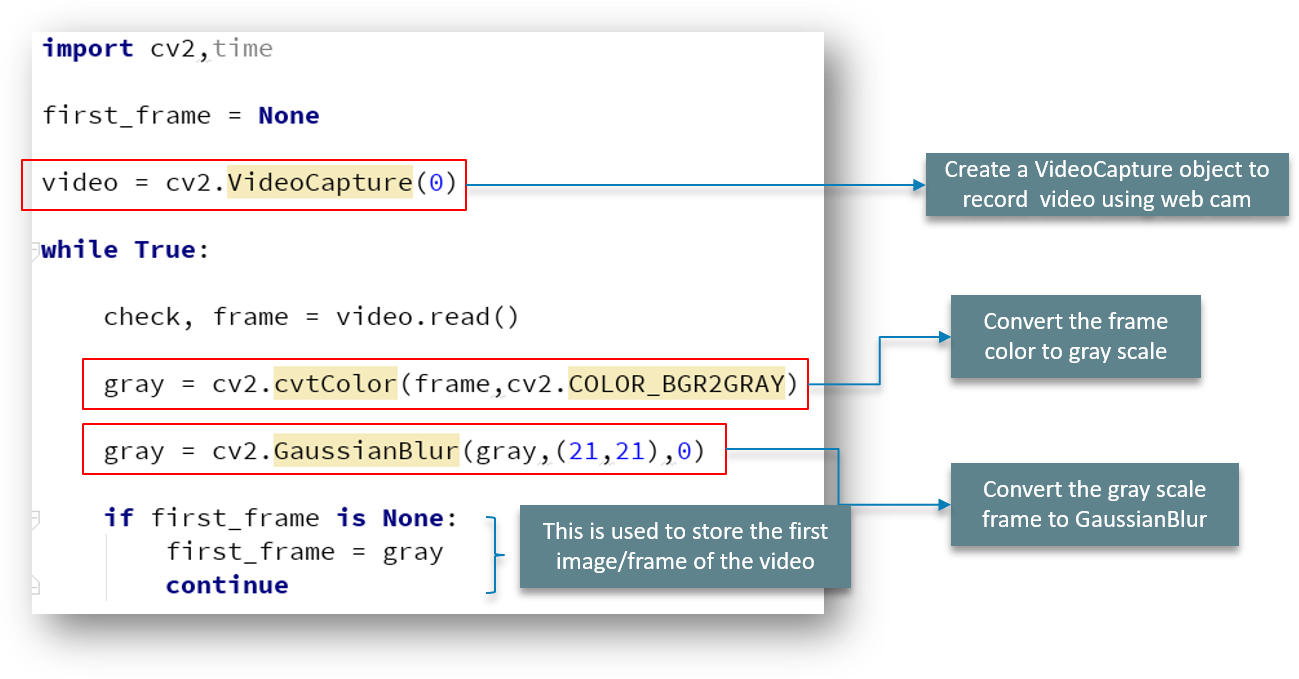
The same principle follows through here as well. We first import the package and create the VideoCapture object to ensure we capture video using the webcam.
The while loop iterates through the individual frames of the video. We convert the color frame to a grey-scale image and later convert this grey-scale image to Gaussian blur.
We need to store the first image/frame of the video, correct? We make use of the if statement for this purpose alone.
Now, let us dive into a little more code:
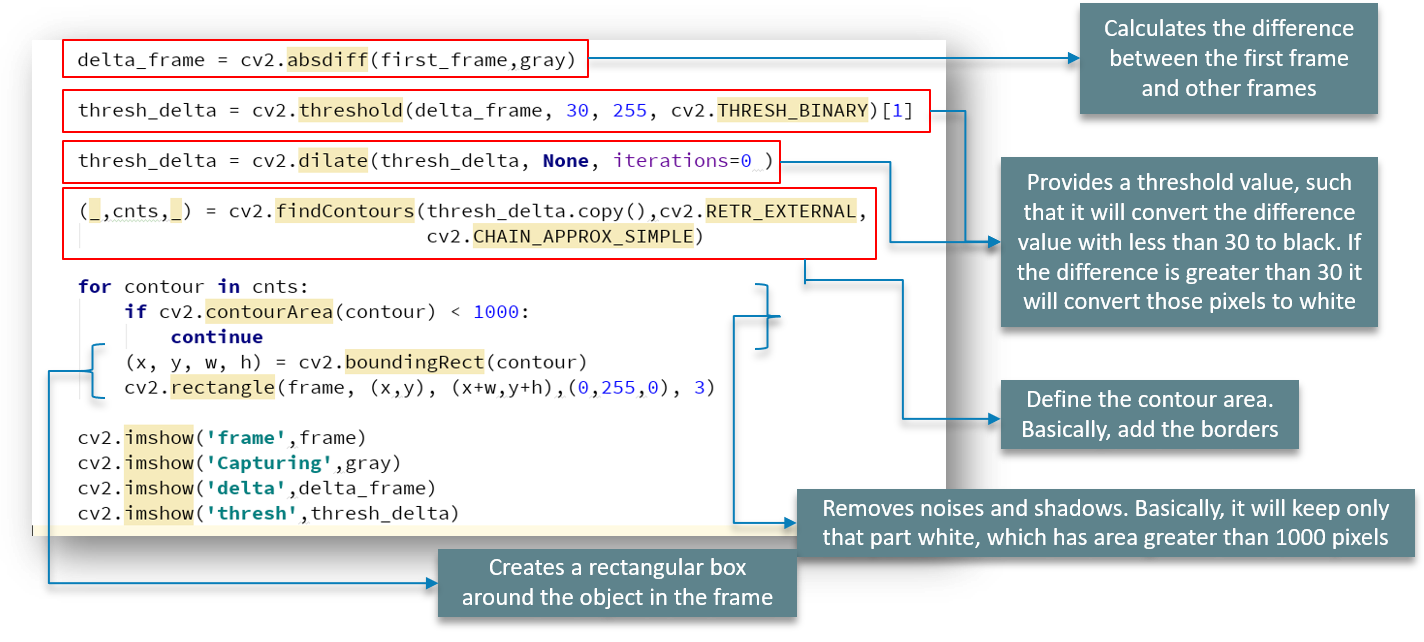
We make use of the absdiff function to calculate the difference between the first occurring frame and all the other frames.
The threshold function provides a threshold value such that it will convert the difference value with less than 30 to black. If the difference is greater than 30, it will convert those pixels to white color. THRESH_BINARY is used for this purpose.
Later, we make use of the findContours function to define the contour area for our image. And we add in the borders at this stage as well.
The contourArea function, as previously explained, removes the noises and the shadows. To make it simple, it will keep only that part white, which has an area greater than 1000 pixels as we’ve defined for that.
Later, we create a rectangular box around our object in the working frame.
And followed by this is this simple code:

As discussed earlier, the frame changes every 1 millisecond, and when the user enters ‘q’, the loop breaks and the window closes.
One thing that remains with our use-case is that we need to calculate the time for which the object was in front of the camera.
Calculating the Time:
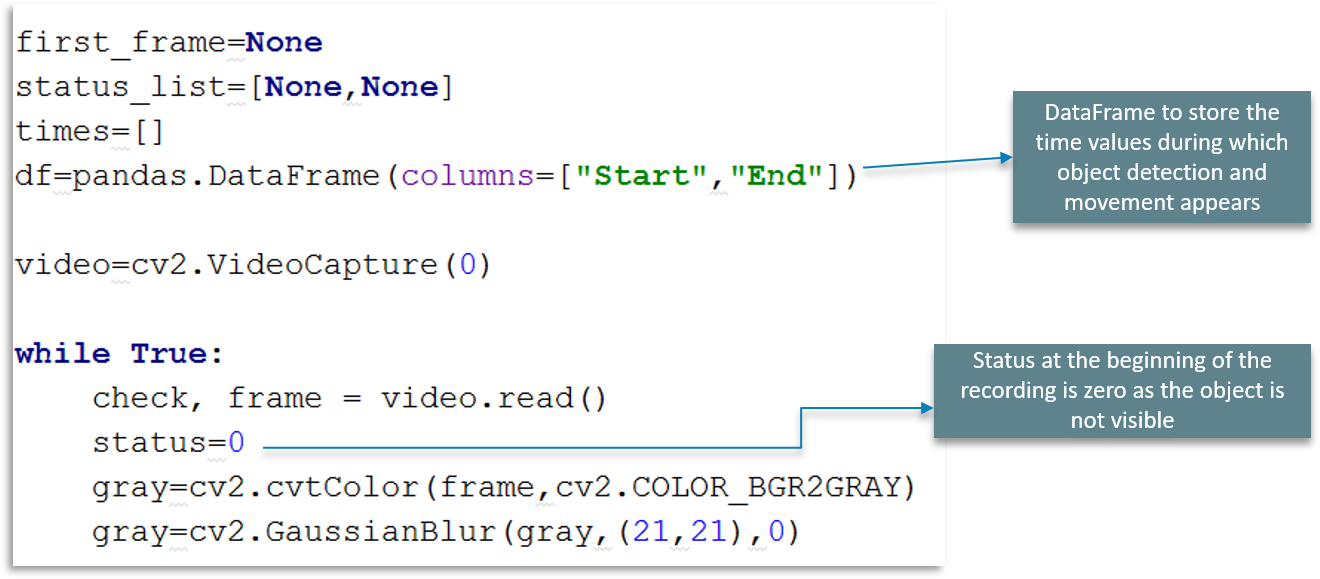
We make use of DataFrame to store the time values during which object detection and movement appear in the frame.
Followed by that is the VideoCapture function we explained earlier. But here, we have a flag bit we call status. We use this status at the beginning of the recording to be zero, as the object is not initially visible.
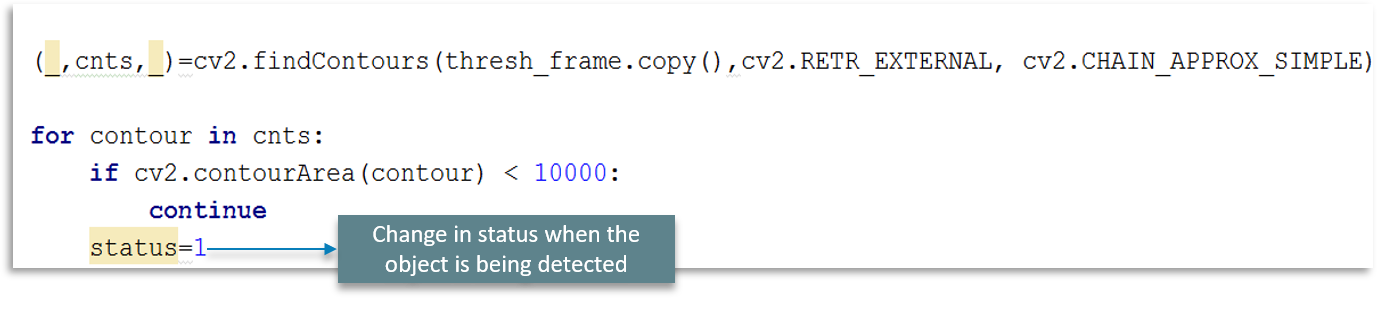
We will change the status flag to 1 when the object is being detected as shown in the above figure. Pretty simple, right?
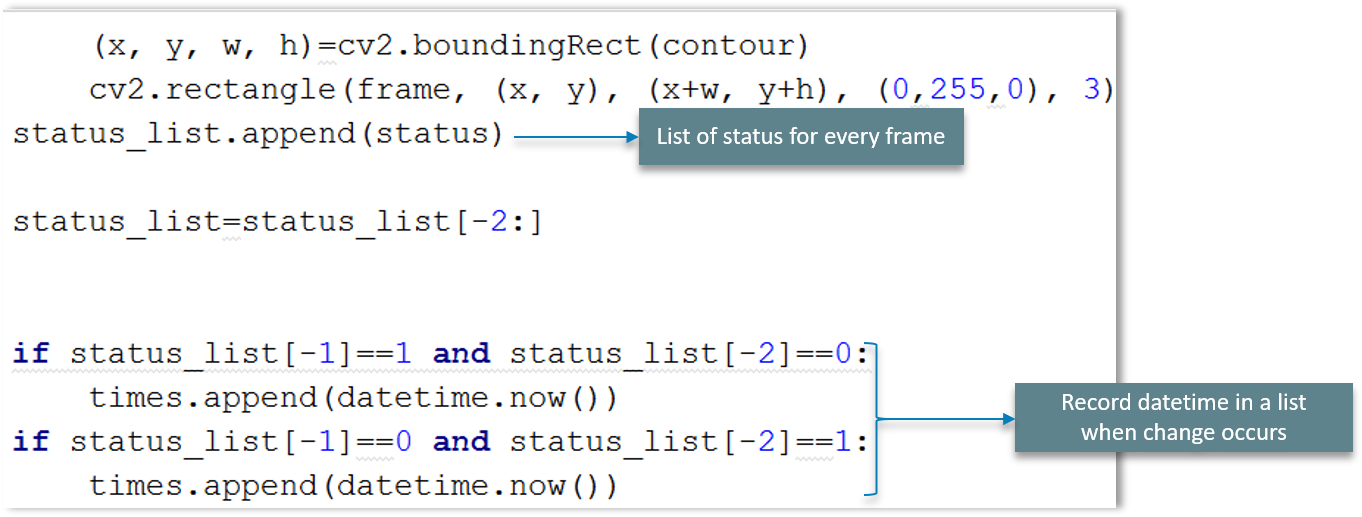
We are going to make a list of the status for every scanned frame and later record the date and time using datetime in a list if and where a change occurs.
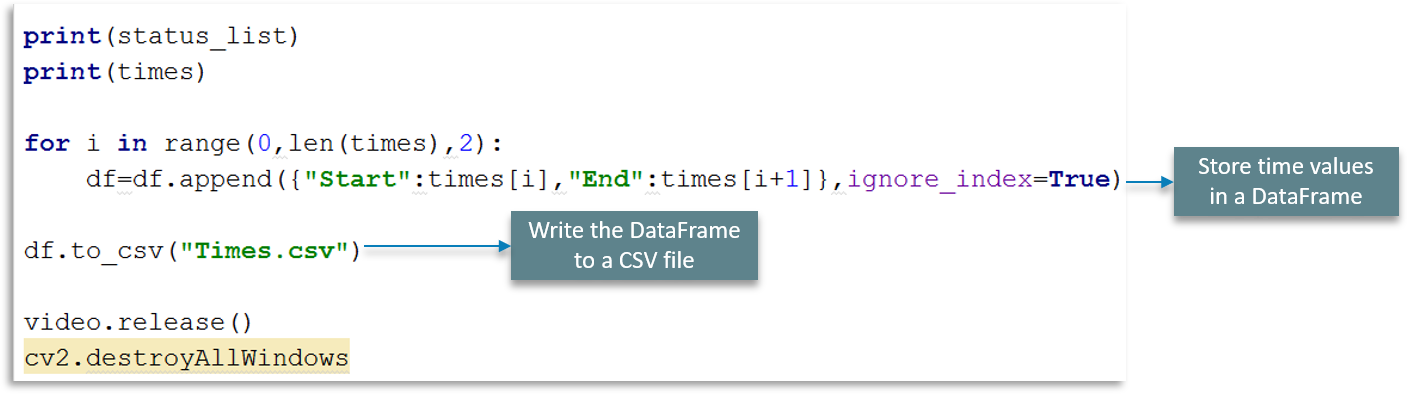
We store the time values in a DataFrame as shown in the above explanatory diagram. We’ll conclude by writing the DataFrame to a CSV file as shown.
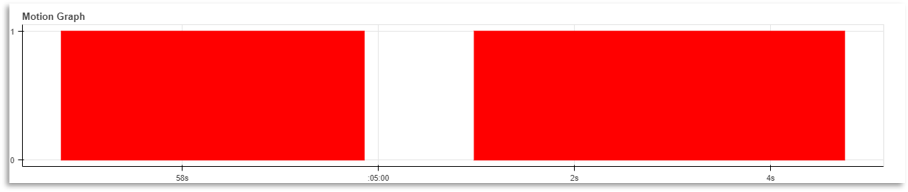
Plotting the Motion Detection Graph:
The final step in our use-case is to display the results. We are displaying the graph, which denotes the motion on 2-axes. Consider the below code:
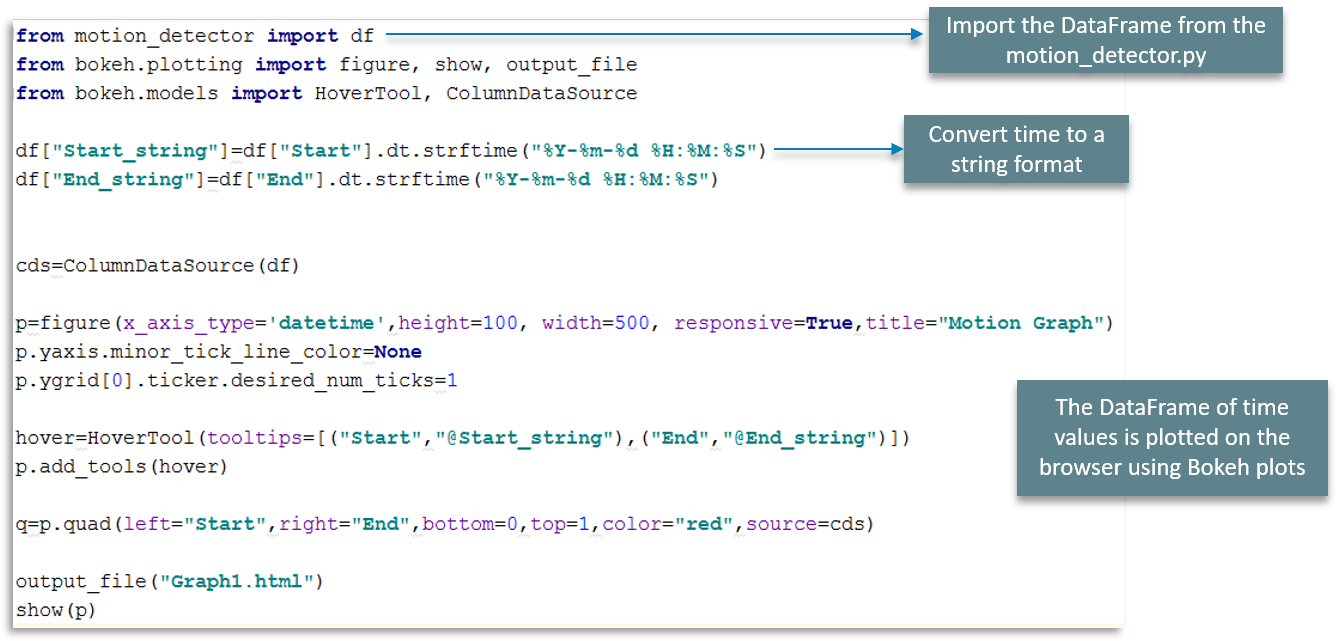
To begin with, we import the DataFrame from the motion_detector.py file.
The next step involves converting time to a readable string format, which can be parsed.
Lastly, the DataFrame of time values is plotted on the browser using Bokeh plots.
Output:
Conclusion
I hope this OpenCV Python tutorial helps you in learning all the fundamentals needed to get started with OpenCV using Python.
This will be very handy when you are trying to develop applications that require image recognition and similar principles. Now, you should also be able to use these concepts to develop applications easily with the help of OpenCV in Python.
#python #opencv