Add emoji, GIFs and rich link previews to an Angular 7 chatroom
In this tutorial, you’ll learn three common features of Angular 7 chat chatroom and described how they can be implemented in a Chatkit powered application.
Sometimes, sending only text just isn’t quite enough. This is where the ability to spice up a conversation with GIFs and emoji becomes invaluable. We can provide a richer user experience by adding the ability to search for and select emoji and animated GIFs directly in the chatroom.
An added feature we’ll be looking at in this tutorial is allowing users see what’s behind a link shared in the chatroom without clicking on it using rich link previews. This gives the user more information about a link so they can decide whether to click through or not. In the sections below, I’ll show you how to build out all these features into your Chatkit powered app.
Project setup
This tutorial is a continuation of the How to build a Chatroom with Angular 7 and Chatkit one, so you need to complete that first before moving on to this one. You can clone this GitHub repository and follow the instructions in the README file to get set up.
Prerequisites
- Basic understanding of Angular and Node.js
- Node.js (version 8 or later) and npm. Installation instructions are here.
Install additional dependencies
Run the command below from the client directory to install all the additional dependencies we’ll be needing in the course of building this application:
npm install giphy-api skeleton-css @ctrl/ngx-emoji-mart angular-feather -S
Update the application styles
I made some changes to the CSS to account for the new features we’ll be building, so open up app.component.css and update the styles as follows:
    // client/src/app/app.component.css

    html {
      box-sizing: border-box;
    }

    *, *::before, *::after {
      box-sizing: inherit;
      margin: 0;
      padding: 0;
    }

    body {
      font-family: -apple-system,BlinkMacSystemFont,"Segoe UI",Roboto,Oxygen-Sans,Ubuntu,Cantarell,"Helvetica Neue",sans-serif;
    }

    .App {
      width: 100vw;
      height: 100vh;
      display: flex;
      overflow: hidden;
    }

    ul {
      list-style: none;
    }

    .sidebar {
      flex-basis: 20%;
      background-color: #300d4f;
      color: #fff;
      padding: 5px 10px;
    }

    .sidebar input {
      color: #333;
    }

    .sidebar section {
      margin-bottom: 20px;
    }

    .sidebar h2 {
      margin-bottom: 10px;
    }

    .user-list li {
      margin-bottom: 10px;
      font-size: 16px;
      display: flex;
      align-items: center;
    }

    .presence {
      display: inline-block;
      width: 20px;
      height: 20px;
      background-color: #fff;
      margin-right: 10px;
      border-radius: 50%;
    }

    .presence.online {
      background-color: green;
    }

    .chat-window {
      flex-grow: 1;
      display: flex;
      flex-direction: column;
      justify-content: space-between;
      position: relative;
    }

    .chat-window > * {
      padding: 10px 20px;
    }

    .chat-header, .chat-footer {
      display: flex;
      align-items: center;
    }

    .chat-header {
      border-bottom: 1px solid #ccc;
    }

    .chat-session {
      height: calc(100vh - 108px);
      overflow-y: auto;
      position: relative;
    }

    .message-list {
      display: flex;
      flex-direction: column;
      justify-content: flex-end;
    }

    .user-message {
      margin-top: 10px;
    }

    .user-message span {
      display: block;
    }

    .user-id {
      font-weight: bold;
      margin-bottom: 3px;
    }

    .chat-footer {
      border-top: 1px solid #ccc;
    }

    .chat-footer form, .chat-footer input {
      width: 100%;
    }

    .chat-footer {
      padding: 0 !important;
    }

    .chat-footer form {
      display: flex;
      align-items: center;
      width: 100%;
    }

    .chat-footer input {
      height: 50px;
      flex-grow: 1;
      line-height: 35px;
      padding-left: 20px;
      border-radius: 0;
      border-top-left-radius: 0;
      border-top-right-radius: 0;
      border-bottom-left-radius: 0;
      border-bottom-right-radius: 0;
      border: none;
      font-size: 16px;
      color: #333;
      min-height: auto;
      overflow-y: hidden;
      resize: none;
      border-left: 1px solid #ccc;
    }

    .emoji-mart {
      position: fixed;
      bottom: 70px;
      right: 20px;
    }

    .chat-footer button {
      border: none;
      width: 50px;
      height: auto;
      padding: 0;
      margin-bottom: 0;
      display: flex;
      align-items: center;
      justify-content: center;
    }

    .toggle-emoji svg {
      width: 28px;
      height: 28px;
    }

    .giphy-search {
      position: fixed;
      bottom: 70px;
      right: 20px;
      width: 300px;
      height: 300px;
      overflow-y: auto;
      border: 1px solid #ccc;
      border-radius: 4px;
      background-color: #fff;
    }

    .giphy-search input {
      width: 100%;
    }

    img {
      max-width: 100%;
    }

    .gif-result img {
      cursor: pointer;
    }
Next, we need to tell the Angular CLI of some of the other styles our application needs. These styles are from the dependencies we just installed. Open up angular.json and change the styles property as shown below. By doing this, you’re specifying that the referenced styles be included in your application bundle.
    // client/angular.json

    "styles": [
      "src/styles.css",
      "node_modules/@ctrl/ngx-emoji-mart/picker.css",
      "node_modules/skeleton-css/css/skeleton.css",
      "node_modules/skeleton-css/css/normalize.css"
    ]
Start the application
If you haven’t already, install angular-cli globally by running npm install -g @angular/cli in the terminal, then cd to your client directory and run ng serve to build and serve the app at http://localhost:4200. Don’t forget to start your Node.js server by running node server.js from the project root.

Set up the app icons
We’ll be making use of Feather Icons for our iconography needs via the angular-feather package. Before we can use it in our template files, a couple of additional steps are needed.
First, run the command below from the client directory to generate a module to host the icons we’ll import:
ng generate module icons
The command above should create a new icons.module.ts file in client/src/app/icons/icons.module.ts. Open up the file, and change it to look like this:
    // client/src/app/icons/icons.module.ts

    import { NgModule } from '@angular/core';
    import { IconSmile } from 'angular-feather';

    const icons = [
      IconSmile,
    ];

    @NgModule({
      exports: icons
    })
    export class IconsModule { }
We’re making use of the smile icon in the emoji picker toggle, so we’ve imported it above. Finally, we need to import IconsModule in our app.module.ts and declare it in the imports array as shown below.
    // client/src/app/app.module.ts

    // [..]
    import { IconsModule } from './icons/icons.module';

    @NgModule({
      declarations: [
        AppComponent,
      ],
      imports: [
        BrowserModule,
        FormsModule,
        IconsModule,
      ],
      providers: [],
      bootstrap: [AppComponent]
    })

    export class AppModule { }
Now, we’ll be able to use the smile icon in our templates like this <i-smile></i-smile> as you’ll see in the next section.
Add an emoji picker to the room
It is important to provide easy access to emojis in a chat app, and the accepted way of doing so is using an emoji picker where users can easily search for and add an emoji to their message. We’ll be making use of the emoji-mart package to build this feature into our app. Although originally built for React apps, this package has been ported for use in Angular applications as well.
First, let’s add a button that can be used to toggle the emoji picker. Open up app.component.html and change it to look like this:
    // client/src/app/app.component.html

    <div class="App">
      <!-- [..] -->

      <main class="chat-window">
        <!-- [..] -->
        <footer class="chat-footer">
          <form (ngSubmit)='sendMessage()'>
            <button
              type="button"
              class="toggle-emoji"
              (click)="toggleEmojiPicker()"
              >
              <i-smile></i-smile>
            </button>
            <input placeholder="Type a message. Hit Enter to send" type="text"
            name="message" [(ngModel)]="message">
          </form>
        </footer>
      </main>
    </div>
Next, update the app.component.ts as follows:
    // client/src/app/app.component.ts

    // [..]
    export class AppComponent {
      // [..]
      showEmojiPicker = false;

      // [..]

      toggleEmojiPicker() {
        this.showEmojiPicker = !this.showEmojiPicker;
      }

      // [..]
    }
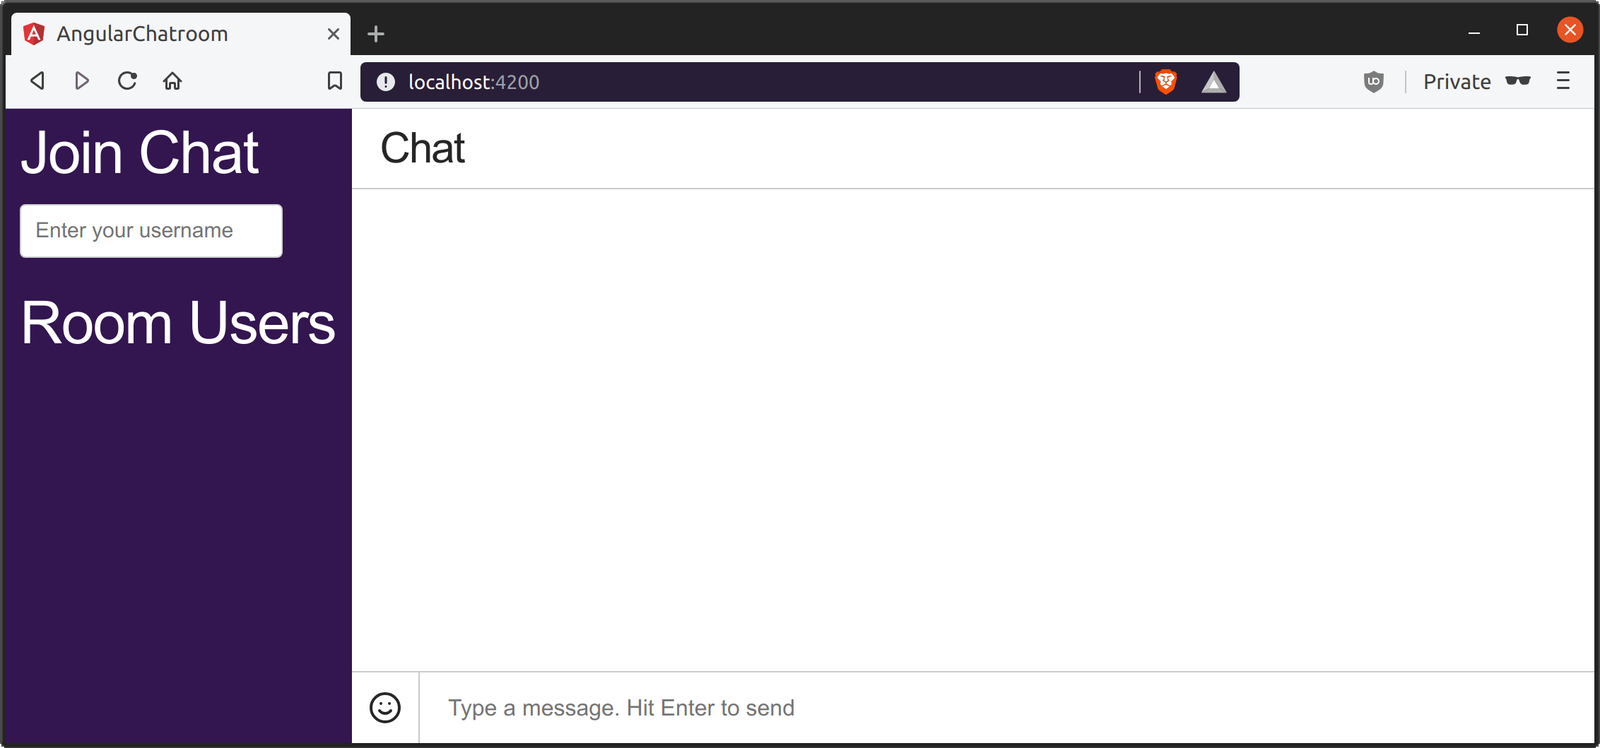
The app should look like this now, and the button will toggle the showEmojiPicker flag to true or false when clicked via the toggleEmojiPicker() method.
The next step is to toggle the visibility of the emoji picker based on the value of showEmojiPicker. To use the emoji picker, we need to import the PickerModule in app.module.ts and declare it in the imports array:
    // client/src/app/app.module.ts

    // [..]
    import { PickerModule } from '@ctrl/ngx-emoji-mart';

    @NgModule({
      declarations: [
        AppComponent,
      ],
      imports: [
        BrowserModule,
        FormsModule,
        IconsModule,
        PickerModule,
      ],
      providers: [],
      bootstrap: [AppComponent]
    })

    export class AppModule { }
Then use the emoji mart component in app.component.html:
    // client/src/app/app.component.html

    <div class="App">
      <!-- [..] -->

      <main class="chat-window">
        <!-- [..] -->
        <section class="chat-session">
          <!-- [..] -->

          <emoji-mart class="emoji-mart" set="emojione" (emojiSelect)="addEmoji($event)" *ngIf="showEmojiPicker" title="Pick your emoji…"></emoji-mart>
        </section>

      </main>
    </div>
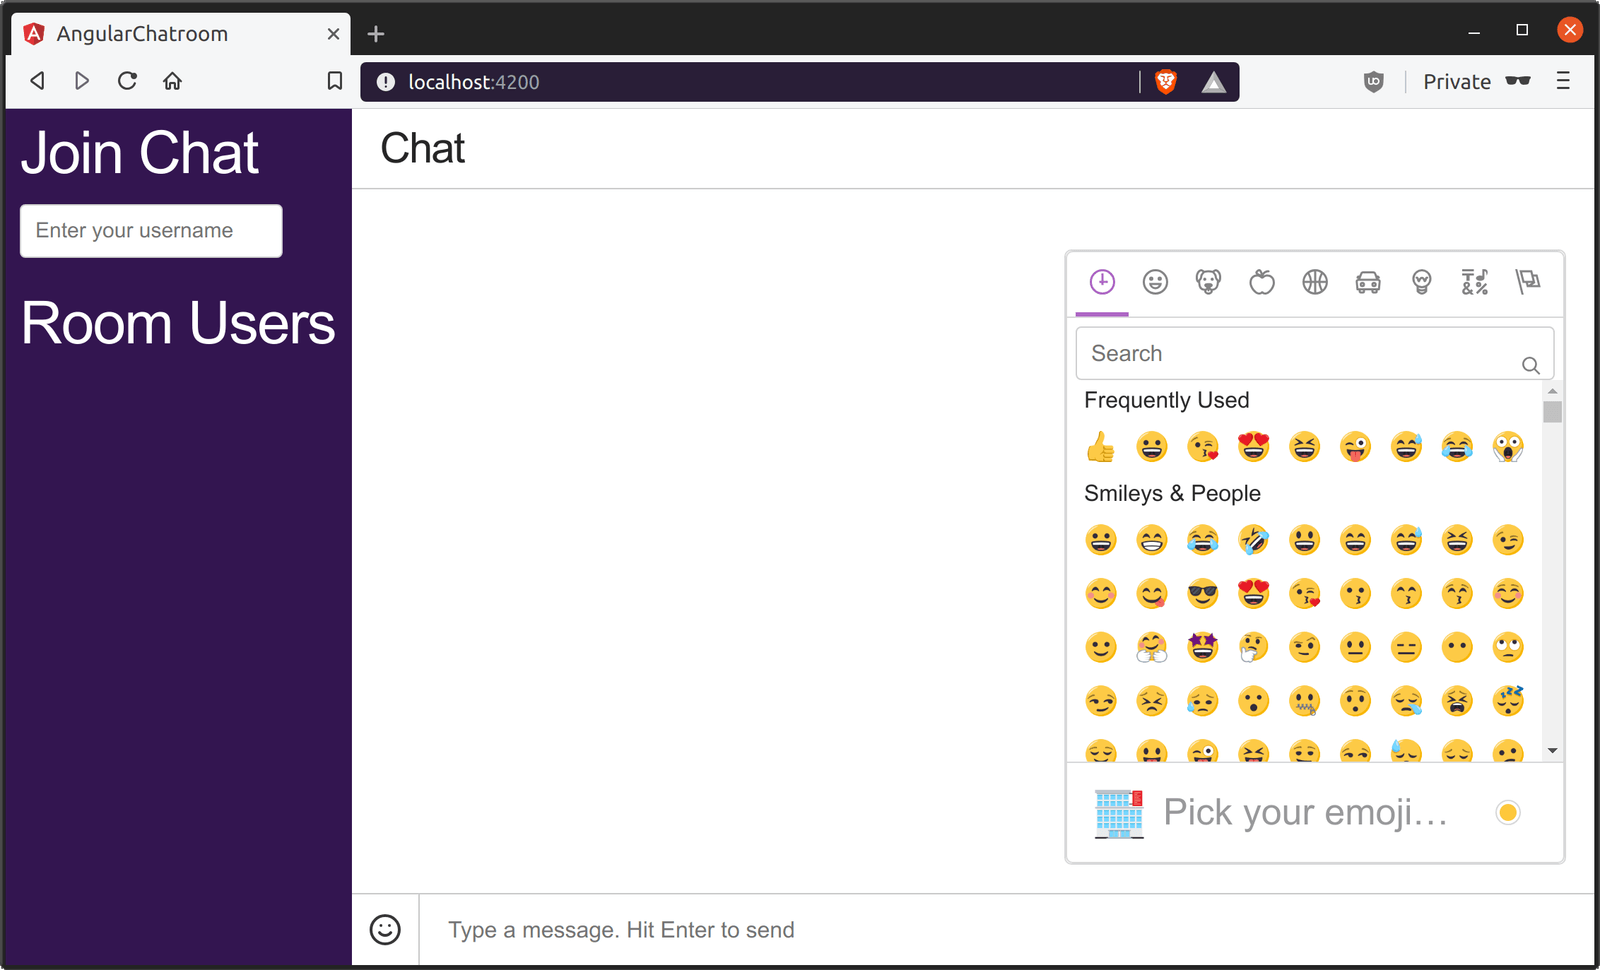
Now, you should be able to toggle the emoji picker by clicking the smile icon.
The next step is make it possible to add an emoji to a message by selecting it in the emoji picker. Notice the (emojiSelect) event on the emoji mart component in app.component.html. It is triggered when an emoji is selected in the picker, and details about the event is passed to the addEmoji() method which updates the message input with the selected emoji.
Create the addEmoji() method in app.component.ts below toggleEmojiPicker():
    // client/src/app/app.component.ts

    // [..]
    export class AppComponent {
      // [..]

      toggleEmojiPicker() {
        this.showEmojiPicker = !this.showEmojiPicker;
      }

      addEmoji(event) {
        const { message } = this;
        const text = `${message}${event.emoji.native}`;

        this.message = text;
        this.showEmojiPicker = false;
      }

      // [..]
    }
You can try it out by selecting an emoji from the emoji picker. It should work as shown below:
Add rich link previews with Microlink
The next feature we’ll add to this app is the ability to show a preview of web content like articles, pages, and YouTube videos shared in the application. We’ll be achieving this using the Microlink package which can be used as an npm package or linked via a CDN.
As I didn’t have much success with getting the npm package to compile, we’ll make use of the provided CDN for this tutorial. Reference the microlink script in client/src/index.html as shown below:
    <!-- client/src/index.html -->

    <!doctype html>
    <html lang="en">
    <head>
      <meta charset="utf-8">
      <title>AngularChatroom</title>
      <base href="/">

      <meta name="viewport" content="width=device-width, initial-scale=1">
      <link rel="icon" type="image/x-icon" href="favicon.ico">
    </head>
    <body>
      <app-root></app-root>

      <script src="//cdn.jsdelivr.net/npm/@microlink/vanilla@latest/umd/microlink.min.js"></script>
    </body>
    </html>
Following that, we need to detect the presence of a URL in a message and display the link appropriately in the rendered message. To do so, we’ll update the onMessage hook in addUser() as follows:
    // client/src/app/app.component.ts

    hooks: {
      onMessage: message => {
        let { text } = message;
        const urlMatches = message.text.match(/\b(http|https)?:\/\/\S+/gi) || [];

        function insertTextAtIndices(text, obj) {
          return text.replace(/./g, function(character, index) {
            return obj[index] ? obj[index] + character : character;
          });
        }

        urlMatches.forEach(link => {
          const startIndex = text.indexOf(link);
          const endIndex = startIndex + link.length;
          text = insertTextAtIndices(text, {
            [startIndex]: `<a href="${link}" target="_blank" rel="noopener noreferrer" class="embedded-link">`,
            [endIndex]: '</a>',
          });
        });

        this.messages.push({ ...message, text, url_matches: urlMatches, });
      },
      // [..]
    }
Here, we’re matching the message text against a regular expressions and returning an array of URLs found in the message text or an empty array if no links are present in the message. Next, each URL in the array is wrapped in an anchor tag with the help of the insertTextAtIndices() function. Finally, the array of URLs found in the message text are placed in the url_matches property of the message object.
Next, let’s render an anchor tag for each link present in the url_matches and give it a class of .link-preview so that we can target those anchor tags and replace them with rich link previews using microlink. Update app.component.html as follows:
    // client/src/app/app.component.html

    <div class="App">
      <!-- [..] -->

      <main class="chat-window">
        <!-- [..] -->
        <section class="chat-session">
          <ul class="message-list">
            <li class="user-message" *ngFor="let message of messages">
              <span class="user-id">{{ message.senderId }}</span>
              <span [innerHTML]="message.text"></span>
              <a *ngFor="let link of message.url_matches" href="{{ link }}"
                class="link-preview">{{
                link }}</a>
            </li>
          </ul>
          <emoji-mart class="emoji-mart" set="emojione" (emojiSelect)="addEmoji($event)" *ngIf="showEmojiPicker" title="Pick your emoji…"></emoji-mart>

        </section>
        <!-- [..] -->
      </main>
    </div>
Then update app.component.ts as follows:
    // client/src/app/app.component.ts

    import { Component, AfterViewChecked } from '@angular/core';
    import Chatkit from '@pusher/chatkit-client';
    import axios from 'axios';
    declare const microlink;

    // [..]

    export class AppComponent implements AfterViewChecked {
      // [..]

      ngAfterViewChecked() {
        microlink('.link-preview');
      }

      toggleEmojiPicker() {
        this.showEmojiPicker = !this.showEmojiPicker;
      }

      // [..]

    }
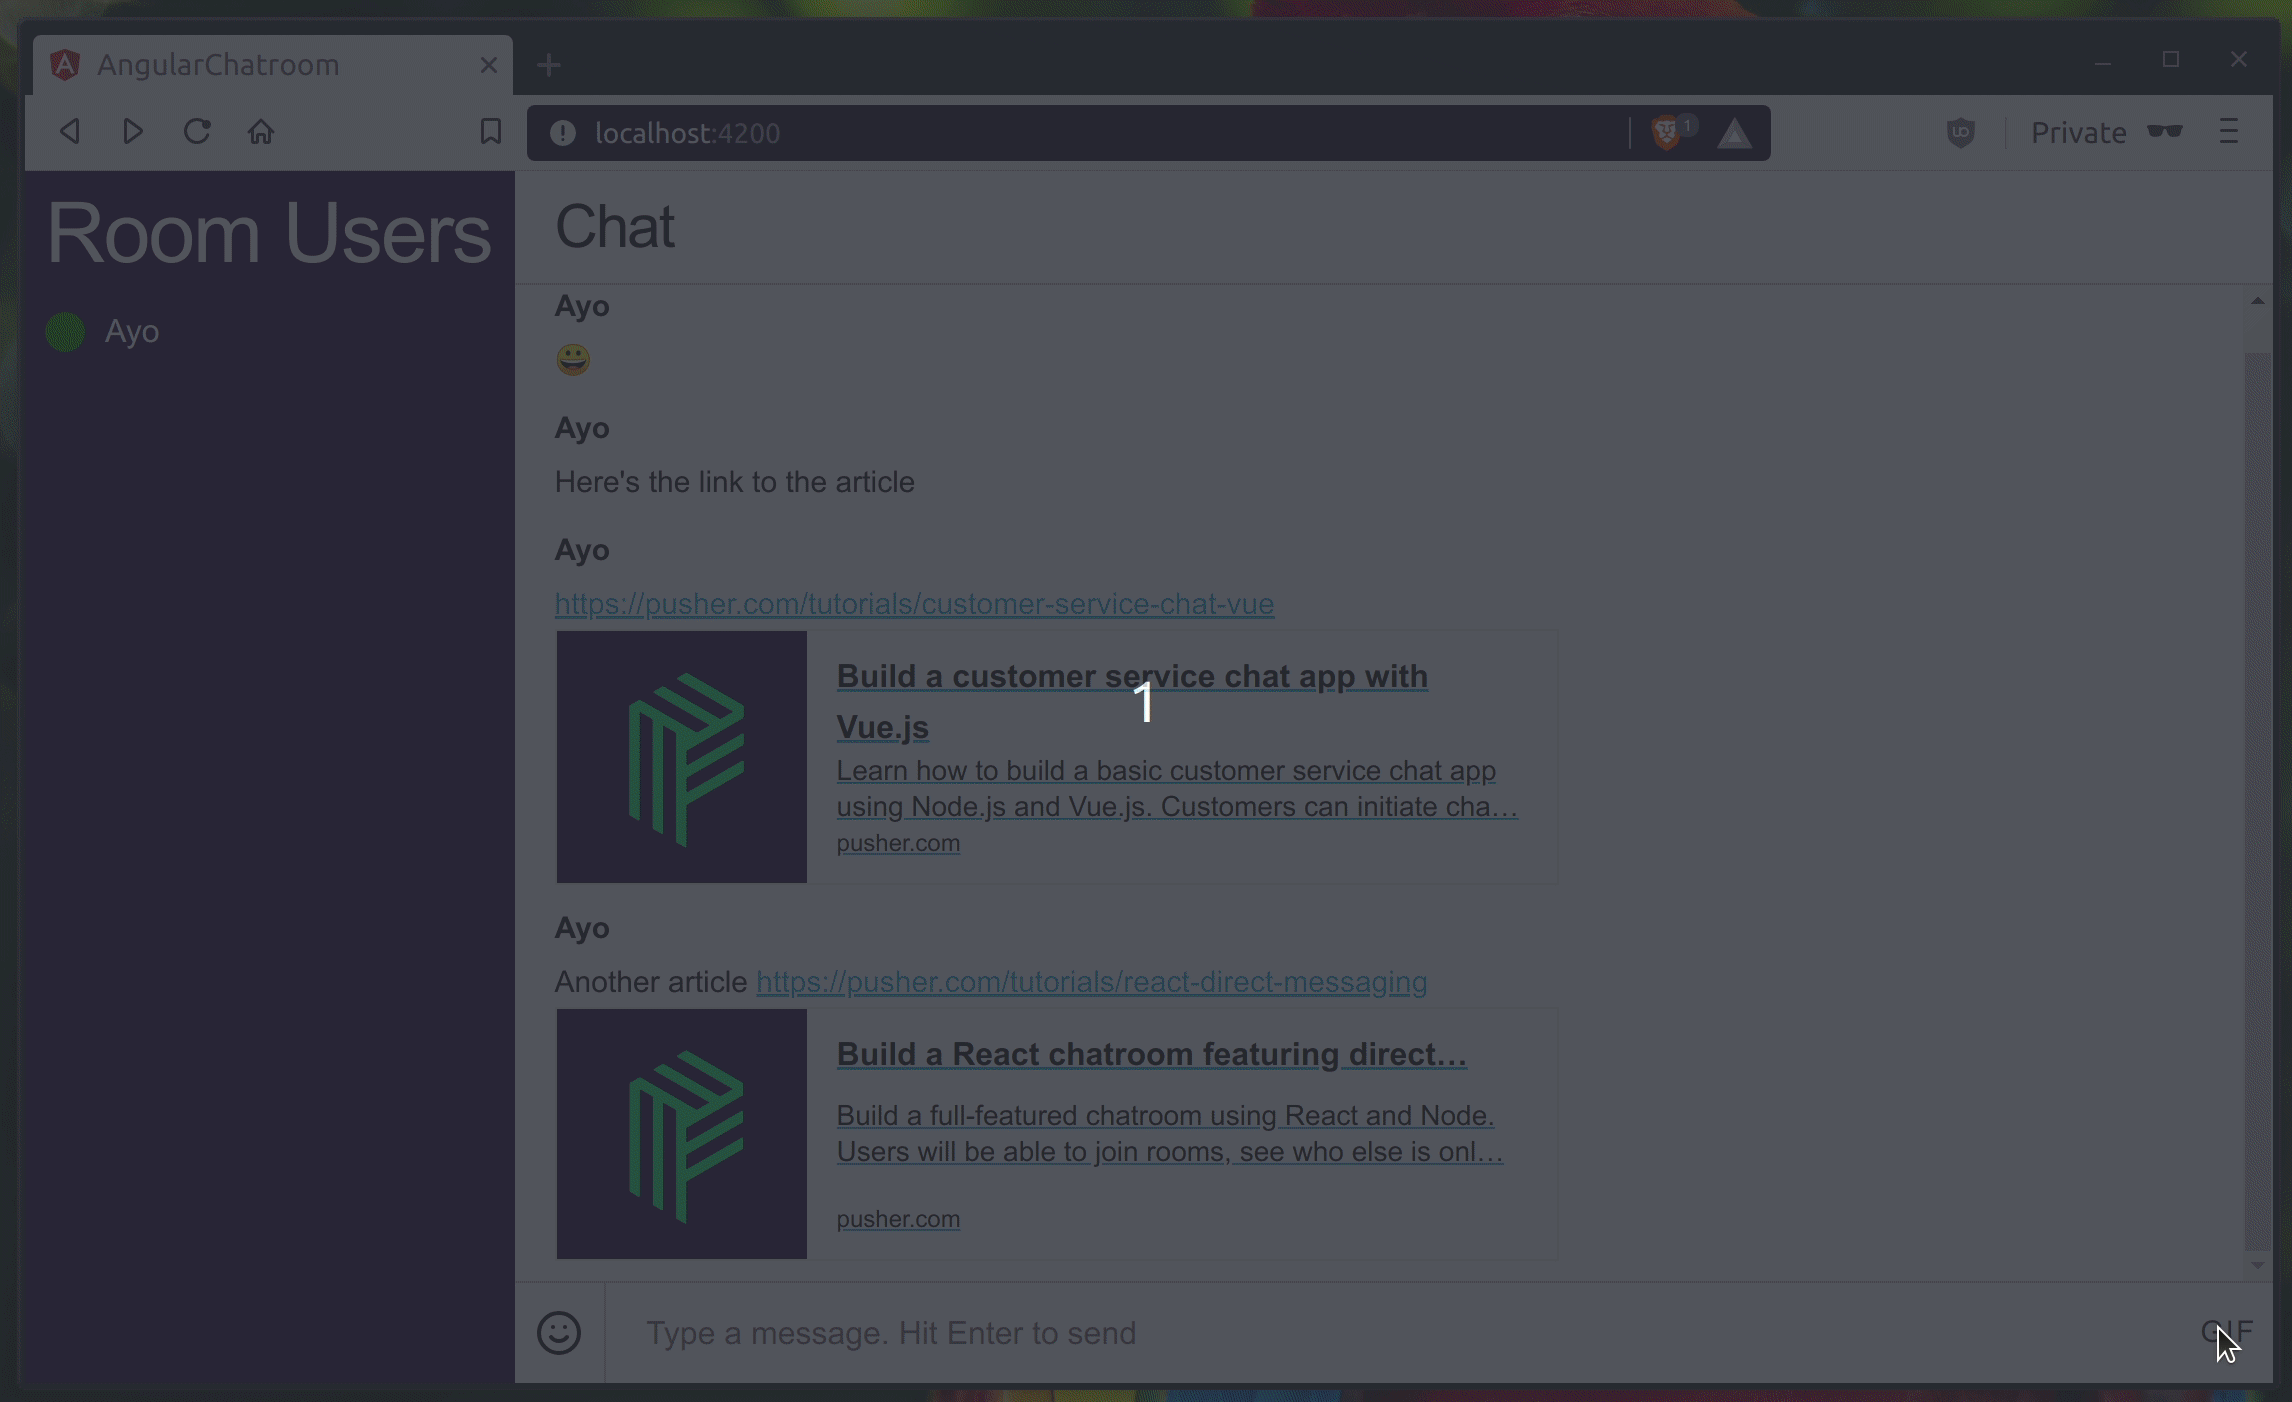
At this point, you be able to view a minimal preview for each link shared in the chatroom.

Share GIFs in the chatroom with Giphy
The final feature for this tutorial involves building out the ability to search for and share GIFs right from within the chat app. We’ll be making use of the Giphy API via the giphy-api package which has already be installed as a dependency.
The user will be able to toggle a GIF picker, search for a GIF by entering a search term, and view the results in the picker. Once a GIF is clicked, it will be sent to the room as an image attachment and rendered on the screen.
Update your app.component.html file to look like this:
    // client/src/app/app.component.html

    <div class="App">
      <!-- [..] -->

      <main class="chat-window">
        <!-- [..] -->
        <section class="chat-session">
          <ul class="message-list">
            <li class="user-message" *ngFor="let message of messages">q
              <span class="user-id">{{ message.senderId }}</span>
              <span [innerHTML]="message.text"></span>
              <img *ngIf="message.attachment"
                class="image-attachment"
                src="{{ message.attachment.link }}"
                alt="{{ message.attachment.name }}"
                />
              <a *ngFor="let link of message.url_matches" href="{{ link }}"
                class="link-preview">{{
                link }}</a>
            </li>
          </ul>
          <emoji-mart class="emoji-mart" set="emojione" (emojiSelect)="addEmoji($event)" *ngIf="showEmojiPicker" title="Pick your emoji…"></emoji-mart>
          <div *ngIf="showGiphySearch" class="giphy-search">
            <form (ngSubmit)="searchGiphy()">
              <input type="text" placeholder="Search for a GIF" name="giphy" [(ngModel)]="giphySearchTerm">
            </form>
            <ul class="search-results">
              <li class="gif-result" *ngFor="let result of giphyResults">
                <img src="{{ result.images.downsized_large.url }}"
                     (click)="sendGif(result.title, result.images.original.url)">
              </li>
            </ul>
          </div>
        </section>
        <footer class="chat-footer">
          <form (ngSubmit)='sendMessage()'>
            <!-- [..] -->
            <button type="button" class="toggle-giphy"
              (click)="toggleGiphySearch()">GIF</button>
          </form>
        </footer>
      </main>
    </div>
Then update app.component.ts as follows:
    // client/src/app/app.component.ts

    import { Component, AfterViewChecked } from '@angular/core';
    import Chatkit from '@pusher/chatkit-client';
    import axios from 'axios';
    import Giphy from 'giphy-api';
    declare const microlink;

    // [..]

    export class AppComponent implements AfterViewChecked {
      // [..]
      showGiphySearch = false;
      giphySearchTerm = '';
      giphyResults = [];

      // [..]

      ngAfterViewChecked() {
        microlink('.link-preview');
      }

      searchGiphy() {
        const giphy = Giphy();
        const searchTerm = this.giphySearchTerm;
        giphy.search(searchTerm)
          .then(res => {
            console.log(res);
            this.giphyResults = res.data;
          })
          .catch(console.error);
      }

      sendGif(title, url) {
        const { currentUser } = this;
        currentUser.sendMessage({
          text: title,
          roomId: '<your room id>',
          attachment: {
            link: url,
            type: 'image',
          }
        }).catch(console.error);
        this.showGiphySearch = false;
      }

      toggleGiphySearch() {
        this.showGiphySearch = !this.showGiphySearch;
      }

      // [..]
    }
The GIF button toggles the visibility of the GIF picker via the toggleGiphySearch() method. Once the user enters a search term and submits the form, the searchGiphy() method is triggered and the results are stored in giphyResults which renders them in the .search-results list. The user can scroll through the list and select their preferred GIF. By clicking on the image, the sendGif() method is triggered, and the animated GIF is rendered in the chat for all the participants.
Here’s a GIF of what the above steps look like in practice. Before you test this out, make sure to replace <your room id> with the appropriate value from your Chatkit instance dashboard.
Wrap up
In this tutorial, I’ve explored three common features of chat applications and described how they can be implemented in a Chatkit powered application. First, we added an emoji picker so that users can quickly search for and include an emoji in their message. Next, we provided rich link previews for links shared in the chatroom, and finally, we added an option to search a library of animated GIFs and share them in the chatroom.
The source code for this project can be found here.
#angular #image