How to Upload Files in a React and Rails App
In this guide, we will cover how to upload images/videos in a React application.
For the server, we will be setting up a Rails API to store the information of the image/video. For the actual storage of image/video, we will be including a third-party service called Cloudinary. It is a cloud-based image and video management platform.
Let’s begin by signing up with an account at Cloudinary as we will need credentials to integrate into the Rails API.
Cloudinary Setup
If you don’t have an account yet for Cloudinary, go ahead and register for one here:
https://cloudinary.com/users/register/free
Once you sign up, you should be redirected to the dashboard containing the account details on the top.
For our Rails API, we will need the “Cloud name,” “API Key,” and “API Secret.” For now, we’re actually finished with the set up of Cloudinary. Let’s move on to setting up our Rails API.
Rails API Setup
Let’s begin by generating a Rails app with:
rails new rails-file-upload-template --database=postgresql --api
In the Gemfile, we need to include one gem to integrate Cloudinary. Add gem 'cloudinary' , uncomment out gem 'rack-cors', and run bundle install.
Generate model and controller
We will need to generate the model for Item, which has the attributes of image and video, this will represent the URL link associated with the image or video uploaded in Cloudinary.
rails g model Item image:string video:string
Ideally, we will also generate the controller:
rails g controller items
Once we have generated the controller and model, let’s create the database and migrate with:
rails db:create && db:migrate
Config file
Let’s navigate to config/initializers/cors.rb . In the file, replace example.com with * and uncomment out:
Rails.application.config.middleware.insert_before 0, Rack::Cors do
  allow do
    origins '*'
    resource '*',
      headers: :any,
      methods: [:get, :post, :put, :patch, :delete, :options, :head]
    end
end
Cors.rb
Under config/initializers, let’s create a new file named cloudinary.rb. In this file, let’s copy the following configuration:
Cloudinary.config do |config|
   config.cloud_name = "cloud_name"
   config.api_key = "api_key"
   config.api_secret = "api_secret"
   config.secure = true
   config.cdn_subdomain = true
end
Cloudinary.rb
In the fields for cloud_name, api_key, and api_secret, replace them with your information from the Cloudinary account details. Make sure they are wrapped in strings!
Navigate to config/routes.rb and set up the create routes for Item:
Rails.application.routes.draw do
   resources :items, only: [:create]
end
For this guide, we will only focus on implementing the creation of an Item. Let’s shift our attention to the ItemsController and define the method for create.
ItemsController
In the create method of ItemsController, what we want to do is upload the actual image and video sent from the client to Cloudinary.
Once we upload successfully, Cloudinary will send a response containing the URL strings of the image and video respectively. What we will store in our Rails database is not the actual image or video but the URL strings to where it is stored in Cloudinary.
Let’s first set up methods to upload photos and images to Cloudinary. When we installed Cloudinary in our Gemfile, we inherited methods from Cloudinary. The one method we will be utilizing is Cloudinary::Uploader.upload.
If it’s just an image, Cloudinary::Uploader.upload() can take in the image data as the one argument.
If it’s a video, it takes in the video data as the first argument and :resource_type => :video as the second argument to indicate that you are uploading a video.
I suggest placing a byebug within the method to check exactly what is being sent back from the response.
image = Cloudinary::Uploader.upload(params[:image])
video = Cloudinary::Uploader.upload(params[:video], :resource_type => :video)
Most images can be uploaded but with regards to video, I believe it has to be in the format of .mp4 and there is also a size limit. If you want more information on uploading videos, refer to:
https://cloudinary.com/documentation/upload_videos
As mentioned, if the image and video upload are successful, the response will be an object containing different types of information. But what we want is the URL string which can be accessed from the “url” key.
When creating the instance of the item:
item = Item.create(image: image["url"], video: video["url"])
Once we create the Item instance and store it in our database, we can render it as a JSON.
class ItemsController < ApplicationController
    def create
        image = Cloudinary::Uploader.upload(params[:image])
        video = Cloudinary::Uploader.upload(params[:video], :resource_type => :video)
        item = Item.create(image: image["url"], video: video["url"])
        render json: item
    end
end
item_controller.rb
Item Controller create method
Bonus
Let’s say we wanted to delete the item instance from our database. We might also want to delete the image and video it is associated with on Cloudinary.
To delete an image, we call another method from Cloudinary, Cloudinary::Uploader.destroy(id). For example, an image URL should be stored in the data as a string.
"http://res.cloudinary.com/dv4i7ebnk/image/upload/v1586048935/znb3ns5mujg08fifm2uh.png"
Our ID would represent the identifier before the .png.
For deleting a video, we call the same method but pass in a second argument to indicate it is a video:
Cloudinary::Uploader.destroy(id, :resource_type => :video)
If you are receiving errors as a response after uploading to Cloudinary, consider the possibility that you are not passing in the image or video data. You might be passing in a string.
We will shift focus to client-side React to ensure that when you submit a request, you are passing in the correct data type.
React Form Setup
For this portion, we will not focus on setting up a React application from scratch.
Instead, it will be assumed that you have a React component built and we will focus on creating a form component that will handle submitting the image and video data to the Rails API.
import React from 'react'

export default class NewItemForm extends React.Component {

    state = {
        image: {},
        video: {}
    }

    onChange = (e) => {
        e.persist()
        this.setState(() => {
            return {
                [e.target.name]: e.target.files[0]
            }
        })
    }

    onSubmit = (e) => {
        e.preventDefault()
        const form = new FormData()
        form.append("image", this.state.image)
        form.append("video", this.state.video)
        fetch(`http://localhost:4000/items`, {
            method: "POST",
            body: form
        })
    }
    render(){
        return (
            <div className="form">
                <h1>New Upload</h1>
                <form onSubmit={this.onSubmit}>
                    <label>Image Upload</label>
                    <input type="file" name="image" onChange={this.onChange}/>
                    <br/>
                    <label>Video Upload</label>
                    <input type="file" name="video" onChange={this.onChange}/>
                    <br/>
                    <input type="submit"/>
                </form>
            </div>
        )
    }
}
NewItemForm.js
React Form for handling Image and Video upload
In the NewItemForm component, we will have the properties for the image and video. Inside render(), we will return a div element with form inside.
Inside the form, we add two input fields for the image and video with the type set to “file”. We also assign a name property for each to utilize for the onChange function, which is responsible for setting the state.
When we are setting state inside of onChange, we are accessing a very specific property on e (event).
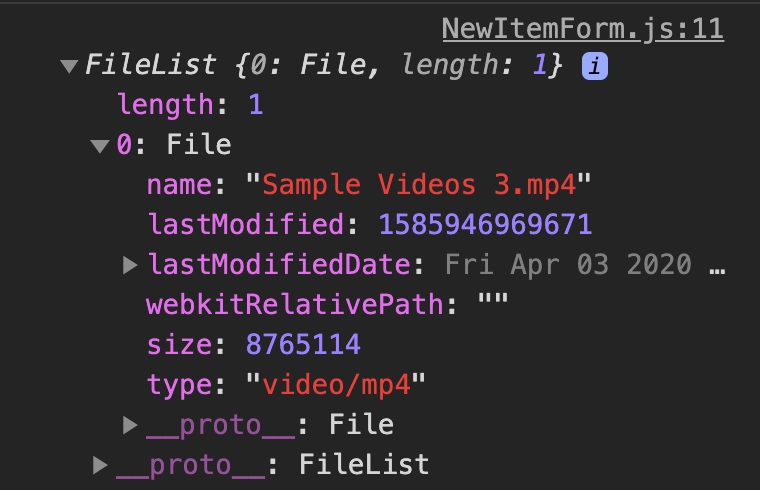
Since we assigned the type of the input fields as “file”, we can access the data from e.target.files. If we were to console.log(e.target.files), we will get the following data structure:

e.target.files
It is an object with one key, 0, with a value of the file that was uploaded. We want to send that value to the Rails API which will forward it to Cloudinary. We get access to that value through e.target.files[0].
There is one more thing we have to set up before sending the information to the Rails API.
Inside the event handler for the form submit, onSubmit, aside from using e.preventDefault to prevent the page from refreshing and losing our data, we also need to create a new instance of FormData.
In this case, we store that instance in the variable form. We append the information we need to the form variable using the .append method.
The first argument .append needs is the key name which will be image and video. The second argument is the value, which will be the file data of image and video.
Now we are ready to submit a request to the Rails API.
In the fetch request, we need to define the method, which is “POST” and pass in the data, form as a value to the key, body. We have structured the data from the form in a way that will work with our Rails API setup.
Closing Remarks
Cloudinary is an efficient cloud storage service and it is fairly simple to implement in several server-side frameworks.
This guide covers how to set up Cloudinary for photo and video storage for a Rails API and how to properly send the request from a React form component. Thank you for reading!
For reference, Rails API repo and React repo.
#reactjs #ruby #rails
