In this post, we’ll be going through a step-by-step guide on how to train a YOLOv5 model to detect whether people are wearing a mask or not on a video stream.
We’ll start by going through some basic concepts behind object detection models and motivate the use of YOLOv5 for this problem.
From there, we’ll review the dataset we’ll be using to train the model, and see how it can be adapted so that it conforms with the darknet format.
I’ll then show you how you can train a YOLOv5 model using the downloaded dataset and run inference on images or video files.
This project was done alongside with Fran Pérez, also a contributor of this community. I’d recommend you to read some of his excellent posts!
Background
“YOLO”, refering to “You Only Look Once”, is a family of object detection models introduced by Joseph Redmon with a 2016 publication “You Only Look Once: Unified, Real-Time Object Detection”.
Since then, several newer versions have been released, of which, the first three were released by Joseph Redmon. On June 29, Glenn Jocher released the latest version YOLOv5, claiming significant improvements with respect to its predecessor.
The most interesting improvement, is its “_blazingly fast inference”. As posted in this article by DataRobot, _running in a Tesla P100, YOLOv5 achieves inference times of up to 0.007 seconds per image, meaning 140 FPS!
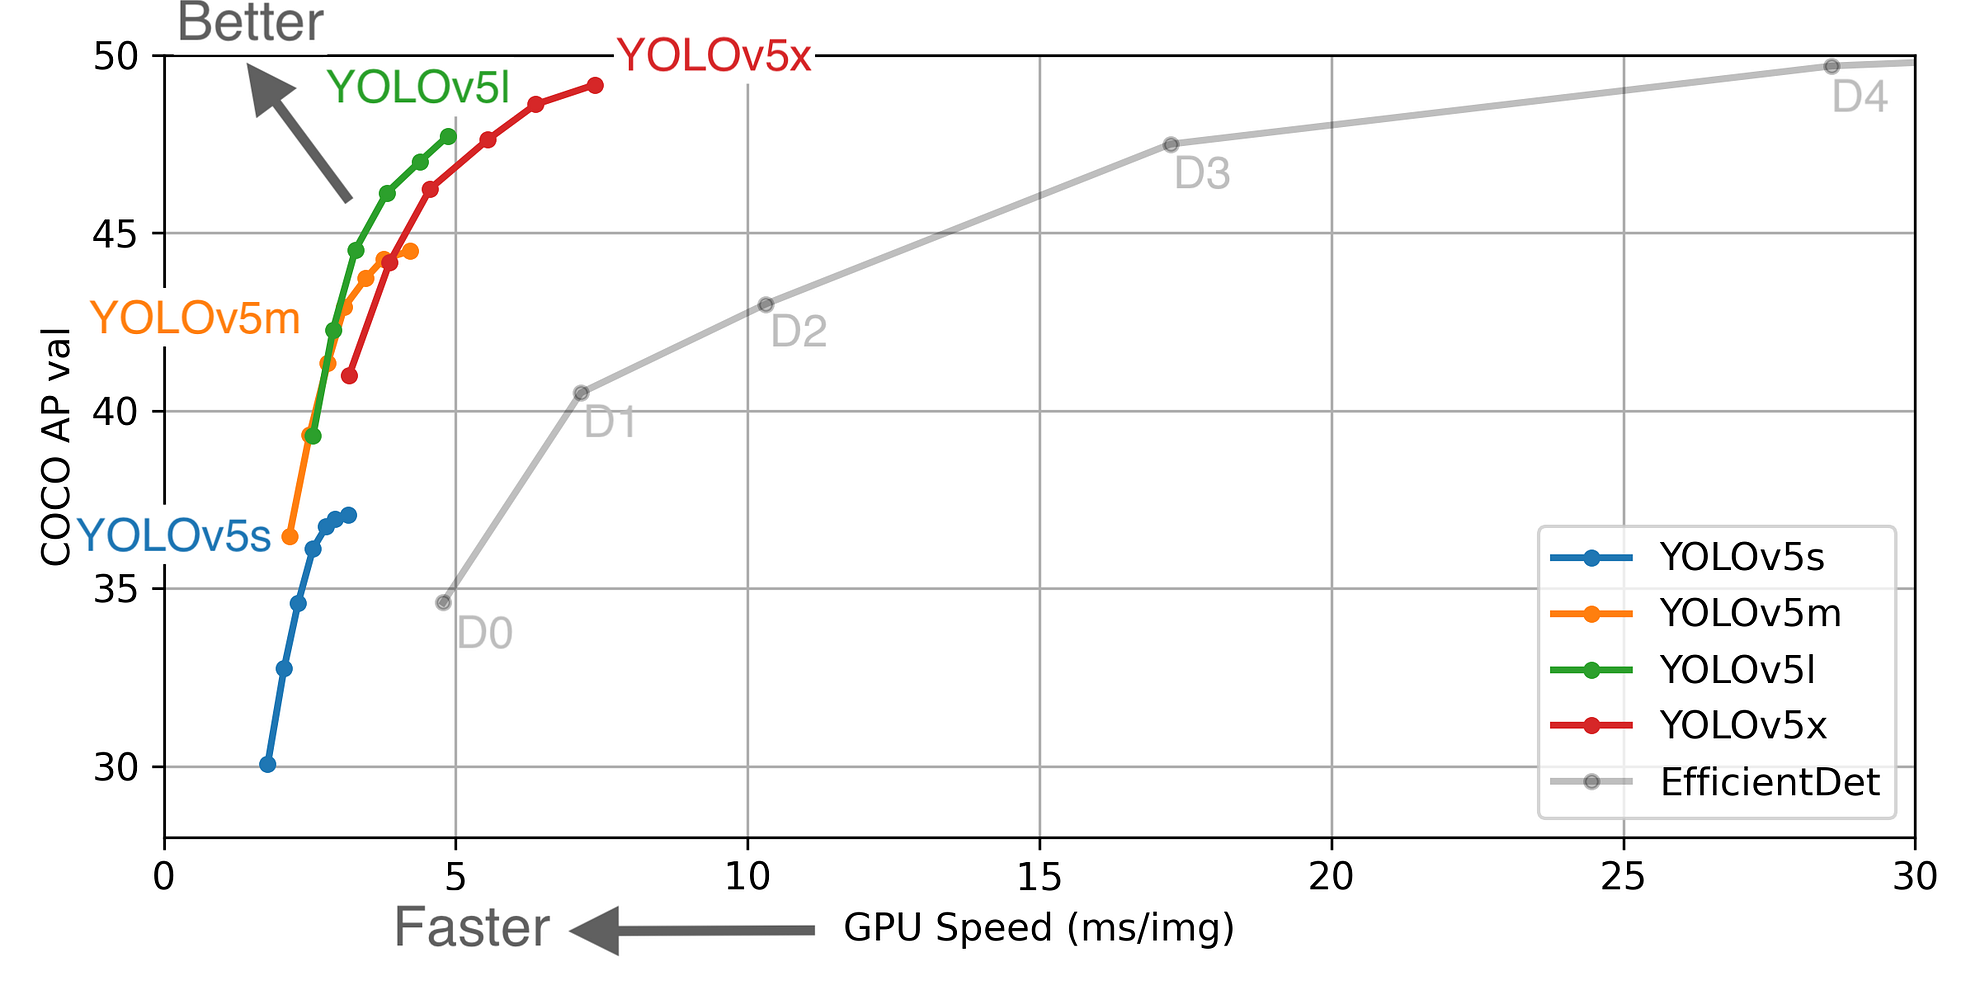
YOLO models comparison (image source)
Why YOLO?
Using an object detection model such as YOLOv5 is most likely the simplest and most reasonable approach to this problem. This is because we’re limiting the computer vision pipeline to a single step**, **since object detectors are trained to detect a:
- **Bounding box **and a
- Corresponding label
This is precisely what we’re trying to achieve for this problem. In our case, the bounding boxes will be the detected faces, and the corresponding labels will indicate whether the person is wearing a mask or not.
Alternatively, if we wanted to build our own deep learning model, it would be more complex, since it would have to be 2**-fold**: we’d need a model to detect faces in an image, and a second model to detect the presence or absence of face mask in the found bounding boxes.
A drawback of doing so, apart from the complexity, is that the inference time would be much slower, especially in images with many faces.
What about the data?
We now know which model we can use for this problem. The next natural, and probably most important, aspect is… what about the data??
Luckily, there is a publicly available dataset in **Kaggle **named Face Mask Detection, which will make our life way easier.
The dataset contains 853 images and their corresponding annotation files, indicating whether a person is wearing a mask correctly, incorrectly or not wearing it.
Bellow is a sample from the dataset:
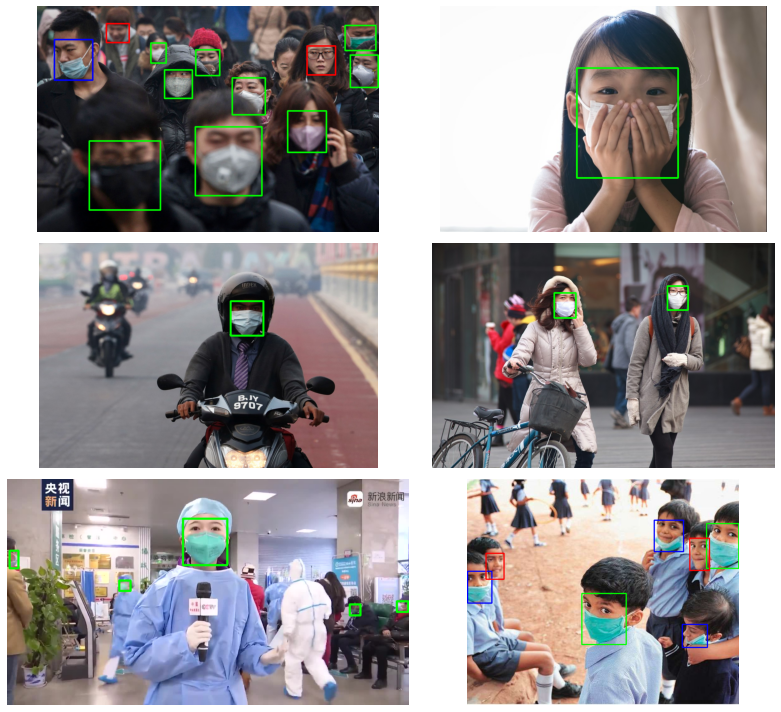
Sample images from the face mask dataset (image by author)
In this case, we’ll simplify the above to detect if a person is _wearing the mask or not _(we’ll see how in the DataRobot section).
Training on custom data
We now know everything we need to get started, so its time to get hands-on!
Project layout
The first thing we need to do is clone the repository from ultralytics/yolov5, and install all required dependencies:
!git clone https://github.com/ultralytics/yolov5 ## clone repo
!pip install -U -r yolov5/requirements.txt ## install dependencies
The main files that we’ll need from the repository are structured as follows:
yolov5           ## project root
├── models       ## yolov5 models
├── train.py     ## training script
└── detect.py    ## inference script
The 📁models folder contains several .yml files with the different proposed models. In it we can find 4 different models, ordered from smaller to larger (in terms of the amount of parameters): yolov5-s, yolov5-m,_ yolov5-l_ and yolov5-x. For a detailed comparison, see here.
train.py and detect.py will be the scripts that we’ll be calling to train the model and predict on new images/videos respectively.
DataRobot
In order to train the model, a necessary step will be to change the format of the .xml annotation files so that they conform with the darknet format. In the linked github thread, we’ll see that each image has to have a .txt file associated with it, with rows with the format:
<object-class> <x> <y> <width> <height>
Each line will represent the annotation for each object in the image, where <x> <y> are the coordinates of the centre of the bounding box, and <width> <height> the respective width and height.
For example an img1.jpg must have an associated img1.txt containing:
1 0.427234 0.123172 0.191749 0.171239
0 0.183523 0.431238 0.241231 0.174121
1 0.542341 0.321253 0.191289 0.219217
The good news, is that this step is made really simple thanks to DataRobot. DataRobot enables to easily change between annotation formats, as well as as to augment our image data and split it into training and validation sets, which will be extremely handy!
This can be done in 5 simple steps:
- Upload the images and annotations

DataRobot, uploading annotations (image by author)
- Choose the train, validation and test proportions you want (train and validation will be enough)
- Add an augmentation step choosing from among the existing filters, for instance blur, brightness, rotation etc.

Augmentation (image by author)
- And finally, generate the new images and export to YOLO Darknet format
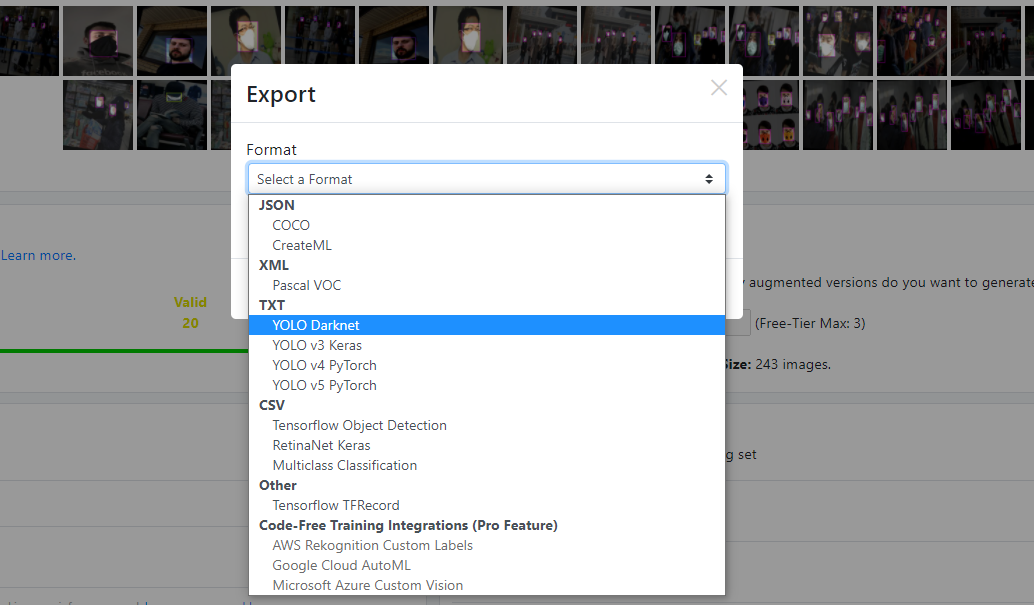
Selecting output format (image by author)
We should now have a separate folder for each split, train and validation (and test if included), where each of these should contain the .jpg augmented images, the corresponding .txt annotation files and a ._darknet.labels file with the labels in their corresponding order:
mask_weared_incorrect ## label 0
with_mask             ## label 1
without_mask          ## label 2
#machine-learning #computer-vision #data-science #artificial-intelligence #developer
