Containerized applications are fast becoming a need for most enterprises. Docker is probably the most popular tool for containerizing applications. With non-containerized applications, developers were able to do a continuous deployment on on-prem servers using several well-established processes. However, we have a similar need with containerized applications. Amazon Web Services offer a suite of services which enable continuous deployments of Dockerized applications using AWS CodePipeline.
AWS CodePipeline uses CodeCommit as a source code repository, CodeBuild for building the Docker image, Elastic Container Service (ECS) for deploying the Docker Image, and Elastic Container Registry (ECR) for storing the Docker image.
This post will help guide you through a step-by-step process of setting up a CodePipeline for your Docker images. A few prerequisites for these steps would be:
- AWS CodeCommit as a source code repository containing the source code and Dockerfile.
- AWS ECR as a repository for the Docker image.
- AWS ECS cluster configured with a Task Definition which references the Docker image stored in ECR repository.
We will accomplish the creation of a pipeline in just three steps:
1. Build a Docker Image using AWS CodeBuild.
2. Use AWS CodePipeline to build a pipeline.
3. Test the pipeline!
Build Docker Image Using AWS CodeBuild
For CodeBuild to build your project source code, you only need to add one configuration file, typically in YAML format, to your project source code. This file is to be named as buildspec.yml CodeBuild will connect with your source control repository, read the buildspec.yml, and build your project code.
The buildspec.yml file will contain instructions on how to build the source code into a Docker image. Here, you may also mention where to push the newly created image. You can specify the Image Repository.
The buidlspec.yml file has three sections: prebuild, build and post-build. Refer to this sample buildspec.yml file below and its following explanation.
version: 0.2
phases:
  pre_build:
    commands:
      - echo Logging in to Amazon ECR...
      - aws --version
      - $(aws ecr get-login --region us-east-2)
      - REPOSITORY_URI=87324561928.dkr.ecr.us-east-2.amazonaws.com/projectcode
      - COMMIT_HASH=$(echo $CODEBUILD_RESOLVED_SOURCE_VERSION)
      - IMAGE_TAG=${COMMIT_HASH:=latest}
  build:
    commands:
      - echo Build started on `date`
      - echo Building the Docker image...
      - docker build -t $REPOSITORY_URI:latest .
      - docker tag $REPOSITORY_URI:latest $REPOSITORY_URI:$IMAGE_TAG
  post_build:
    commands:
      - echo Build completed
      - echo Pushing the Docker images...
      - docker push $REPOSITORY_URI:latest
      - docker push $REPOSITORY_URI:$IMAGE_TAG
      - echo Writing definitions file...
      - printf '[{"name":"project-container","imageUri":"%s"}]' $REPOSITORY_URI:$IMAGE_TAG > taskdefinition.json
artifacts:
    files: taskdefinition.json
Pre-build:
In this stage, we set the CodeBuild to be able to log in to ECR as we will save our Docker image in ECR. We set the REPOSITORY_URI to point to the ECR image and tag it with a Git commit ID for uniqueness.
Build:
We build the Docker image and tag the image as latest and with the image tag created in the previous step.
Post-Build:
After the image has been built, we will now push it to ECR using the specifics set in the pre-build step. We will tag it as latest and with the image tag. Here, we also need to output the ECS service’s container name and image and tag it to a file. In the sample code, this file is named as taskdefinition.json . This definition is needed in the deployment step of the pipeline, where an updated task definition will be created.
Create an AWS CodePipeline
Go to AWS CodePipeline console and you will see this page with five steps.
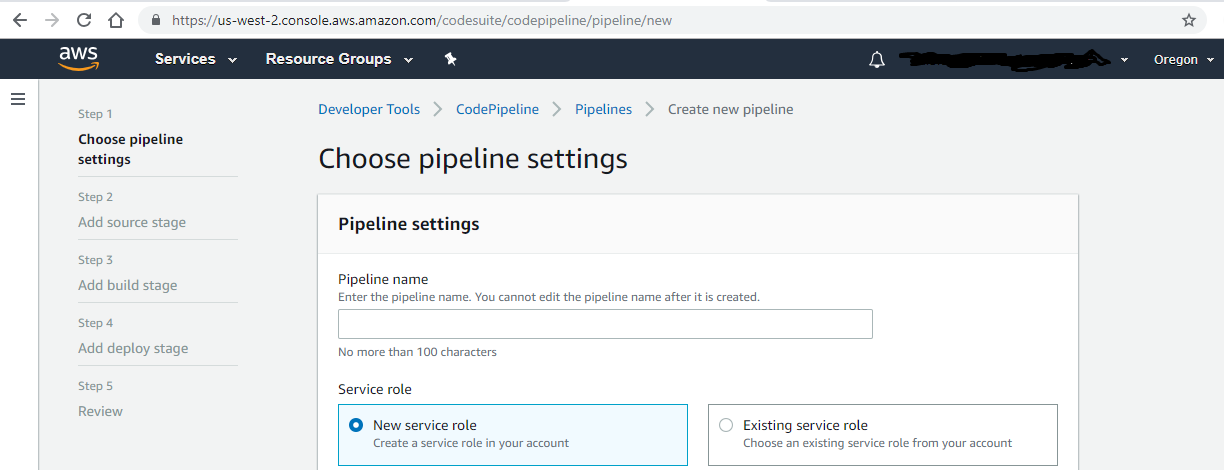
At step 1, simply provide a name to your pipeline.
At step 2, mention the source of your project code — the repository name and branch name.
On step 3, choose CodeBuild and specify details like “Runtime as Docker.”
For step 4, specify the deployment provider as AWS ECS. We will deploy our Docker image on ECS. Mention the ECS Cluster name and Service name.
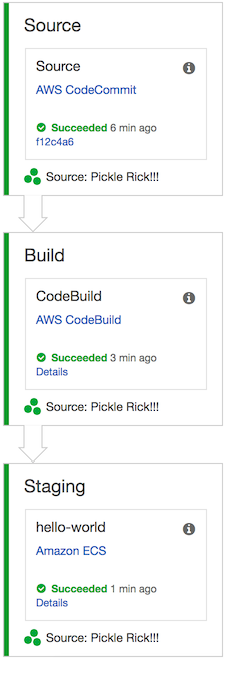
Test the Pipeline
Let us test the pipeline. Go to the CodePipline console again and pick the pipeline you just created.
Simultaneously, also push a code change to your source code. Now you will be able to see the pipeline progress through various stages. See the representative image below:
While this pipeline is only to demonstrate AWS CodePipeline, it may be further enhanced to also include extensive test case suites for unit testing, integration testing, regression, and smoke testing. Also, include static code analysis before code build. As you may have observed, it is quite simple to set up a CodePipeline using AWS console. You can manage all your pipelines through the console.
Benefits of CodePipeline
CodePipeline makes the release process streamlined and manageable. In Agile methodology, frequent and periodic releases are common. In such a scenario, the use of the CodePipeline helps quickly release new features to production in a stable manner. It also offers integration with several third-party tools. Many third-party partners offer testing tools for load testing, performance testing, and more. Finally, CodePipeline has a GUI which makes it easy to model the pipeline.
Originally published by Vaibhav Raizada at https://dzone.com
Learn more
☞ Docker Mastery: The Complete Toolset From a Docker Captain
☞ Learn DevOps: The Complete Kubernetes Course
☞ Docker for the Absolute Beginner - Hands On
☞ Docker Technologies for DevOps and Developers
☞ Docker Swarm Mastery: DevOps Style Cluster Orchestration
#docker #aws