Exciting news from HashiCorp via live stream that Vault 1.4 is generally available as of April 7, 2020. This is particularly exciting for us as MongoDB Atlas is now supported in two ways within HashiCorp Vault:
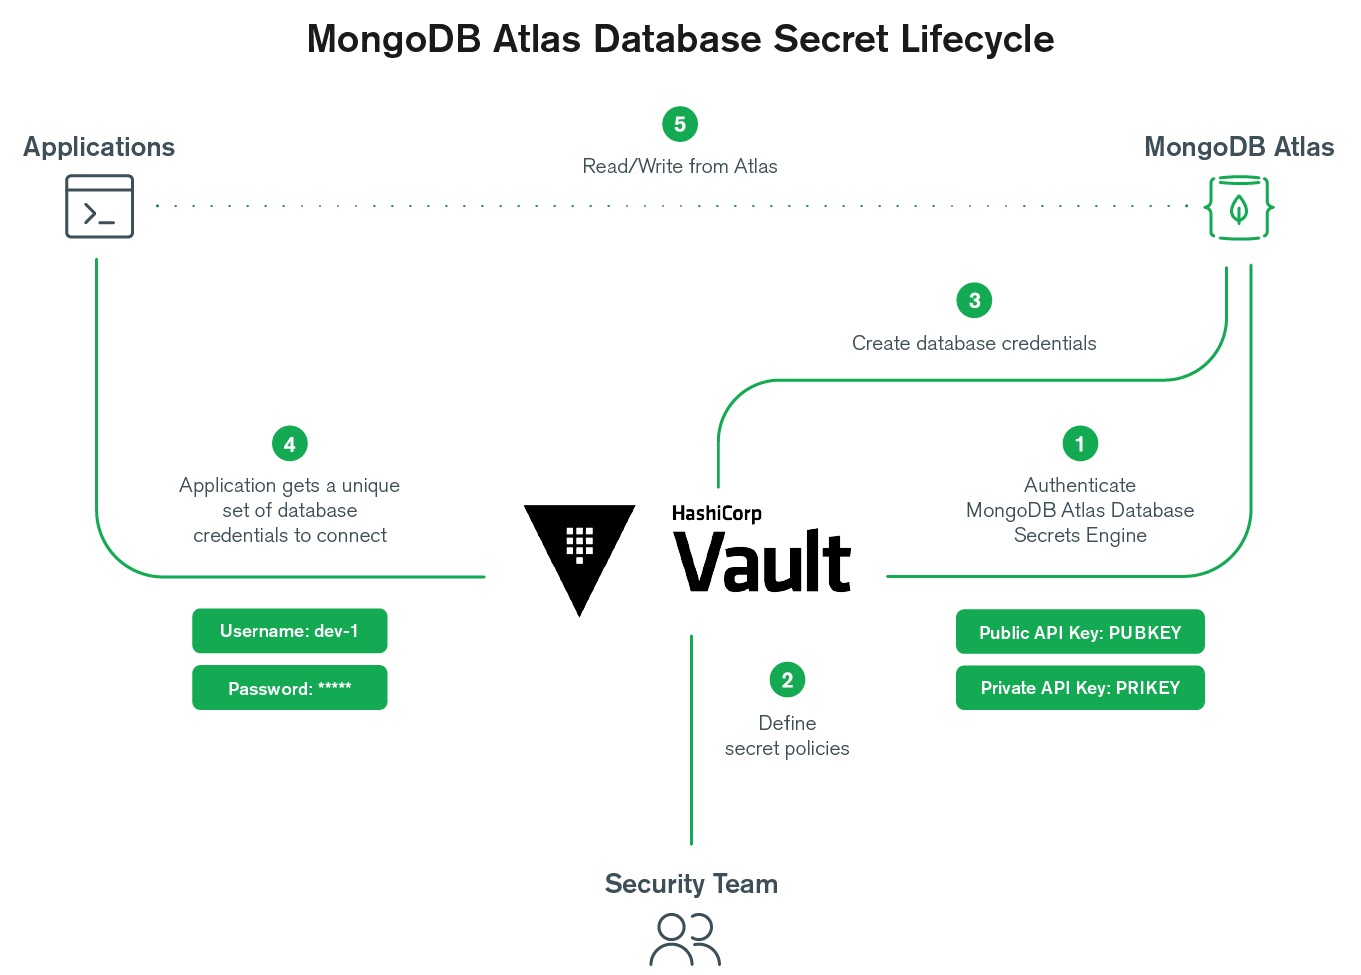
The MongoDB Atlas Database Users Vault Secrets Engine generates unique, ephemeral database users for MongoDB Atlas projects, which can be managed programmatically in Vault. The database secrets engine already supported self-managed MongoDB users, but we extended it to support MongoDB Atlas customers as well.
The MongoDB Atlas Vault Secrets Engine generates unique, ephemeral programmatic API keys for MongoDB Atlas with assigned roles and permissions, along with IP whitelists to restrict individual key access. Project IP whitelists in Atlas do not cover API keys, so each API key must have an associated IP whitelist.
I’ve always found the best way to learn something new is just to try it out, so below we have a short guide that will walk you through the basics of using both of these secrets engines. But before we jump into some hands-on-keyboard fun, there are a few prerequisites you’ll need to knock out.
- First, you’ll need to create at least one MongoDB Atlas Programmatic API key, if you don’t already have one, with the appropriate permissions for what you want to accomplish with Vault and whitelist entries configured for the key.
- Second, you’ll want to make sure you have Vault 1.4 and are running at least in dev mode, i.e.,
vault server -dev.
Ready? Okay, let’s create some MongoDB Atlas secrets!
Managing the Lifecycle of a MongoDB Atlas Database User with HashiCorp Vault
First, you need to enable the secrets engine you want to use. In this case, it’s database as the MongoDB Atlas Vault integration is an extension of this existing secrets engine.
$ vault secrets enable database
Success! Enabled the database secrets engine at: database/
Next, you have to configure the secrets engine for the MongoDB Atlas plugin, so be sure to give the configuration a name that makes sense for your team. Our example uses “acme-mongodbatlas-database” as acme is the code-name of the application. A configuration requires the name of the specific database plugin, the name(s) of Vault roles you will be creating for this project, the public and private programmatic Atlas API key that have sufficient permissions to create users in the project, and the project ID of the project in which you want the users to exist.
$ vault write database/config/acme-mongodbatlas-database \
  plugin_name=mongodbatlas-database-plugin \
  allowed_roles="acme-read-role, acme-dba-role" \
  public_key="<PRIKEY>" \
  private_key="<PUBKEY>" \
  project_id="4e336bb981299e77v6b9229d"
As long as the command returns without an error you are ready to proceed with creating your first Vault role. Tip: You can double-check the config was written by using the vault list command.
In our config example above, we defined two Vault roles in our allowed_roles parameter: acme-read-role and acme-dba-role. As the names imply, we are going to create a Vault role for Atlas that will create a database user for our “acme” application in the denoted project that is restricted to only being able to read the “ecomm” database, and a second Vault role for Atlas that will create a database user in our project that has DBA-level permissions on only the “ecomm” database.
You can now “write” the Vault roles that define your Atlas database users:
$ vault write database/roles/acme-read-role \
  db_name=acme-mongodbatlas-database \
  creation_statements='{ "database_name": "admin", "roles": [{"databaseName":"ecomm","roleName":"read"}]}' \
  default_ttl="1h" \
  max_ttl="24h"
Success! Data written to: database/roles/acme-read-role

$ vault write database/roles/acme-dba-role \
  db_name=acme-mongodbatlas-database \
  creation_statements='{"database_name": "admin", "roles":[{"databaseName":"ecomm","roleName":"dbAdmin"}]}' \
  default_ttl="1h" \
  max_ttl="24h"
Success! Data written to: database/roles/acme-dba-role
Note the “ecomm” database does not have to exist! In Atlas, you can create role-based access controls for database users for databases and collections you have not yet created, which gives you maximum flexibility in the order of operations.
This is also where you can define the lifecycle parameters for your Atlas database users’ lease. These Vault roles have a default time-to-live (TTL) of 1 hour with the ability to renew for up to 24 hours. Once the TTL is reached, the credential is revoked (i.e., deleted) from Atlas. If you do not set a default and max TTL, the Vault defaults will be used.
Now you get to create Atlas database users with a super simple one-liner. Just simply “read” one of the roles you created and in return, an Atlas database user is created. Vault returns the username and password, confirmation on the lease TTL values, and a lease ID. Later, we’ll use the lease ID as the token to further manage the lifecycle of the secret generated.
$ vault read database/creds/acme-read-role
  Key            	  Value
  ---               -----
  lease_id          database/creds/acme-read-role/fHAatgxsxeDVFhakTI1aSnmn
  lease_duration 	  1h
  lease_renewable	  true
  password       	  <PASSWORD>
  username       	  v-root-acme-read-role-dfoDwfXaQCz9SlWuJyL7-1583409850

$ vault read database/creds/acme-dba-role
  Key            	  Value
  ---            	  -----
  lease_id       	  database/creds/acme-dba-role/sLabhVj25qz1As2DCDWv4EDS
  lease_duration 	  1h
  lease_renewable	  true
  password       	  <PASSWORD>
  username       	  v-root-acme-dba-role-w1UV9Onih9rKVmLClxGL-1583409983
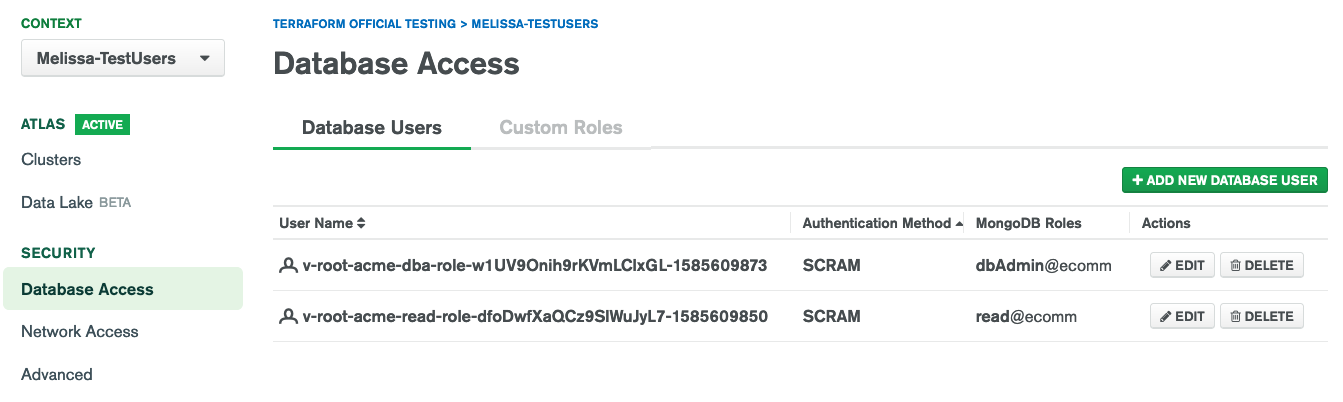
We can check the Atlas UI to confirm that our new database users have been created. Yup, our users are there:
Modifying Vault Leases for a MongoDB Atlas Database User
After talking with your team perhaps you all realize DBAs actually need 96 hours as a maximum TTL value, so you want to modify the lease. Let’s try to extend that using the lease ID returned from when we created a DBA user:
$ vault lease renew -increment=96h database/creds/acme-dba-role/sLabhVj25qz1As2DCDWv4EDS

WARNING! The following warnings were returned from Vault:

  * TTL of "96h" exceeded the effective max_ttl of "23h41m39s"; TTL value is
  capped accordingly

Key            	Value
---            	-----
lease_id       	database/creds/acme-dba-role/sLabhVj25qz1As2DCDWv4EDS
lease_duration 	23h41m39s
lease_renewable	true
Looks like we get a warning that we can’t do that because the maximum TTL was set to 24 hours. If we want to have a DBA role with a max TTL of 96 hours, we’ll need to create a new Vault role. For now, let’s just extend the lease duration to 2 hours (this time doing so in seconds) for our DBA to use:
$ vault lease renew -increment=7200 database/creds/acme-dba-role/sLabhVj25qz1As2DCDWv4EDS
Key            	Value
---            	-----
lease_id       	database/creds/acme-dba-role/sLabhVj25qz1As2DCDWv4EDS
lease_duration 	2h
lease_renewable	true
Let’s say it turns out that after an hour our users no longer need access. We can cut off access by revoking the lease early, thereby removing the credentials we created:
$ vault lease revoke database/creds/acme-read-role/fHAatgxsxeDVFhakTI1aSnmn
All revocation operations queued successfully!

$ vault lease revoke database/creds/acme-dba-role/sLabhVj25qz1As2DCDWv4EDS
All revocation operations queued successfully!
If you do not revoke before the max TTL then the secret would be removed at that time by Vault.
#mongodb