How to create the Node.js API with TypeScript and GraphQL
GraphQL is a strongly typed query language, and Typescript is a typed superset of JavaScript - together they are a match made in heaven!
Prerequisites
- Basic knowledge of TypeScript and Node.js
- You should be able to work with Git
Why GraphQL
GraphQL is a query language for our API. It makes developing complex APIs a breeze by being strongly typed, which allows us to easily generate mocks for tests, documentation and automated optimizations.
GraphQL also allows us to optimize latency and response sizes as we can selectively query data or batch requests very easily. It also allows us to validate the input in several easy ways.
Approaching types
Unfortunately, syncing the types of both GraphQL and TypeScript is not so straight forward, and here are two ways in which we can achieve this:
-
Generating GraphQL from TypeScript using annotations. type-graphql is a library that does just that, but this can pose a problem when you also want to use the types on the front-end.
-
Generating TypeScript from a GraphQL schema. There are a lot of tools for generating types out of the schema such as graphql-schema-typescript.
Before we start
In this tutorial, we will build a simple message board app, and add some basic authentication to it. There will be no database here — we will simply use lowdb to create a database out of a JSON file.
We are going to use a pretty large array of technologies here. Here are some of them:
-
Apollo - Provides us with a server implementation for GraphQL, creates a playground where we can play with our queries and gives us different tools. Apollo can be either a standalone server or combined with Express. We will use the later.
-
graphql-schema-typescript & graphql cli - These two tools will allow us to convert our GraphQL API into TypeScript. They can do more, but that’s mostly what we will use them for.
-
graphql-tag - Allows us to embed chunks of GraphQL code inside our TypeScript files. It makes it easier to separate our schemas into multiple smaller chunks.
We will also use uuid to generates id’s, bcrypt to hash passwords and JWT to generate tokens, but you can ignore these parts as we will not discuss them in this article.
The basics of GraphQL
I think the easiest way to explain how GraphQL schemas work will be to simply check an example.
We will use 3 root types for our schemas:
type Query {
  getPuppies: [Puppy]
}

type Mutation {
  createPuppy(input: InputPuppy!): Puppy
}

type Subscription {
  onPuppy: String
}
Let’s take a look at what we have here:
-
Query - defines all of our queries. As you can see we have a query called getPuppies, and it returns an array of puppies. This is the array notation in GraphQL: [Int] [String] [Cat]…
-
Mutation - defines all of our possible mutations. You can think of it as PUT/POST in terms of REST. As you can see we have a mutation named
createPuppywhich accepts a Puppy by the name of input. The ! sign after the Puppy means it is required, and it returns a single puppy. -
Subscription - defines all of the events our server can emit to the client. We can use web-sockets to subscribe to the
onPuppysubscription and get a String every time a new puppy is born.
Simple GraphQL queries make use of POST request as follows:
query {
  getPuppies{
    name
    id
  }
  getKittens{
    name
    age
  }
}
This is a good example since it shows how we can batch queries. We will have data from 2 queries, returned in a single HTTP request.
To do such a thing with a REST API we would have to do two requests, one to GET /api/puppies and another to GET /api/kittens. That way the response is simpler, faster, the server needs to handle fewer requests and we have less network overhead for both the clients and the server.
Let’s say a puppy also has color,eyeColor and owner - thanks to GraphQL we don’t have to get those parameters, we can simply query what we need.
We will use some of the types GraphQL provides:
-
type - you can think of type values as objects. We have seen them before and we can also define custom Objects.
-
scalarType - the base scalar Types are Int, Float, Boolean, String and ID which can be either a string or a number, but it’s always parsed as a string.
-
input - input are types that can be accepted as input for queries, the base scalarTypes are also accepted as input for functions.
-
enum - an enum of strings
We can define types like this:
" we can define descriptions too "
    # or comments
    input GetBookInput {
        id: ID!
    }

    " we can also define required on types using !"
    type Book {
        id: ID!
        title: String
        writerID: ID!
        country: CountryEnum
    }


    """
    multiline descriptions
    are also possible
    """
    enum CountryEnum {
      UNITED_STATES
      JAPAN
      CHINA
    }
GraphQL has a lot of other types, and you can read more about them in the official docs. You may want to learn more about GraphQL, and there’s a lot to learn about it, and if that’s the case you should visit the GraphQL website.
Planning our application
Through this tutorial we will make an API that will provide basic functionality for a real-time message board. You will be able to create a user, get a user, get a user’s public data, post messages, get messages, and listen to new messages.
In terms of REST API it might look something like this:
- POST /user/login (login)
- POST /user/register (create)
- GET /user (get publicly available user data)
- POST /post (post a new post, a user must be logged in for this)
- GET /post/all (get all the posts)
And a separate logic for web-sockets.
Each post has a userId which allows us to join and know which user posted it.
Other than that, when a user logs in or registers they will get a JWT token which will be used for authentication.
In GraphQL, however, there are no POST/GET/PUT methods. We will replace them with Mutation and Query which use POST for the HTTP request, and Subscription which uses web-sockets under the hood.
Setting Up
You should clone the git repository and we will go over the main parts of the code.
Unfortunately, it’s beyond the scope of the tutorial to get into the Typescript/Webpack configurations in this tutorial, but they are pretty simple and straightforward.
We can also completely ignore the database implementation. You shouldn’t care about it as it’s only there to provide mock data.
We are going to base our app partially off of this article by the Apollo team which gives a simple method to modularize our GreaphQL schemas.
After cloning you should have this directory structure:
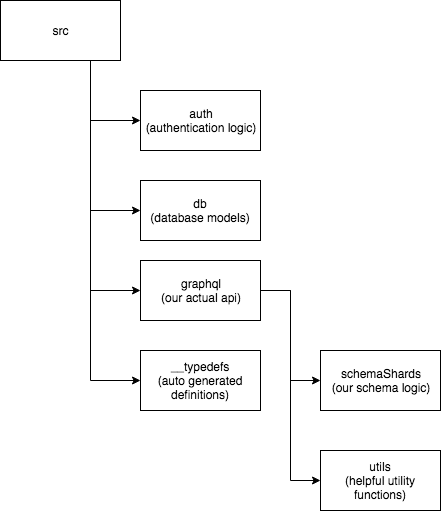
Other than that we have some configuration files:
.graphqlconfig This file is used by graphql-cli. It was created with the init command.
webpack.config.js, tsconfig.json, tslint.json Standard files to configure our build. I used webpack since it provides us with HMR so development is much faster than with typescript only.
db.json This file holds our database.
You can run the server like so:
# run the server in development mode
npm run dev
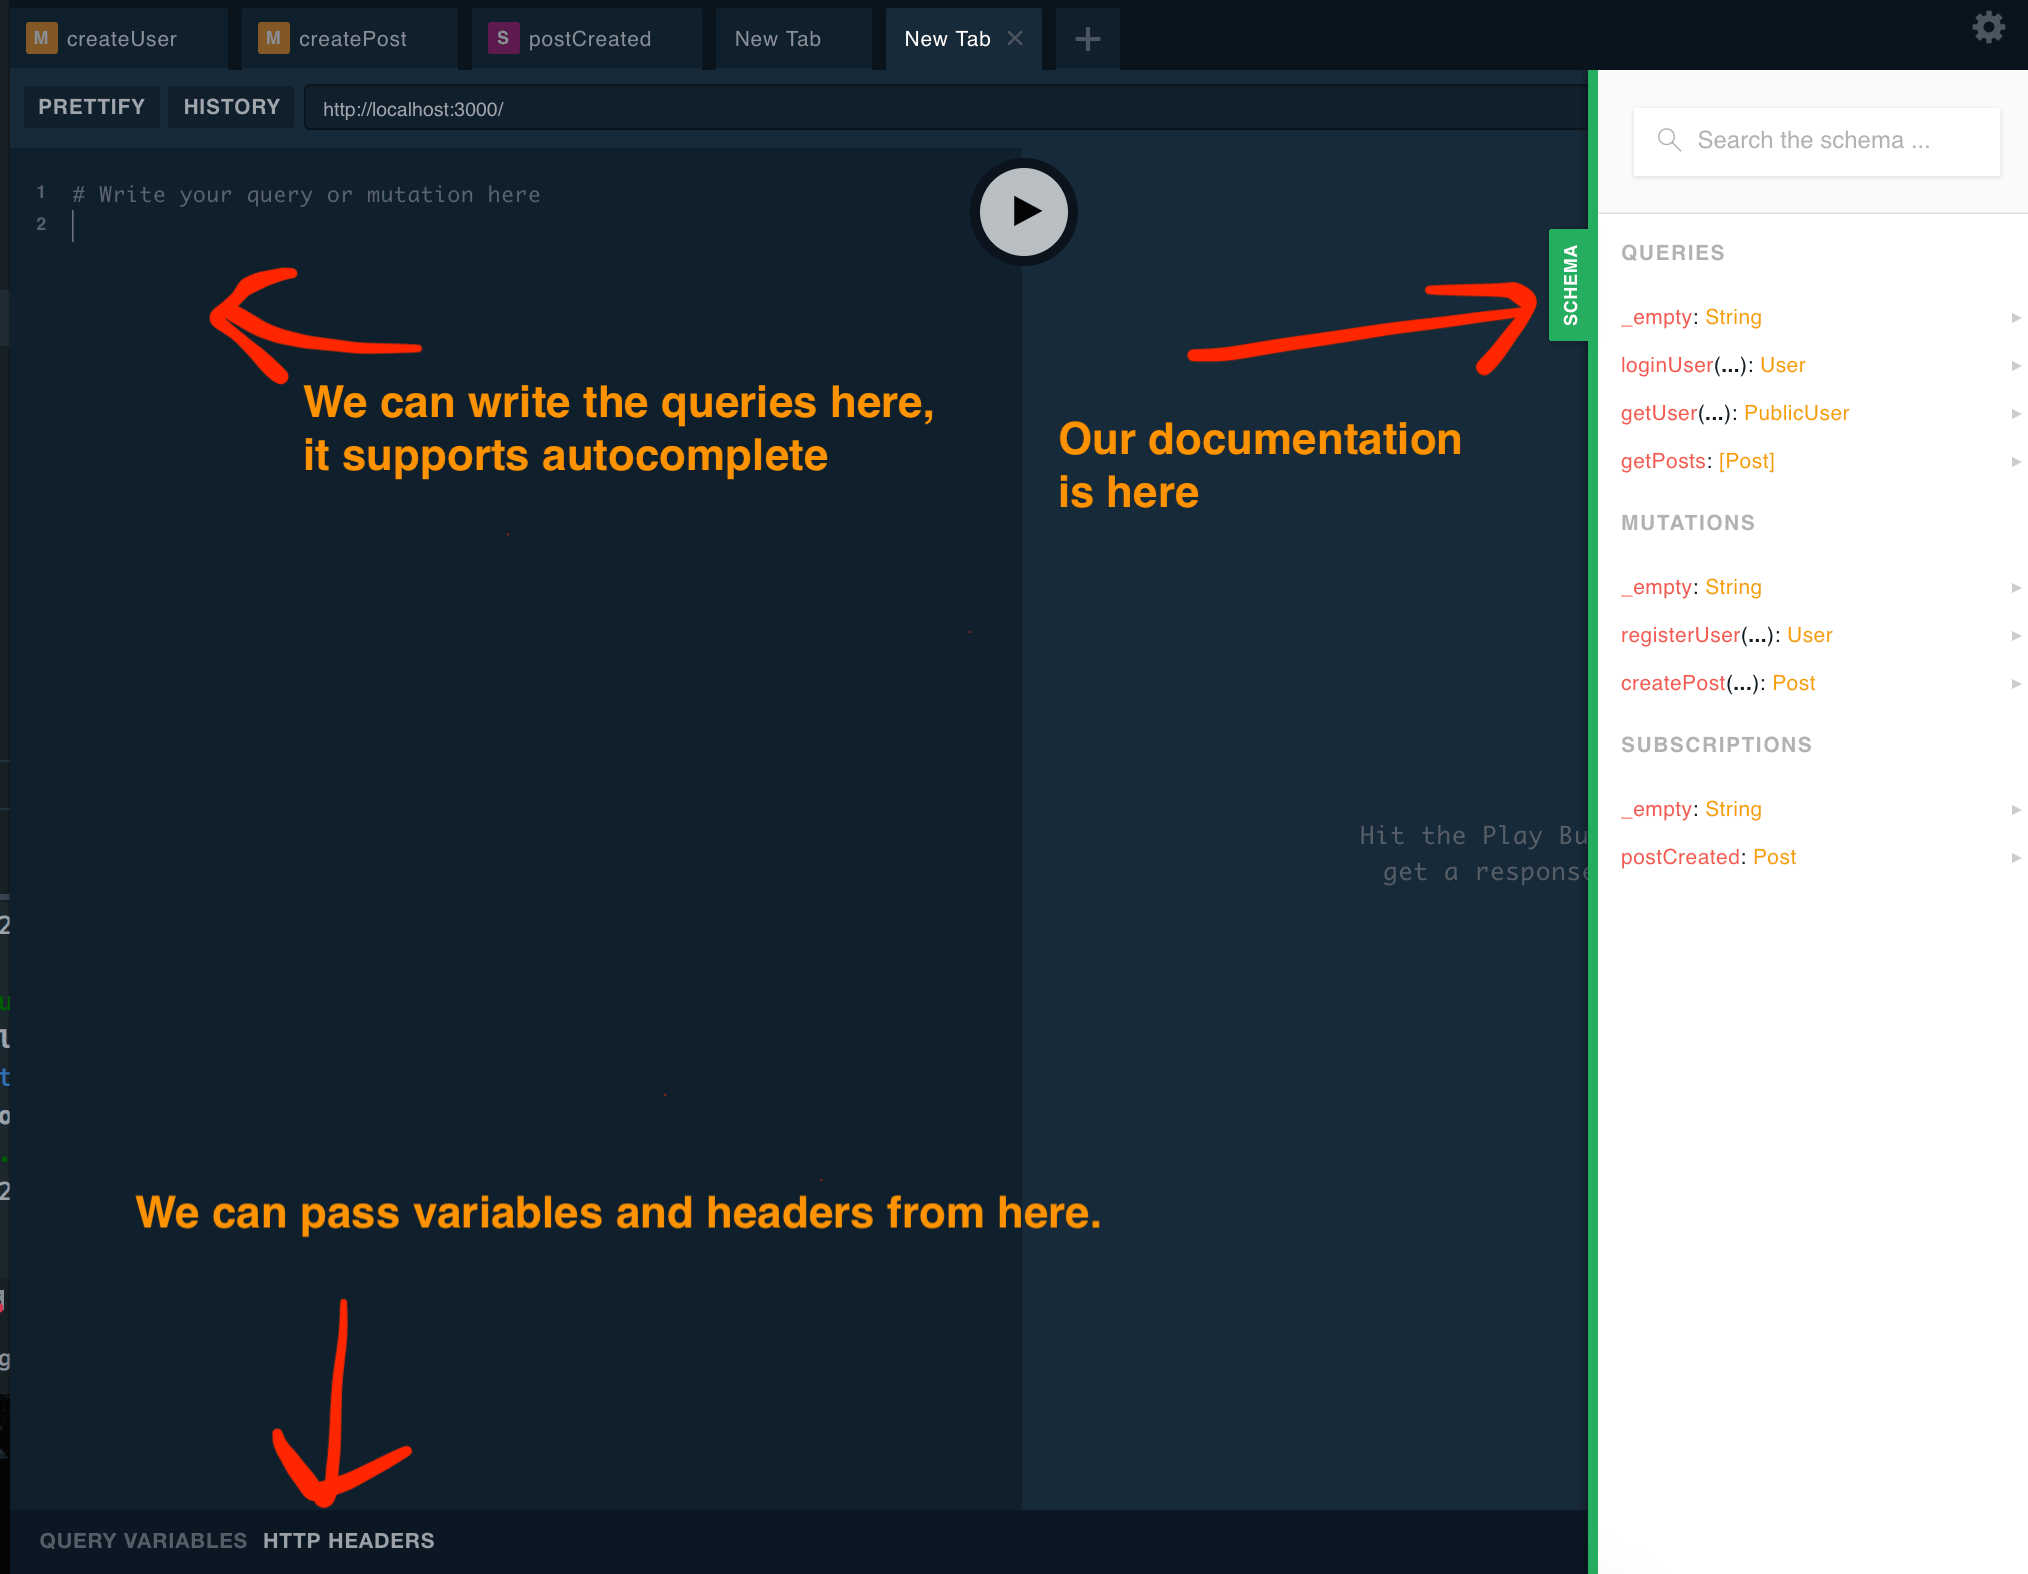
You should be able to see the playground at http://localhost:3000/, for now you can ignore it as we will play with the queries at the end of this tutorial.
It should look like this:
Our server
We will start from the file src/index.ts — this is where our server initialization is happening:
import { ApolloServer, Config } from 'apollo-server';
import { makeExecutableSchema } from 'graphql-tools';
import { handleGraphQLContext, handleGraphQLSubscriptionContext } from 'src/auth/index';
import { rawSchema } from './graphql';

const port = process.env.PORT || 3000;

// create our schema
const schema = makeExecutableSchema(rawSchema);

// configure the server here
const serverConfig: Config = {
  schema,
  context: handleGraphQLContext,
  subscriptions: {
    onConnect: handleGraphQLSubscriptionContext,
  },
  playground: {
    settings: {
      'editor.theme': 'dark', // change to light if you prefer
      'editor.cursorShape': 'line', // possible values: 'line', 'block', 'underline'
    },
  },
};

// create a new server
const server = new ApolloServer(serverConfig);
server.listen(port).then(({ url }) => {
  console.log(`🚀  Server ready at ${url}`);
});
You can see that we are doing 3 interesting things:
-
We create a schema with makeExecutableSchema. We will cover the rawSchema variable later, but this executable schema is the optimized version of our GraphQL schema with the resolvers, it matches GraphQL endpoints to functions that return the responses.
-
We create the configuration for our server, we pass the schema that matches requests to resolvers, a context which is a function that will authenticate the users, and pass the users as a variable to the resolvers.
-
We create our server with Apollo.
And that’s it. With this we have web-socket support, GraphQL support, auto-generated documentation and a playground to test queries.
Our first schema
In the file src/graphql/index.ts you can see the root schema:
import { mergeRawSchemas } from './utils/mergeRawSchemas';
import { gql } from 'apollo-server';
import schemaShards from './schemaShards';

export const rawSchema = mergeRawSchemas(
  {
    typeDefs: [
      // we create empty main types, we can later extend them in the shards
      gql`
                 type Query {
                    _empty: String
                }

                type Mutation {
                    _empty: String
                }

                type Subscription {
                    _empty: String
                }
            `,
    ],
    resolvers: {},
  },
  schemaShards,
);
We see some new things here too:
gql - a tag used for creating our schema. It should provide syntax highlighting and auto-complete in your IDE of choice.
Each type has a “_empty” field. This is used so we can later extend those types, allowing us to completely modularize our application into different files.
mergeRawSchemas is a utility function written with lodash. It merges the arrays that contain typeDefs and the objects that contain the resolvers.
Now we can look at the users schema, in src/graphql/schemaShards/user, I’m separating the code snippets to allow syntax highlight.
Our schema:
extend type Query {
    " login as a user "
    loginUser(input: InputLogin!): User
    " get a user's public data"
    getUser(id: ID!): PublicUser
}

extend type Mutation {
    " register a new user "
    registerUser(input: InputRegisterUser!): User
}

" used for logging in "
input InputLogin {
    email: String!
    password: String!
}

" used for creating a new user "
input InputRegisterUser {
    name: String!
    email: String!
    password: String!
}

" a type defining a user's public data "
type PublicUser {
    id: ID
    name: String
    email: String
}

" a type defining a user  "
type User {
    id: ID
    name: String
    email: String
    token: String
}
And our code:
import { getPublicUser, getUserByPasswordAndEmail, registerUser } from 'src/db';
import { gql } from 'apollo-server';

const typeDefs = gql`..typedefs..`;

export default {
  resolvers: {
    Query: {
      // login
      loginUser: (root, { input }: GQL.QueryToLoginUserArgs) => getUserByPasswordAndEmail(input),
      // get a user
      getUser: (root, { id }:  GQL.QueryToGetUserArgs) => getPublicUser(id),
    },
    Mutation: {
      // register
      registerUser:  (root, { input }: GQL.MutationToRegisterUserArgs) => registerUser(input),
    },
  },
  typeDefs: [typeDefs],
};
As you can see, for each root type I have created a matching resolver, and each resolver is a function that gets some parameters. It usually looks like this:
fieldName(root, args, context, info) { result }
Where root is used to do type resolution, we will talk about more about it later in this post.
args are the arguments we pass. context is an object that we will handle later when we talk about authentication.
info is a pretty advanced variable. It contains information about the execution. In most cases we don’t need to use it.
And a result can be either a value or a promise that returns the value. The value must match the return value defined in the schema.
Generating types
The types you see such as GQL.QueryToLoginUserArgs are auto generated. Here is how we can generate them.
# download the schema with graphql-cli
graphql get-schema
You will have the schema downloaded and saved in** src/_typedefs/schema.graphql** (it’s defined in .graphqlconfig). I only use it to generate types, but this schema could have different usages.
Now we can generate the types from the schema:
# generate types with graphql-schema-typescript

graphql-schema-typescript --namespace=GQL --global=true --typePrefix='' generate-ts --output=src/__typedefs/graphqlTypes.d.ts src/__typedefs
And with that we are done. We should have a new file named graphqlTypes.d.ts and the types will be available globally under the GQL namespace.
For simplicity it’s all defined in package.json, so generating types is easy – just call npm run generate-typedefs.
Authentication
As I mentioned before, I created a function called handleGraphQLContext. We can take a look at it in src/auth/index.ts:
import { getUserByToken } from 'src/db';
import { Request, Response } from 'express';

// our context interface
export interface IContext {
  token?: string;
}

// handle all of the context magic here
function createContext(token: string): Promise<IContext> | IContext {
  return {
    token,
  };
}

// create context for requests
export function handleGraphQLContext(ctx: {connection?: any, req?: Request, res?: Response}) {
  const { req, connection } = ctx;
  // we already connected with a subscription
  if (connection) {
    return connection.context;
  }
  // check the request for the token
  const token = req.headers && req.headers.token;
  return createContext(token as string);
}

// handle authentication for socket connections
export function handleGraphQLSubscriptionContext(
    connectionParams: {token: string},
    webSocket: WebSocket,
) {
  const token = connectionParams.token;
  return createContext(token);
}

// check if the user is logged in or whatever you want to do to authenticate the user
export async function authenticateContext(context: IContext): Promise<GQL.User> {
  if (!context.token) {
    // too bad 👎
    throw new Error('user is not logged in');
  }
  const user = await getUserByToken(context.token);
  if (!user) {
    // too bad 👎
    throw new Error('invalid token');
  }
  // yay 👍
  return user;
}
Depending on whether the request is a subscription or a query/mutation, we will have to handle it differently. Either way we want to generate the same context, so we handle it with one of the functions handleGraphQLSubscriptionContext or handleGraphQLContext. Those functions extract the token and call createContext.
Our main authentication logic should happen in either createContext or in authenticateContext.
Unfortunately, there is no easy way to do authentication with OAuth or other complicated mechanisms in Apollo, but you can create your own Express app and let apollo-server become a middleware in it. This is easier and pretty straightforward to do.
const app = express();
app.use('/auth', authRoutes);
apolloServer.applyMiddleware({app, path: '/graphql'});
app.listen(3000);
Subscriptions
Now that we can create and get a user, and we can authenticate them, let’s create an API to post, get and listen to new messages.
We need to start by looking at** src/graphql/subscriptionManager.ts**:
import { PubSub } from 'graphql-subscriptions';

// In a production server you might want to have some message broker or pubsub implementation like
// rabbitMQ, redis or kafka logic here
// you can use one of the graphql subscription implementations to do it easily
//
// Redis: https://github.com/davidyaha/graphql-redis-subscriptions
// Kafka: https://github.com/ancashoria/graphql-kafka-subscriptions
// Rabbitmq: https://github.com/cdmbase/graphql-rabbitmq-subscriptions

export const pubsub = new PubSub();
This is the file where you could handle all of the pubsub tools like kafka/reds/rabbitmq. The comments have leads for libraries to help you with that kind of task.
But we are going to use a local pubsub since we are not doing a microservices architecture here.
graphql-subscriptions have lots of other useful tools for managing subscriptions, but we will keep it simple for this tutorial.
Next we will see how to implement a simple subscription:
Let’s take a look at src/graphql/schemaShards/posts.ts. We will first look at the GraphQL schema there:
extend type Query {
    " get all posts "
    getPosts: [Post]
}

extend type Mutation {
    " create a new post "
    createPost(input: InputCreatePost!): Post
}

extend type Subscription {
    " called when a new post is created "
    postCreated: Post
}

" input to create a new post "
input InputCreatePost {
    text: String
    userId: ID
}

type Post {
    id: ID
    userId: ID
    text: String
    user: PublicUser
    timestamp: String
}
As you can see this schema is pretty much the same. We only added a Subscription type, and it has an event named postCreated that returns an object of type Post.
It means that the client can subscribe to this postCreated event and get the new post.
Now we have a pretty simple resolver for our subscription:
Subscription: {
      postCreated: {
        subscribe: (root, args, context) => {
          return pubsub.asyncIterator('postCreated');
        },
      },
    },
But in order for this subscription to do anything, we need to publish to it. We can examine the createPost mutation for that:
Mutation: {
      // create a post
      createPost:  async (root, { input }: GQL.MutationToCreatePostArgs, context) => {
        // get the user from the context
        const user = await authenticateContext(context);
        // create a new post in the database
        const post = await createPost(input, user.id);
        // publish the post to the subscribers
        pubsub.publish('postCreated', {
          postCreated: post,
        });
        return post;
      },
    }
We used the authenticateContext function to get the user from its context. If no user exists, we can just let it throw an error and let Apollo catch it.
For the subscription, we use pubsub.publish. We pass the name of the subscription, and we need to pass an object that has a key with the name of the subscription, and a value of whatever we want the subscription to send.
Type resolvers
Type resolvers are an easy way to emulate an SQL “join” like you may do for the database. GraphQL is designed in a way that enables it to work well with microservices. Let’s pretend we keep the posts in one microservice and the users in another.
You can see that our Post has 2 variables that are useful for us: user and userId.
Post: {
  user: (post: Partial<GQL.Post>) => getPublicUser(post.userId),
},
Instead of a generic root argument we now have a post argument. This is because we now have a type resolver with an actual type. We have a Partial since it is not the full Post object, and we just need to return the user, or a promise for a user.
Playing in the playground
Now we are pretty much done with building our little server. We have good type definitions and are now able to modularize our app. Adding and editing resolvers and our schemas is a breeze.
But what does all of this allow us to do? Let’s take a look at how to work with the playground and how to read the documentation that we created without even knowing.
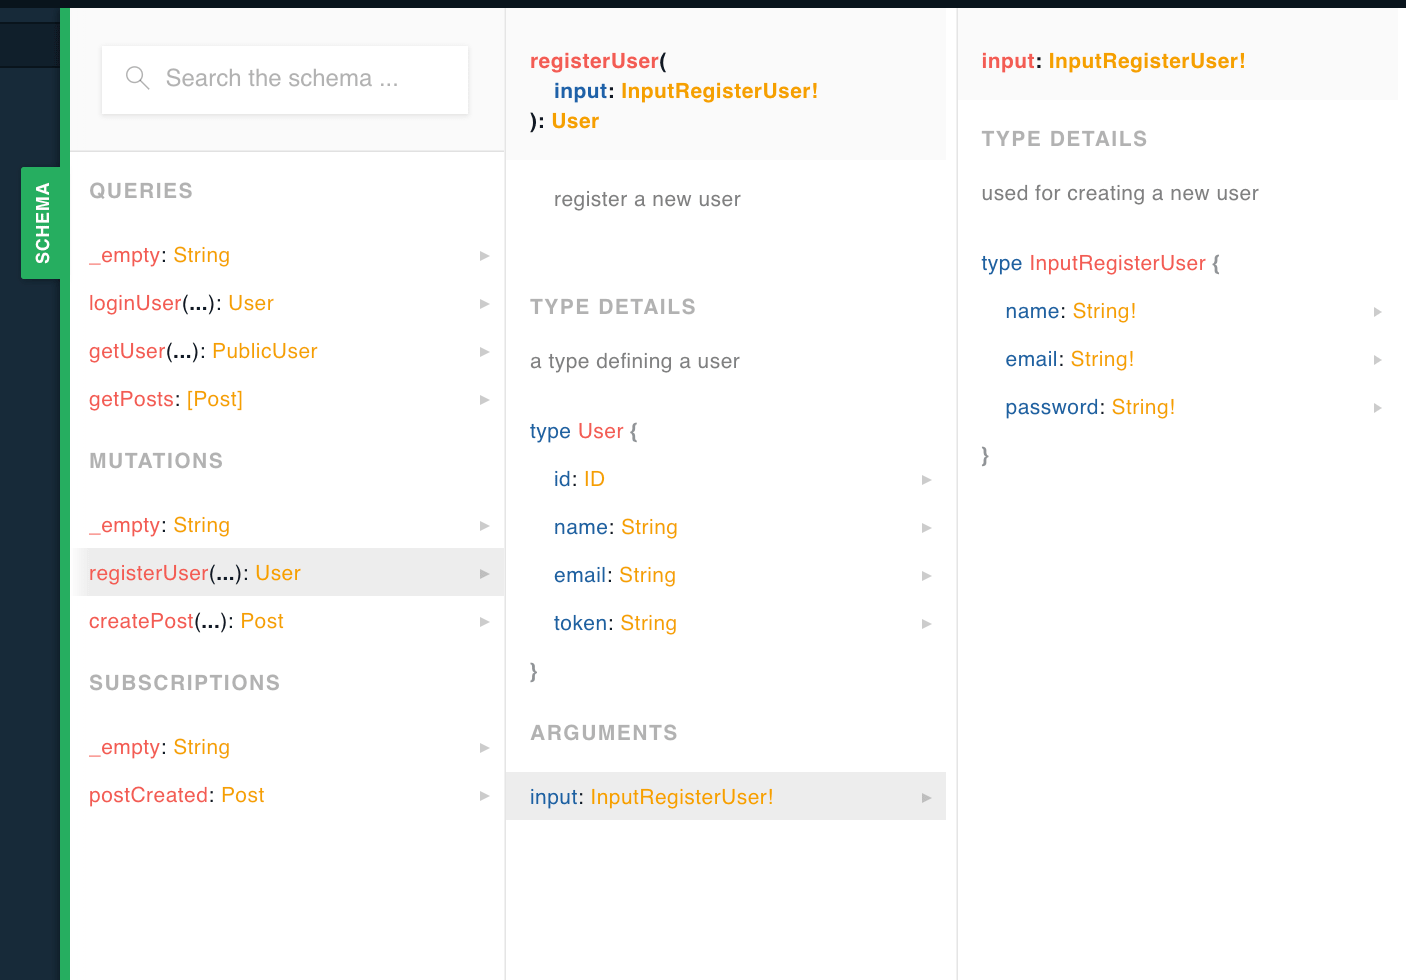
After you open the playground you can create a new user. The new user requires us to pass in a name, email and a password in order to create it. We can find out how to do it by looking at the documentation.
Click the green button on the right side of the playground (it says SCHEMA).
Click the query you want to use (registerUser in this case).
Click on the arguments or variables (input) in this case.
And you will get more information about the query, what variables it can return, what arguments it accepts, and we can easily write documentation about what each variable does.
Let’s create a user now. This is how we pass variables to the playground and you should also have the autocomplete option.
Click the play button to make the query.
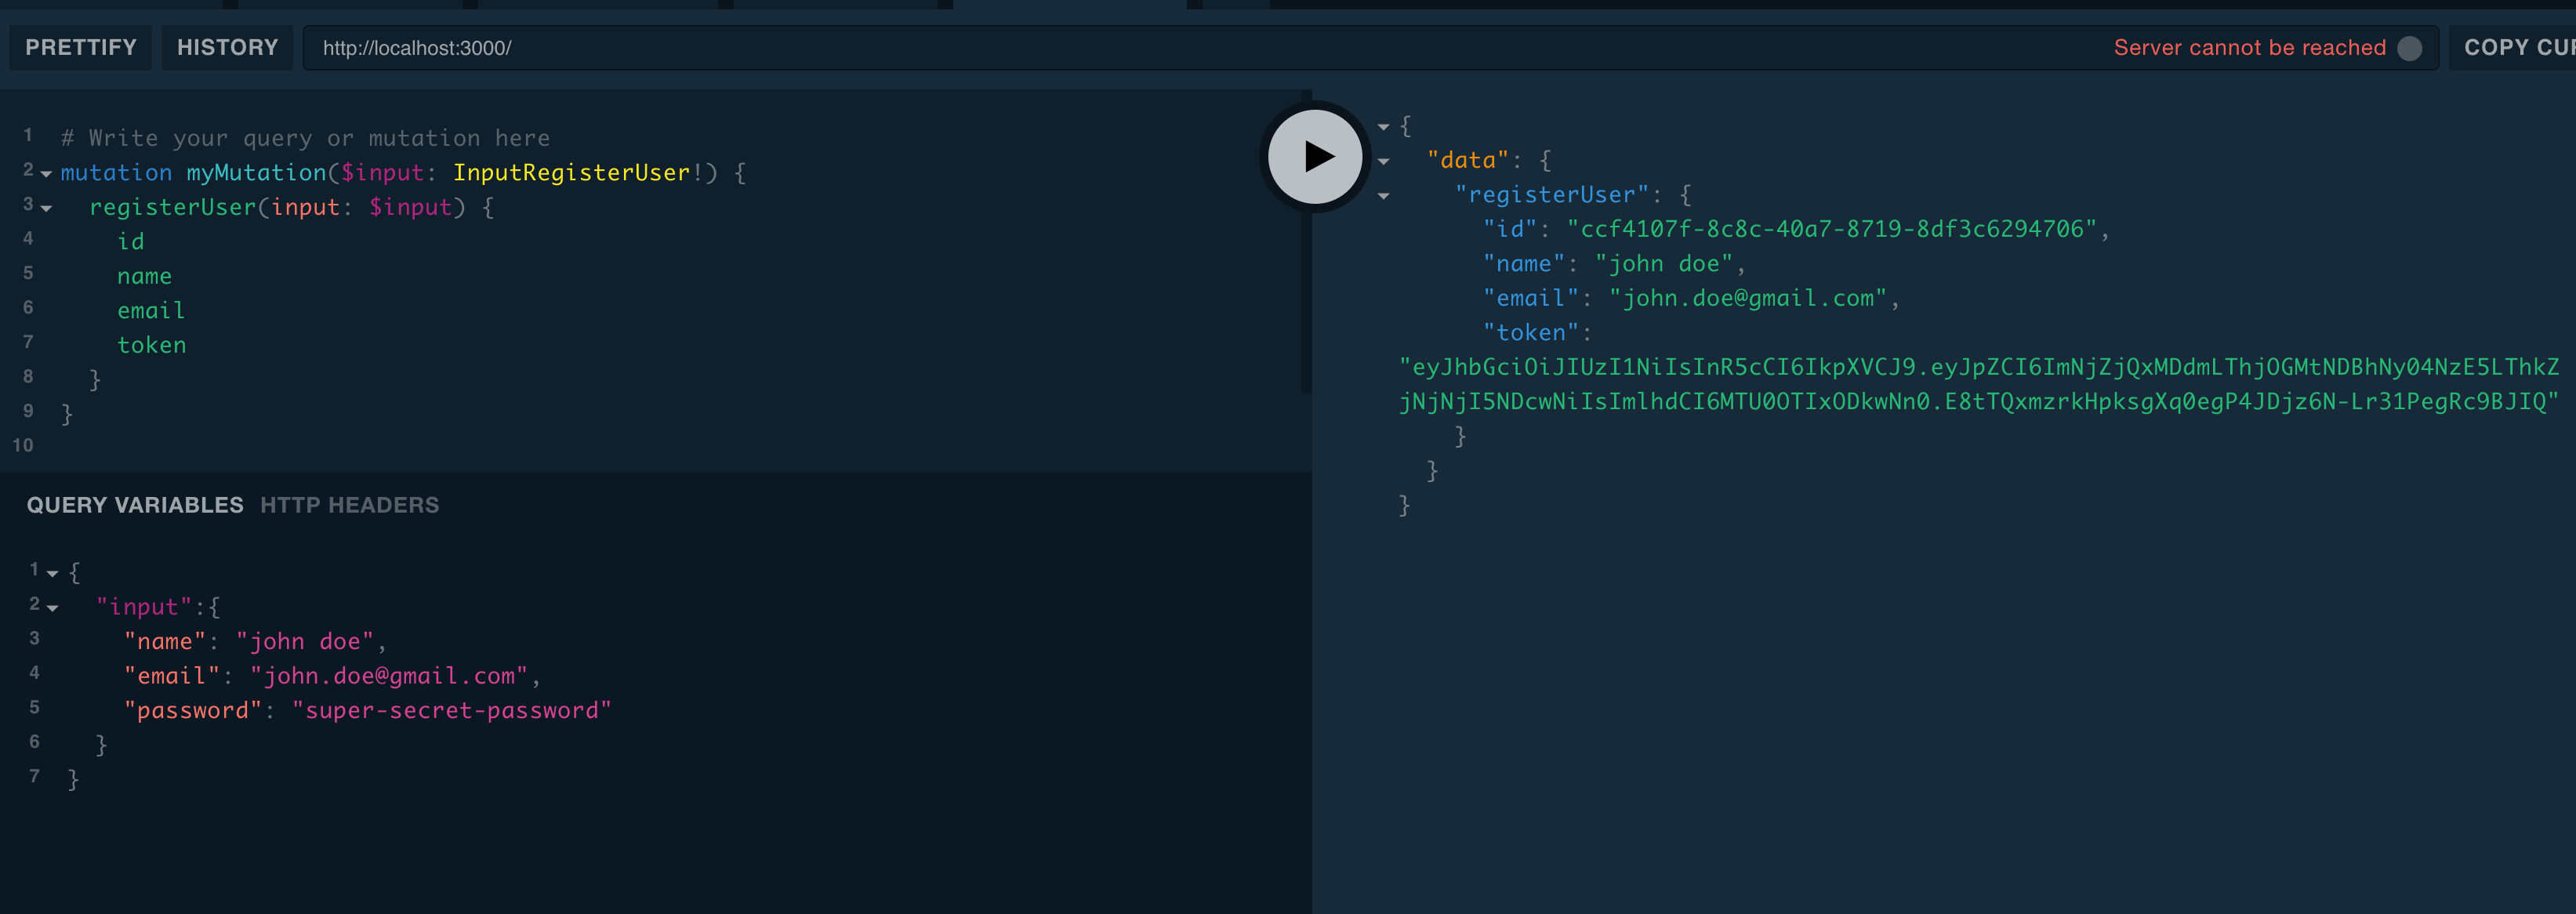
To understand exactly what the playground sends to the server we can check out the network using the debugger. This is what the request looks like:
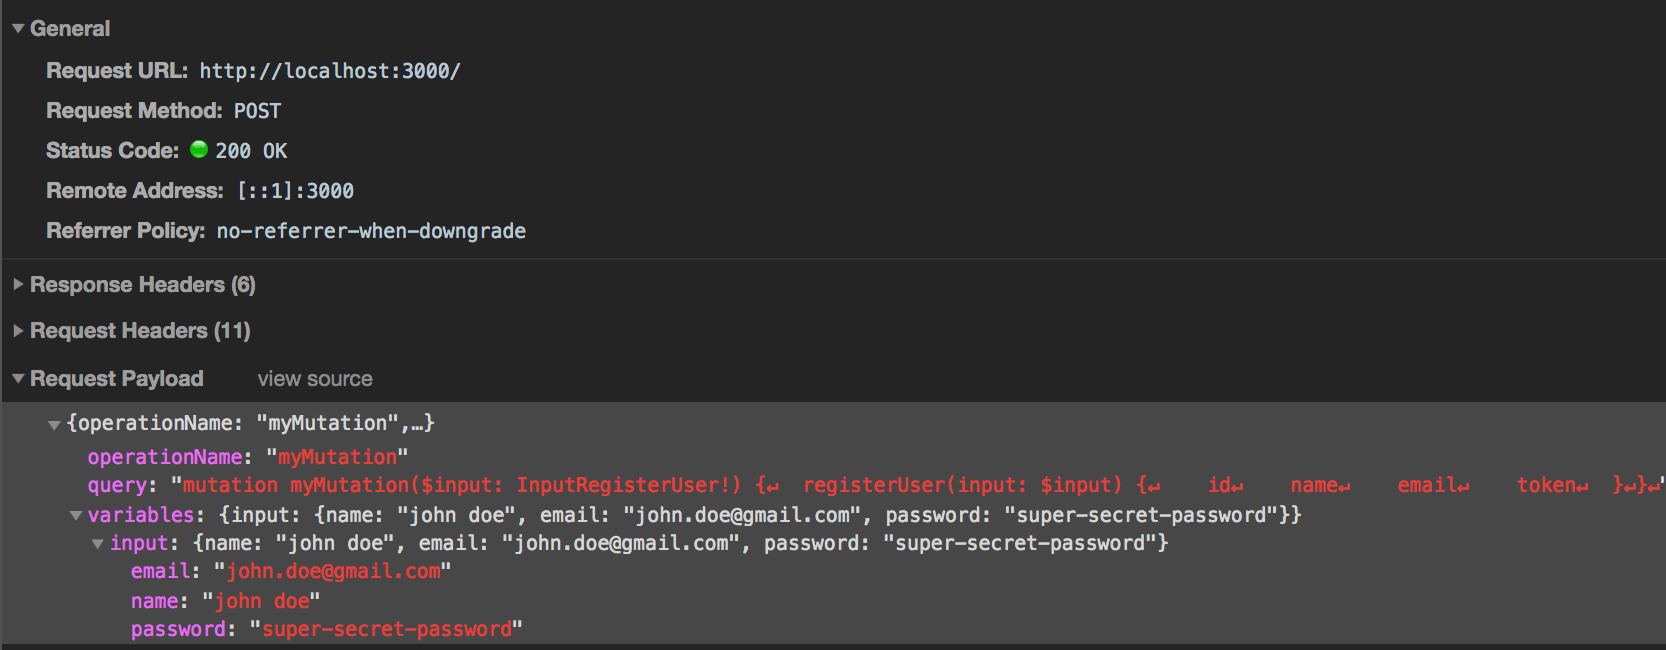
As you can see, we sent a simple POST request with some variables, a query and an operation name. The operation name can be useful for debugging, but it can have any name you want.
Now to see how our subscription works, we can call it with a simple query and with no variables. As you can see I chose not to return the userId as we don’t need it.
subscription{
  postCreated{
    text
    user{
      name
    }
  }
}
Press the play button, and open another tab. In the other tab we can create a new Post. You need to copy the token from the database and pass it as a header:
Query
mutation createPost($input: InputCreatePost!){
  createPost(input:$input){
    id
    text
    user{
      name
    }
  }
}
Headers (goes into the HTTP HEADERS tab)
{
  "token": "eyJhbGciOiJIUzI1NiIsInR5cCI6IkpXVCJ9.eyJpZCI6ImNjZjQxMDdmLThjOGMtNDBhNy04NzE5LThkZjNjNjI5NDcwNiIsImlhdCI6MTU0OTIxODkwNn0.E8tTQxmzrkHpksgXq0egP4JDjz6N-Lr31PegRc9BJIQ"
}
Variables
{
  "input": {
    "text": "hello world"
  }
}
Now the server should have sent data to the subscription, and it should be updated.
Summary
I hope that this tutorial showed you how easy it is to create a GraphQL server with Apollo, and that synchronizing your TypeScript and schema is not that difficult either.
We can gain so much from using GraphQL in terms of performance, documentation and stability.
Thanks for reading !
Originally published by Liron Navon at hashnode.com
#node-js #typescript #graphql
