Creating a note-taking app in Flutter/Dart
Apps for which are written in Dart. Flutter comes pre-equipped with Material Design components which makes it easy to create apps with good looks and feels to it. In Flutter everything is a Widget of either stateless or stateful. A note-taking app is something to start with, with a usable design and functionalities.
If you haven’t installed flutter and a supported IDE, you can find the instructions here.
First, let’s set up the project:
- Create a flutter project from Android Studio or enter the command in terminal/cmd “flutter create notes”.
- In main.dart remove the homePage class and create a new file with our own HomePage class extending Stateful Widget. This class will contain our Scaffold.
- Create another Stateful Widget class. This will Build body containing Staggered View for HomePage. We’ll call it “StaggeredGridPage”.
Let’s be creative and try to present the notes in a cool staggered view.
We’ll use this dart package to create a staggered grid view. https://pub.dartlang.org/packages/flutter_staggered_grid_view and SQLite to store the notes data on the device.
Following is a code snippet from pubspec.yaml* *with the required dependencies listed. Add them, save the file and use flutter command “flutter packages get” to resolve the newly added dependencies.
dependencies:
  flutter:
    sdk: flutter

  cupertino_icons: ^0.1.2
  flutter_staggered_grid_view: ^0.2.7
  auto_size_text: ^1.1.2
  sqflite:
  path:
  intl: ^0.15.7
  share: ^0.6.1
Create a class for the notes. We’ll need the **toMap **function for database queries.
class Note {
  int id;
  String title;
  String content;
  DateTime date_created;
  DateTime date_last_edited;
  Color note_color;
  int is_archived = 0;

  Note(this.id, this.title, this.content, this.date_created, this.date_last_edited,this.note_color);

  Map<String, dynamic> toMap(bool forUpdate) {
    var data = {
//      'id': id,  since id is auto incremented in the database we don't need to send it to the insert query.
      'title': utf8.encode(title),
      'content': utf8.encode( content ),
      'date_created': epochFromDate( date_created ),
      'date_last_edited': epochFromDate( date_last_edited ),
      'note_color': note_color.value,
      'is_archived': is_archived  //  for later use for integrating archiving
    };
    if(forUpdate){  data["id"] = this.id;  }
    return data;
  }

// Converting the date time object into int representing seconds passed after midnight 1st Jan, 1970 UTC
int epochFromDate(DateTime dt) {  return dt.millisecondsSinceEpoch ~/ 1000; }

void archiveThisNote(){ is_archived = 1; }
}
Grab the code of SQLite database queries for note class and table fromhere.
Now your Material App’s home should have a Scaffold from HomePage.dart which should have StaggeredGridView as the body. In the AppBar of the scaffold place an action button to enable the user to toggle between list view and staggered view. Don’t forget to wrap the body in SafeArea, we want the app to be notch friendly on latest phones.
The Staggered View library requires a cross-axis count for the view which we’ll provide dynamically based on width of the display size. This is required to tell the view number of notes we want to show side by side. In landscape mode on a phone or a tablet screen, we’ll make it arrange 3 notes horizontally and 2 for a phone in portrait mode.
import 'dart:convert';
import 'package:flutter/material.dart';
import 'package:flutter_staggered_grid_view/flutter_staggered_grid_view.dart';
import '../Models/Note.dart';
import '../Models/SqliteHandler.dart';
import '../Models/Utility.dart';
import '../Views/StaggeredTiles.dart';
import 'HomePage.dart';

class StaggeredGridPage extends StatefulWidget {
  final notesViewType;
  const StaggeredGridPage({Key key, this.notesViewType}) : super(key: key);
  @override
  _StaggeredGridPageState createState() => _StaggeredGridPageState();
}

class _StaggeredGridPageState extends State<StaggeredGridPage> {

  var  noteDB = NotesDBHandler();
  List<Map<String, dynamic>> _allNotesInQueryResult = [];
  viewType notesViewType ;

@override
  void initState() {
    super.initState();
    this.notesViewType = widget.notesViewType;
  }

@override void setState(fn) {
    super.setState(fn);
    this.notesViewType = widget.notesViewType;
  }

  @override
  Widget build(BuildContext context) {
    GlobalKey _stagKey = GlobalKey();
    if(CentralStation.updateNeeded) {  retrieveAllNotesFromDatabase();  }
    return Container(child: Padding(padding:  _paddingForView(context) , child:
      new StaggeredGridView.count(key: _stagKey,
        crossAxisSpacing: 6, mainAxisSpacing: 6,
        crossAxisCount: _colForStaggeredView(context),
        children: List.generate(_allNotesInQueryResult.length, (i){ return _tileGenerator(i); }),
      staggeredTiles: _tilesForView() ,
          ),
        )
      );
  }

  int _colForStaggeredView(BuildContext context) {
      if (widget.notesViewType == viewType.List) { return 1; }
      // for width larger than 600, return 3 irrelevant of the orientation to accommodate more notes horizontally
      return MediaQuery.of(context).size.width > 600 ? 3 : 2 ;
  }

 List<StaggeredTile> _tilesForView() { // Generate staggered tiles for the view based on the current preference.
  return List.generate(_allNotesInQueryResult.length,(index){ return StaggeredTile.fit( 1 ); }
  ) ;
}

EdgeInsets _paddingForView(BuildContext context){
  double width = MediaQuery.of(context).size.width;
  double padding ;
  double top_bottom = 8;
  if (width > 500) {
    padding = ( width ) * 0.05 ; // 5% padding of width on both side
  } else {
    padding = 8;
  }
  return EdgeInsets.only(left: padding, right: padding, top: top_bottom, bottom: top_bottom);
}


 MyStaggeredTile _tileGenerator(int i){
 return MyStaggeredTile(  Note(
      _allNotesInQueryResult[i]["id"],
      _allNotesInQueryResult[i]["title"] == null ? "" : utf8.decode(_allNotesInQueryResult[i]["title"]),
      _allNotesInQueryResult[i]["content"] == null ? "" : utf8.decode(_allNotesInQueryResult[i]["content"]),
     DateTime.fromMillisecondsSinceEpoch(_allNotesInQueryResult[i]["date_created"] * 1000),
     DateTime.fromMillisecondsSinceEpoch(_allNotesInQueryResult[i]["date_last_edited"] * 1000),
      Color(_allNotesInQueryResult[i]["note_color"] ))
  );
  }

  void retrieveAllNotesFromDatabase() {
  // queries for all the notes from the database ordered by latest edited note. excludes archived notes.
    var _testData = noteDB.testSelect();
    _testData.then((value){
        setState(() {
          this._allNotesInQueryResult = value;
          CentralStation.updateNeeded = false;
        });
    });
  }
}
This view needs tiles for notes to display. The tile we design for the view must preview the title and the content of the note. To handle the text of different length in the tile we’ll use a library to create auto-expanding text view. We only have to define line limit and the widget will auto-expand to accommodate the content till that limit.
Like segue in iOS and Intent in Android, to navigate between pages in Flutter we use Navigator.
import 'package:flutter/material.dart';
import 'package:auto_size_text/auto_size_text.dart';
import '../ViewControllers/NotePage.dart';
import '../Models/Note.dart';
import '../Models/Utility.dart';

class MyStaggeredTile extends StatefulWidget {
  final Note note;
  MyStaggeredTile(this.note);
  @override
  _MyStaggeredTileState createState() => _MyStaggeredTileState();
}

class _MyStaggeredTileState extends State<MyStaggeredTile> {

  String _content ;
  double _fontSize ;
  Color tileColor ;
  String title;

  @override
  Widget build(BuildContext context) {

    _content = widget.note.content;
    _fontSize = _determineFontSizeForContent();
    tileColor = widget.note.note_color;
    title = widget.note.title;

    return GestureDetector(
      onTap: ()=> _noteTapped(context),
      child: Container(
      decoration: BoxDecoration(
        border: tileColor == Colors.white ?   Border.all(color: CentralStation.borderColor) : null,
          color: tileColor,
          borderRadius: BorderRadius.all(Radius.circular(8))),
      padding: EdgeInsets.all(8),
      child:  constructChild(),) ,
    );
  }

  void _noteTapped(BuildContext ctx) {
    CentralStation.updateNeeded = false;
    Navigator.push(ctx, MaterialPageRoute(builder: (ctx) => NotePage(widget.note)));
  }

  Widget constructChild() {
    List<Widget> contentsOfTiles = [];

    if(widget.note.title.length != 0) {
      contentsOfTiles.add(
        AutoSizeText(title,
          style: TextStyle(fontSize: _fontSize,fontWeight: FontWeight.bold),
          maxLines: widget.note.title.length == 0 ? 1 : 3,
          textScaleFactor: 1.5,
        ),
      );
      contentsOfTiles.add(Divider(color: Colors.transparent,height: 6,),);
    }

    contentsOfTiles.add(
        AutoSizeText(
          _content,
          style: TextStyle(fontSize: _fontSize),
          maxLines: 10,
          textScaleFactor: 1.5,)
    );
    return Column(
        crossAxisAlignment: CrossAxisAlignment.start,
        mainAxisAlignment: MainAxisAlignment.start,
        children:     contentsOfTiles
    );
  }

 double _determineFontSizeForContent() {
    int charCount = _content.length + widget.note.title.length ;
    double fontSize = 20 ;
    if (charCount > 110 ) { fontSize = 12; }
    else if (charCount > 80) {  fontSize = 14;  }
    else if (charCount > 50) {  fontSize = 16;  }
    else if (charCount > 20) {  fontSize = 18;  }
    return fontSize;
  }
}
The tile in the view will look something like this.
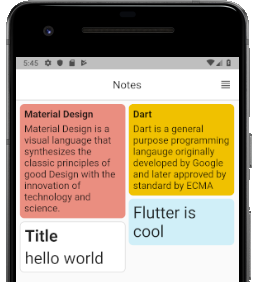
Note tiles in staggered view on HomePage
Now we need a view to edit/create a note. which will also possess various useful actions in AppBar to undo, archive and more. The more action will bring up a bottom sheet with options like share, duplicate, delete permanently and a horizontally scrollable colour picker with which we’ll be able to change the background colour of that particular note.
We’ll segregate NotePage, BottomSheet and ColorSlider widgets in different classes and files to keep the code clean and manageable. To change the colour on all of them when the user picks a new one from the ColorSlider we need to update the state. We can connect these three widgets via callback functions to respond to the changes so they can update themselves.
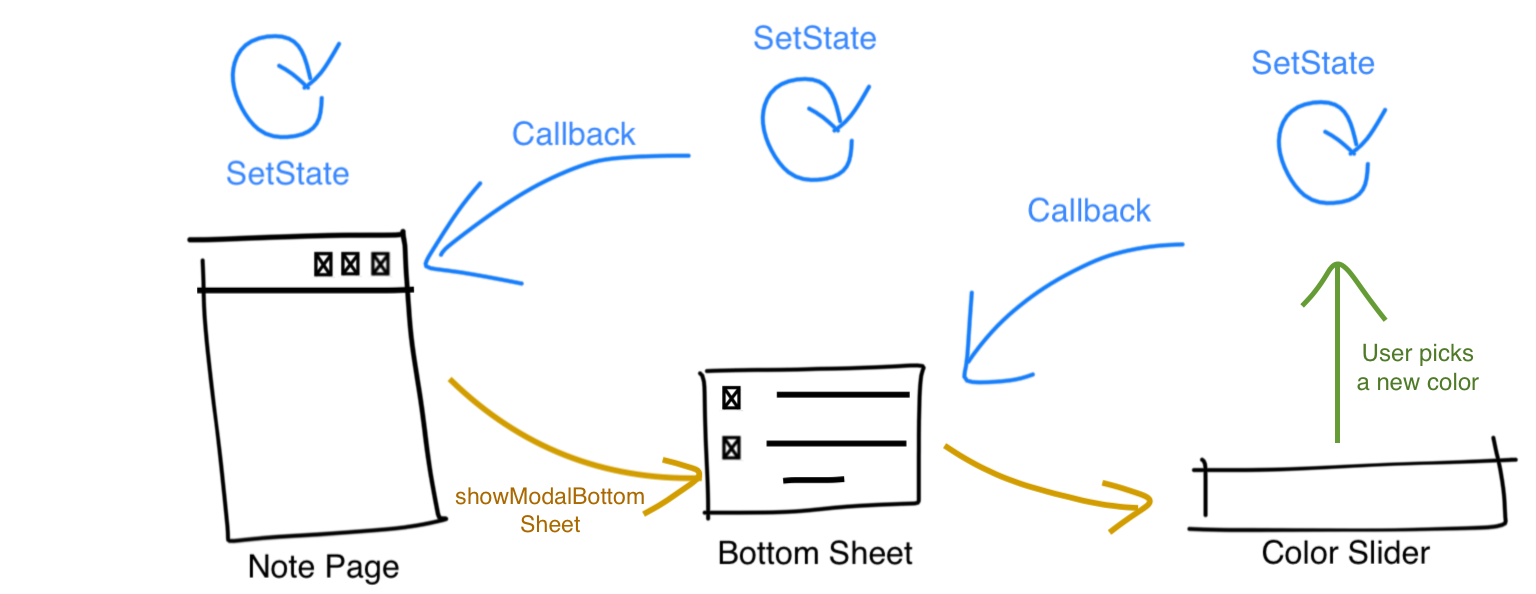
CallBack flow. You’ll see it in action below.
import 'package:flutter/material.dart';

class ColorSlider extends StatefulWidget {
  final void Function(Color)  callBackColorTapped ;
  final Color noteColor ;
  ColorSlider({@required this.callBackColorTapped, @required this.noteColor});
  @override
  _ColorSliderState createState() => _ColorSliderState();
}

class _ColorSliderState extends State<ColorSlider> {

  final colors = [
    Color(0xffffffff), // classic white
    Color(0xfff28b81), // light pink
    Color(0xfff7bd02), // yellow
    Color(0xfffbf476), // light yellow
    Color(0xffcdff90), // light green
    Color(0xffa7feeb), // turquoise
    Color(0xffcbf0f8), // light cyan
    Color(0xffafcbfa), // light blue
    Color(0xffd7aefc), // plum
    Color(0xfffbcfe9), // misty rose
    Color(0xffe6c9a9), // light brown
    Color(0xffe9eaee)  // light gray
  ];

   final Color borderColor = Color(0xffd3d3d3);
   final Color foregroundColor = Color(0xff595959);

  final _check = Icon(Icons.check);
  Color noteColor;

  int indexOfCurrentColor;
  @override void initState() {
    super.initState();
    this.noteColor = widget.noteColor;
    indexOfCurrentColor = colors.indexOf(noteColor);
  }

  @override
  Widget build(BuildContext context) {
    return ListView(
      scrollDirection: Axis.horizontal,
      children:
      List.generate(colors.length, (index)
      {
        return
          GestureDetector(
              onTap: ()=> _colorChangeTapped(index),
              child: Padding(
                  padding: EdgeInsets.only(left: 6, right: 6),
                  child:Container(
                  child: new CircleAvatar(
                    child: _checkOrNot(index),
                    foregroundColor: foregroundColor,
                    backgroundColor: colors[index],
                  ),
                  width: 38.0,
                  height: 38.0,
                  padding: const EdgeInsets.all(1.0), // border width
                  decoration: new BoxDecoration(
                    color: borderColor, // border color
                    shape: BoxShape.circle,
                  )
              ) )
          );
      })
      ,);
  }

  void _colorChangeTapped(int indexOfColor) {
    setState(() {
      noteColor = colors[indexOfColor];
      indexOfCurrentColor = indexOfColor;
      widget.callBackColorTapped(colors[indexOfColor]);
    });
  }

  Widget _checkOrNot(int index){
    if (indexOfCurrentColor == index) {
      return _check;
    }
    return null;
  }

}
I’ve added some handy features as well to undo changes, archive, share, duplicate and permanently delete the note.
#mobile-apps #flutter #ios #dart