Kubernetes Fundamentals - Learn Kubernetes from the Beginning
Kubernetes is about orchestrating containerized apps. Docker is great for your first few containers. As soon as you need to run on multiple machines and need to scale/up down and distribute the load and so on, you need an orchestrator - you need Kubernetes
This is the first part of a series of articles on Kubernetes, cause this topic is BIG!.
- Part I - From the beginning, Part I, Basics, Deployment and Minikube: In this part, we cover why Kubernetes, some history and some basic concepts like deploying, Nodes, Pods.
- Part II - Introducing Services and Labeling: In this part, we deepen our knowledge of Pods and Nodes. We also introduce Services and labeling using labels to query our artifacts.
- Part III - Scaling: Here we cover how to scale our app
- Part IV - Auto scaling: In this part we look at how to set up auto-scaling so we can handle sudden large increases of incoming requests
Resources
- Kubernetes.io One of the best resources to learn about Kubernetes is at this official Kubernetes site by Google.
- Kubernetes overview An overview on Kubernetes, all its parts and how it works
- Free Azure Account If you want to try out AKS, Azure Kubernetes Service, you will need a free Azure account
- Kubernetes in the Cloud Do you feel you know everything about Kubernetes already and just want to learn how to use a managed service? Then this link is for you
- Documentation on AKS, Azure Kubernetes Service Azure Kubernetes Service, a managed Kubernetes
- Best practices on AKS You already know AKS and want to learn how to use it better?
Kubernetes
So what do we know about Kubernetes?
It’s an open-source system for automating deployment, scaling, and management of containerized applications
Let’start with the name. It’s Greek for Helmsman, the person who steers the ship. Which is why the logo looks like this, a steering wheel on a boat:

It’s Also called K8s so K ubernete s, 8 characters in the middle are removed. Now you can impress your friends that you know why it’s referred to as K8.
Here is some more Jeopardy knowledge on its origin. Kubernetes was born out of systems called Borg and Omega. It was donated to CNCF, Cloud Native Computing Foundation in 2014. It’s written in Go/Golang.
If we see past all this trivia knowledge, it was built by Google as a response to their own experience handling a ton of containers. It’s also Open Source and battle-tested to handle really large systems, like planet-scale large systems.
So the sales pitch is:
Run billions of containers a week, Kubernetes can scale without increasing your ops team
Sounds amazing right, billions of containers cause we are all Google size. No? :) Well even if you have something like 10-100 containers, it’s for you.
In this part I hope to cover the following:
- Why Kubernetes and Orchestration in General
- Hello world: Minikube basics, talking through Minikube, simple deploy example
- Cluster and basic commands, Nodes,
- Deployments, what it is and deploying an app
- Pods and Nodes, explain concepts and troubleshooting
Part I - From the beginning, Part I, Basics, Deployment and Minikube
Why Orchestration
Well, it all started with containers. Containers gave us the ability to create repeatable environments so dev, staging, and prod all looked and functioned the same way. We got predictability and they were also light-weight as they drew resources from the host operating system. Such a great breakthrough for Developers and Ops but the Container API is really only good for managing a few containers at a time. Larger systems might consist of 100s or 1000+ containers and needs to be managed as well so we can do things like scheduling, load balancing, distribution and more.
At this point, we need orchestration the ability for a system to handle all these container instances. This is where Kubernetes comes in.
Getting started
Ok ok, let’s say I buy into all of this, how do I get started?
Impatient ey, sure let’s start to do something practical with Minikube
Ok, sounds good I’m a coder, I like practical stuff. What is Minikube?
Minikube is a tool that lets us run Kubernetes locally
Oh, sweet, millions of containers on my little machine?
Well, no, let’s start with a few and learn Kubernetes basics while at it.
Installation
To install Minikube lets go to this installation page
It’s just a few short steps that means we install
- a Hypervisor
- Kubectl (Kube control tool)
- Minikube
Run
Get that thing up and running by typing:
minikube start
It should look something like this:

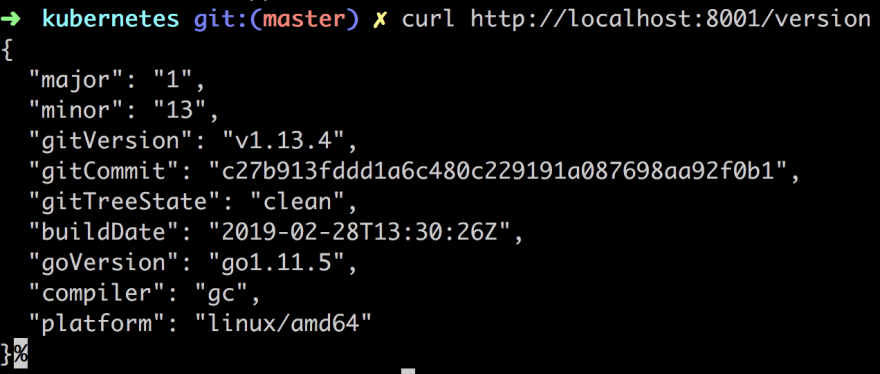
You can also ensure that kubectl have been correctly installed and running:
kubectl version
Should give you something like this in response:

Ok, now we are ready to learn Kubernetes.
Learning kubectl and basic concepts
In learning Kubernetes lets do so by learning more about kubectl a command line program that lets us interact with our Cluster and lets us deploy and manage applications on said Cluster.
The word Cluster just means a group of similar things but in the context of Kubernetes, it means a Master and multiple worker machines called Nodes. Nodes were historically called Minions

, but not so anymore.
The master decides what will run on the Nodes, which includes things like scheduled workloads or containerized apps. Which brings us to our next command:
kubectl get nodes
This should give us a result like this:

What this tells us what Nodes we have available to do work.
Next up let’s try to run our first app on Kubernetes with the run command like so:
kubectl run kubernetes-first-app --image=gcr.io/google-samples/kubernetes-bootcamp:v1 --port=8080
This should give us a response like so:

Next up lets check that everything is up and running with the command:
kubectl get deployments
This shows the following in the terminal:

In putting our app on the Kluster, by invoking the run command, Kubernetes performed a few things behind the scenes, it:
- searched for a suitable node where an instance of the application could be run, there was only one node so it got chosen
- scheduled the application to run on that Node
- configured the cluster to reschedule the instance on a new Node when needed
Next up we are going to introduce the concept Pod, so what is a Pod?
A Pod is the smallest deployable unit and consists of one or many containers, for example, Docker containers. That’s all we are going to say about Pods at the moment but if you really really want to know more have a read here
The reason for mentioning Pods at this point is that our container and app is placed inside of a Pod. Furthermore, Pods runs in a private isolated network that, although visible from other Pods and services, it cannot be accessed outside the network. Which means we can’t reach our app with say a curl command.
We can change that though. There is more than one way to expose our application to the outside world for now however we will use a proxy.
Now open up a 2nd terminal window and type:
kubectl proxy
This will expose the kubectl as an API that we can query with HTTP request. The result should look like:

Instead of typing kubectl version we can now type curl http://localhost:8001/version and get the same results:
The API Server inside of Kubernetes have created an endpoint for each pod by its pod name. So the next step is to find out the pod name:
kubectl get pods
This will list all the pods you have, it should just be one pod at this point and look something like this:

Then you can just save that down to a variable like so:

Lastly, we can now do an HTTP call to learn more about our pod:
curl http://localhost:8001/api/v1/namespaces/default/pods/$POD_NAME
This will give us a long JSON response back (I trimmed it a bit but it goes on and on…)

Maybe that’s not super interesting for us as app developers. We want to know how our app is doing. Best way to know that is looking at the logs. Let’s do that with this command:
kubectl logs $POD_NAME
As you can see below we know get logs from our app:

Now that we know the Pods name we can do all sorts of things like checking its environment variables or even step inside the container and look at the content.
kubectl exec $POD_NAME env
This yields the following result:

Now lets step inside the container:
kubectl exec -ti $POD_NAME bash

We are inside! This means we can see what the source code looks like even:
cat server.js
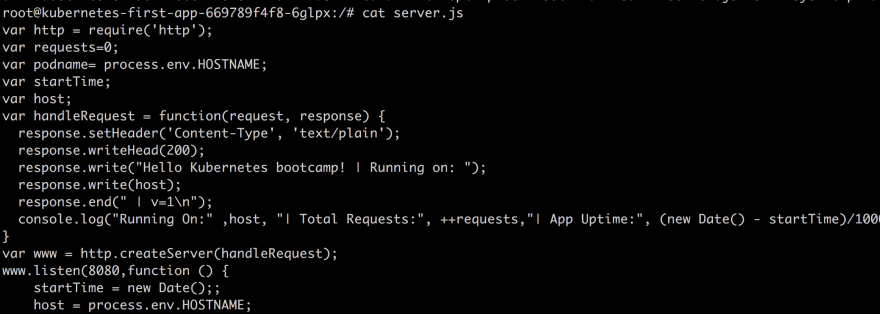
Inside of our container, we can now reach the running app by typing:
curl http://localhost:8080
Summary Part I
This is where we will stop for now.
What did we actually learn?
- Kubernetes, its origin what it is
- Orchestration why you will soon need it
- Concepts like Master, Nodes and Pods
- Minikube, kubectl and how to deploy an image onto our Cluster
Part II - Introducing Services and Labeling
In this part we will cover the following:
- Deepen our knowledge on Pods and Nodes
- Introduce Services and labeling
- Perform an exercise, involving setting labels on Pods and use labels to query our artifacts
Concepts revisited
When we create a Deployment on Kubernetes, that Deployment creates Pods with containers inside them. So Pods are tied to Nodes and will continue to exist until terminated or deleted. Let’s try to educate ourselves a bit more on Pods, Nodes and let’s also introduce a new topic Services.
Pods
Pods are the atomic unit on the Kubernetes platform, i.e smallest possible deployable unit
We’ve stated the above before but it’s worth mentioning again.
What else is there to know?
A Pod is an abstraction that represents a group of one or more containers, for example, Docker or rkt, and some shared resources for those containers. Those resources include:
- Shared storage, as Volumes
- Networking, as a unique cluster IP address
- Information about how to run each container, such as the container image version or specific ports to use
A Pod can have more than one container. If it does contain more than one container it is so the other containers can support the primary application.
Typical examples of helper applications are data pullers, data pushers, and proxies. You can read more on that use case here
- The containers in a Pod share an IP Address and port space and are:
- Always co-located
- Co-scheduled
Let me show you an image to make it easier to visualize:

As we can see above a Pod can have a lot of different artifacts in them that are able to communicate and support the app in some way.
Nodes
A Pod always runs on a Node
So Node is the Pods parent?
Yes.
A Node is a worker machine and may be either a virtual or a physical machine, depending on the cluster
Each Node is managed by the Master. A Node can have multiple pods.
So it’s a one to many relationship
The Kubernetes master automatically handles scheduling the pods across the Nodes in the cluster
Every Kubernetes Node runs at least a:
-
Kubelet, is responsible for the pod spec and talks to the cri interface
-
Kube proxy, is the main interface for coms between nodes
-
A container runtime, (like Docker, rkt) responsible for pulling the container image from a registry, unpacking the container, and running the application.
Ok so a Node contains a Kubelet and container runtime and one to many Pods. I think I got it.
Let’s show an image to make this info stick, cause it’s quite important that we know what goes on, at least at a high level:

Services
Pods are mortal, they can die. Pods, in fact, have a lifecycle.
When a worker node dies, the Pods running on the Node are also lost.
What happens to our apps? :(
You might think them and their data are lost but not so. The whole point with Kubernetes is to not let that happen. We normally deploy something like a ReplicaSet.
A ReplicaSet, what do you mean?
A ReplicaSet is a high-level artifact that can drive the cluster back to desired state via the creation of new Pods to keep your application running.
Ok so if a Pod goes down the ReplicaSet just creates a new Pod/s in its place?
Yes, exactly that. If you focus on defining a desired state the rest is up to Kubernetes.
Phew sounds really great then.
This concept of desired state is a very important one. You need to specify how many containers you want of each kind, at all times.
Oh so 4 database containers, 3 services etc?
Yes exactly.
So you don’t have to care about the details just tell Kubernetes what state you want and it does the rest. If something goes up, Kubernetes ensures it comes back up again to desired state.
Each Pod in a Kubernetes cluster has a unique IP address, even Pods on the same Node, so there needs to be a way of automatically reconciling changes among Pods so that your applications continue to function.
Ok?
Yea, think like this. If a Pod containing your app goes down and another Pod is created in its place, running your app. Users should still be able to use your app after that.
Ok I got it. Makes me think…
The motivation for a Service
You should never refer to a Pod by it’s IP address, just think what happens when a Pod goes down and comes back up again but this time with a different IP. It is for that reason a Service exists.
A Service in Kubernetes is an abstraction which defines a logical set of Pods and a policy by which to access them.
Makes me think of a routers and subnets
Yea I guess you can say there is a resemblance in there somewhere.
Services enable a loose coupling between dependent Pods and are defined using YAML or JSON file, just like all Kubernetes objects.
That’s handy, just JSON and YAML :)
Services and Labels
The set of Pods targeted by a Service is usually determined by a LabelSelector.
Although each Pod has a unique IP address, those IPs are not exposed outside the cluster without a Service. We can expose them through a proxy though as we showed in part I.
Wait, go back a second here, you said
LabelSelector. I wasn’t quite following?
Remember how we couldn’t refer to Pods by IP, cause Pods might go down and a new Pod could come back in its place?
Yes
Well, labels are the answer to how Services and Pods are able to communicate. This is what we mean by loose coupling. By applying labels like for example frontend, backend, release and so on to Pods, we are able to refer to Pods by their logical name rather than their specifics, i.e IP number.
Oh I get it, so it’s a high-level domain language
Mm, kind of.
Services and Traffic
Services allow your applications to receive traffic.
Services can be exposed in different ways by specifying a type in ServiceSpec, service specification.
- ClusterIP (default) - Exposes the Service on an internal IP in the cluster. This type makes the Service only reachable from within the cluster.
- NodePort - Exposes the Service on the same port of each selected Node in the cluster using NAT. Makes a Service accessible from outside the cluster using :. Superset of ClusterIP.
- LoadBalancer - Creates an external load balancer in the current cloud (if supported) and assigns a fixed, external IP to the Service. Superset of NodePort.
- ExternalName - Exposes the Service using an arbitrary name (specified by
externalNamein the spec) by returning a CNAME record with the name. No proxy is used. This type requires v1.7 or higher of kube-dns.
Ok I think I get it. Ensure I’m speaking externally to a Service instead of specific Pods. Depending on what I expose the Service as, that leads to different behavior?
Yea that’s correct.
You said something about labels though, how do we create and apply them to Pods?
Yea lets talk about that next.
Labels
As we just mentioned, Services are the abstraction that allows pods to die and replicate in Kubernetes without impacting your application.
Now, Services match a set of Pods using labels and selectors, it allows us to operate on Pods like a group.
Labels are key/value pairs attached to objects and can be used in any number of ways:
- Designate objects for development, test, and production
- Embed version tags
- Classify an object using tags
Labels can be attached to objects at creation time or later on. They can be modified at any time.
Lab - Fun with Labels and kubectl
It’s a good idea to have read the first part of this series where we create a deployment. If you haven’t you need to first create a deployment like so:
kubectl run kubernetes-first-app --image=gcr.io/google-samples/kubernetes-bootcamp:v1 --port=8080
Now we should be good to go.
Ok. I know you are probably all tired from all theory by now.

I bet you are just itching to learn more hands on Kubernetes with kubectl.
Well, the time for that has come :). We will do two things:
- Create a Service and learn how we can expose our app using said Service
- Learn about Labeling and how we can improve our querying game by having appropriate labels on our artifacts.
Let’s create a new service.
We will get acquainted with the expose command.
Let’s check for existing pods,
kubectl get pods

Next let’s see what services we have:
kubectl get services

Next lets create a Service like so:
kubectl expose deployment/kubernetes-first-app --type="NodePort" --port 8080
As you can see above we are just targeting one of our deployments kubernetes-first-app and referring to it with [type]/[deployment name] and type being deployment.
We expose it as service of type NodePort and finally, we choose to expose it at port 8080.

Now run kubectl get services again and see the results:

As you can see we now have two services in use, our basic kubernetes service and our newly created kubernetes-first-app.
Next up we need to grab the port of our service and assign that to a variable:
export NODE_PORT=$(kubectl get services/kubernetes-first-app -o go-template='{{(index .spec.ports 0).nodePort}}')
echo NODE_PORT=$NODE_PORT
We now have a our port stored on environment variable NODE_PORT and we are ready to start communicating with our service like so:
curl $(minikube ip):$NODE_PORT
Which leads to the following output:

Creating and applying Labels
When we created our deployment and our Pod, it was automatically assigned with a label.
By typing
kubectl describe deployment
we can see the name of said label.

Next up we can query the pods by that same label
kubectl get pods -l run=kubernetes-first-app
Above we are using -l to query for a specific label and kubernetes-bootcamp as the name of the label. This gives us the following result:

You can do a similar query to your services:
kubectl get services -l run=kubernetes-first-app
That just shows that you can query on different levels, for specific Pods or Services that have Pods with that label.
Next up we will look at how to change the label
First let’s get the name of the pod, like so:
POD_NAME=kubernetes-first-app-669789f4f8-6glpx
Above I’m just assigning what my Pod is called to a variable POD_NAME. Check with a kubectl getpods what your Pod is called.
Then we can add/apply the new label like so:
kubectl label pod $POD_NAME app=v1

Verify that the new label have been set, like so:
kubectl describe pod
or
kubectl describe pods $POD_NAME

As you can see from the result our new label app=v1 has been appended to existing labels.
Now we can query like so:
kubectl get pods -l app=v1
That’s pretty much how labeling works, how to get available labels, apply them and use them in a query. Ensure to give them a descriptive name like an app version, a certain environment or a name like frontend or backend, something that makes sense to your situation.
Clean up
Ok, so we created a service. We should learn how to clean up after ourselves. Run the following command to remove our service:
kubectl delete service -l run=kubernetes-bootcamp
Verify the service is no longer there with:
kubectl get services
also, ensure our exposed IP and port can no longer be reached:
curl $(minikube ip):$NODE_PORT
Just because the service is gone doesn’t mean the app is gone. The app should still be reachable on:
kubectl exec -ti $POD_NAME curl localhost:8080
Summary Part II
So what did we learn? We learned a bit more on Pods and Nodes. Furthermore, we learned that we shouldn’t speak directly to Pods but rather use a high-level abstraction such as Services. Services use labels as a way to define a domain language and apply those to different Pods.
Ok, so we understand a bit more on Kubernetes and how different concepts relate. We mentioned something called desired state a number of times but we didn’t go into detail on how to set such a state. That’s our next part in this series where we will cover how to set the desired state and how Kubernetes maintains it, so stay tuned.
Part III - Scaling
This third part aims to show how you scale your application. We can easily set the number of Replicas we want of a certain application and let Kubernetes figure out how to do that. This is us defining a so-called desired state.
When traffic increases, we will need to scale the application to keep up with user demand. We’ve talked about deployments and services, now lets talk scaling.
What does scaling mean in the context of Kubernetes?
We get more Pods. More Pods that are scheduled to nodes.
Now it’s time to talk about desired state again, that we mentioned in previous parts.
This is where we relinquish control to Kubernetes. All we need to do is tell Kubernetes how many Pods we want and Kubernetes does the rest.
So we tell Kubernetes about the number of Pods we want, what does that mean? What does Kubernetes do for us?
It means we get multiple instances of our application. It also means traffic is being distributed to all of our Pods, ie. load balancing.
Furthermore, Kubernetes, or more specifically, services within Kubernetes will monitor which Pods are available and send traffic to those Pods.
Scaling demo Lab
If you haven’t followed the first two parts I do recommend you go back and have a read. What you need for the following to work is at least a deployment. So if you haven’t created one, here is how:
kubectl run kubernetes-first-app --image=gcr.io/google-samples/kubernetes-bootcamp:v1 --port=8080
Let’s have a look at our deployments:
kubectl get deployments
Let’s look closer at the response we get:

We have three pieces of information that are important to us. First, we have the READY column in which we should read the value in the following way, CURRENT STATE/DESIRED STATE. Next up is the UP_TO_DATE column which shows the number of replicas that were updated to match the desired state.
Lastly, we have the AVAILABLE column that shows how many replicas we have available to do work.
Let’s scale
Now, let’s do some scaling. For that we will use the scale command like so:
kubectl scale deployments/kubernetes-first-app --replicas=4

as we can see above the number of replicas was increased to 4 and kubernetes is thereby ready to load balance any incoming requests.
Let’s have a look at our Pods next:

When we asked for 4 replicas we got 4 Pods.
We can see that this scaling operation took place by using the describe command, like so:
kubectl describe deployments/kubernetes-first-app

In the above image, we are given quite a lot of information on our Replicas for example, but there is some other information in there that we will explain later on.
Does it load balance?
The whole point with the scaling was so that we could balance the load on incoming requests. That means that not the same Pod would handle all the requests but that different Pods would be hit.
We can easily try this out, now that we have scaled our app to contain 4 replicas of itself.
So far we used the describe command to describe the deployment but we can use it to describe the IP and port of. Once we have the IP and port we can then hit it with different HTTP requests.
kubectl describe services/kubernetes-first-app
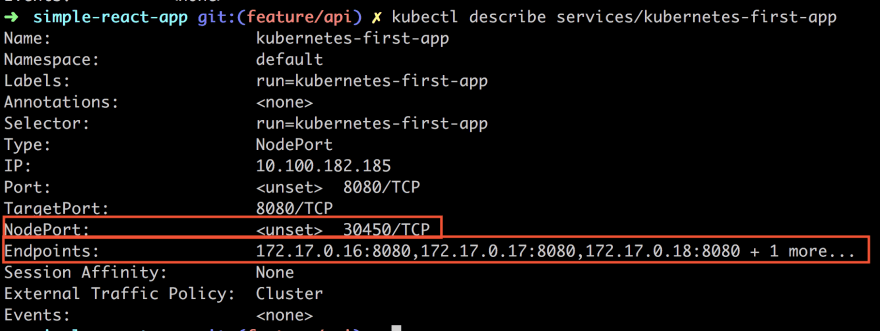
Especially look at the NodePort and the Endpoints. NodePort is the port value that we want to hit with an HTTP request.
Now we will actually invoke the cURL command and ensure that it hits a different port each time and thereby prove our load balancing is working. Let’s do the following:
NODE_PORT=30450
Next up the cURL call:
curl $(minikube ip):$NODE_PORT
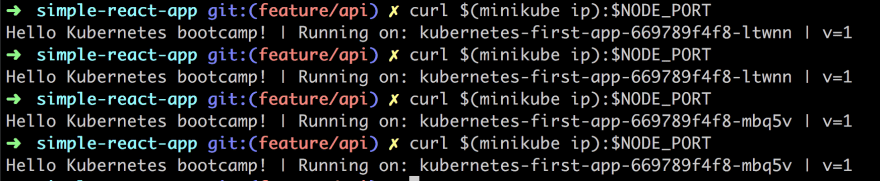
As you can see above we are doing the call 4 times. Judging by the output and the name of the instance we see that we are hitting a different Pod for each request. Thereby we see that the load balancing is working.
Scaling down
So far we have scaled up. We managed to go from one Pod to 4 Pods thanks to the scale command. We can use the same command to scale down, like so:
kubectl scale deployments/kubernetes-first-app --replicas=2

Now if we are really fast adding the next command we can see how the Pods are being removed as Kubernetes is trying to adjust to desired state.

2 out of 4 Pods are saying Terminating as only 2 Pods are needed to maintain the new desired state.
Running our command again we see that only 2 Pods remain and thereby our new desired state have been reached:

We can also look at our deployment to see that our scale instruction has been parsed correctly:

Self-healing
Self-healing is Kubernetes way of ensuring that the desired state is maintained. Pods don’t self heal cause Pods can die. What happens is that a new Pod appears in its place, thanks to Kubernetes.
So how do we test this?
Glad you asked, we can delete a Pod and see what happens. So how do we do that? We use the delete command. We need to know the name of our Pod though so we need to call get pods for that. So let’s start with that:
kubectl get pods
Then lets pick one of our two Pods kubernetes-first-app-669789f4f8-6glpx and assign it to a variable:
POD_NAME=kubernetes-first-app-669789f4f8-6glpx
Now remove it:
kubectl delete pods $POD_NAME
Let’s be quick about it and check our Pod status with get pods. It should say Terminating like so:

Wait some time and then echo out our variable $POD_NAME followed by get pods. That should give you a result similar to the below.

So what does the above image tell us? It tells us that the Pod we deleted is truly deleted but it also tells us that the desired state of two replicas has been achieved by spinning up a new Pod. What we are seeing is * self-healing* at work.
Different ways to scale
Ok, we looked at a way to scale by explicitly saying how many replicas we want of a certain deployment. Sometimes, however, we might want a different way to scale namely auto-scaling. Auto-scaling is about you not having to set the exact number of replicas you want but rather rely on Kubernetes to create the number of replicas it thinks it needs. So how would Kubernetes know that? Well, it can look at more than one thing but a common metric is CPU utilization. So let’s say you have a booking site and suddenly someone releases Bruce Springsteen tickets you are likely to want to rely on auto-scaling, cause the next day when the tickets are all sold out you want the number of Pods to go back to normal and you wouldn’t want to do this manually.
Auto-scaling is a topic I plan to cover more in detail in a future article so if you are really curious how that is done I recommend you have a look here
Summary Part III
Ok. So we did it. We managed to scale an app by creating replicas of it. It wasn’t so hard to accomplish. We showed how we only needed to provide Kubernetes with a desired state and it would do its utmost to preserve said state, also called * self-healing*. Furthermore, we mentioned that there was another way to scale, namely auto-scaling but decided to leave that topic for another article. Hopefully, you are now more in awe of how amazing Kubernetes is and how easy it is to scale your app.
Part IV - Auto scaling
In this article, we will cover the following:
- Why auto scaling, we will discuss different scenarios in which it makes sense to rely on auto scaling over defining it statically like we do with desired state
- How, lets talk about Horizontal Auto Scaling the concept/feature that allows us to scale in an elastic way.
- Lab - lets scale, we will look at how to actually set this up in
kubectland simulate a ton of incoming requests. We will then inspect the results and see that Kubernetes acts the way we think
Why
So in our last part, we talked about desired state. That’s an OK strategy until something unforeseen happens and suddenly you got a great influx of traffic. This is likely to happen to businesses such as e-commerce around a big sale or a ticket vendor when you release tickets to a popular event.
Events like these are an anomaly which forces you to quickly scale up. The other side of the coin though is that at some point you need to scale down or you suddenly have overcapacity you might need to pay for. What you really want is for the scaling to act in an elastic way so it scaled up when you need it to and scales down when there is less traffic.
How
Horizontal auto-scaling, what does it mean?
It’s a concept in Kubernetes that can scale the number of Pods we need. It can do so on a replication controller, deployment or replica set. It usually looks at CPU utilization but can be made to look at other things by using something called custom metrics support, so it’s customizable.
It consists of two parts a resource and a controller. The controller checks utilization, or whatever metric you decided, to ensure that the number of replicas matches your specification. If need be it spins up more Pods or removes them. The default is checking every 15 seconds but you can change that by looking at a flag called --horizontal-pod-autoscaler-sync-period.
The underlying algorithm that decides the number of replicas looks like this:
desiredReplicas = ceil[currentReplicas * ( currentMetricValue / desiredMetricValue )]
Lab - lets scale
Ok, the first thing we need to do is to scale our deployment to use something other than desired state.
We have two things we need to specify when we do autoscaling:
- min/max, we define a minimum and maximum in terms of how many Pods we want
- CPU, in this version we set a certain CPU utilization percentage. When it goes above that it scales out as needed. Think of this one as an
IFclause, if CPU value greater than the threshold, try to scale
Set up
Before we can attempt our scaling experiment we need to make sure we have the correct add-ons enabled. You can easily see what add-ons you have enabled by typing:
minikube addons list
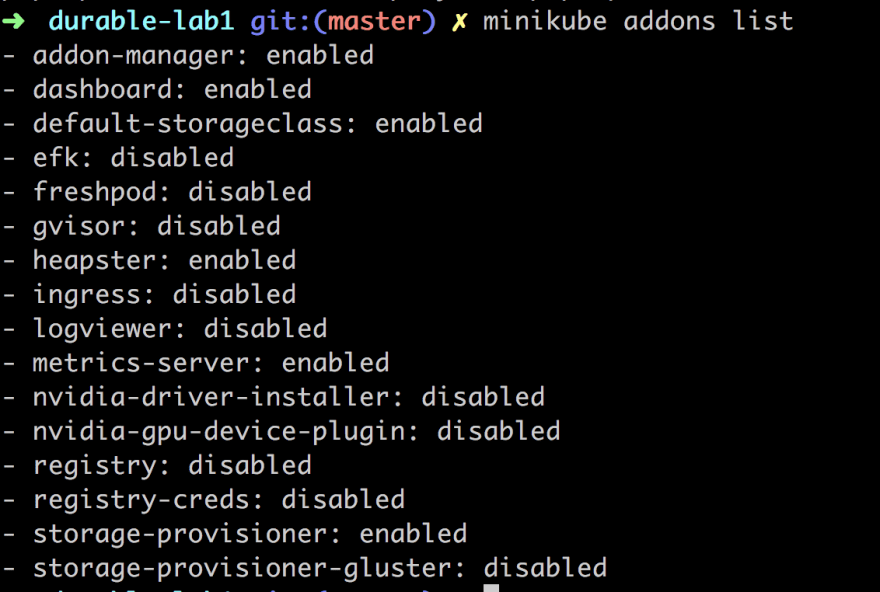
If it looks like the above we are all good. Why am I saying that? Well, what we need, to be able to auto-scale, is that heapster and metrics-server add ons are enabled.
Heapster enables Container Cluster Monitoring and Performance Analysis.
Metrics server provide metrics via the resource metrics API. Horizontal Pod Autoscaler uses this API to collect metrics
We can easily enable them both with the following commands (we will need to for auto-scaling to show correct data):
minikube addons enable heapster
and
minikube addons enable metrics-server
We need to do one more thing, namely to enable Custom metrics, which we do by starting minikube with such a flag like so:
minikube start --extra-config kubelet.EnableCustomMetrics=true
Ok, now we are good to go.
Running the experiment
We need to do the following to run our experiment
- Create a deployment
- Apply autoscaling
- Bombard the deployment with incoming requests
- Watch the auto scaling how it changes
Create a deployment
kubectl run php-apache --image=k8s.gcr.io/hpa-example --requests=cpu=200m --expose --port=80
Above we are creating a deployment php-apache and expose it as a service on port 80. We can see that we are using the image k8s.gcr.io/hpa-example
It should tell us the following:
service/php-apache created
deployment.apps/php-apache created
Autoscaling
Next up we will use the command autoscale. We will use it like so:
kubectl autoscale deployment php-apache --cpu-percent=50 --min=1 --max=10
It should say something like:
horizontalpodautoscaler.autoscaling/php-apache autoscaled
Above we are applying the auto-scaling on the deployment php-apache and as you can see we are applying both min-max and cpu based auto scaling which means we give a rule for how the auto scaling should happen:
If CPU load is
>= 50%create a new Pod, but only maximum 10 Pods. If the load is low go back gradually to one Pod
Bombard with requests
Next step is to send a ton of requests against our deployment and see our auto-scaling doing its work. So how do we do that?
First off let’s check the current status of our horizontal pod auto-scaler or hpa for short by typing:
kubectl get hpa
This should give us something like this:

The above shows us two pieces of information. The first is the TARGETS column which shows our CPU utilization, actual usage/trigger value. The next bit of interest is the column REPLICAS that shows us the number of copies, which is 1 at the moment.
For our next trick open up a separate terminal tab. We need to do is to set things up so we can send a ton of requests.
Next up we create a container using this command:
kubectl run -i --tty load-generator --image=busybox /bin/sh
This should take us to a prompt within the container. This is followed by:
while true; do wget -q -O- http://php-apache.default.svc.cluster.local; done
The command above should result in something looking like this.

This will just go on and on until you hit CTRL+C, but leave it be for now.
This throws a ton on requests in while true loop.
I thought
while trueloops were bad?
They are but we are only going to run it for a minute so that the auto scaling can happen. Yes, the CPU will sound a lot but don’t worry :)

Let this go on for a minute or so, then enter the following command into the first terminal tab (not the one running the requests), like so:
kubectl get hpa
It should now show something like this:

As you can see from the above the column TARGETS looks different and now says 339%/50% which means the current load on the CPU and REPLICAS is 7 which means it has gone from 1 to 7 replicas. So as you can see we have been bombarding it pretty hard.
Now go to the second terminal and hit CTRL+C or you will have a situation like this:

It will actually take a few minutes for Kubernetes to cool off and get the values back to normal. A first look at the Pods situation shows us the following:
kubectl get pods

As you can see we have 7 Pods up and running still but let’s wait a minute or two and it should look like this:

Ok, now we are back to normal.
Summary Part IV
Now we did some great stuff in this article. We managed to set up auto-scaling, bombard it with requests and without frying our CPU, hopefully ;)
We also managed to learn some new Kubernetes commands while at it and got to see auto-scaling at work giving us new Pods based on our specification.
#Kubernetes #devops #docker