Our first challenge at App Brewery’s Flutter Bootcamp is to make an I Am Rich app.
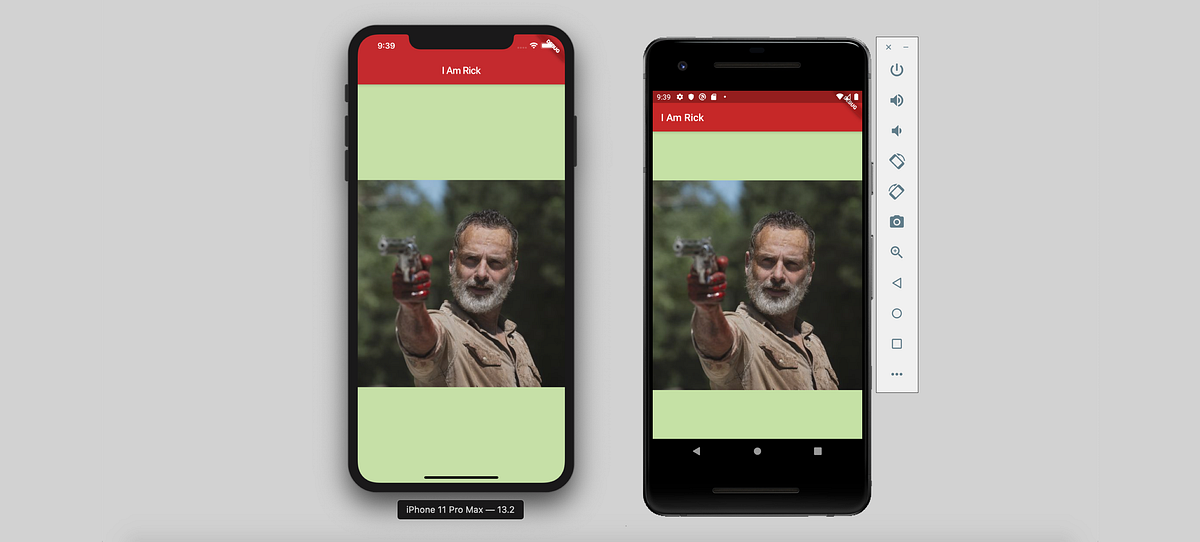
Since I’m a fan of The Walking Dead, I decided to make an app paying tribute to one of its most badass characters, Rick Grimes.
To begin with, if you’re running macOS Catalina and still haven’t installed Flutter, check out my previous story: Setting up Flutter on macOS Catalina. I go over the many obstacles that you might encounter and are not covered in the installation documentation.
(EDIT: Or if you want to build something more interesting, scroll down to the end of the article for the next episodes!)
If you’re good to go, open Android Studio, select:
- Start a new Flutter project
- Flutter Application
- Name it: i_am_rick(or whatever you want your app to be)
- Enter a company domain: example.com, yourname.com or yourcompany.com
- Deselect the ‘Platform channel languages’ boxes as we won’t be writing any iOS/Android specific code
The project opens with the main.dart file, which contains the code for a sample app. You can test the sample app on iOS and Android to make sure everything is running well and then you can delete all the code and replace it with the code below.
import 'package:flutter/material.dart';

void main() {
  runApp(
    MaterialApp(
      home: Scaffold(
        backgroundColor: Colors.lightGreen[200],
        appBar: AppBar(
          title: Text("I Am Rick"),
          backgroundColor: Colors.red[800],
        ),
        body: Center(
          child: Image(
            image: AssetImage('images/rick_gun.jpg'),
          ),
        ),
      ),
    ),
  );
}
That’s all the code you need to run this app on iOS and Android!
Code Breakdown
MaterialApp
Flutter apps are structured like a tree. Here we create a MaterialApp, which is based on the Material Design by Google.
Scaffold
Inside the MaterialApp, we add a Scaffold, which implements the basic material design layout. Inside the Scaffold you can have the main body, as well as app bars, drawers, snack bars, and bottom sheets.
Colors
You can also set the backgroundColor of the Scaffold. By using the Colors class, we tap into Material Design’s color palette.
AppBar
Inside the Scaffold, we add an AppBar which implements a top bar on iOS and Android. Inside the AppBar, we add a title by using a simple Text widget and we also change the backgroundColor like before, to a ‘Walking Dead’ red kind of color.
Centering widgets
For the body of the Scaffold, we use the Center class, which is a widget that centers its child within itself. Useful shortcut: If you already have a widget and want to embed it into a Center widget, click on the widget and wait for the lightbulb icon to come up next to it and tap it (or click on the widget and tap alt/option + Enter on Mac). Then choose Center widget, which automatically wraps the widget in a Center widget.
Images
For the child of the Center widget, we add an Image widget (don’t confuse it with the Image class from dart-ui), that displays an image that can be from various sources, such as URL, file, etc.
To fetch an image from a URL you can do:
Image(image: NetworkImage('image_url'))
or from an asset:
Image(image: AssetImage('images/rick_gun.jpg'))
Adding assets to the project
To add images to your project, go to the Project hierarchy, right click on the main project folder -> New -> Directory and create a directory called images. Move your files into that folder.
To specify your assets and images, you need to go to the pubspec.yaml file and uncomment the part where it says:
# The following section is specific to Flutter.
flutter:

  # To add assets to your application, add an assets section, like this:
  assets:
    - images/rick_gun.jpg
Be careful with the indentation here as yaml files are strict with it. Each level of indentation is two spaces in, so assets: needs to be two spaces in (because it’s under flutter:) and — images/rick_gun.jpg needs to be four spaces in.
If you have a lot of images and don’t want to type all the filenames separately, you can add all the files in the images folder like:
assets:
  - images/
Formatting code with dartfmt
You might have noticed that we include a comma after every widget. This helps us to format the code by simply right clicking in the editor and selecting: Reformat Code with dartfmt. This creates the nice, nested structure that matches the Flutter widget tree.
If you want a better way to visualise this structure, you can also click on Flutter Outline which sits on the right sidebar in Android Studio.
#flutter