In this post, I’ll walk through the process of building a music streaming similar to Spotify.
React Native is a framework for building native apps using React and Javascript.
What’s really cool is that the exact same code is going to work for both iOS and Android, and the apps are going to be 100 % native (no WebViews or anything).
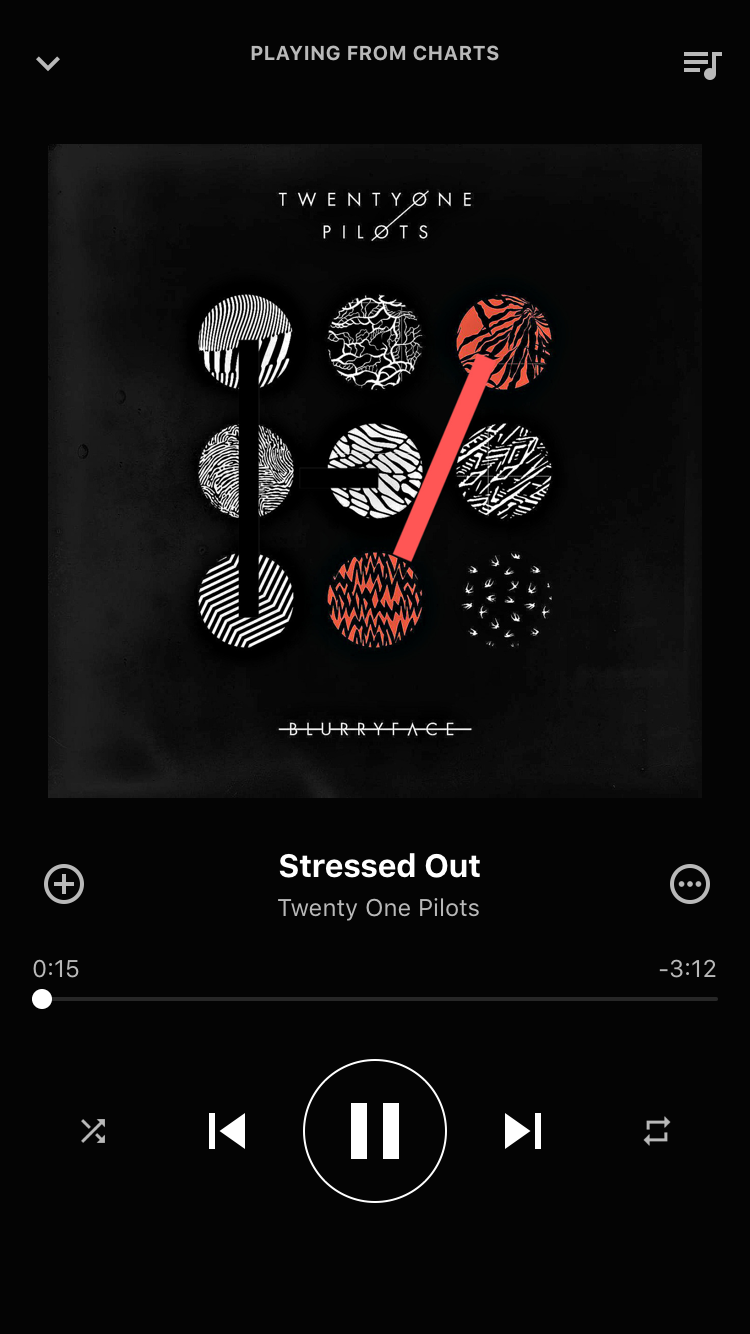
We’re going to build the ‘Now Playing’ screen, which looks like this on Spotify:
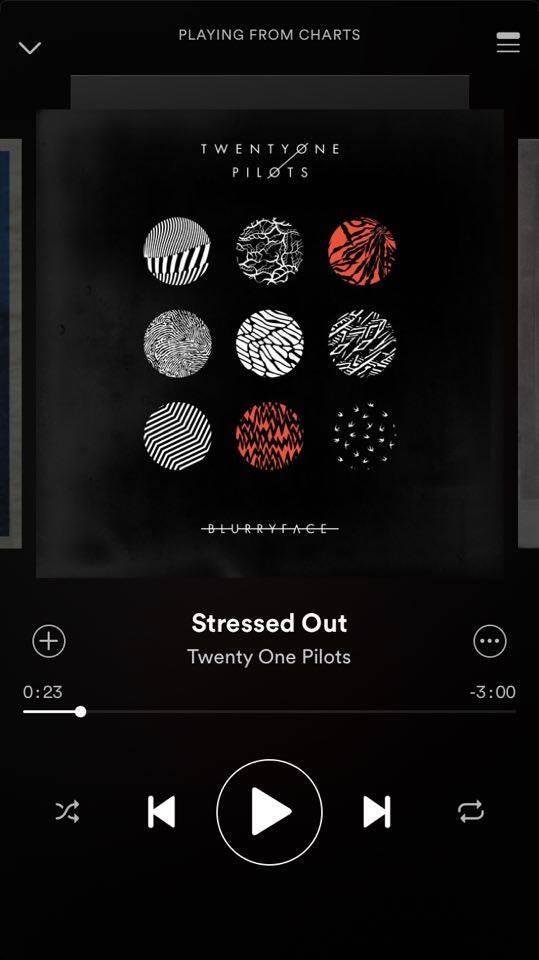
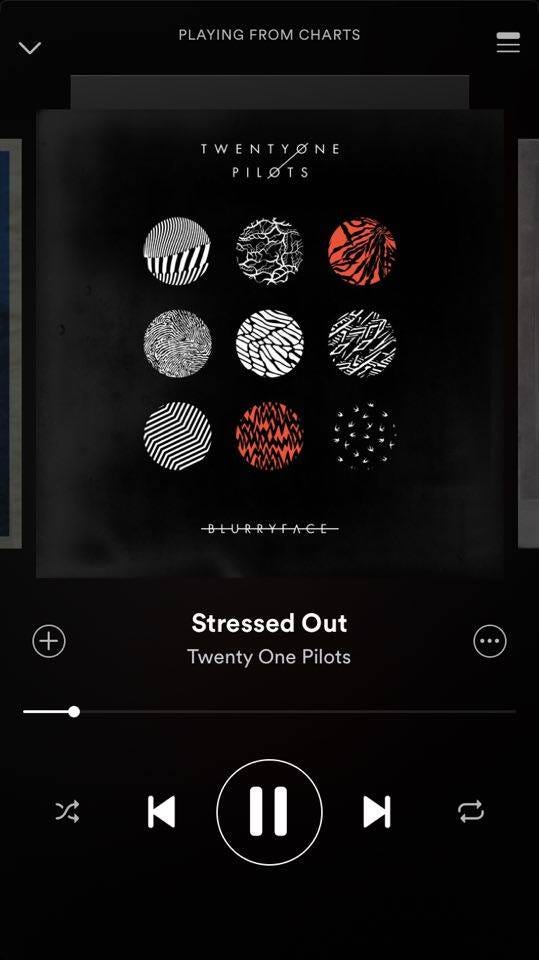
Somebody stole my car radio, so now I’m gonna steal Spotify’s UI.
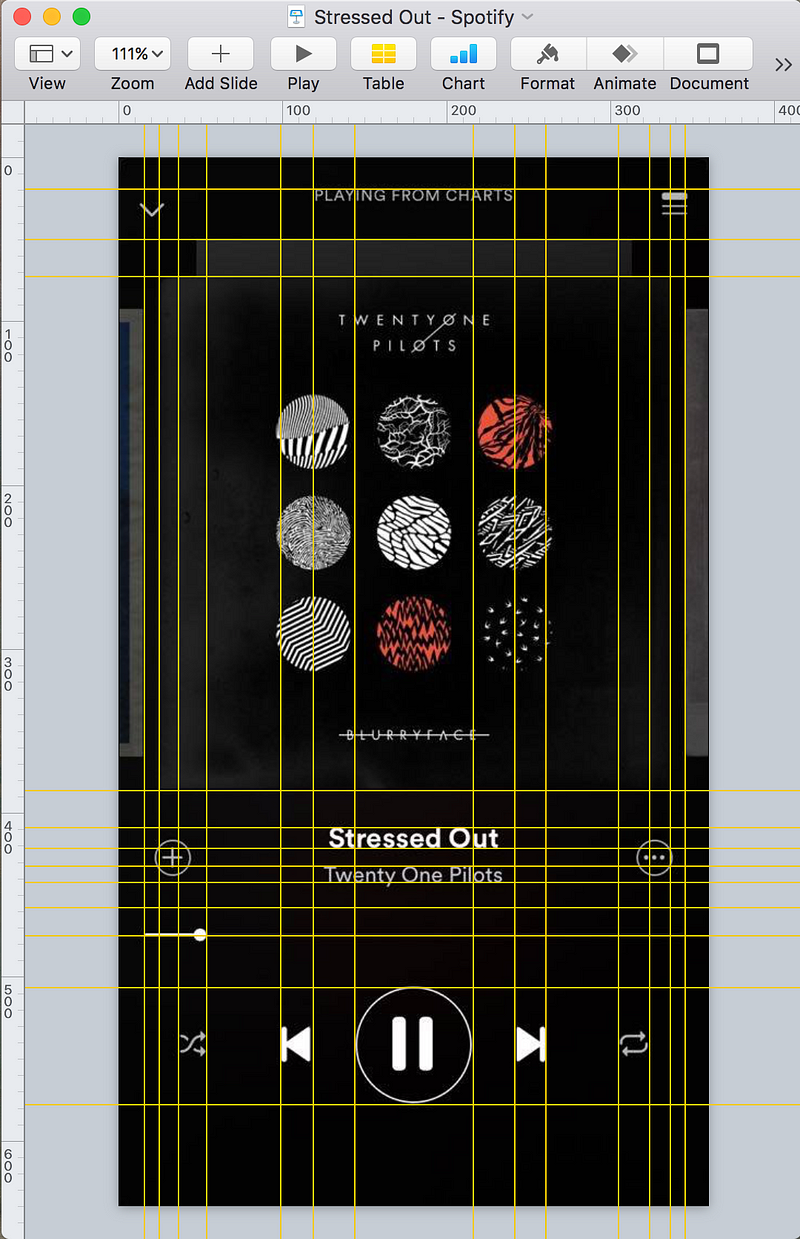
Since I’m not a designer, and I really like Spotify’s clean design, we’re going to use this as a reference for our building our player. In the third image, I’ve opened up a screenshot in Keynote, and added rulers all over the image to accurately measure the positions, margins, font sizes etc. for all the different elements in the UI. We’ll use these measurements to style our own app’s UI.
Now that we have a (stolen) design, we’re ready to start coding. So let’s create a new React Native project. Open a up a terminal window and run the following commands :
$ npm install react-native-cli@latest
$ react-native init ReactMusic
Phew! That took a while, didn’t it? We’re almost ready now, just a few more commands to run :
$ react-native run-ios      # Launch an iOS emulator and run the app
$ android avd &             # Launch an Android emulator
$ react-native run-android  # Run the app on the Android emulator
$ subl .                    # Open up the project in Sublime Text
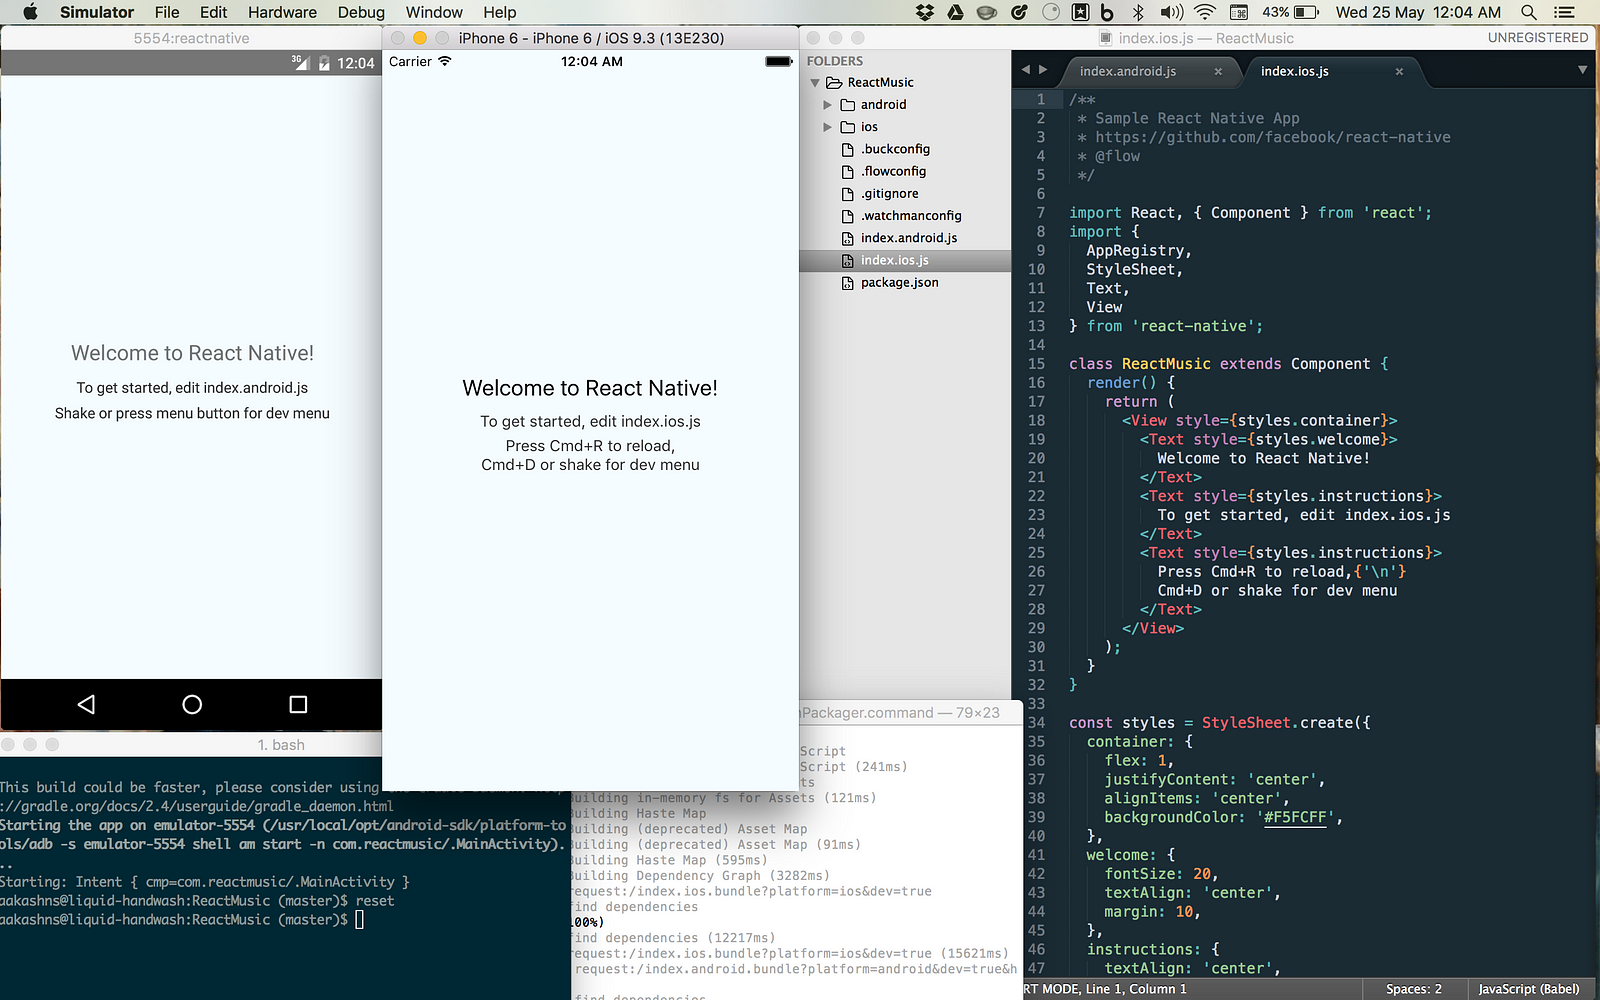
If the last command doesn’t work for you, just open up the directory ‘ReactMusic’ in any editor of your choice, or do this. Your app should be up and running on both emulators, and your screen should look something like this :
Open up index.ios.js and index.android.js. You’ll notice that they have the same code. We’re going to get rid of all of it and start from scratch. Let’s create a directory called app inside the project’s root directory. Then create a file app/App.js and with the following code :
import React, { Component } from 'react';

import {
  View,
  Text,
} from 'react-native';

export default class App extends Component {
  render() {
    return (
      <View style={styles.container}>
        <Text style={{color: 'white'}}>
          Hello React Native!
        </Text>
      </View>
    );
  }
}

const styles = {
  container: {
    flex: 1,
    backgroundColor: 'rgb(4,4,4)',
  },
}
Now, we can remove all the code from index.ios.js and index.android.js, and simply render the component App in both of them :
import React, { Component } from 'react';
import { AppRegistry } from 'react-native';
import App from './app/App';

AppRegistry.registerComponent('ReactMusic', () => App);
If you reload the emulators (Cmd+R for iOS, and Fn+F2 for Android), you should now see a black screen with some white text on it. You can also set up Live Reloading in the emulators to automatically reload the Javascript every time you save a file after making a change.
If we go back and take another look at the UI, we can see that it is made up of 5 main parts :

We’re going to create one component for each of these parts, starting with the Header, which is really just a title and two buttons. We’re going to use TouchableOpacity to render the buttons. Create a directory ‘img’ in the root directory of the project to store icons and images. You can get the icons for the header from Google’s Material Icons collection. Download the icons ‘keyboard arrow down’ and ‘queue music’ and copy the files from the ‘ios’ directory of the icon-set to the ‘img’ directory of the project. You can learn more about rendering images and icons here. Here’s the code for Header :
const Header = ({ message, onDownPress, onQueuePress, onMessagePress }) => (
  <View style={styles.container}>
    <TouchableOpacity onPress={onDownPress}>
      <Image style={styles.button}
        source={require('../img/ic_keyboard_arrow_down_white.png')} />
    </TouchableOpacity>
    <Text onPress={onMessagePress}
      style={styles.message}>{message.toUpperCase()}</Text>
    <TouchableOpacity onPress={onQueuePress}>
      <Image style={styles.button}
        source={require('../img/ic_queue_music_white.png')} />
    </TouchableOpacity>
  </View>
);
Link to full code
I’ve left out the imports and the styling for the sake of brevity. Follow the link in the description below the gist for the full code. You can put this code in app/Header.js, and then import and use the Header component inside app/App.js :
import Header from './Header';

class App extends Component {
  render() {
    return (
      <View style={styles.container}>
        <Header message="Playing from Charts" />
      </View>
    );
  }
}
Next up, we have a really simple component for displaying the album art :
const AlbumArt = ({ url, onPress}) => (
  <View style={styles.container}>
    <TouchableOpacity onPress={onPress}>
      <Image style={styles.image} source={{uri: url}} />
    </TouchableOpacity>
  </View>
);
Here is the full code.
Next, we have the track title and artist :
const TrackDetails = ({
  title,
  artist,
  onAddPress,
  onMorePress,
  onTitlePress,
  onArtistPress,
}) => (
  <View style={styles.container}>
    <TouchableOpacity onPress={onAddPress}>
      <Image style={styles.button}
        source={require('../img/ic_add_circle_outline_white.png')} />
    </TouchableOpacity>
    <View style={styles.detailsWrapper}>
      <Text style={styles.title} onPress={onTitlePress}>{title}</Text>
      <Text style={styles.artist} onPress={onArtistPress}>{artist}</Text>
    </View>
    <TouchableOpacity onPress={onMorePress}>
      <View style={styles.moreButton}>
        <Image style={styles.moreButtonIcon}
          source={require('../img/ic_more_horiz_white.png')} />
      </View>
    </TouchableOpacity>
  </View>
);
Here is the full code.
For the Seek Bar, we’ll use react-native-slider, which has better cross platform styling options.
$ npm install --save react-native-slider
Then, we can implement the Seek Bar :
var Slider = require('react-native-slider');

function pad(n, width, z=0) {
  n = n + '';
  return n.length >= width ? n : new Array(width - n.length + 1).join(z) + n;
}

const minutesAndSeconds = (position) => ([
  pad(Math.floor(position / 60), 2),
  pad(position % 60, 2),
]);

const SeekBar = ({
  trackLength,
  currentPosition,
  onSeek,
  onSlidingStart,
}) => {
  const elapsed = minutesAndSeconds(currentPosition);
  const remaining = minutesAndSeconds(trackLength - currentPosition);
  return (
    <View style={styles.container}>
      <View style={{flexDirection: 'row'}}>
        <Text style={styles.text}>
          {elapsed[0] + ":" + elapsed[1]}
        </Text>
        <View style={{flex: 1}} />
        <Text style={[styles.text, {width: 40}]}>
          {trackLength > 1 && "-" + remaining[0] + ":" + remaining[1]}
        </Text>
      </View>
      <Slider
        maximumValue={Math.max(trackLength, 1, currentPosition + 1)}
        onSlidingStart={onSlidingStart}
        onSlidingComplete={onSeek}
        value={currentPosition}
        style={styles.slider}
        minimumTrackTintColor='#fff'
        maximumTrackTintColor='rgba(255, 255, 255, 0.14)'
        thumbStyle={styles.thumb}
        trackStyle={styles.track}/>
    </View>
  );
};
Here is the full code
Let’s also add a component for the controls :
const Controls = ({
  paused,
  shuffleOn,
  repeatOn,
  onPressPlay,
  onPressPause,
  onBack,
  onForward,
  onPressShuffle,
  onPressRepeat,
  forwardDisabled,
}) => (
  <View style={styles.container}>
    <TouchableOpacity activeOpacity={0.0} onPress={onPressShuffle}>
      <Image style={[styles.secondaryControl, shuffleOn ? [] : styles.off]}
        source={require('../img/ic_shuffle_white.png')}/>
    </TouchableOpacity>
    <View style={{width: 40}} />
    <TouchableOpacity onPress={onBack}>
      <Image source={require('../img/ic_skip_previous_white_36pt.png')}/>
    </TouchableOpacity>
    <View style={{width: 20}} />
    {!paused ?
      <TouchableOpacity onPress={onPressPause}>
        <View style={styles.playButton}>
          <Image source={require('../img/ic_pause_white_48pt.png')}/>
        </View>
      </TouchableOpacity> :
      <TouchableOpacity onPress={onPressPlay}>
        <View style={styles.playButton}>
          <Image source={require('../img/ic_play_arrow_white_48pt.png')}/>
        </View>
      </TouchableOpacity>
    }
    <View style={{width: 20}} />
    <TouchableOpacity onPress={onForward}
      disabled={forwardDisabled}>
      <Image style={[forwardDisabled && {opacity: 0.3}]}
        source={require('../img/ic_skip_next_white_36pt.png')}/>
    </TouchableOpacity>
    <View style={{width: 40}} />
    <TouchableOpacity activeOpacity={0.0} onPress={onPressRepeat}>
      <Image style={[styles.secondaryControl, repeatOn ? [] : styles.off]}
        source={require('../img/ic_repeat_white.png')}/>
    </TouchableOpacity>
  </View>
);
Here is the full code.
Finally, we can put all these stateless components together in App.js to check out the UI and play around with it :
import Header from './Header';
import AlbumArt from './AlbumArt';
import TrackDetails from './TrackDetails';
import SeekBar from './SeekBar';
import Controls from './Controls';

class App extends Component {
  render() {
    return (
      <View style={styles.container}>
        <Header message="Playing from Charts" />
        <AlbumArt url="http://36.media.tumblr.com/14e9a12cd4dca7a3c3c4fe178b607d27/tumblr_nlott6SmIh1ta3rfmo1_1280.jpg" />
        <TrackDetails title="Stressed Out"
          artist="Twenty One Pilots" />
        <SeekBar trackLength={204} currentPosition={156} />
        <Controls />
      </View>
    );
  }
}
Here’s a comparison, with a screenshot from Spotify on the left and our app on the right :
Not too bad, eh? Now to acutally play the audio, we’ll use react-native-video. Here’s how to use it:
$ npm install react-native-video — save
$ npm install -g rnpm
$ rnpm link react-native-video
$ react-native run-ios
$ react-native run-android
Now let’s hook up the play and pause buttons in the component called Player :
export default class Player extends Component {
  constructor(props) {
    super(props);
    this.state = {
      paused: true,
      totalLength: 1,
      currentPosition: 0,
      selectedTrack: 0,
    };
  }

  setDuration(data) {
    this.setState({totalLength: Math.floor(data.duration)});
  }

  setTime(data) {
    this.setState({currentPosition: Math.floor(data.currentTime)});
  }

  seek(time) {
    time = Math.round(time);
    this.refs.audioElement && this.refs.audioElement.seek(time);
    this.setState({
      currentPosition: time,
      paused: false,
    });
  }

  render() {
    const track = this.props.tracks[this.state.selectedTrack];
    const video = (
      <Video source={{uri: track.audioUrl}} // Can be a URL or a local file.
        ref="audioElement"
        paused={this.state.paused}               // Pauses playback entirely.
        onLoad={this.setDuration.bind(this)}    // Callback when video loads
        onProgress={this.setTime.bind(this)}    // Callback every ~250ms with currentTime
        style={styles.audioElement} />
    );

    return (
      <View style={styles.container}>
        <StatusBar hidden={true} />
        <Header message="Playing From Charts" />
        <AlbumArt url={track.albumArtUrl} />
        <TrackDetails title={track.title} artist={track.artist} />
        <SeekBar
          onSeek={this.seek.bind(this)}
          trackLength={this.state.totalLength}
          onSlidingStart={() => this.setState({paused: true})}
          currentPosition={this.state.currentPosition} />
        <Controls
          onPressPlay={() => this.setState({paused: false})}
          onPressPause={() => this.setState({paused: true})}
          paused={this.state.paused}/>
        {video}
      </View>
    );
  }
}
Full code is here
And we can use it in the app by defining a few tracks :
import React, { Component } from 'react';
import Player from './Player';

export const TRACKS = [
  {
    title: 'Stressed Out',
    artist: 'Twenty One Pilots',
    albumArtUrl: "http://36.media.tumblr.com/14e9a12cd4dca7a3c3c4fe178b607d27/tumblr_nlott6SmIh1ta3rfmo1_1280.jpg",
    audioUrl: "http://russprince.com/hobbies/files/13%20Beethoven%20-%20Fur%20Elise.mp3",
  },
  {
    title: 'Love Yourself',
    artist: 'Justin Bieber',
    albumArtUrl: "http://arrestedmotion.com/wp-content/uploads/2015/10/JB_Purpose-digital-deluxe-album-cover_lr.jpg",
    audioUrl: 'http://oranslectio.files.wordpress.com/2013/12/39-15-mozart_-adagio-fugue-in-c-minor-k-546.mp3',
  },
  {
    title: 'Hotline Bling',
    artist: 'Drake',
    albumArtUrl: 'https://upload.wikimedia.org/wikipedia/commons/c/c9/Drake_-_Hotline_Bling.png',
    audioUrl: 'http://russprince.com/hobbies/files/13%20Beethoven%20-%20Fur%20Elise.mp3',
  },
];

export default class App extends Component {
  render() {
    return <Player tracks={TRACKS} />
  }
}
With a little more work, we can connect all the buttons. After everything, we will reach
That’s it! You can find the full code for this blog post here
#javascript #mobile-apps #react-native