To become an Outstanding AngularJs Developer - part 1
1. Tutorial
AngularJS is a very powerful JavaScript Framework. It is used in Single Page Application (SPA) projects. It extends HTML DOM with additional attributes and makes it more responsive to user actions. AngularJS is open source, completely free, and used by thousands of developers around the world. It is licensed under the Apache license version 2.0.
Audience
This tutorial is designed for software professionals who want to learn the basics of AngularJS and its programming concepts in simple and easy steps. It describes the components of AngularJS with suitable examples.
Prerequisites
You should have a basic understanding of JavaScript and any text editor. As we are going to develop web-based applications using AngularJS, it will be good if you have an understanding of other web technologies such as HTML, CSS, AJAX, etc.
2. Overview
AngularJS is an open-source web application framework. It was originally developed in 2009 by Misko Hevery and Adam Abrons. It is now maintained by Google. Its latest version is 1.2.21.
Definition of AngularJS as put by its official documentation is as follows −
AngularJS is a structural framework for dynamic web applications. It lets you use HTML as your template language and lets you extend HTML's syntax to express your application components clearly and succinctly. Its data binding and dependency injection eliminate much of the code you currently have to write. And it all happens within the browser, making it an ideal partner with any server technology.
General Features
The general features of AngularJS are as follows −
- AngularJS is a efficient framework that can create Rich Internet Applications (RIA).
- AngularJS provides developers an options to write client side applications using JavaScript in a clean Model View Controller (MVC) way.
- Applications written in AngularJS are cross-browser compliant. AngularJS automatically handles JavaScript code suitable for each browser.
- AngularJS is open source, completely free, and used by thousands of developers around the world. It is licensed under the Apache license version 2.0.
Overall, AngularJS is a framework to build large scale, high-performance, and easyto-maintain web applications.
Core Features
The core features of AngularJS are as follows −
- Data-binding − It is the automatic synchronization of data between model and view components.
- Scope − These are objects that refer to the model. They act as a glue between controller and view.
- Controller − These are JavaScript functions bound to a particular scope.
- Services − AngularJS comes with several built-in services such as $http to make a XMLHttpRequests. These are singleton objects which are instantiated only once in app.
- Filters − These select a subset of items from an array and returns a new array.
- Directives − Directives are markers on DOM elements such as elements, attributes, css, and more. These can be used to create custom HTML tags that serve as new, custom widgets. AngularJS has built-in directives such as ngBind, ngModel, etc.
- Templates − These are the rendered view with information from the controller and model. These can be a single file (such as index.html) or multiple views in one page using partials.
- Routing − It is concept of switching views.
- Model View Whatever − MVW is a design pattern for dividing an application into different parts called Model, View, and Controller, each with distinct responsibilities. AngularJS does not implement MVC in the traditional sense, but rather something closer to MVVM (Model-View-ViewModel). The Angular JS team refers it humorously as Model View Whatever.
- Deep Linking − Deep linking allows to encode the state of application in the URL so that it can be bookmarked. The application can then be restored from the URL to the same state.
- Dependency Injection − AngularJS has a built-in dependency injection subsystem that helps the developer to create, understand, and test the applications easily.
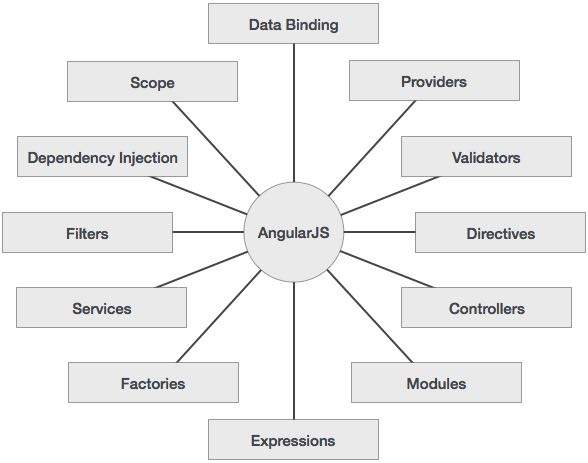
Concepts
The following diagram depicts some important parts of AngularJS which we will discuss in detail in the subsequent chapters.
 Advantages of AngularJS
The advantages of AngularJS are −
- It provides the capability to create Single Page Application in a very clean and maintainable way.
- It provides data binding capability to HTML. Thus, it gives user a rich and responsive experience.
- AngularJS code is unit testable.
- AngularJS uses dependency injection and make use of separation of concerns.
- AngularJS provides reusable components.
- With AngularJS, the developers can achieve more functionality with short code.
- In AngularJS, views are pure html pages, and controllers written in JavaScript do the business processing.
On the top of everything, AngularJS applications can run on all major browsers and smart phones, including Android and iOS based phones/tablets.
Disadvantages of AngularJS
Though AngularJS comes with a lot of merits, here are some points of concern −
- Not Secure − Being JavaScript only framework, application written in AngularJS are not safe. Server side authentication and authorization is must to keep an application secure.
- Not degradable − If the user of your application disables JavaScript, then nothing would be visible, except the basic page.
AngularJS Directives
The AngularJS framework can be divided into three major parts −
- ng-app − This directive defines and links an AngularJS application to HTML.
- ng-model − This directive binds the values of AngularJS application data to HTML input controls.
- ng-bind − This directive binds the AngularJS application data to HTML tags.
3. Environment Setup
This chapter describes how to set up AngularJS library to be used in web application development. It also briefly describes the directory structure and its contents.
When you open the link https://angularjs.org/, you will see there are two options to download AngularJS library −
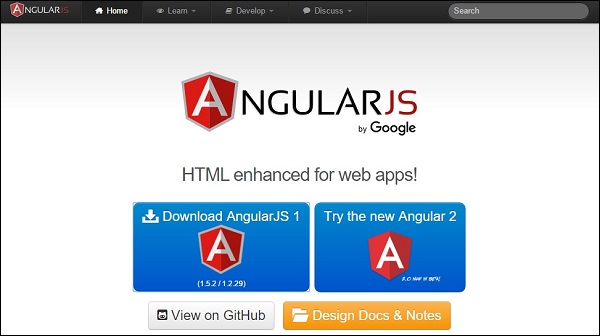 View on GitHub − By clicking on this button, you are diverted to GitHub and get all the latest scripts.
- Download AngularJS 1 − By clicking on this button, a screen you get to see a dialog box shown as −
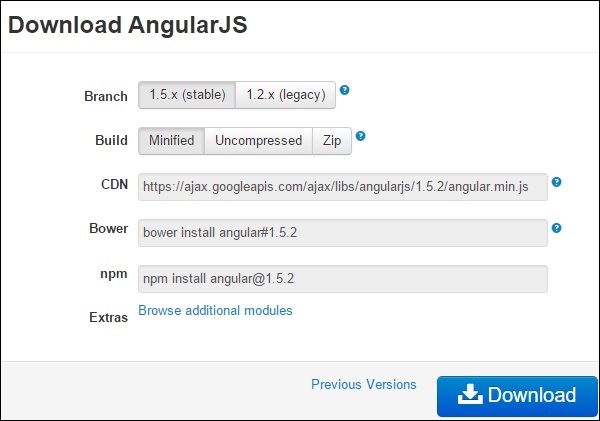 This screen gives various options of using Angular JS as follows −
- Downloading and hosting files locally
- There are two different options : Legacy and Latest. The names themselves are self-descriptive. The Legacy has version less than 1.2.x and the Latest come with version 1.3.x.
- We can also go with the minimized, uncompressed, or zipped version.
- CDN access − You also have access to a CDN. The CDN gives you access to regional data centers. In this case, the Google host. The CDN transfers the responsibility of hosting files from your own servers to a series of external ones. It also offers an advantage that if the visitor of your web page has already downloaded a copy of AngularJS from the same CDN, there is no need to re-download it.
We are using the CDN versions of the library throughout this tutorial.
Example
Now let us write a simple example using AngularJS library. Let us create an HTML file myfirstexample.html shown as below −
<!doctype html>
<html>
<head>
<script src = "https://ajax.googleapis.com/ajax/libs/angularjs/1.5.2/angular.min.js"></script>
</head>
<body ng-app = “myapp”>
<div ng-controller = “HelloController” >
<h2>Welcome {{helloTo.title}} to the world of Tutorialspoint!</h2>
</div>
<script>
angular.module("myapp", [])
.controller("HelloController", function($scope) {
$scope.helloTo = {};
$scope.helloTo.title = "AngularJS";
});
</script>
</body>
</html>
Let us go through the above code in detail −
Include AngularJS
We include the AngularJS JavaScript file in the HTML page so that we can use it −
<head>

<script src = “https://ajax.googleapis.com/ajax/libs/angularjs/1.4.8/angular.min.js”>

</script>

</head>
You can check the latest version of AngularJS on its official website.
Point to AngularJS app
Next, it is required to tell which part of HTML contains the AngularJS app. You can do this by adding the ng-app attribute to the root HTML element of the AngularJS app. You can either add it to the html element or the body element as shown below −
<body ng-app = “myapp”>

</body>
View
The view is this part −
<div ng-controller = “HelloController” >

<h2>Welcome {{helloTo.title}} to the world of Tutorialspoint!</h2>

</div>
ng-controller tells AngularJS which controller to use with this view. helloTo.title tells AngularJS to write the model value named helloTo.title in HTML at this location.
Controller
The controller part is −
<script>
angular.module(“myapp”, []).controller(“HelloController”, function($scope) {
$scope.helloTo = {};
$scope.helloTo.title = “AngularJS”;
});
</script>
This code registers a controller function named HelloController in the angular module named myapp. We will study more about modules and controllers in their respective chapters. The controller function is registered in angular via the angular.module(…).controller(…) function call.
The $scope parameter model is passed to the controller function. The controller function adds a helloTo JavaScript object, and in that object it adds a title field.
Execution
Save the above code as myfirstexample.html and open it in any browser. You get to see the following output −
Welcome AngularJS to the world of Tutorialspoint!
What happens when the page is loaded in the browser ? Let us see −
- HTML document is loaded into the browser, and evaluated by the browser.
- AngularJS JavaScript file is loaded, the angular global object is created.
- The JavaScript which registers controller functions is executed.
- Next, AngularJS scans through the HTML to search for AngularJS apps as well as views.
- Once the view is located, it connects that view to the corresponding controller function.
- Next, AngularJS executes the controller functions.
- It then renders the views with data from the model populated by the controller. The page is now ready.
4. MVC Architecture
Model View Controller or MVC as it is popularly called, is a software design pattern for developing web applications. A Model View Controller pattern is made up of the following three parts −
- Model − It is the lowest level of the pattern responsible for maintaining data.
- View − It is responsible for displaying all or a portion of the data to the user.
- Controller − It is a software Code that controls the interactions between the Model and View.
MVC is popular because it isolates the application logic from the user interface layer and supports separation of concerns. The controller receives all requests for the application and then works with the model to prepare any data needed by the view. The view then uses the data prepared by the controller to generate a final presentable response. The MVC abstraction can be graphically represented as follows.
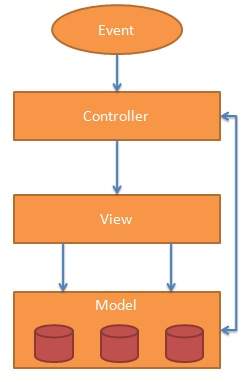 The Model
The model is responsible for managing application data. It responds to the request from view and to the instructions from controller to update itself.
The View
A presentation of data in a particular format, triggered by the controller’s decision to present the data. They are script-based template systems such as JSP, ASP, PHP and very easy to integrate with AJAX technology.
The Controller
The controller responds to user input and performs interactions on the data model objects. The controller receives input, validates it, and then performs business operations that modify the state of the data model.
AngularJS is a MVC based framework. In the coming chapters, we will see how AngularJS uses MVC methodology.
5. First Application
Before creating actual Hello World ! application using AngularJS, let us see the parts of a AngularJS application. An AngularJS application consists of following three important parts −
- ng-app − This directive defines and links an AngularJS application to HTML.
- ng-model − This directive binds the values of AngularJS application data to HTML input controls.
- ng-bind − This directive binds the AngularJS Application data to HTML tags.
Creating AngularJS Application
Step 1: Load framework
Being a pure JavaScript framework, it can be added using <Script> tag.
<script

src = “https://ajax.googleapis.com/ajax/libs/angularjs/1.3.14/angular.min.js”>

</script>
Step 2: Define AngularJS application using ng-app directive
<div ng-app = “”>

…

</div>
Step 3: Define a model name using ng-model directive
<p>Enter your Name: <input type = “text” ng-model = “name”></p>
Step 4: Bind the value of above model defined using ng-bind directive
<p>Hello <span ng-bind = “name”></span>!</p>
Executing AngularJS Application
Use the above-mentioned three steps in an HTML page.
testAngularJS.htm
<html>
<head>
<title>AngularJS First Application</title>
</head><body>
<h1>Sample Application</h1><div ng-app = ""> <p>Enter your Name: <input type = "text" ng-model = "name"></p> <p>Hello <span ng-bind = "name"></span>!</p> </div> <script src = "https://ajax.googleapis.com/ajax/libs/angularjs/1.3.14/angular.min.js"> </script></body>
</html>
Output
Open the file testAngularJS.htm in a web browser. Enter your name and see the result.
How AngularJS Integrates with HTML
- The ng-app directive indicates the start of AngularJS application.
- The ng-model directive creates a model variable named name, which can be used with the HTML page and within the div having ng-app directive.
- The ng-bind then uses the name model to be displayed in the HTML <span> tag whenever user enters input in the text box.
- Closing</div> tag indicates the end of AngularJS application.
6. Directives
AngularJS directives are used to extend HTML. They are special attributes starting with ng-prefix. Let us discuss the following directives −
- ng-app − This directive starts an AngularJS Application.
- ng-init − This directive initializes application data.
- ng-model − This directive defines the model that is variable to be used in AngularJS.
- ng-repeat − This directive repeats HTML elements for each item in a collection.
ng-app directive
The ng-app directive starts an AngularJS Application. It defines the root element. It automatically initializes or bootstraps the application when the web page containing AngularJS Application is loaded. It is also used to load various AngularJS modules in AngularJS Application. In the following example, we define a default AngularJS application using ng-app attribute of a <div> element.
<div ng-app = “”>

…

</div>
ng-init directive
The ng-init directive initializes an AngularJS Application data. It is used to assign values to the variables. In the following example, we initialize an array of countries. We use JSON syntax to define the array of countries.
<div ng-app = “” ng-init = “countries = [{locale:‘en-US’,name:‘United States’},

{locale:‘en-GB’,name:‘United Kingdom’}, {locale:‘en-FR’,name:‘France’}]”>

…

</div>
ng-model directive
The ng-model directive defines the model/variable to be used in AngularJS Application. In the following example, we define a model named name.
<div ng-app = “”>

…

<p>Enter your Name: <input type = “text” ng-model = “name”></p>

</div>
ng-repeat directive
The ng-repeat directive repeats HTML elements for each item in a collection. In the following example, we iterate over the array of countries.
<div ng-app = “”>
…
<p>List of Countries with locale:</p><ol>
<li ng-repeat = “country in countries”>
{{ 'Country: ’ + country.name + ', Locale: ’ + country.locale }}
</li>
</ol>
</div>
Example
The following example shows the use of all the above-mentioned directives.
testAngularJS.htm
<html>
<head>
<title>AngularJS Directives</title>
</head><body>
<h1>Sample Application</h1><div ng-app = "" ng-init = "countries = [{locale:'en-US',name:'United States'}, {locale:'en-GB',name:'United Kingdom'}, {locale:'en-FR',name:'France'}]"> <p>Enter your Name: <input type = "text" ng-model = "name"></p> <p>Hello <span ng-bind = "name"></span>!</p> <p>List of Countries with locale:</p> <ol> <li ng-repeat = "country in countries"> {{ 'Country: ' + country.name + ', Locale: ' + country.locale }} </li> </ol> </div> <script src = "https://ajax.googleapis.com/ajax/libs/angularjs/1.3.14/angular.min.js"> </script></body>
</html>
Output
Open the file testAngularJS.htm in a web browser. Enter your name and see the result.
7. Expressions
Expressions are used to bind application data to HTML. Expressions are written inside double curly braces such as in {{ expression}}. Expressions behave similar to ngbind directives. AngularJS expressions are pure JavaScript expressions and output the data where they are used.
Using numbers
<p>Expense on Books : {{cost * quantity}} Rs</p>
Using Strings
<p>Hello {{student.firstname + " " + student.lastname}}!</p>
Using Object
<p>Roll No: {{student.rollno}}</p>
Using Array
<p>Marks(Math): {{marks[3]}}</p>
Example
The following example shows the use of all the above-mentioned expressions −
testAngularJS.htm
<html>
<head>
<title>AngularJS Expressions</title>
</head><body>
<h1>Sample Application</h1><div ng-app = "" ng-init = "quantity = 1;cost = 30; student = {firstname:'Mahesh',lastname:'Parashar',rollno:101}; marks = [80,90,75,73,60]"> <p>Hello {{student.firstname + " " + student.lastname}}!</p> <p>Expense on Books : {{cost * quantity}} Rs</p> <p>Roll No: {{student.rollno}}</p> <p>Marks(Math): {{marks[3]}}</p> </div> <script src = "https://ajax.googleapis.com/ajax/libs/angularjs/1.3.14/angular.min.js"> </script></body>
</html>
Output
Open the file testAngularJS.htm in a web browser and see the result.
8. Controllers
AngularJS application mainly relies on controllers to control the flow of data in the application. A controller is defined using ng-controller directive. A controller is a JavaScript object that contains attributes/properties, and functions. Each controller accepts $scope as a parameter, which refers to the application/module that the controller needs to handle.
<div ng-app = “” ng-controller = “studentController”>

…

</div>
Here, we declare a controller named studentController, using the ng-controller directive. We define it as follows −
<script>
function studentController($scope) {
$scope.student = {
firstName: “Mahesh”,
lastName: “Parashar”,fullName: function() { var studentObject; studentObject = $scope.student; return studentObject.firstName + " " + studentObject.lastName; } };}
</script>
- The studentController is defined as a JavaScript object with $scope as an argument.
- The $scope refers to application which uses the studentController object.
- The $scope.student is a property of studentController object.
- The firstName and the lastName are two properties of $scope.student object. We pass the default values to them.
- The property fullName is the function of $scope.student object, which returns the combined name.
- In the fullName function, we get the student object and then return the combined name.
- As a note, we can also define the controller object in a separate JS file and refer that file in the HTML page.
Now we can use studentController’s student property using ng-model or using expressions as follows −
Enter first name: <input type = “text” ng-model = “student.firstName”><br>

Enter last name: <input type = “text” ng-model = “student.lastName”><br>

<br>

You are entering: {{student.fullName()}}
- We bound student.firstName and student.lastname to two input boxes.
- We bound student.fullName() to HTML.
- Now whenever you type anything in first name and last name input boxes, you can see the full name getting updated automatically.
Example
The following example shows the use of controller −
testAngularJS.htm
<html>
<head>
<title>Angular JS Controller</title>
<script src = “https://ajax.googleapis.com/ajax/libs/angularjs/1.3.14/angular.min.js”>
</script>
</head><body>
<h2>AngularJS Sample Application</h2><div ng-app = "mainApp" ng-controller = "studentController"> Enter first name: <input type = "text" ng-model = "student.firstName"><br> <br> Enter last name: <input type = "text" ng-model = "student.lastName"><br> <br> You are entering: {{student.fullName()}} </div> <script> var mainApp = angular.module("mainApp", []); mainApp.controller('studentController', function($scope) { $scope.student = { firstName: "Mahesh", lastName: "Parashar", fullName: function() { var studentObject; studentObject = $scope.student; return studentObject.firstName + " " + studentObject.lastName; } }; }); </script></body>
</html>
Output
Open the file testAngularJS.htm in a web browser and see the result.
9. Filters
Filters are used to modify the data. They can be clubbed in expression or directives using pipe (|) character. The following list shows the commonly used filters.
Uppercase Filter
Add uppercase filter to an expression using pipe character. Here we’ve added uppercase filter to print student name in all capital letters.
Enter first name:<input type = “text” ng-model = “student.firstName”>

Enter last name: <input type = “text” ng-model = “student.lastName”>

Name in Upper Case: {{student.fullName() | uppercase}}
Lowercase Filter
Add lowercase filter to an expression using pipe character. Here we’ve added lowercase filter to print student name in all lowercase letters.
Enter first name:<input type = “text” ng-model = “student.firstName”>

Enter last name: <input type = “text” ng-model = “student.lastName”>

Name in Lower Case: {{student.fullName() | lowercase}}
Currency Filter
Add currency filter to an expression returning number using pipe character. Here we’ve added currency filter to print fees using currency format.
Enter fees: <input type = “text” ng-model = “student.fees”>

fees: {{student.fees | currency}}
Filter
To display only required subjects, we use subjectName as filter.
Enter subject: <input type = “text” ng-model = “subjectName”>

Subject:

<ul>

<li ng-repeat = “subject in student.subjects | filter: subjectName”>

{{ subject.name + ‘, marks:’ + subject.marks }}

</li>

</ul>
OrderBy Filter
To order subjects by marks, we use orderBy marks.
Subject:

<ul>

<li ng-repeat = “subject in student.subjects | orderBy:‘marks’”>

{{ subject.name + ‘, marks:’ + subject.marks }}

</li>

</ul>
Example
The following example shows use of all the above mentioned filters.
testAngularJS.htm
<html>
<head>
<title>Angular JS Filters</title>
<script src = “https://ajax.googleapis.com/ajax/libs/angularjs/1.3.14/angular.min.js”>
</script>
</head><body>
<h2>AngularJS Sample Application</h2><div ng-app = "mainApp" ng-controller = "studentController"> <table border = "0"> <tr> <td>Enter first name:</td> <td><input type = "text" ng-model = "student.firstName"></td> </tr> <tr> <td>Enter last name: </td> <td><input type = "text" ng-model = "student.lastName"></td> </tr> <tr> <td>Enter fees: </td> <td><input type = "text" ng-model = "student.fees"></td> </tr> <tr> <td>Enter subject: </td> <td><input type = "text" ng-model = "subjectName"></td> </tr> </table> <br/> <table border = "0"> <tr> <td>Name in Upper Case: </td><td>{{student.fullName() | uppercase}}</td> </tr> <tr> <td>Name in Lower Case: </td><td>{{student.fullName() | lowercase}}</td> </tr> <tr> <td>fees: </td><td>{{student.fees | currency}} </td> </tr> <tr> <td>Subject:</td> <td> <ul> <li ng-repeat = "subject in student.subjects | filter: subjectName |orderBy:'marks'"> {{ subject.name + ', marks:' + subject.marks }} </li> </ul> </td> </tr> </table> </div> <script> var mainApp = angular.module("mainApp", []); mainApp.controller('studentController', function($scope) { $scope.student = { firstName: "Mahesh", lastName: "Parashar", fees:500, subjects:[ {name:'Physics',marks:70}, {name:'Chemistry',marks:80}, {name:'Math',marks:65} ], fullName: function() { var studentObject; studentObject = $scope.student; return studentObject.firstName + " " + studentObject.lastName; } }; }); </script></body>
</html>
Output
Open the file testAngularJS.htm in a web browser. See the result.
10. Tables
Table data is generally repeatable. The ng-repeat directive can be used to draw table easily. The following example shows the use of ng-repeat directive to draw a table −
<table>
<tr>
<th>Name</th>
<th>Marks</th>
</tr><tr ng-repeat = “subject in student.subjects”>
<td>{{ subject.name }}</td>
<td>{{ subject.marks }}</td>
</tr>
</table>
Table can be styled using CSS Styling.
<style>

table, th , td {

border: 1px solid grey;

border-collapse: collapse;

padding: 5px;

}

table tr:nth-child(odd) {

background-color: #f2f2f2;

}

table tr:nth-child(even) {

background-color: #ffffff;

}

</style>
Example
The following example shows the use of all the above-mentioned directives.
testAngularJS.htm
<html>
<head>
<title>Angular JS Table</title>
<script src = “https://ajax.googleapis.com/ajax/libs/angularjs/1.3.14/angular.min.js”></script><style> table, th , td { border: 1px solid grey; border-collapse: collapse; padding: 5px; } table tr:nth-child(odd) { background-color: #f2f2f2; } table tr:nth-child(even) { background-color: #ffffff; } </style></head>
<body>
<h2>AngularJS Sample Application</h2>
<div ng-app = “mainApp” ng-controller = “studentController”><table border = "0"> <tr> <td>Enter first name:</td> <td><input type = "text" ng-model = "student.firstName"></td> </tr> <tr> <td>Enter last name: </td> <td> <input type = "text" ng-model = "student.lastName"> </td> </tr> <tr> <td>Name: </td> <td>{{student.fullName()}}</td> </tr> <tr> <td>Subject:</td> <td> <table> <tr> <th>Name</th>. <th>Marks</th> </tr> <tr ng-repeat = "subject in student.subjects"> <td>{{ subject.name }}</td> <td>{{ subject.marks }}</td> </tr> </table> </td> </tr> </table> </div> <script> var mainApp = angular.module("mainApp", []); mainApp.controller('studentController', function($scope) { $scope.student = { firstName: "Mahesh", lastName: "Parashar", fees:500, subjects:[ {name:'Physics',marks:70}, {name:'Chemistry',marks:80}, {name:'Math',marks:65}, {name:'English',marks:75}, {name:'Hindi',marks:67} ], fullName: function() { var studentObject; studentObject = $scope.student; return studentObject.firstName + " " + studentObject.lastName; } }; }); </script></body>
</html>
Output
Open the file testAngularJS.htm in a web browser and see the result.
Thanks For Visiting, Keep Visiting.
continue…
#angular-js #angular #web-development #devops