How to Build a React Admin Panel with react-admin
Learn how to create a React admin panel and how react-admin scaffolds admin interfaces for React applications. With React’s react-admin, we can scaffold admin interfaces quite readily
A good number of web applications have evolved from static websites that just display content to dynamic webpages where users access and interact with content. This content is often powered by APIs that send and receive data. Often, an admin page sorts and handles this data, usually by building an interface and connecting every endpoint by sending requests to the API.
This was previously a tedious process until react-admin was introduced. In this article, we will learn how to create a React admin panel and how react-admin scaffolds admin interfaces for React applications. Let’s get started, shall we?
Contents:
- What is a React admin panel?
- What is react-admin?
- Benefits of using react-admin
- Exploring react-admin UI elements
- Getting started with react-admin
- Modifying and filtering data with guessers
- How to use guessers in React
- Using the
<ListGuesser>component - Working with the
EditGuessercomponent - Adding new users
- React-admin authentication
- How to customize your react-admin page
- Referencing multiple records
- Theming
What is a React admin panel?
An admin panel is a web-based interface that allows admins to manage and control a web application. With web applications always scaling, administratively managing and controlling the data is essential. Using an admin panel can simplify the process of controlling and managing a web app, ultimately saving time and increasing productivity while providing security, collaboration, flexibility, and real-time insights.
What is react-admin?
React-admin is an open source framework that builds admin interfaces by consuming APIs, including REST, GraphQL, or custom ones using React. We also don’t need to worry about style formatting because react-admin provides a set of pre-built UI components based on Material-UI.
Benefits of using react-admin
React-admin can be designed to fit the web application’s specific needs, providing flexibility and control while delivering a high-quality UX. React-admin comes with common features of admin panels, including the following:
- Data management: React-admin provides a simple way to handle data management. With it, you can perform CRUD operations, filtering, sorting, and pagination with less code
- Customizable UI: React-admin comes pre-built with UI components that can be customized to fit your needs using Material-UI or CSS
- Streamlined development: React-admin provides guessers that generate a reusable component with the properties and values from your API
- Authentication and authorization: React-admin allows developers to easily manage user access to the admin panel out-of-the-box
- Internationalization (i18n): React-admin has inbuilt support for internationalization, which makes it easy to create an admin panel with support for multiple languages
Exploring react-admin UI elements
Before we jump in, let’s take a look at some of the common UI elements of react-admin and what they are used for. These elements are pre-built and come as React components. The list elements are used to fetch and display a list of records (data). These elements also come with UI controls for filtering, sorting, and pagination. They include <ListGuesser>, <List>, <DataGrid> <FilterList>, <Pagination>, and more.
React-admin also comes with show elements. These elements are used to fetch and display the detail of a single record. The <Show> element, for example, is responsible for fetching the record from the dataProvider (we will see this in play later in this article), renders the page layout with a default page title or a custom title, etc.
Some other elements used in displaying a record along with <Show> include <SimpleShowLayout>, <TabbedShowLayout>, field elements (<TextField>, <DateField>), etc. Lastly, we have the creation and edition elements. These elements are used for creating and editing records. They include <Create>, <Edit>, <SimpleForm>, <Form >, <EditGuesser>.
These elements are used with input elements like <TextInput>, <NumberInput>, and more. The <Create> and <Edit> elements create pages for creating and editing a record, respectively, while the <SimpleForm> element creates the form to create or edit a record.
Getting started with react-admin
Let’s begin by creating a new-react-admin folder and installing package.json, concurrently, and json-server in a new server folder, as shown below:
# install package.json, concurrently & json-server

npm init -y
npm install json-server
npm install concurrently
Instead of installing json-server globally, we’ll create an npm script for it. Open up the package.json file and replace the default value of the scripts object with the following:
// /new-react-admin/server/package.json
# - "test": "echo \"Error: no test specified \" && exit 1"

+ "server": "json-server --watch db.json --port 5000",
+ "client": "npm start --prefix ../admin-demo",
+ "dev": "concurrently \"npm run server\" \"npm run client\""

# "admin-demo" will be the name of our react app
In the code block above, we want to run json-server and watch a file called db.json. The db.json file holds the data generated by the fake REST API we’ll be using. By default, this runs on port 3000, which prevents our React app from running. Instead, we’ll set it to port 5000.
The Concurrently framework enables the API and React app to run simultaneously instead of running in separate terminals. As shown above, the client script is assigned to start the React app and the dev script runs both the server and client scripts simultaneously. Now, we can create a React project in a new folder called admin-demo and install react-admin in its directory:
npx create-react-app admin-demoThen, add a proxy to the package.json file of the React app. The proxy is set to the server script URL as shown below:
// /new-react-admin/admin-demo/package.json
"proxy": "http://localhost:5000"
Next, we’ll need to fill the db.json file with some data. Here’s a sample of the data we’ll use:
// /new-react-admin/server/db.json

{
  "users": [
    {
      "id": "1",
      "name": "Klaus Huntelaar",
      "username": "Kanaar",
      "email": "applboss@gmail.com",
      "phone": 37802223,
      "company": "Hunters Mobile Co."
    },
    {
      "id": "2",
      "name": "Peggy Sonaya",
      "username": "Peggaya",
      "email": "sonayapeg@gmail.com",
      "phone": 4402673,
      "company": "Peggy's Drycleaning"
    },
    {
      "id": "3",
      "name": "Joseph Maguire",
      "username": "Joemag",
      "email": "Jojo1956@gmail.com",
      "phone": 224423045,
      "company": "Jojo's Pot"
    },
    {
      "id": "4",
      "name": "Jon Hanus",
      "username": "Hanuson",
      "email": "Joehanus11@gmail.com",
      "phone": 89354033,
      "company": "Joe's Funeral Home"
    },
    {
      "id": "5",
      "name": "Ron Burgundy",
      "username": "Colorburgundy",
      "email": "Rongundy@gmail.com",
      "phone": 23455,
      "company": "Color Burgundy"
    }
  ],
  "posts": [
    {
      "id": "1",
      "title": "Post One",
      "body": "This is post one",
      "publishedAt": "2019-08-01",
      "userId": "2"
    },
    {
      "id": "2",
      "title": "Post Two",
      "body": "This is post two",
      "publishedAt": "2011-06-27",
      "userId": "1"
    },
    {
      "id": "3",
      "title": "Post Three",
      "body": "This is post three",
      "publishedAt": "2021-12-14",
      "userId": "4"
    }
  ]
}
Modifying and filtering data with guessers
An admin page needs to have CRUD functionalities. We’ll use a data provider to show how react-admin does this. Simple REST is a data provider that fits REST APIs using simple GET parameters that exist for filters and sorting. First, we need to install Simple REST into our react-admin app with the following code:
// /new-react-admin/admin-demo
npm install ra-data-simple-rest
Let’s try fetching data with db.json. For this purpose, react-admin uses <Admin>, its root component, to provide the data exchange between APIs and applications. Replace the default syntax in src/App.js with the following:
import React from 'react'
import { Admin} from 'react-admin'
import restProvider from 'ra-data-simple-rest'

const dataProvider = restProvider('http://localhost:3000');

function App() {
  return (
      <Admin dataProvider={dataProvider} />
    );
  }
export default App;
Now, changing directories from the React app to the main folder, cd .., and running npm run dev at this point should render an app with a confirmatory message in a browser:
To display the data from the db.json file, the API server needs to have a content range value to prevent it from throwing an error. With the help of middleware, we’ll create a file called range.js that has a function to set the amount of content to display:
// /new-react-admin/server/range.js
module.exports = (req, res, next) => {
    res.header('Content-Range', 'posts 0-20/20');
    next();
}
For the middleware function to run, we must add --middlewares ./range.js to the server script in the package.json file.
How to use guessers in React
While still in development, react-admin creates admin interfaces through guessers. Guessers receive data from the API, determine what sort of data it is, and decide what kind of format the data should display. Let’s try to display a list of users by applying guessers:
import { Admin, Resource,ListGuesser } from 'react-admin'
import restProvider from 'ra-data-simple-rest'

const dataProvider = restProvider('http://localhost:3000');

function App() {
    return (
      <Admin dataProvider={dataProvider}>
        <Resource name="users" list={ListGuesser} />
      </Admin>
    );
  }
export default App;
In the code block above, the <resource> element is responsible for mapping the name property to an endpoint in the API. Here, <resource> appends the users value to our API and fetches the data of users from the API.
Using the <ListGuesser> component
The list property uses the <ListGuesser> component to display this data as a list of users. Here’s what that looks like:
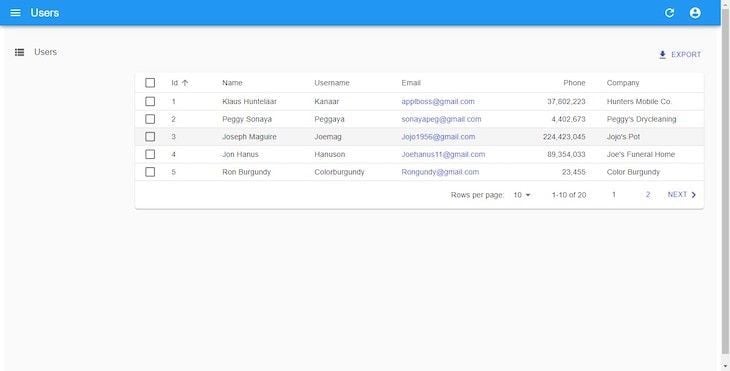
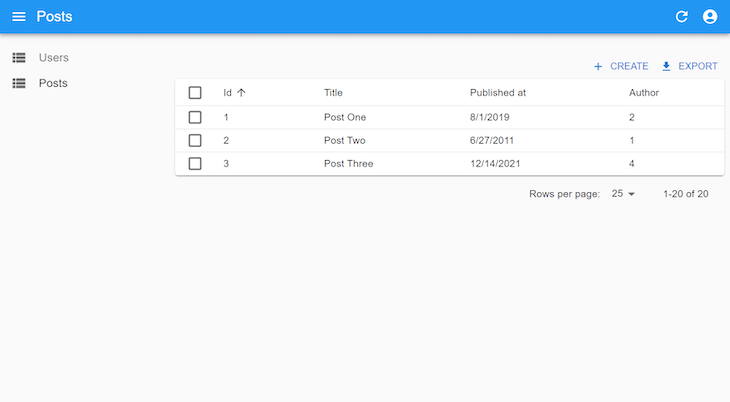
<ListGuesser> is not meant to be used in production. Therefore, it must be replaced by a custom component. An awesome feature of guessers is the display of source code data retrieved from the API in the browser’s console. Let’s take a look at what <ListGuesser> displays:
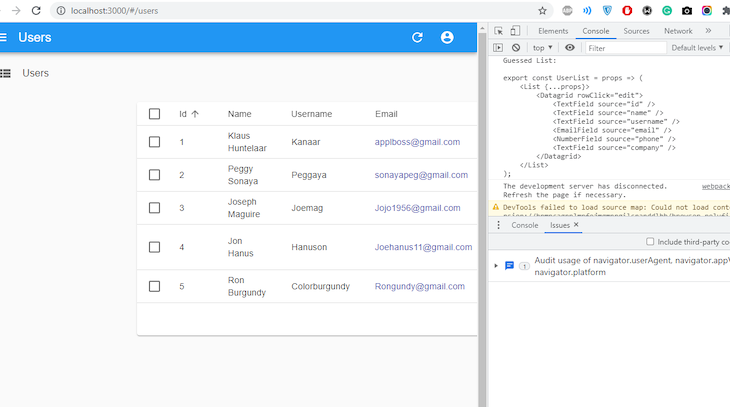
So, this shows us how our user list should be created. Let’s replicate this data in our application. In the src folder of the project, create a components folder, and in it, create a file and name it User.js:
/src/components/User.js
import { List, Datagrid, TextField, EmailField, DeleteButton } from 'react-admin';

export const UserList = () => {
    return (
        <List>
            <Datagrid rowClick="edit">
              <TextField source="id" />
              <TextField source="name" />
              <TextField source="username" />
              <EmailField source="email" />
              <TextField source="phone" />
              <TextField source="company" />
              <DeleteButton />
            </Datagrid>
        </List>
    )
}
In the code block above, a couple of changes were made. First, we used the <EmailField> element to make the links on our email column clickable. Then, we added a DeleteButton component to easily delete any of the records (data).
Let’s navigate to App.js and replace ListGuesser with UserList:
/src/App.js
import { Admin, Resource } from "react-admin";
import { UserList } from './components/User';
import restProvider from 'ra-data-simple-rest';

const dataProvider = restProvider('http://localhost:3000');
function App() {
  return (
      <Admin dataProvider={dataProvider}>
        <Resource name="users" list={UserList} />
      </Admin>
    );
  }
export default App;
Working with the EditGuesser component
Admin pages should also be able to edit, delete, and create data. React-admin does this by using guessers. If you recall, we added the rowClick prop to the DataGrid component in UserList. This means when a row is clicked, it will navigate you to an edit page where you can make updates to that record. EditGuesser edits data of admin pages. In App.js, import EditGuesser from react-admin with the following code:
src/App.js
import { Admin, Resource, EditGuesser } from "react-admin";
import { UserList } from './components/User';
import restProvider from 'ra-data-simple-rest';

const dataProvider = restProvider('http://localhost:3000');
function App() {
  return (
      <Admin dataProvider={dataProvider}>
        <Resource
          name="users"
          list={UserList}
          edit={EditGuesser}
        />
      </Admin>
    );
  }
}
One important thing to note is that Simple REST, the data provider we’re using for the fake API, has editing and creating functionalities. Here, react-admin displays changes made while simultaneously sending an update query to the data in the db.json file. Similar to listing users, a look at our console gives us an idea of what to input as markup. Here’s what we have after using EditGuesser:
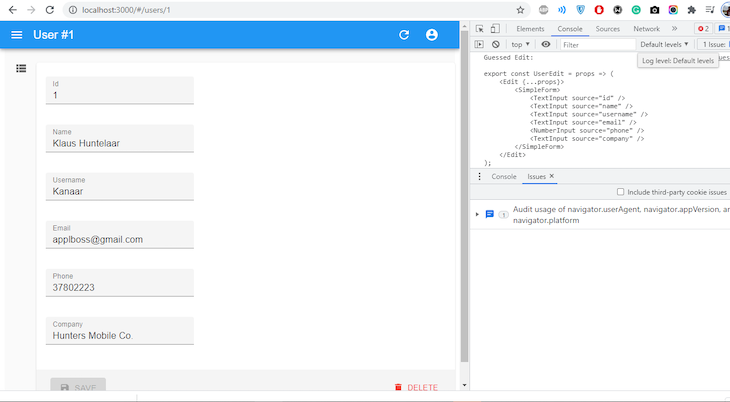
Now, let’s replicate our console’s markup in our application. Append the code sample below in Users.js:
//src/components/User.js
import { Edit, SimpleForm, TextInput } from 'react-admin';

export const UserEdit = () => {
    return (
        <Edit>
            <SimpleForm>
                <TextInput disabled source="id" />
                <TextInput source="name" />
                <TextInput source="username" />
                <TextInput source="email" />
                <TextInput source="phone" />
                <TextInput source="company"/>
            </SimpleForm>
        </Edit>
    )
}
The disabled attribute in the TextInput element prevents sensitive properties from being edited. In App.js, replace EditGuesser with UserEdit:
//src/App.js
import { Admin, Resource } from "react-admin";
import  { UserList, UserEdit }  "./components/User";
import jsonServerProvider from "ra-data-json-server";

const dataProvider = restProvider('http://localhost:3000')
function App() {
  return (
      <Admin dataProvider={dataProvider}>
        <Resource name="users" list={UserList} edit={UserEdit} />
      </Admin>
    );
  }
}
export default App;
Adding new users
The process of creating a new user is almost the same as editing. However, we must create a new set in the db.json file. In User.js, replicate the code sample below:
//src/components/User.js
import { Create, SimpleForm, TextInput, NumberInput } from 'react-admin';

export const UserCreate = () => {
    return (
        <Create title='Create User'>
            <SimpleForm>
                <NumberInput source="id" />
                <TextInput source="name" />
                <TextInput source="username" />
                <TextInput source="email" />
                <TextInput source="phone" />
                <TextInput source="company"/>
            </SimpleForm>
        </Create>
    )
}
Now, in App.js, add the UserCreate component:
//src/App.js
import { Admin, Resource } from "react-admin";
import  { UserList, UserEdit, UserCreate }  from './components/User';
const dataProvider = restProvider('http://localhost:3000')
function App() {
  return (
    <Admin dataProvider={dataProvider}>
      <Resource name="users" list={UserList} create={UserCreate} edit={UserEdit} />
    </Admin>
  );
}
export default App;
Similar to what happens when we try to edit the details of a user, when we try to create new users, optimistic rendering occurs. This explains why, in the last seconds of the snippet above, our newly created user displays for a while before the message NOT FOUND can be seen.
React-admin authentication
Every admin page needs an authentication process. It can be basic or a bit more complex, such as JSON Web Tokens (JWT) or OAuth. Although, by default, react-admin apps do not need authentication to function, it’s still best practice to integrate authentication into admin pages.
React-admin lets us be flexible with how we implement authentication. Simple REST has no authentication model, so we will create a dummy authentication process that accepts any values as username and password, and store these values in localStorage. In our src folder, create a file called authProvider:
// src/authProvider.js
import { AUTH_LOGIN, AUTH_LOGOUT, AUTH_ERROR, AUTH_CHECK } from 'react-admin';

   export const authProvider = (type, params) => {
    // when a user tries to log in
    if (type === AUTH_LOGIN) {
     const { username } = params;
     localStorage.setItem('username', username)
     return Promise.resolve();
    }
    // when a user tries to logout
    if (type === AUTH_LOGOUT) {
        localStorage.removeItem('username');
     return Promise.resolve();
    }
    // when the API throws an error
    if (type === AUTH_ERROR) {
     const { status } = params;
     if (status === 401 || status === 403) {
      localStorage.removeItem('username');
      return Promise.reject()
     }
     return Promise.resolve()
    }
    // when a user navigates to a new location
    if (type === AUTH_CHECK) {
     return localStorage.getItem('username') ?
      Promise.resolve() :
      Promise.reject();
    }
    return Promise.reject('Unknown Method');
   };
Then, head to App.js and pass the authProvider property in the <Admin> component:
//src/App.js
import { Admin, Resource } from 'react-admin'
import restProvider from 'ra-data-simple-rest'
import { authProvider } from "./authProvider";
import { UserList, UserEdit, UserCreate} from './components/User';

const dataProvider = restProvider('http://localhost:3000')
function App() {
  return (
    <Admin dataProvider={dataProvider} authProvider={authProvider}>
      <Resource name="users" list={UserList} create={UserCreate} edit={UserEdit} />
    </Admin>
  );
}
export default App;
How to customize your react-admin page
In this section, we’re going to look at another set of records other than just the users we’ve seen from the examples above. We’ll look at how we can style our admin page and how to manage multiple records with reference to each other. So, let’s start off by enlisting posts as one of the resources to the Admin component, so head up to App.js and paste this in:
// src/App.js
import {Admin, Resource} from 'react-admin'
import restProvider from 'ra-data-simple-rest'
import { authProvider } from "./authProvider";
import { PostList, PostEdit, PostCreate} from './components/Post';
import { UserList, UserEdit, UserCreate} from './components/User';

const dataProvider = restProvider('http://localhost:3000')
function App() {
  return (
    <Admin dataProvider={dataProvider} authProvider={authProvider}>
      <Resource name="users" list={UserList} create={UserCreate} edit={UserEdit} />
      <Resource name="posts" list={PostList} create={PostCreate} edit={PostEdit} />
    </Admin>
  );
}

export default App;
Just like we’ve created UserList, UserEdit, and UserCreate with the help of guessers, we’ll do the same thing to create PostList, PostEdit, and PostCreate. But, we won’t go through every detail like we did for users. So, in components, simply create a Post.js file and paste the following code:
// src/components/Post.js
import { List, Create, Edit, SimpleForm, TextInput, DateInput, Datagrid, TextField, DateField, NumberInput } from 'react-admin'

export const PostList = () => {
    return (
        <List>
            <Datagrid rowClick='edit'>
                <TextField source="id" />
                <TextField source="title" />
                <DateField source="publishedAt" />
                <TextField source='userId' label='Author' />
            </Datagrid>
        </List>
    )
}

export const PostCreate = () => {
    return (
        <Create title='Create a Post' >
            <SimpleForm>
                <NumberInput source='id' />
                <TextInput source='title' />
                <TextInput multiline source='body' />
                <DateInput label='Published' source='publishedAt' />
            </SimpleForm>
        </Create>
    )
}

export const PostEdit = () => {
    return (
        <Edit>
            <SimpleForm>
                <NumberInput disabled source='id' />
                <TextInput source='title'/>
                <TextInput multiline source='body' />
                <DateInput label='Published' source='publishedAt' />
            </SimpleForm>
        </Edit>
    )
}
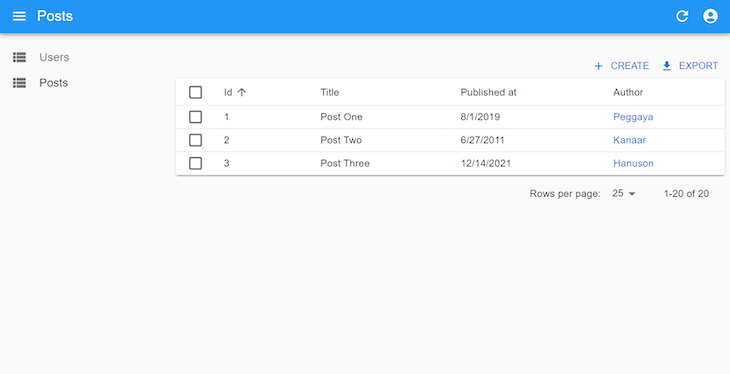
Notice that the author columns are not as effective as they should be. Here, we expect the username of the authors to display rather than the userId passed from the db.json. We can do so with the reference prop.
Referencing multiple records
Head up to Post.js and update your PostList component as follows:
// src/components/Post.js
export const PostList = () => {
    return (
        <List>
            <Datagrid rowClick='show'>
                <TextField source="id" />
                <TextField source="title" />
                <DateField source="publishedAt" />
                <ReferenceField source="userId" label="Author" reference="users" />
            </Datagrid>
        </List>
    )
}
Here, we introduce a ReferenceField component and set the reference prop on the users. The value of the reference should tally with the name we provided for the users’ Resource in the Admin component. So far, what we’ve done will only make each list of the Author column clickable, and when clicked, it will navigate you to that user.
But, it will still show the authors’ IDs rather than their usernames. To change that, head up to App.js and update the Resource of users to this:
// src/App.js
<Resource
  name="users"
  list={UserList}
  create={UserCreate}
  edit={UserEdit}
  recordRepresentation={(user) => user.username}
/>
By default, react-admin represents each record by its ID, but now we’ve changed this representation to the username. Here’s what that looks like:
When updating or creating a new post, we can use the ReferenceInput to help admins specify the authors. Update your PostCreate and PostEdit to this:
// src/components/App.js
export const PostCreate = () => {
  return (
    <Create title="Create a Post">
      <SimpleForm>
        <NumberInput source="id" />
        <ReferenceInput source="userId" reference="users">
          <AutocompleteInput label="Author" />
        </ReferenceInput>
        <TextInput source="title" />
        <TextInput multiline source="body" />
        <DateInput label="Published" source="publishedAt" />
      </SimpleForm>
    </Create>
  );
};

export const PostEdit = () => {
  return (
    <Edit>
      <SimpleForm>
        <NumberInput disabled source="id" />
        <ReferenceInput source="userId" reference="users">
          <AutocompleteInput label="Author" />
        </ReferenceInput>
        <TextInput source="title" />
        <TextInput multiline source="body" />
        <DateInput label="Published" source="publishedAt" />
      </SimpleForm>
    </Edit>
  );
};
Theming
Each component of react-admin can be styled with the sx prop from MUI System. It uses CSS-in-JS, just like React’s style prop. We will be using it to style the DataGrid component in UserList, as shown below:
export const UserList = () => {
return (
<List>
<Datagrid
rowClick="edit"
sx={{
".RaDatagrid-rowEven": {
backgroundColor: "lavender",
},
".RaDatagrid-headerCell": {
backgroundColor: "MistyRose",
},
}}
>
<TextField source="id" />
<TextField source="name" />
<TextField source="username" />
<EmailField source="email" />
<TextField source="phone" />
<TextField source="company" />
<DeleteButton />
</Datagrid>
</List>
);
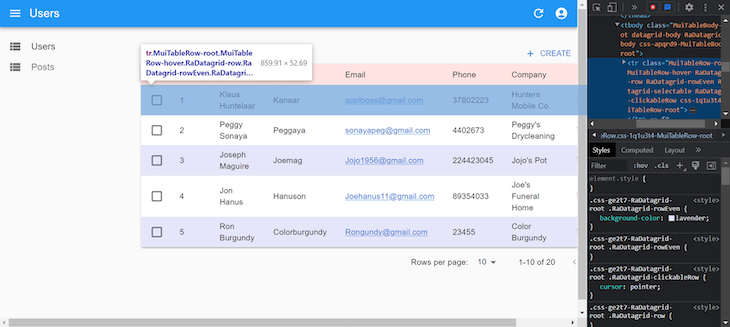
};The .RaDatagrid-rowEven is a class selector that selects all even rows of the table, meanwhile, .RaDatagrid-headerCell selects the header of the table. You can get the class names when you inspect the element like so:
If we want to apply the same style to multiple DataGrid components in our app, we use the styled function from the MUI System to create a reusable styled DataGrid component:
import { styled } from '@mui/system';
import { Datagrid } from 'react-admin';
export const CustomDataGrid = styled(Datagrid)({
  '.RaDatagrid-rowEven': {
    backgroundColor: 'lavender',
  },
  '.RaDatagrid-headerCell': {
    backgroundColor: 'MistyRose',
  },
});
Now, let’s see how we can give unique icons to both the users and posts menu on the left sidebar. The Resource component has an icon prop that you can pass an icon component like this:
import { Admin, Resource } from "react-admin";
import restProvider from "ra-data-simple-rest";
import { authProvider } from "./authProvider";
import { PostList, PostEdit, PostCreate } from "./components/Post";
import { UserList, UserEdit, UserCreate } from "./components/User";
import PeopleIcon from "@mui/icons-material/People";
import ArticleIcon from "@mui/icons-material/Article";

const dataProvider = restProvider("http://localhost:3000");

function App() {
  return (
    <Admin dataProvider={dataProvider} authProvider={authProvider}>
      <Resource
        name="users"
        list={UserList}
        create={UserCreate}
        edit={UserEdit}
        recordRepresentation={(user) => user.username}
        icon={PeopleIcon}
      />
      <Resource
        name="posts"
        list={PostList}
        create={PostCreate}
        edit={PostEdit}
        icon={ArticleIcon}
      />
    </Admin>
  );
}

export default App;
Finally, let’s create an option to switch from a dark to a light theme and vice versa. To do this, we will have to create a new layout that will contain a toggle button on the header of all pages. So, create a layouts folder in the src folder. In that folder, create an AppLayout.js file, and paste the following into it:
// src/layouts/AppLayout.js
import {
  defaultTheme,
  Layout,
  AppBar,
  ToggleThemeButton,
  TitlePortal,
} from 'react-admin';
import { createTheme } from '@mui/material';

const darkTheme = createTheme({
  palette: { mode: 'dark' },
});

const CustomAppBar = () => (
  <AppBar>
    <TitlePortal />
    <ToggleThemeButton lightTheme={defaultTheme} darkTheme={darkTheme} />
  </AppBar>
);
export const AppLayout = (props) => <Layout {...props} appBar={CustomAppBar} />;
Now, head up to App.js and pass the new AppLayout to the layout prop of Admin like so:
<Admin
  dataProvider={dataProvider}
  authProvider={authProvider}
  layout={AppLayout}
>
{/**/}
</Admin>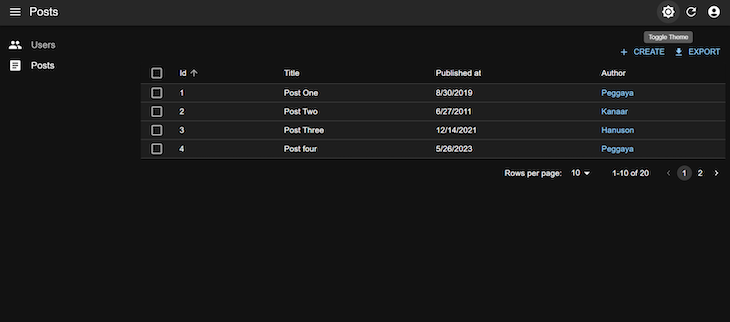
Conclusion
Creating React admin panels does not have to be as complex as it once was. With React’s react-admin, we can scaffold admin interfaces quite readily. Authentication processes are equally important, and they are not excluded here. You can find the source code for this project here on GitHub.
Source: https://blog.logrocket.com
#react #reactjs