How to Make your Nuxt.js Website SEO friendly
I’m Anamol Soman and I’m a web developer. In this blog, we will see how we can optimize our Nuxtjs website for better SEO performance. Here I am not talking about what is SEO ? or How it works? you will find a lot of stuff on the internet about this, We are going to directly deal with the changes that we need for better SEO.
Always Select Universal Mode Over SPA Mode
NuxtJs provides two different modes one in universal mode and another is SPA(Single Page Application). we will see why universal mode is important for SEO in short
SPA website is known for its fast loading and it updates very fast compared to other normal websites But they are not SEO friendly. When the SPA website loads it only sends basic Html content without rendered, then it makes another request for javascript. But what happens if javascript rendering takes time? Here the problem is when SEO crawlers hit the website they see only basic Html without rendering so they don’t see any proper data to index the website.
<!DOCTYPE html>
<html>
  <head>
    <meta charset="utf-8">
    <title>Home</title>
  </head>
  <body>
    <div id="app"></div>
    <script src="/js/app.js"></script>
  </body>
</html>
Universal mode solves this issue by passing the complete rendered data so that SEO crawlers can understand and index the pages on our website. That’s why Universal mode is very important for SEO.
Now our setup is ready, next we need to install some npm packages to enhance our SEO
Add a Dynamic Sitemap
A sitemap is an XML file which contains page URLs of our website so that search engine can easily crawl our pages. We can add a sitemap in our application but first, we need to install a nuxt module
yarn add @nuxtjs/sitemap
After installing the sitemap module we just need to add an entry in our nuxt.config.js file
modules: [
    // ...  other modules
    '@nuxtjs/sitemap' // <--- This one!
  ],
To check if the sitemap is properly installed or not just hit /sitemap.xml in front of your home page URL then you will able to see whether your page links are properly shown or not.
Add Google Analytics
Google Analytics is very important to track our website traffic and check performance. For adding google analytics in Nuxtjs we just need to install the following module
yarn add @nuxtjs/google-analytics
Then go to your nuxt.config.js and add the module entry
modules: [
    '// ... other modules
    '@nuxtjs/google-analytics'  // <--- This one!
  ],
Now we need to connect our google analytics account with this nuxt application. For that we need to add google analytics id inside nuxt.config.js
googleAnalytics: {
    id: "{YOUR GOOGLE ANALYTICS ID}",
    dev: false
  },
Add Meta Tags
Meta tags are very important for our SEO that’s why we will see this in more details, I am going to divide these into three sub-sections
Set meta tags for all pages
In this subsection, we will see how to add global meta tags which show in all pages of our website
head: {

titleTemplate: '%s - ' + 'Anamol Soman',
title: 'Website Name' || '',
meta: [
{ charset: 'utf-8' },
{ name: 'viewport', content: 'width=device-width, initial-scale=1' },
{
hid: 'description',
name: 'description',
content: process.env.npm_package_description || '',
},
],
we will place the above code in nuxt.config.js file inside the export so that this title and description will be added for all pages. But we need a dynamic name here that’s why we use “%s” in titleTemplate. I will explain it with example lets consider a page and set the title “About me” . When our site loads then %s will be replaced by the page title and then it will be shown like “ About me-Anamol Soman”
The title “About me ” will change depends on the page but “Anamol Soman ” will remain the same.
Set meta tags for a single page
Here we just add the head() method in particular page and add meta tags in that method
export default {

data() {
return {}
},
head() {
return {
title: 'About Us',
meta: [
hid: 'title',
name: 'title',
content: 'About Us',
},
{
hid: 'description',
name: 'description',
content: process.env.npm_package_description,
},
],
}
},
}
In the above meta tag, I am passing package.json description to the description attribute
Set dynamic meta tags
Dynamic meta tags use when we need the same page or component and show many items. for example we have a shopping cart app and we need meta tags for each product but in that scenario, we use a single component and call that multiple times here we need dynamic meta tags.
meta: [

{
hid: 'title',
name: 'title',
content: 'Natural ' + `${this.productName}`,
},
{
hid: 'description',
name: 'description',
content:
'Natural' +
`${this.productName}` ,
},
Here variable productName contains the name of that particular product and set the meta tag.
Setting Social Media Meta Tags
In the above section, we see the only title and description meta tags but social media is a very important aspect in SEO we need to optimize it also. When we share our link on any social media app then which type of card will appear and tell the user what that link contains. But we need to set that manually.
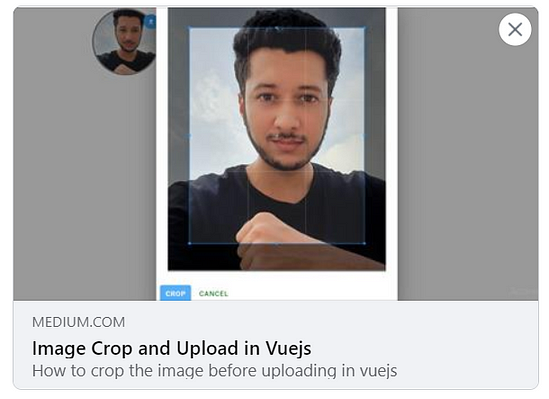
In the above image, we have different sections first one is the image then our website name which is showing medium.com then the title of our blog or page, and the last one is the description
{

hid: 'twitter:card',
name: 'twitter:card',
content: 'Anamol Soman',
},
{
hid: 'twitter:site',
name: 'twitter:site',
content: '@Anamolsoman',
},
{
hid: 'twitter:creator',
name: 'twitter:creator',
content: '@Anamolsoman',
},
{
hid: 'twitter:title',
name: 'twitter:title',
content: 'This is title',
},
{
hid: 'twitter:description',
name: 'twitter:description',
content:'this is description',
},
{
hid: 'og:image',
property: 'og:image',
content:
'/test.png',
},
{
hid: 'og:site_name',
name: 'og:site_name',
content: 'Website Name',
},
{
hid: 'og:type',
name: 'og:type',
content: 'website',
},
{
hid: 'og:url',
name: 'og:url',
content: 'https://medium.com/@anamolsoman2',
},
{
hid: 'og:title',
name: 'og:title',
content: 'This is title',
},
{
hid: 'og:description',
name: 'og:description',
content:'this is description',
},
We all know about title and description meta tags but there are few new tags which maybe you don’t know so I will explain it
twitter: creator
it specifies who is a creator of that website.
og: type
here we will pass the type of our URL, it’s a website or blog. the card layout will be changed depends on the type.
og:image
In this tag we will pass our image, just add an image in the static folder and pass the image name here (because the static folder id directly added to our root) or we can upload that image somewhere and pass the URL.
or: url
When anyone clicks on that shared card then the user will redirect to the URL that we passed in or: URL. it’s important to pass proper website URL here.
That’s it these all things will improve your SEO performance for sure but note one thing it’s not all the SEO that you have to do there are many other things, but this will improve your SEO performance.
If you want more SEO blogs on nuxt then leave a comment. if I get some comment then I will come with part 2 which contains about google analytic details and image SEO.
Conclusion
So we add most of the things that are important for nuxt SEO.
Thank you for reading!
#seo #nuxtjs #vuejs #seo-tips #google-analytics