A quick introduction to ASP.NET Core with MongoDB as a data store.
Document databases have become increasingly popular due to their speed and ability to store huge amounts of data or semi-structured data. MongoDB has emerged as a leader in the document database space and, as a consequence, it may be necessary for developers to learn how to interact with MongoDB from .NET applications. This post strips away all the arguments that obscure how document databases can easily serve as a datastore for .NET applications.
The app you’ll build is a virtual suggestion box. It is meant to strip away anything that doesn’t deal with saving, retrieving, updating, and deleting data from the document store.
For this example, you’ll use MongoDB’s Atlas. Atlas is a hosted solution for MongoDB clusters. You can easily sign up for a free account. You’ll also use Okta for user authentication (you can also sign up for a free account).
Scaffold Your ASP.NET Core Application
For this application, I’ll show you all the command-line commands for creating the application, coding in VS Code. You could use Visual Studio but, if you’re on macOS or Linux, you won’t have that ability.
To scaffold a basic ASP.NET Core MVC application, use the following command:
dotnet new mvc --no-https -n OktaNetCoreMvcMongoExample
This command creates the application in a folder called OktaNetCoreMvcMongoExample. It also tells the .NET Core SDK not to use https for the development URL. Obviously, if this were a production application, you would want to leave that on.
Next, change into the OktaNetCoreMvcMongoExample folder and open VSCode in that directory. From there, install the two packages you need for the application to work:
dotnet add package MongoDB.Driver -v 2.10.4
dotnet add package Microsoft.AspNetCore.Authentication.OpenIdConnect -v 3.1.4
The MongoDB.Driver package allows .NET Core to connect to the MongoDB database. ou’ll use the Microsoft.AspNetCore.Authentication.OpenIdConnect to authenticate to Okta.
Set Up Your Free MongoDB Cluster
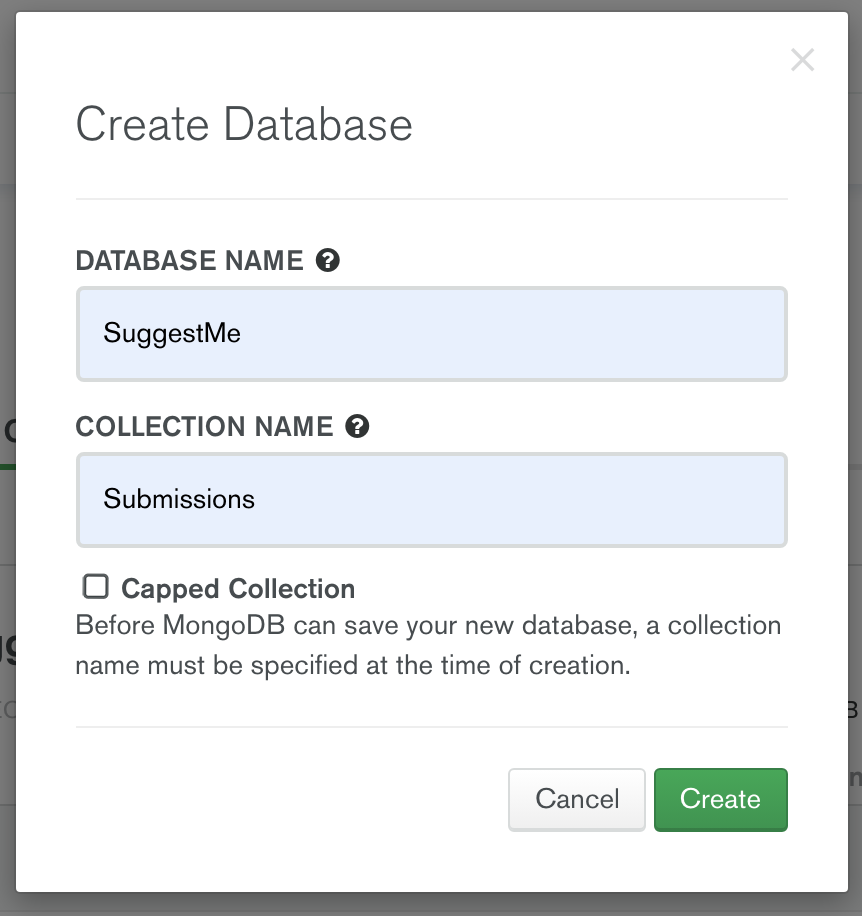
Once you’ve signed up for a free MongoDB cluster (I just used my Google account), you should be taken to a page that lists your clusters. The only cluster that should be in there to begin with is called Cluster0. Click on the COLLECTIONS button, then click the + Create Database button and create a database called “SuggestMe” with a collection of “Submissions”. You can have as many collections in the database as you want, but for the purposes of the “SuggestMe” app, all you’ll need is the “Submissions” collection.
Connect Your .NET Core Application to the MongoDB Database
Add your database connection information to the appsettings.json file in the root of your application. After the Logging section of the JSON document, add:
"DatabaseSettings": {
    "ConnectionString": "{MongoDBConnectionString}",
    "DatabaseName": "SuggestMe"
},
If you go back to the clusters listing by clicking the Clusters menu item on the left, you can then click the CONNECT button.
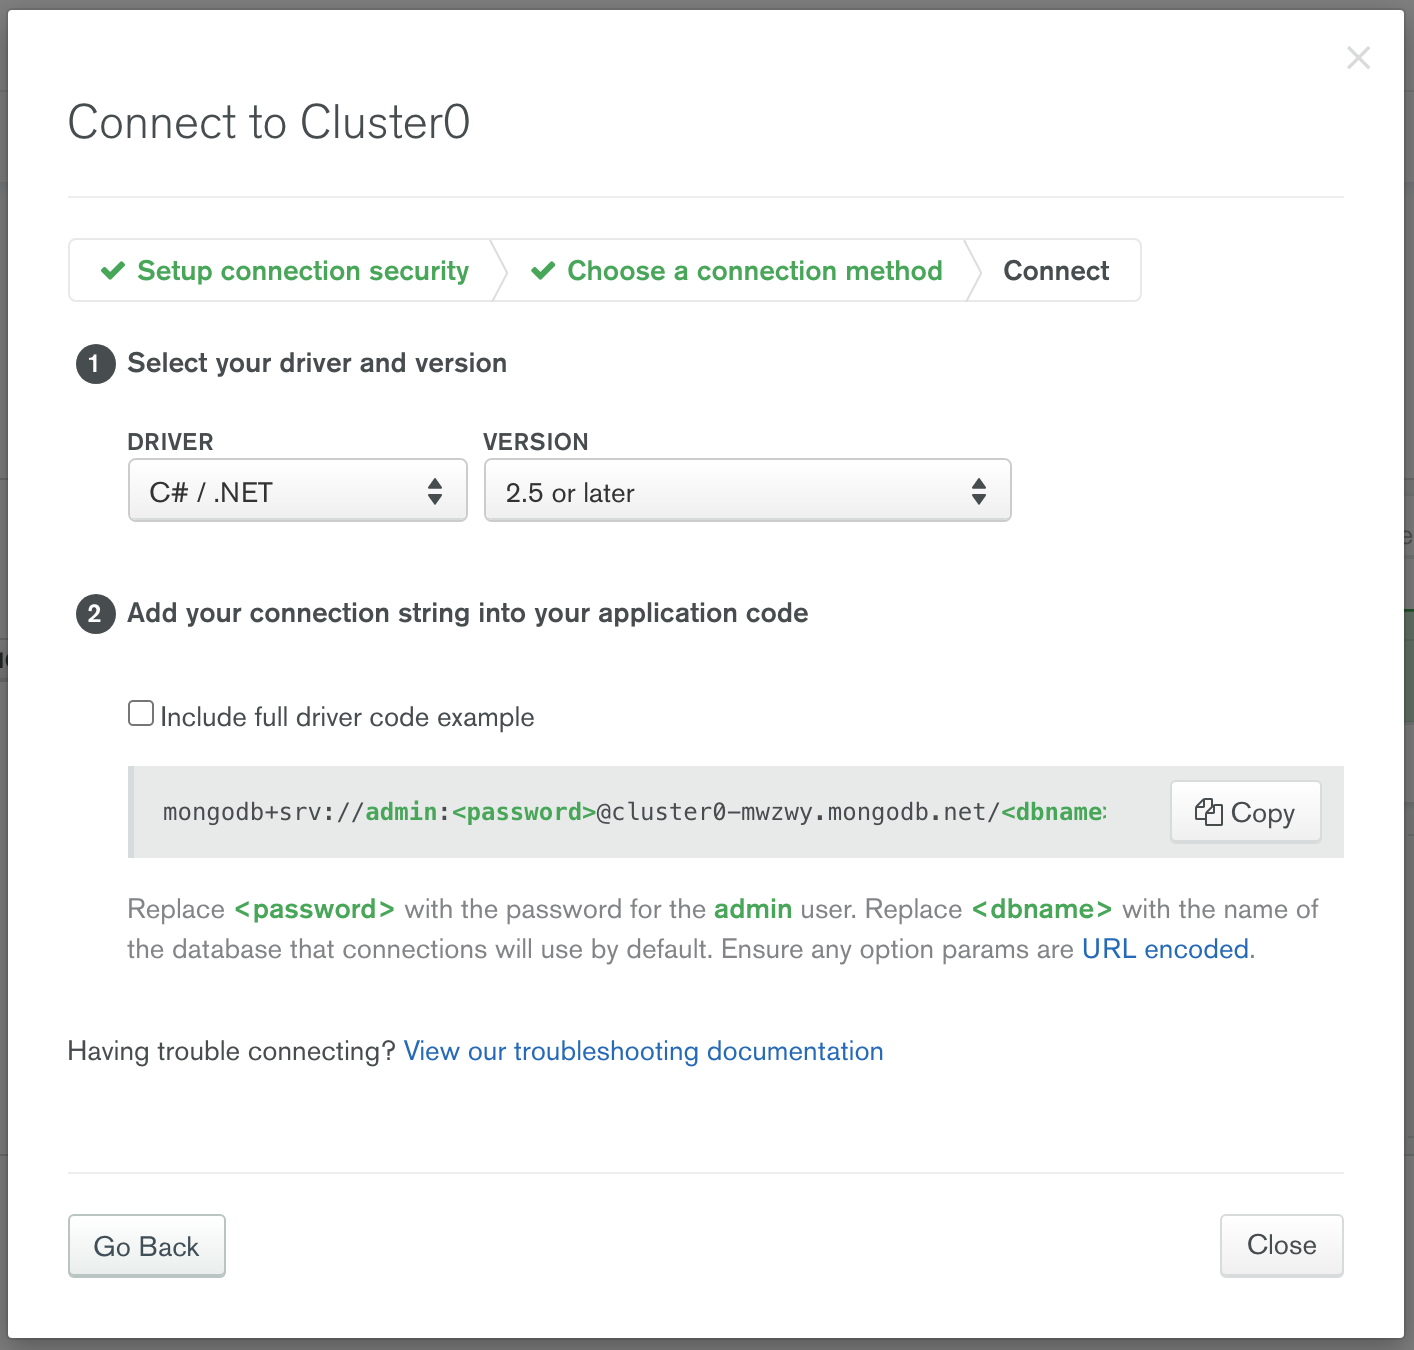
Replace the {MongoDBConnectionString} placeholder with your connection string from MongoDB Atlas. You can copy it directly from the CONNECT dialog and replace your admin password (or, even better, add a new user to the database specifically for your application to use) and put that user and password in the connection string. Also, replace the <dbname> in the connection string with suggestme for your database.
Next, you’ll need some classes to get the connection working correctly. In your Models folder, add a file called DatabaseSettings.cs. The contents of the file will be:
namespace OktaNetCoreMvcMongoExample.Models
{
    public interface IDatabaseSettings
    {
        string ConnectionString { get; set; }
        string DatabaseName { get; set; }
    }

    public class DatabaseSettings : IDatabaseSettings
    {
        public string ConnectionString { get; set; }
        public string DatabaseName { get; set; }
    }
}
You might notice there are a class and an interface in this file. Again, this is just for simplicity’s sake. You can easily separate them into two files if you would like.
The interface will allow you to inject the database connection into any class that needs it using the dependency injection framework built into .NET Core. Do so by going into the Startup.cs file in the root of your project and adding to the beginning of the ConfigureServices method:
services.Configure<DatabaseSettings>(Configuration.GetSection(nameof(DatabaseSettings)));
services.AddSingleton<IDatabaseSettings>(x => x.GetRequiredService<IOptions<DatabaseSettings>>().Value);
This will pull the settings from appsettings.json file into the properties of the DatabaseSettings object and inject them anywhere another object requires a IDatabaseSettings contract to be fulfilled.
In the Models folder, create a file called Submission.cs with the following contents:
using System;
using MongoDB.Bson;
using MongoDB.Bson.Serialization.Attributes;

namespace OktaNetCoreMvcMongoExample.Models
{
    public class Submission
    {
        [BsonId]
        [BsonRepresentation(BsonType.ObjectId)]
        public string Id { get; set; }

        public string UserId { get; set; }

        public string UserName { get; set; }

        public string Content { get; set; }

        public DateTime Created { get; set; }

        public DateTime LastUpdated { get; set; }
    }
}
#aspdotnet #mongodb #database #web-development #developer