How to Creat an API in Laravel with Passport
In this post, I will be creating an API with Laravel Passport. Laravel Passport provides an easy way to perform API authentication. You will be learning how to build an API in Laravel Passport and how to generate a token for a user. This token is used to authenticate the user.
Installation
Let’s start by installing Laravel Passport via Composer.
composer require laravel/passport
Laravel Passport will create its own tables to store client and access tokens. So we should migrate the database after installing Passport.
php artisan migrate
Next, we will have to create the encryption keys that are needed to generate secure access tokens. We can do this by executing the following command:
php artisan passport:install
Add the HasApiTokens trait to the User model.
<?php
namespace App;
use Illuminate\Notifications\Notifiable;
use Illuminate\Foundation\Auth\User as Authenticatable;
use Laravel\Passport\HasApiTokens;
class User extends Authenticatable
{
    use HasApiTokens, Notifiable;
    protected $fillable = [
        'name', 'email', 'password',
    ];
    protected $hidden = [
        'password', 'remember_token',
    ];
    protected $casts = [
        'email_verified_at' => 'datetime',
    ];
}
In the AuthServiceProvider we should call Passport::routes() within the boot method. This will register routes that are needed to issue access tokens and revoke tokens.
<?php
namespace App\Providers;
use Illuminate\Foundation\Support\Providers\AuthServiceProvider as ServiceProvider;
use Laravel\Passport\Passport;
class AuthServiceProvider extends ServiceProvider
{
    protected $policies = [];
    public function boot()
    {
        $this->registerPolicies();
        Passport::routes();
    }
}
There is one more thing that we need to do before we can start building the API. In the config/auth.php change the guards.api.driver to passport.
Defining a route
For now, we will be using a very simple example in the routes/api.php.
<?php

use App\Book;
use App\Http\Resources\Book as BookResource;
use Illuminate\Http\Request;

Route::middleware('auth:api')->get('/books', function (Request $request) {
    return BookResource::collection(Book::all());
});
Creating a user
To be able to test the endpoint we have to create a user. We will be creating a command to do that for us. Let’s start by creating the command:
php artisan make:command CreateUserCommand
The command will create a user and a token based on some options that have to get passed to the command.
<?php

namespace App\Console\Commands;

use App\User;
use Illuminate\Console\Command;

class CreateUserCommand extends Command
{
    protected $signature = 'user:create {--name=} {--email=} {--password=} {--token=}';

    protected $description = 'Create user and token';

    public function handle()
    {
        $user = User::create([
            'name' => $this->option('name'),
            'email' => $this->option('email'),
            'password' => bcrypt($this->option('password'))
        ]);

        $token = $user->createToken($this->option('token'))->accessToken;

        $this->line($token);
    }
}
As you can see we have to pass four options to the command:
- name
- password
- token, which is the name of the token
Create a user by executing the following command:
php artisan user:create --name=Laravel --email=laravel@example.com --password=secret --token=LaravelToken
After executing the command you should see a token in your console. Copy this token.
Note:
Make sure that the token that gets printed in the console does not contain any line breaks.
Sending a request to the API
To send a GET request to the /api/books endpoint we have to add the token that you just copied as a Bearer token. To do that in Postman, click on the Authorization tab and select Bearer Token in the Type select box.
Furthermore, in the Headers tab add the Accept key with value application/json.
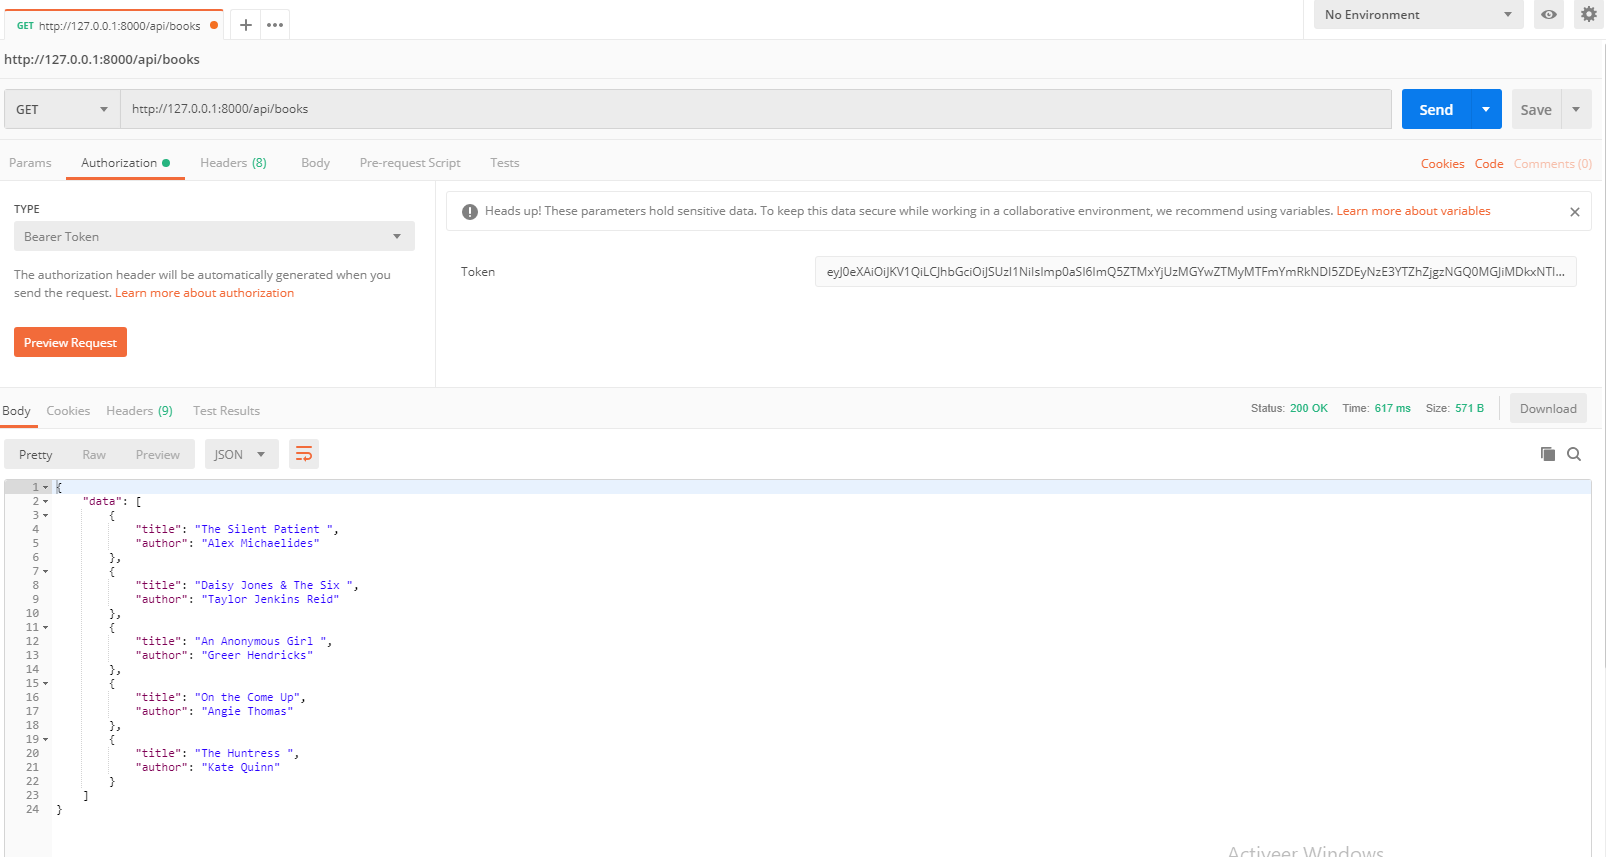
If the request was successful, you will receive a JSON array with books and status code 200.
Making an endpoint public
In the example above we used Laravel Passport for the API authentication. In some situations, you might want to have a public endpoint. Making an endpoint public is very easy. All you have to is remove the auth:api middleware from your route. This means that anybody can send a request to the endpoint without any form of authentication.
This how you set up an API with Laravel Passport. Please share your thoughts on this article. Make sure to check out my other posts as well. A lot of my content is about Laravel. Feel free to leave a comment if you have any feedback, questions or want me to write about another Laravel related topic.
Thank for read and keep visitting!
#php #laravel #api #programming #development