Introduction
Computer is an amazing machine (no doubt in that) and I am really mesmerized by the fact how computers are able to learn and classify Images. Image classification have it’s own advantages and application in various ways, for example, we can buid a pet food dispenser based on which species (cat or dog) is approaching it. I know it’s a wierd idea like they will end up eating all of the food but the system can be time controlled and can be dispensed only once. Anyways let’s move further before getting distracted and continue our discussion. So after upskilling myself with the knowledge of Deep Learning Neural Networks, I thought of building one myself. So here I am going to share building an Alexnet Convolutional Neural Network for 6 different classes built from scratch using Keras and coded in Python.
Overview of AlexNet
Before getting to AlexNet , it is recommended to go through the Wikipedia article on Convolutional Neural Network Architecture to understand the terminologies in this article. Let’s dive in to get a basic overview of the AlexNet network
AlexNet[1]is a Classic type of Convolutional Neural Network, and it came into existence after the 2012 ImageNet challenge. The network architecture is given below :
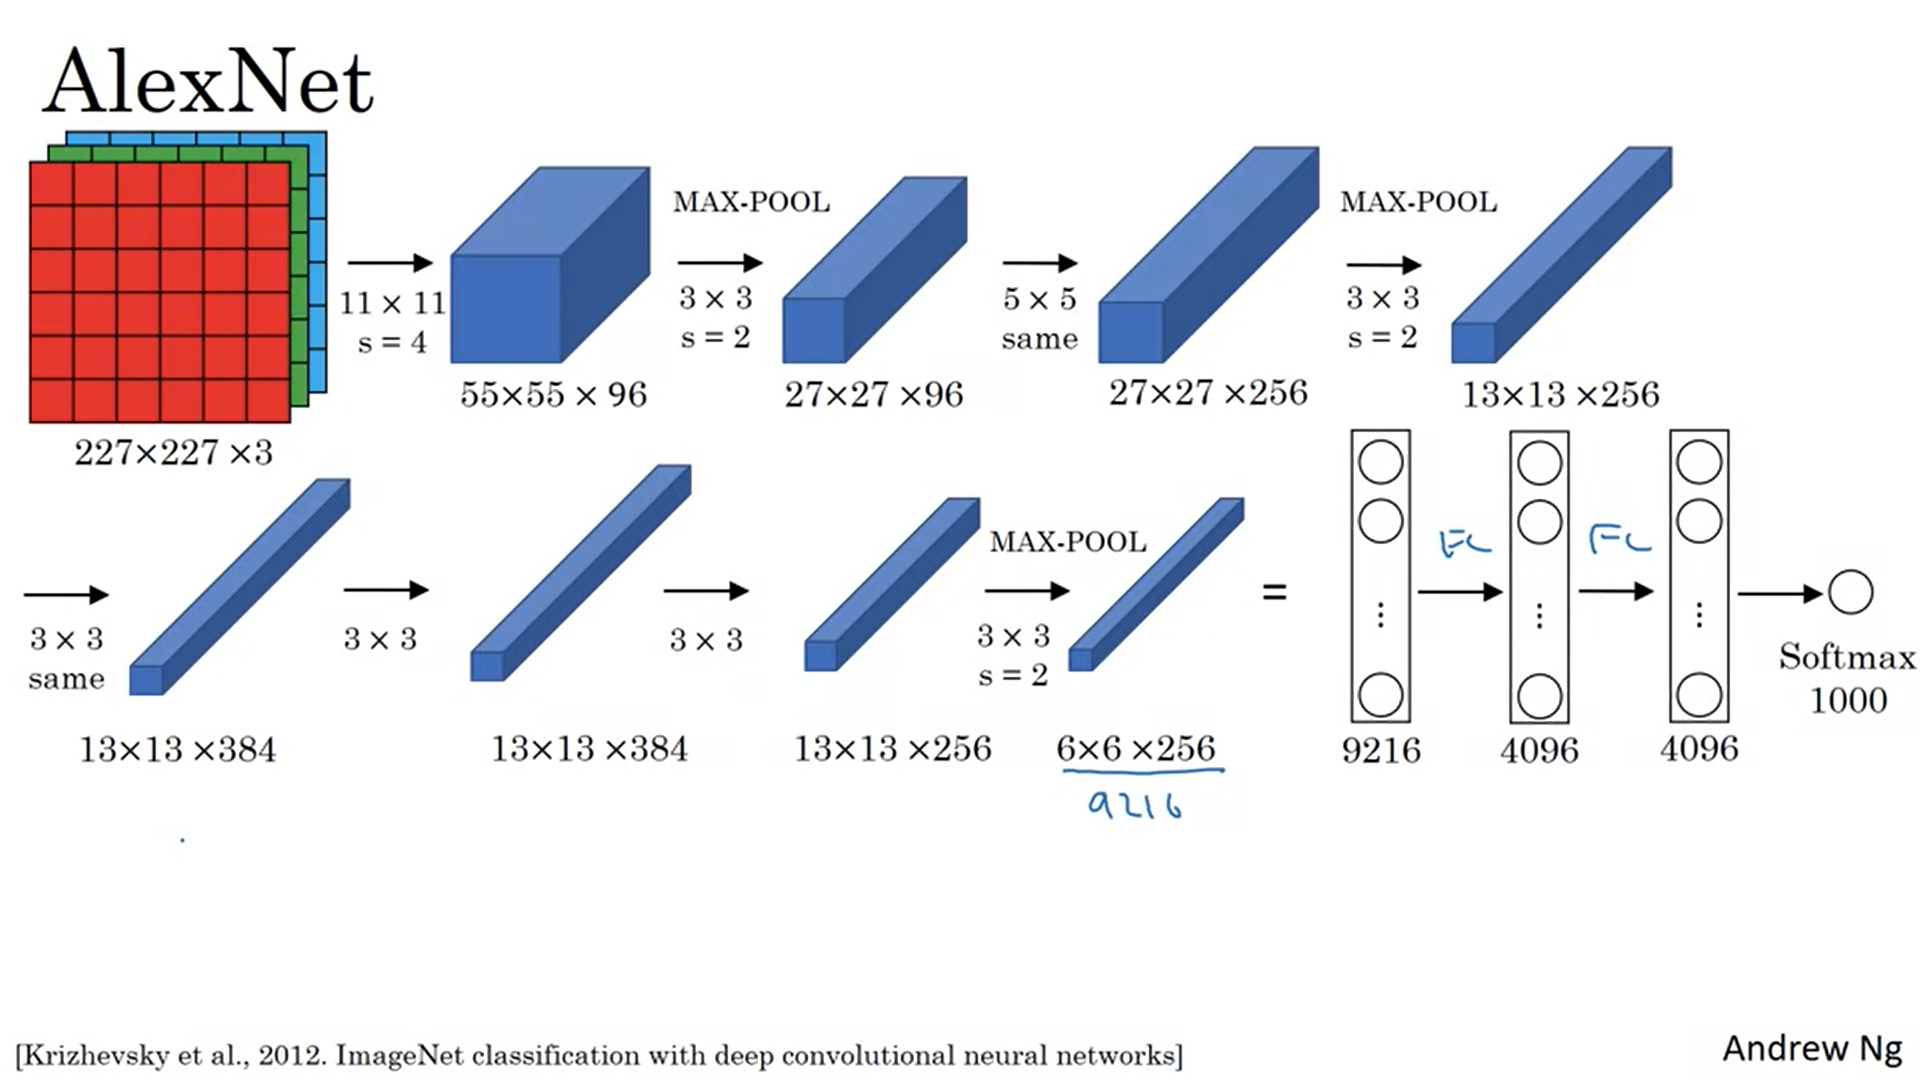
AlexNet Architecture (courtesy of Andrew Ng on Coursera[2])
**Model Explanation : **The Input to this model have the dimensions 227x227x3 follwed by a Convolutional Layer with 96 filters of 11x11 dimensions and having a ‘same’ padding and a stride of 4. The resulting output dimensions are given as :
floor(((n + 2padding - filter)/stride) + 1 ) * floor(((n + 2padding — filter)/stride) + 1)
**Note : **This formula is for square input with height = width = n
Explaining the first Layer with input 227x227x3 and Convolutional layer with 96 filters of 11x11 , ‘valid’ padding and stride = 4 , output dims will be
= floor(((227 + 0–11)/4) + 1) * floor(((227 + 0–11)/4) + 1)
= floor((216/4) + 1) * floor((216/4) + 1)
= floor(54 + 1) * floor(54 + 1)
= 55 * 55
Since number of filters = 96 , thus output of first Layer is : 55x55x96
Continuing we have the MaxPooling layer (3, 3) with the stride of 2,making the output size decrease to 27x27x96, followed by another Convolutional Layer with 256, (5,5) filters and ‘same’ padding, that is, the output height and width are retained as the previous layer thus output from this layer is 27x27x256. Next we have the MaxPooling again ,reducing the size to 13x13x256. Another Convolutional Operation with 384, (3,3) filters having same padding is applied twice giving the output as 13x13x384, followed by another Convulutional Layer with 256 , (3,3) filters and same padding resulting in 13x13x256 output. This is MaxPooled and dimensions are reduced to 6x6x256. Further the layer is Flatten out and 2 Fully Connected Layers with 4096 units each are made which is further connected to 1000 units softmax layer. The network is used for classifying much large number of classes as per our requirement. However in our case, we will make the output softmax layer with 6 units as we ahve to classify into 6 classes. The softmax layer gives us the probablities for each class to which an Input Image might belong.
Implementing AlexNet using Keras
Keras is an API for python, built over Tensorflow 2.0,which is scalable and adapt to deployment capabilities of Tensorflow [3]. We will Build the Layers from scratch in Python using Keras API.
First, lets Import the essentials libraries
import numpy as np
from keras import layers
from keras.layers import Input, Dense, Activation,BatchNormalization, Flatten, Conv2D, MaxPooling2D
from keras.models import Model
from keras.preprocessing import image
from keras.preprocessing.image import ImageDataGenerator
import keras.backend as K
K.set_image_data_format(‘channels_last’)
import matplotlib.pyplot as plt
from matplotlib.pyplot import imshow
In this article we will use the Image Generator to build the Classifier. Next we will import the data using Image Data Generator. Before that let’s understand the Data. The dataset can be found here.
This Data contains around 25k images of size 150x150 distributed under 6 categories, namely : ‘buildings’ , ‘forest’ , ‘glacier’ , ‘mountain’ , ‘sea’ , ‘street’ . There are 14K images in training set, 3K in test setand 7K in Prediction set.
The data images for all the categories are split into it’s respective directories, thus making it easy to infer the labels as according to keras documentation[4]
Arguments :
directory: Directory where the data is located. If
_labels_is “inferred”, it should contain subdirectories, each containing images for a class. Otherwise, the directory structure is ignored.
In the linked dataset also, we have a directory structure and thus the ImageDataGenerator will infer the labels. A view of dataset directory structure is shown below :
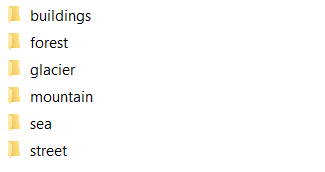
Directory structure in dataset
Next we will import the dataset as shown below :
path = 'C:\\Users\\Username\\Desktop\\folder\\seg_train\\seg_train'
train_datagen = ImageDataGenerator(rescale=1\. / 255)
train = train_datagen.flow_from_directory(path, target_size=(227,227), class_mode='categorical')
Output
Found 14034 images belonging to 6 classes.
As explained above, the input size for AlexNet is 227x227x3 and so we will change the target size to (227,227). The by default Batch Size is 32. Lets see the type of train and train_datagen.
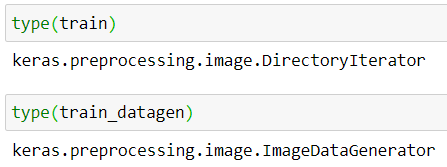
The type keras.preprocessing.image.DirectoryIterator is an Iterator capable of reading images from a directory on disk[5]. The keras.preprocessing.image.ImageDataGenerator generate batches of tensor image data with real-time data augmentation. The by default batch_size is 32
Next let us check the dimensions of the first image and its associated output in the first batch.
#deep-learning #keras #alexnet #classification #machine-learning #deep learning
