Send & Recieve SMS messages with Node.js and Express.js
Nexmo has a couple of APIs that allow you to send and receive a high volume of SMS anywhere in the world. Once you get your virtual phone number, you can use the APIs to manage outbound messages (“sending”) and inbound messages (“receiving”). In this article, you will learn how to send and receive SMS messages with Node.js and Express.
We will first send an SMS with Node.js and the old SMS API (Nexmo’s first API) and then rewrite that code to use the new Messages API to send the same SMS. We’ll then build a Webhook that can receive SMS messages using express. We’ll focus in this article on sending and receiving SMS messages, but if you want to send and receive messages with Facebook Messenger, Viber or Whatsapp, you can do that as well with the Messages API.
You can extend the application we’re building here to reply to incoming SMS messages as well, or to include more complex, interactive elements and give you a head start building autoresponders for your SMS needs.
The code for this tutorial can be found on GitHub & Glitch.
Prerequisites
Before you begin, make sure you have:
- A Nexmo account
- Node.js installed on your machine
- ngrok to make the code on our local machine accessible to the outside world
- The Nexmo CLI:
npm install -g nexmo-cli
Send an SMS Message With the SMS API
The SMS API is the first Nexmo API, and we’ll use it to send an SMS message to your phone number.
Install Node.js Dependencies
First off, initialize an NPM package, otherwise, older versions of NPM will complain about installing a package without having a package.json first. Just use the defaults for init, and then install the nexmo Node.js package.
$ npm init
$ npm install nexmo
Initialize Dependencies
We’ll create a new JavaScript file, let’s call it index.js.
$ touch index.js
We need to initialize the Nexmo node library we installed earlier, in the index.js file you created:
const Nexmo = require('nexmo')

const nexmo = new Nexmo({
  apiKey: NEXMO_API_KEY,
  apiSecret: NEXMO_API_SECRET
})
Replace the values in there with your actual API key and secret. You can find those on the “Getting Started” page in the Nexmo Dashboard.
Send the SMS Message
The Nexmo library has a method for sending the SMS with the SMS API, and that’s nexmo.message.sendSms. The method takes as parameters 3 strings and an object: the Nexmo number from which to send the SMS, the phone number where to deliver the SMS, the text of the message and options for the SMS encoding. It also accepts a callback that gets called when the API request is done.
The response data contains an array for all the messages that were sent, with information about their status. In most cases, it’s going to be 1 element in that array, but if the SMS was longer than 160 characters, it gets split into a multipart SMS, and then the array contains data about each part sent. If the status of the message is 0, the SMS was sent successfully, otherwise, the error data for the message is on the error-text property of the message.
Because my text has an emoji in it, I’m setting the type unicode in the options object, otherwise, that emoji is going to be sent on the network as ?.
let text = "👋Hello from Nexmo";

nexmo.message.sendSms("Nexmo", "TO_NUMBER", text, {
  type: "unicode"
}, (err, responseData) => {
  if (err) {
    console.log(err);
  } else {
    if (responseData.messages[0]['status'] === "0") {
      console.log("Message sent successfully.");
    } else {
      console.log(`Message failed with error: ${responseData.messages[0]['error-text']}`);
    }
  }
})
If your carrier network supports alphanumeric sender IDs, FROM can be text instead of a phone number(for my example it’s Nexmo. If your network doesn’t support alphanumeric sender IDs for example in the US it has to be a phone number.
Depending on the country you’re trying to send the SMS to, there are regulations that require you to own the phone number you’re sending the SMS from, so you’ll have to buy a Nexmo phone number. You can do so in the Nexmo Dashboard or via the CLI:
$ nexmo number:buy --country_code US --confirm
You can run the code and receive the SMS message with:
$ node index.js
Send an SMS Message With the New Messages API
There is a newer Nexmo API that deals with sending text messages called the Messages API. It is a multi-channel API, that can send a message via different channels, such as SMS, Facebook Messenger, Viber, and Whatsapp. The API is in Beta right now, so if we want to use it to send the same SMS message, we’ll need to install the beta version of the Nexmo node library.
$ npm install nexmo@beta
Run ngrok
If you haven’t used ngrok before, If you’re familiar with ngrok, run it with http on the 3000 port.
$ ngrok http 3000
After ngrok runs, it will give you a random-looking URL, that we’ll use as the base for our Webhooks later on. Mine looks like this: http://5b5c1bd0.ngrok.io.
Create a Messages Application
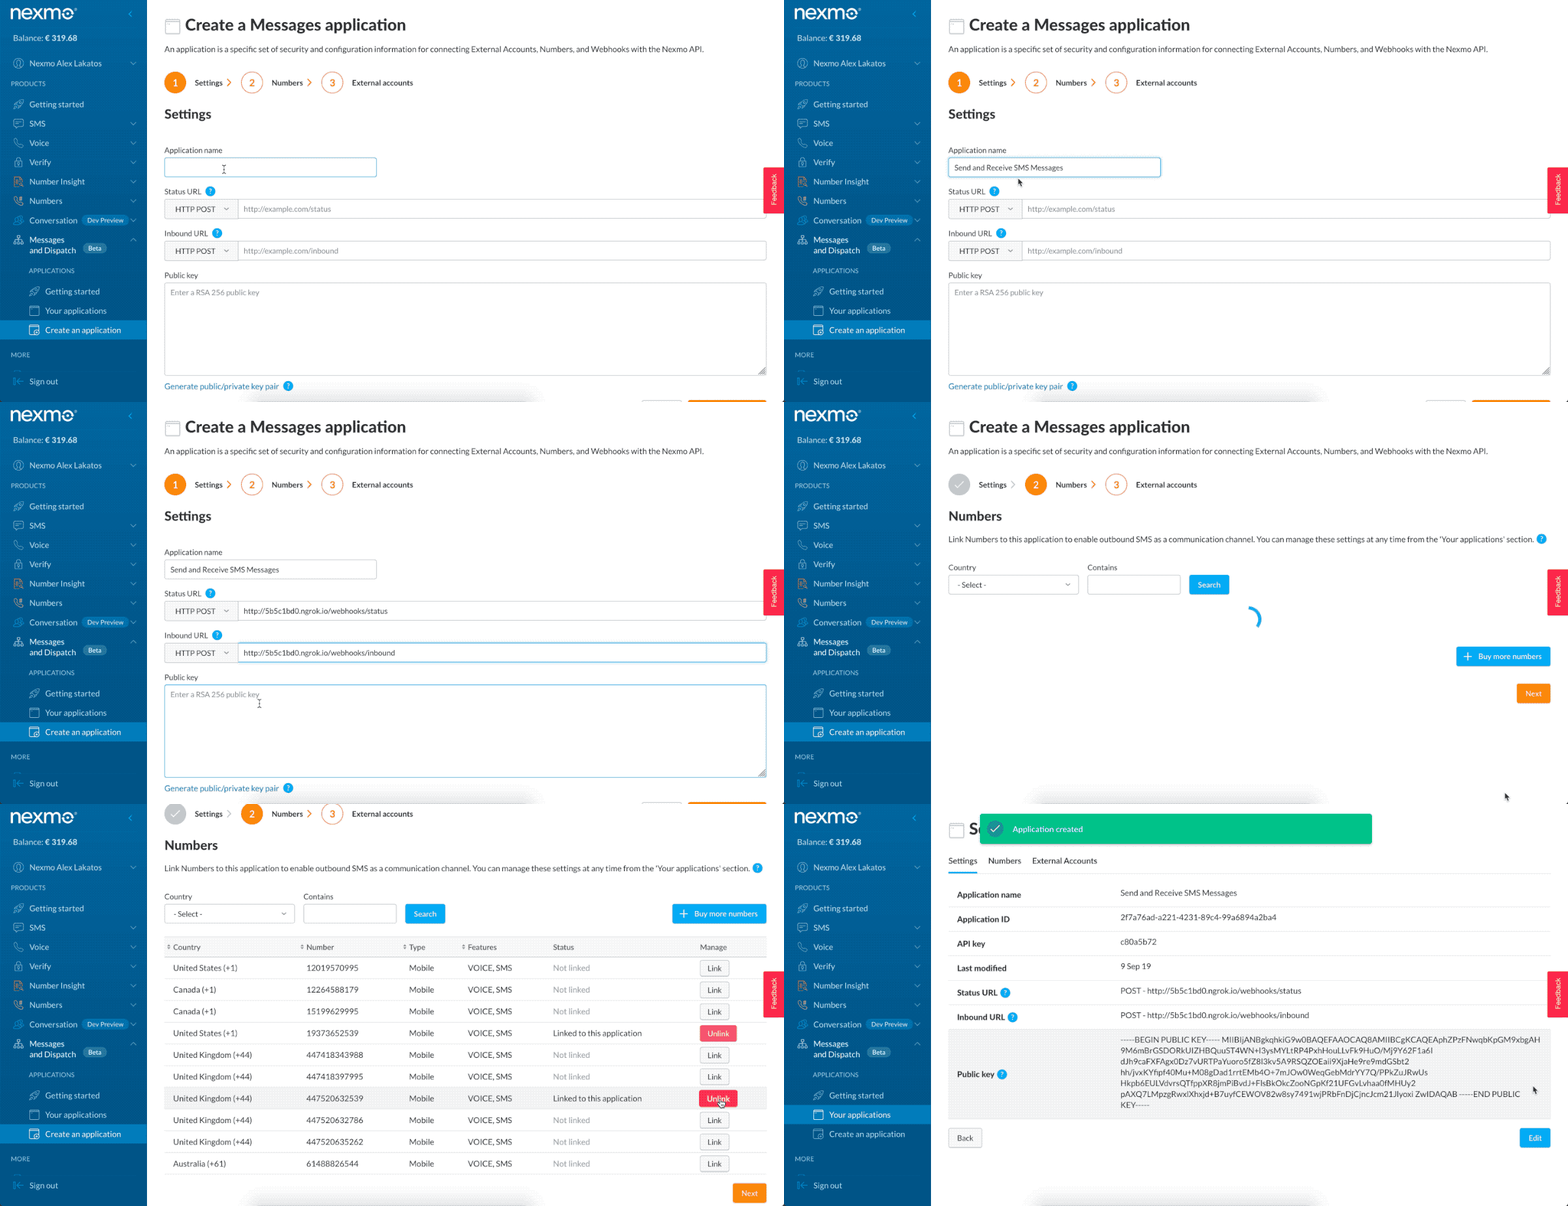
To interact with the Messages API, we’ll need to create a messages application on the Nexmo platform to authenticate our requests. Think of applications more like containers, metadata to group all your data on the Nexmo platform. We’ll create one using the Nexmo Dashboard, and that needs a name, and inbound URL and a status URL.
We’ll also save a keyfile on disk. Applications work on a public / private key system, so when you create an application, a public key is generated and kept with Nexmo, and a private key is generated, not kept with Nexmo, and returned to you via the creation of the application. We’ll use the private key to authenticate our library calls later on.
Use the ngrok URL you got in the previous step and fill in the fields, appending /webhooks/status and /webhooks/inbound, for the respective fields. When a message is coming to the Messages API, the data about the message is sent to the inbound URL. When you send a message with the API, the data about the message status gets sent to the status URL.

Initialize Dependencies
Let’s replace the contents of the file we created earlier. We need to initialize the Nexmo node library we installed earlier, in the index.js file you created:
const Nexmo = require('nexmo')

const nexmo = new Nexmo({
  apiKey: NEXMO_API_KEY,
  apiSecret: NEXMO_API_SECRET,
  applicationId: NEXMO_APPLICATION_ID,
  privateKey: NEXMO_APPLICATION_PRIVATE_KEY_PATH
})
Replace the values in there with your actual API key and secret, the application id for the application you just created earlier, and the path to the private key you saved.
Send the Same SMS Message
In order to send an SMS message with the Messages API, we’ll use the nexmo.channel.send method from the beta version of the Nexmo node library. The method accepts objects as parameters, with information about the recipient, sender, and content. They vary for the different channels.
For SMS, the type of recipient and sender is sms, and the object has to contain a number property as well. The content object accepts a type of text and a text message. The callback returns an error and response object, and we’ll log messages about the success or failure of the operation.
let text = "Hello from Nexmo";

nexmo.channel.send(
  { "type": "sms", "number": "TO_NUMBER" },
  { "type": "sms", "number": "Nexmo" },
  {
    "content": {
      "type": "text",
      "text": text
    }
  },
  (err, responseData) => {
    if (err) {
      console.log("Message failed with error:", err);
    } else {
      console.log(`Message ${responseData.message_uuid} sent successfully.`);
    }
  }
);
You can run the code and receive the SMS message with:
$ node index.js
That’s it, you’ve sent the same SMS message using two different Nexmo APIs. You’ll notice the Messages API is a lot more verbose in usage, while both APIs need just one method to accomplish the same thing.
Receive SMS Messages
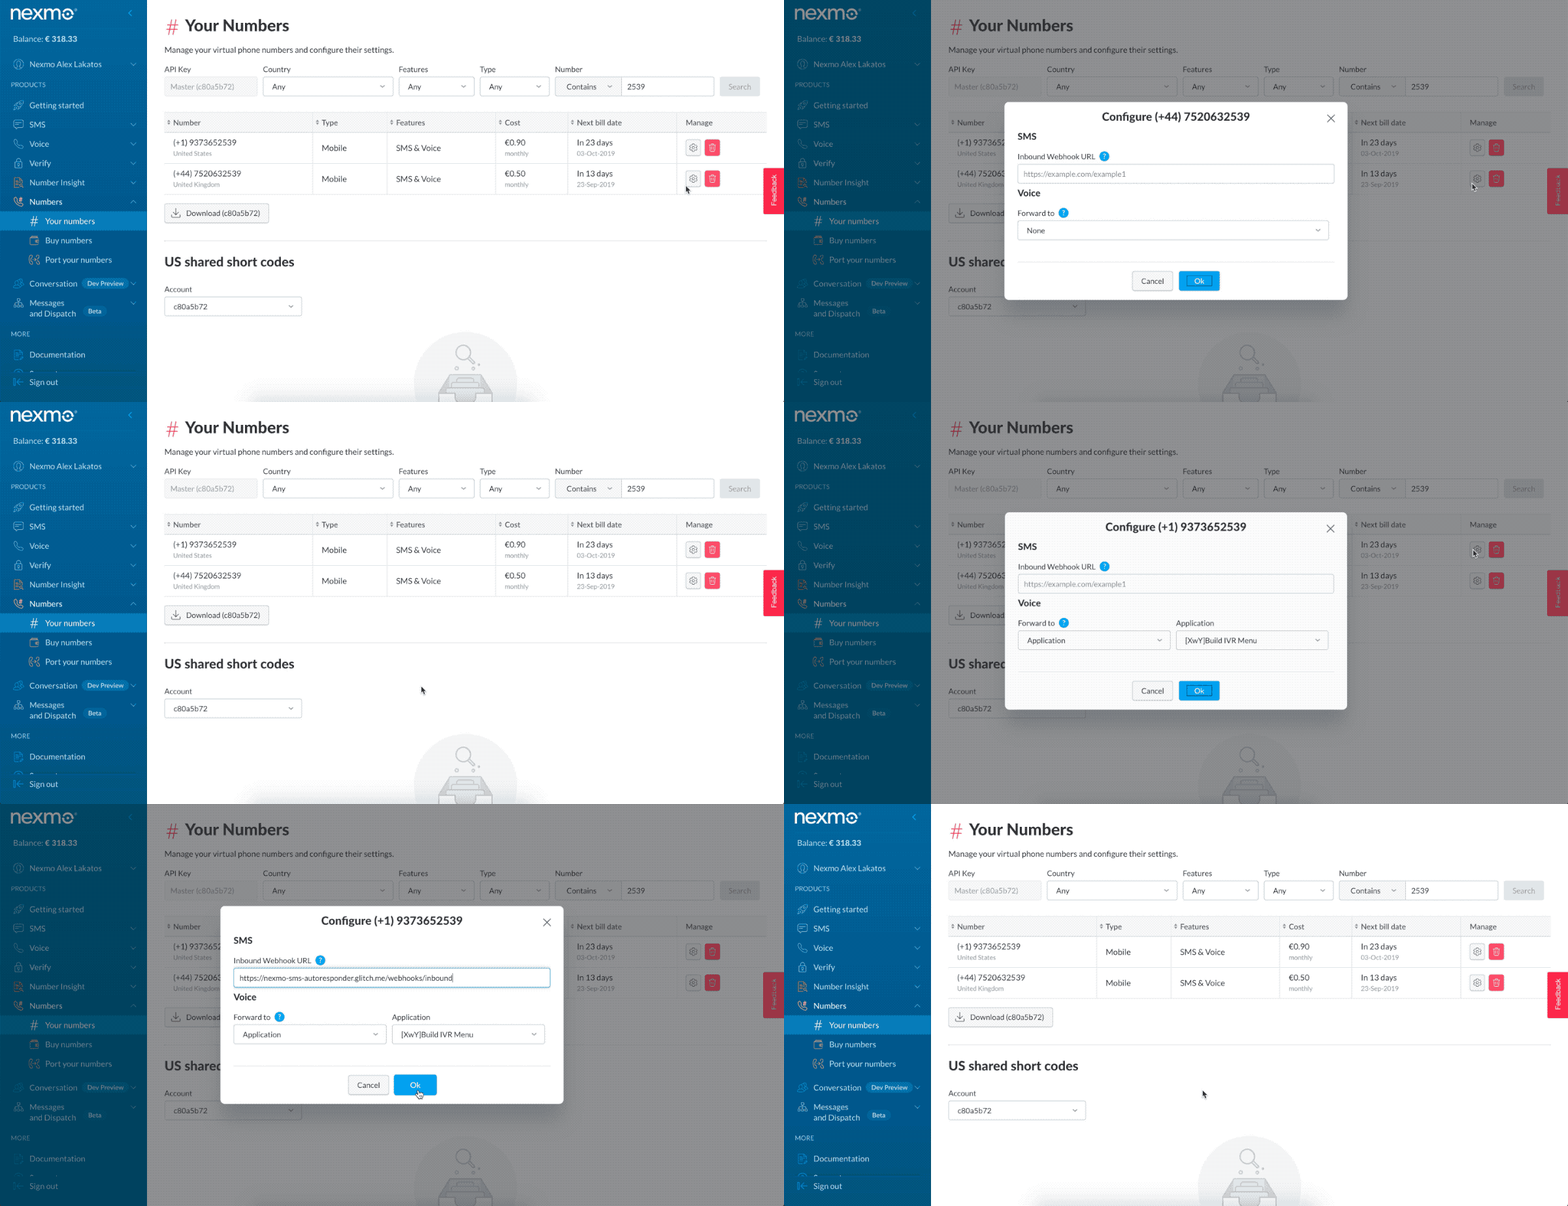
When a Nexmo phone number receives an SMS message, Nexmo will pass that message to a Webhook you have specified in the Nexmo dashboard. In order to set up the webhook URL, go to the little gear icon next to your phone numbers in the Nexmo Dashboard and fill in the “Inbound Webhook URL” field with YOUR_NGROK_URL/webhooks/inbound. Don’t forget to replace your actual ngrok URL.

Create a Web Server
We’ll be creating our webserver using express because it’s one of the most popular and easy to use Node.js frameworks for this purpose. We’ll also be looking at the request bodies for the inbound URL, so we’ll need to install body-parser as well as express from npm.
$ npm install express body-parser
Let’s create a new file for this, call it server.js:
$ touch server.js
We’ll create a basic express application, that uses the JSON parser from bodyParser and sets the urlencoded option to true. Let’s fill out the server.js file we created. We’ll use the port 3000 for the server to listen to, we already have ngrok running on port 3000.
const app = require('express')()
const bodyParser = require('body-parser')

app.use(bodyParser.json())
app.use(bodyParser.urlencoded({ extended: true }))

app.listen(3000)
Create Webhook for the Inbound URL
For the inbound URL, we’re going to create a post handler for /webhooks/inbound, and we’ll just log the request body to the console. Because Nexmo has a retry mechanism, it’s going to keep resending the message if the URL doesn’t respond with 200 OK, so we’ll send back a 200 status.
app.post('/webhooks/inbound-message', (req, res) => {
  console.log(req.body);

  res.status(200).end();
});
You can run the code with:
$ node server.js
Try It Out
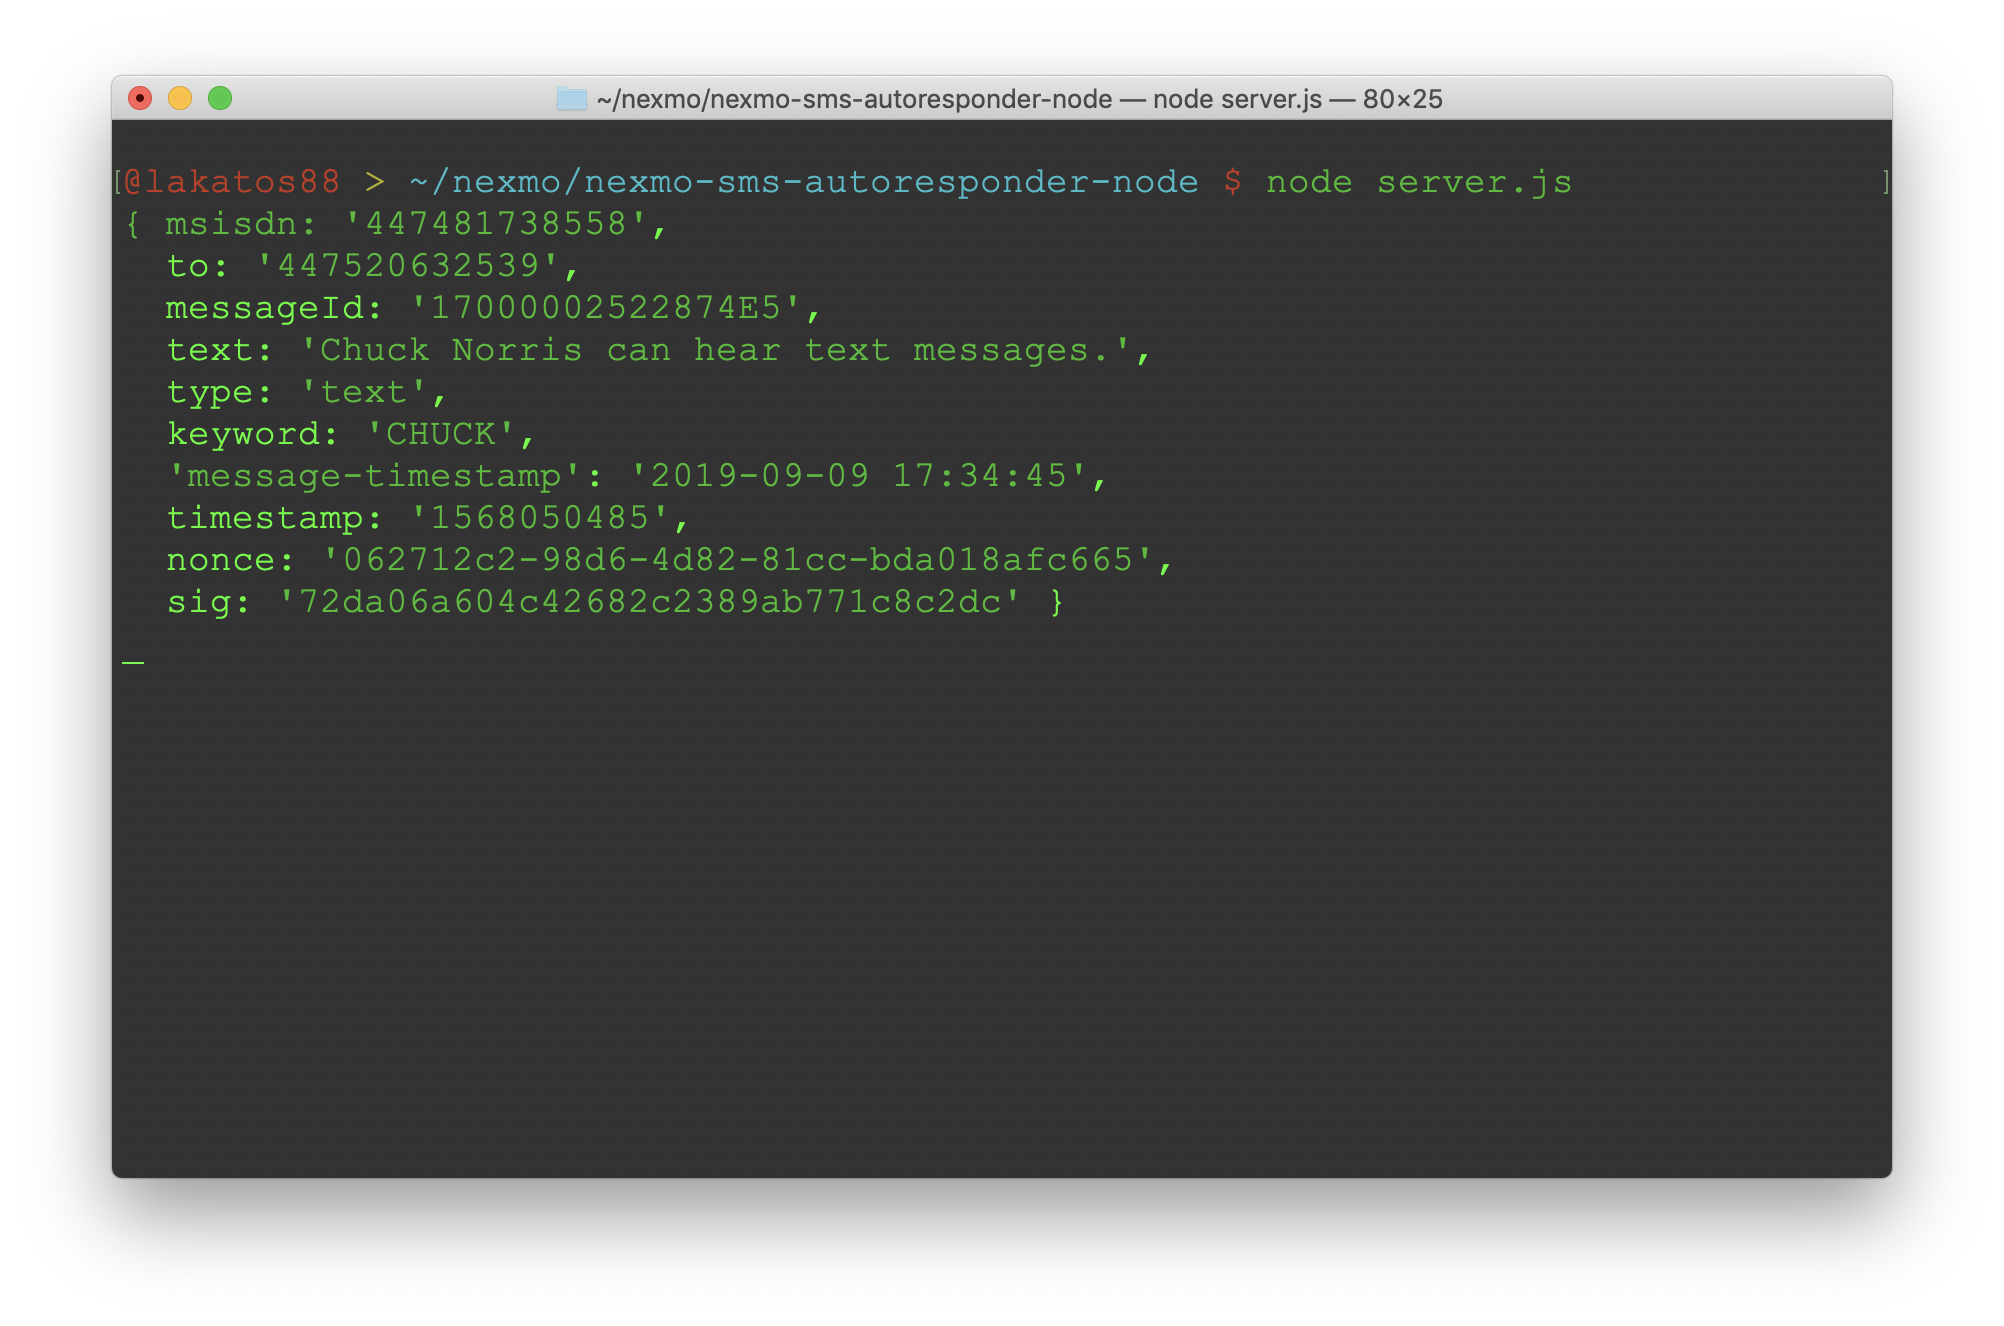
Now send an SMS message from your phone to your Nexmo number. You should see the message being logged in the terminal window where you ran the code. It looks similar to this:

I hope it worked and you’ve just learned how to send and receive SMS messages with the Nexmo APIs and Node.js.
Thank you for reading !
#Nodejs #Expressjs #Javascript #Es6 #SMS
