To begin with, we will start with the introduction and installation of Redis on an Ubuntu machine. Then we will move towards the benchmarking between these two.
Introduction to Redis
According to the official website, Redis is an open source (BSD licensed), in-memory data structure store that’s used as a database, cache, and message broker. Actually, Redis is an advanced key-value store. It is super fast with amazingly high throughput as it can perform approximately 110000 SETs per second, about 81000 GETs per second. It also supports a very rich set of data types to store. As a matter of fact, Redis keeps the data in-memory every time but is also a persistent on-disk database. So, it comes with a trade-off: Amazing speed with the size limit on datasets (as per memory). In this article, to have some benchmarks in comparison to MySQL, we would be using Redis as a caching engine only.
Prerequisites
- PHP installed/configured on your machine, if not, go here: How To Install PHP on Ubuntu 16.04
- MySQL installed/configured on your machine, if not, go here: How To Install MySQL on Ubuntu 16.04
Installation of Redis on Ubuntu
In this section, we will be discussing the steps required to install/configure Redis on an Ubuntu machine. Here is the approach for this:
Installation and Configuration of Redis on Ubuntu
To start with, run the following commands:
sudo apt update sudo apt install redis-server
These commands will update the proper package and install Redis on your Ubuntu machine.
Now, as a matter of fact, to enable Redis to be used as a Service, you need to configure it by updating the supervised directive present inside the configuration file of Redis. You can easily find the configuration file here:
sudo vi /etc/redis/redis.conf
By default, the supervised directive is set to “no.” You need to set it to: systemd . After updating, this section of the configuration file will look something like this:
################################# GENERAL ##################################### # By default Redis does not run as a daemon. Use 'yes' if you need it. # Note that Redis will write a pid file in /var/run/redis.pid when daemonized. daemonize yes # If you run Redis from upstart or systemd, Redis can interact with your # supervision tree. Options: # supervised no - no supervision interaction # supervised upstart - signal upstart by putting Redis into SIGSTOP mode # supervised systemd - signal systemd by writing READY=1 to $NOTIFY_SOCKET # supervised auto - detect upstart or systemd method based on # UPSTART_JOB or NOTIFY_SOCKET environment variables # Note: these supervision methods only signal "process is ready." # They do not enable continuous liveness pings back to your supervisor. supervised systemd # If a pid file is specified, Redis writes it where specified at startup # and removes it at exit. # # When the server runs non daemonized, no pid file is created if none is # specified in the configuration. When the server is daemonized, the pid file # is used even if not specified, defaulting to "/var/run/redis.pid". # # Creating a pid file is best effort: if Redis is not able to create it # nothing bad happens, the server will start and run normally. pidfile /var/run/redis/redis-server.pid # Specify the server verbosity level. # This can be one of: # debug (a lot of information, useful for development/testing) # verbose (many rarely useful info, but not a mess like the debug level) # notice (moderately verbose, what you want in production probably)
Save this file and, to have the changes reflected on Redis, restart the Redis Service by using the following command:
sudo systemctl restart redis.service
Enabling Password Authentication
Configuring Redis with password authentication is not mandatory, but it is super important (and easy, too) as it enables better security for your Redis instance. Configuring our Redis server with the password is super easy and can be done through the same configuration file as mentioned above. So, open the configuration file and look for the requirepassdirective. You would that line is commented by default, just uncomment it and enter your password there. The configuration file should look similar to this:
# Require clients to issue AUTH <PASSWORD> before processing any other # commands. This might be useful in environments in which you do not trust # others with access to the host running redis-server. # # This should stay commented out for backward compatibility and because most # people do not need auth (e.g. they run their own servers). # # Warning: since Redis is pretty fast an outside user can try up to # 150k passwords per second against a good box. This means that you should # use a very strong password otherwise it will be very easy to break. requirepass yourpasswordhere # Command renaming. # # It is possible to change the name of dangerous commands in a shared # environment. For instance the CONFIG command may be renamed into something # hard to guess so that it will still be available for internal-use tools # but not available for general clients. # # Example: # # rename-command CONFIG b840fc02d524045429941cc15f59e41cb7be6c52
Save this file and, to have the changes reflected on Redis, restart the Redis Service by using the following command:
sudo systemctl restart redis.service
Installation of PHPRedis on Ubuntu
Now, to enable your PHP code to use Redis as a service:
- Run the following command to install PHPRedis extension:
sudo apt-get install php-redis
- Add the following line to your php.ini file:
extension=redis.so
Workflow
- With MySQL only:
- Randomly generate a key between [1, 10000] and search for that key in a MySQL database.
- Take a note of the amount of time it takes to do so.
- Take samples to see how long it takes to process n number of such requests while increasing n gradually as 1, 10, 100, 1000, 10000, 100000, 1000000, 1000000.
- With MySQL and Redis:
- Randomly generate a key between [1, 10000].
- Check if that key is already present/stored on our Redis instance.
- If it is present on Redis, we will not hit a MySQL DB.
- If it is not present on Redis, we will search for that key on our MySQL database and store that key to Redis.
- Take a note of the amount time it has taken to do so.
- Take samples to see how long it takes to process n number of such requests while increasing n gradually as 1, 10, 100, 1000, 10000, 100000, 1000000, 1000000.
Source Code
MySQL Only Source Code
(When we try to fetch a key from MySQL only)
<?php $con = mysqli_connect("localhost","root","admin","blog_db"); for($i = 1; $i <= 10000000; $i = $i *10) { $startTime = microtime(true); for($j = 1; $j <= $i; $j++) { $rand = rand(1, 100000); $sql = "SELECT VALUE from data WHERE `key` = $rand"; if (!mysqli_query($con, $sql)) { echo "Error: " . $sql . "" . mysqli_error($con); } } $endTime = microtime(true); file_put_contents('/home/ayush/Desktop/temp/blog/mysqlonly.log', $i . ',' . ($endTime - $startTime) . "\n" , FILE_APPEND); }
MySQL and Redis Source Code
(When we try to fetch a key from Redis first and then from MySQL if we are unable to find that key on Redis)
<?php $con = mysqli_connect("localhost","root","admin","blog_db"); $client = new Redis(); $client->connect('localhost'); for($i = 1; $i <= 10000000; $i = $i *10) { $startTime = microtime(true); for($j = 1; $j <= $i; $j++) { $rand = rand(1, 100000); if(!$client->exists($rand)) { $client->set($rand, $rand); $sql = "SELECT VALUE from data WHERE `key` = $rand"; if (!mysqli_query($con, $sql)) { echo "Error: " . $sql . "" . mysqli_error($con); } } } $endTime = microtime(true); file_put_contents('/home/ayush/Desktop/temp/blog/redis.log', $i . ',' . ($endTime - $startTime) . "\n" , FILE_APPEND); $client->flushAll(); }
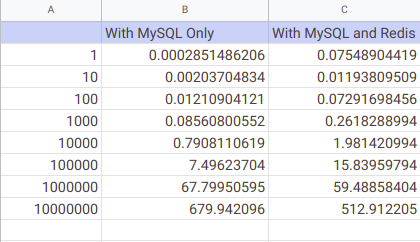
BenchMarks
Tabular Data
Graphical Representation

Conclusion
As it can be easily seen from graphical representation given above, as the number of requests increases significantly, Redis starts outperforming by a significant margin. Hence, using a caching engine like Redis along with your database is a good idea if the number of requests processed is huge.
References
- Redis Official Website: Redis.io
- Redis Installation Guide: How To Install and Secure Redis on Ubuntu 18.04
#database #redis #mysql