Originally published at techiediaries.com on 16 Jun 2019
For quickly initializing our Spring Boot application, we'll use Spring Initializr.
In our example, we'll be using Spring MVC and an embedded Tomcat server to serve our application locally by inlcuding the Spring Web Starter as a dependency of our project.
Spring is an open source Java EE (Enterprise Edition) framework that makes developing Java EE applications less complex by providing support for a comprehensive infrastructure and allowing developers to build their applications from Plain Old Java Objects or POJOS. Spring relieves you from directly dealing with the underlying and complex APIs such as transaction, remote, JMX and JMS APIs.
Spring framework provides Dependency Injection and Inversion of Control out of the box which helps you avoid the complexities of managing objects in your application.
As of Spring Framework 5.1, Spring requires JDK 8+ (Java SE 8+) and provides out of the box support for JDK 11 LTS.
Spring Boot allows you to quickly get up and running with Spring framework. It provides an opinionated approach build a Spring application.
Prerequisites
You will need a bunch of prerequisites to successfully follow this tutorial and build your web application:
- Java 11+ installed on your system. If you are using Ubuntu, check out this post for how to install Java 11 on Ubuntu,
- Gradle 4.10+,
- NetBeans 11,
- Working knowledge of Java.
Initializing a Spring 5 Project
Let's now start by creating a Spring 5 project. We'll make use of the official Spring Initializr generator via its web interface.
Note: You can also use the Spring Initializr generator as a CLI tool. Check out all the ways you can use it from this link.
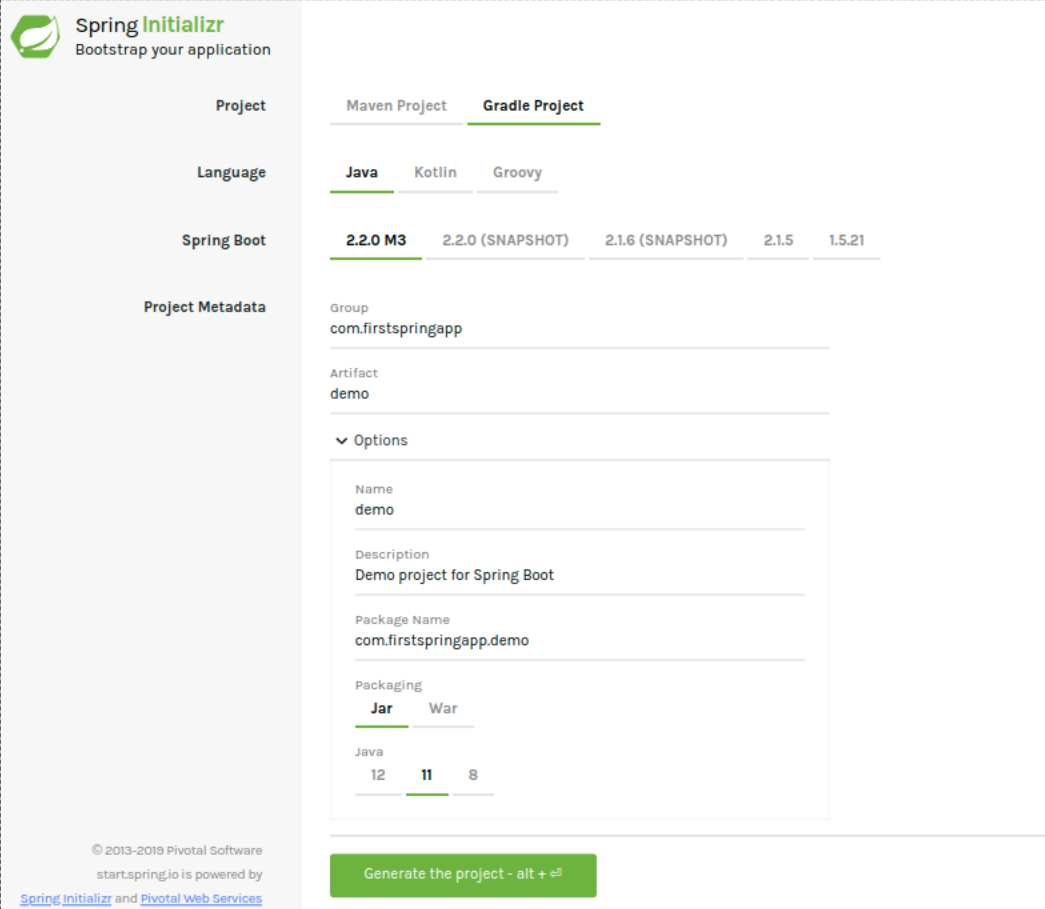
Head to the web UI of Spring Initializr and let's bootstrap our application. You'll be presented with the following interface for choosing various configuration options:

- For Project, select Gradle Project,
- For Language, select Java,
- For Spring Boot, select 2.2.0 M3,
- Under Options, make sure to select at least Java 11.
You can also seed your project with any needed dependencies under Dependencies. You can search for a dependency or select it from a list.
We'll add the Spring Web Starter dependency which includes Spring MVC and Tomcat as the default embedded container. This will allow us to serve our Spring 5 web application using the Tomcat server.

Spring Boot starters help you quickly create Spring Boot projects without going through tedious dependency management.
If you want to build a REST API web app, you would need to add various dependencies such as Spring MVC, Tomcat and Jackson. A starter allows you to add a single dependency instead of manually adding all these required dependencies. In this example, we added the Web starter (spring-boot-starter-web) via the UI.
You can find the list of available starters from this link.
Fill in the other Project Metadata and click on Generate the project.
Once you click on the Generate the project button, your project will be downloaded as a zip file. Open the file and extract it in your working folder.

Open your favorite Java IDE. I'll be using Netbeans 11. If this is your first time using Netbeans, you'll be asked to download some dependencies like nbjavac and Gradle 4.10.2 (As the time of this writing) since our Spring 5 project is using this version of Gradle which is not installed on our system.
In the files pane of the IDE, let's browse to the src/main/java/com/firstspringapp/demo/DemoApplication.java file:

Note: The path and name of the bootstrapping file may be different for you depending on your chosen Package and Artifact names when you initialized the project.
Our Spring 5 application is bootstrapped from the DemoApplication.java file. Let's understand the code in this file:
package com.firstspringapp.demo;import org.springframework.boot.SpringApplication;
import org.springframework.boot.autoconfigure.SpringBootApplication;@SpringBootApplication
public class DemoApplication {public static void main(String[] args) { SpringApplication.run(DemoApplication.class, args); }}
We first import the SpringApplication and SpringBootApplication from their respective packages. Next, we declare a Java class and we annotate it with @SpringBootApplication annotation. In the main() method of our class, we call the Spring Boot’s run() method from SpringApplication to launch our Spring 5 application.
@SpringBootApplication is a shorthand annotation that calls all the following annotations:
@Configuration: makes the class, a source of bean definitions for the application context.@EnableAutoConfiguration: this annotation configures Spring Boot to add beans based on classpath settings and any property settings.@EnableWebMvc: typically, you would need to add the@EnableWebMvcannotation for a Spring MVC app, but Spring Boot adds it automatically when it findsspring-webmvcon the classpath. This annotates your application as a web application.@ComponentScan: this annotation configures Spring to look for other components in thefirstspringapp.demopackage. In the next section, we’ll see how to add a controller class and Spring will automatically find it without adding any extra configuration.
Serving our Spring 5 Application with the Embedded Tomcat Server
Now, let’s run and serve our Spring web app. In your IDE, use click on the green Run project button or F6 on your keyboard (or also the Run -> Run project menu). This will build (if not already built) and run your project. You should get the following output:

From the output window, we can see that our project is using Oracle Java 11 (In the JAVA_HOME variable).
You can see that the IDE has navigated to our project’s folder and executed the ./gradlew --configure-on-demand -x check bootRun command to run our web application which has executed many tasks between them bootRun.
According to the official docs:
The Spring Boot Gradle plugin also includes abootRuntask that can be used to run your application in an exploded form. ThebootRuntask is added whenever you apply theorg.springframework.bootandjavaplugins.
From the output, you also see that our web application is served locally using the embedded TomcatWebServer on the 8080 port:

This is because we’ve added the Spring Web Starter dependency when initializing our project (If your project’s classpath contains the classes necessary for starting a web server, Spring Boot will automatically launch it.) See Embedded Web Servers for more information.
Our web application is running at http://localhost:8080. At this point, if you visit this address with your web browser, you should see the following page:
 We are getting the Whitelable Error Page because at this point, we don’t have any REST controllers mapped to the “/” path. Let’s change that!
Creating our First Spring 5 REST Controller
Let’s now create our first REST controller with Spring. In the src/main/java/com/firstspringapp/demofolder, create a new Java file (you can call it FirstController.java) and add the following code:
package com.springfirstapp.demo;import org.springframework.web.bind.annotation.RestController;
import org.springframework.web.bind.annotation.RequestMapping;@RestController
public class FirstController {@RequestMapping("/") public String index() { return "Hello Spring Boot!"; }}
This is simply a Java class, annotated with @RestController, which makes it ready for use by Spring MVC to handle HTTP requests.
We added an index() method (You can actually call it whatever you want) annotated with @RequestMapping to map the / path to the index() method.
The @RequestMapping annotation provides is used to add routing. It tells Spring that the index() method should be called when an HTTP request is sent from the client to the / path.
When you visit the / path with a browser, the method returns the Hello Spring Boot! text.
Note:@RestControllercombines the@Controllerand@ResponseBodyannotations used when you want to return data rather than a view from an HTTP request.
The@RestControllerand@RequestMappingannotations are actually Spring MVC annotations. (i.e they are not specific to Spring Boot). Please refer to the MVC section in the official Spring docs for more information.
Now stop and run your project again and go to the http://localhost:8080/ address with your web browser, you should see a blank page with the Hello Spring Boot! text. Congratulations! You have created your first controller.
Originally published at techiediaries.com on 16 Jun 2019
=====================================================================
Thanks for reading :heart: If you liked this post, share it with all of your programming buddies! Follow me on Facebook | Twitter
☞ Java Programming Masterclass for Software Developers
☞ JSP, Servlets and JDBC for Beginners: Build a Database App
☞ Java 8 New Features In Simple Way
☞ Java In-Depth: Become a Complete Java Engineer!
☞ Java Programming for Complete Beginners - Learn in 250 Steps
☞ Learn Java Programming Crash Course
☞ Apache Spark for Java Developers
#java #spring-boot
