Building API’s is super fun! Especially when you can leverage modern technologies such as Koa, GraphQL and MongoDB.
Koa is a Node framework, just like Express is a Node framework. We’ll replace Express with Koa since Koa uses async/await syntax over callbacks.
Getting started
The prerequisites for building our API are the following;
- Node installed
- Text Editor; I pick Visual Studio Code
- Terminal
- Browser
If you have everything you need, please proceed - if not, please install them.
Open your terminal and create a node project, like so;
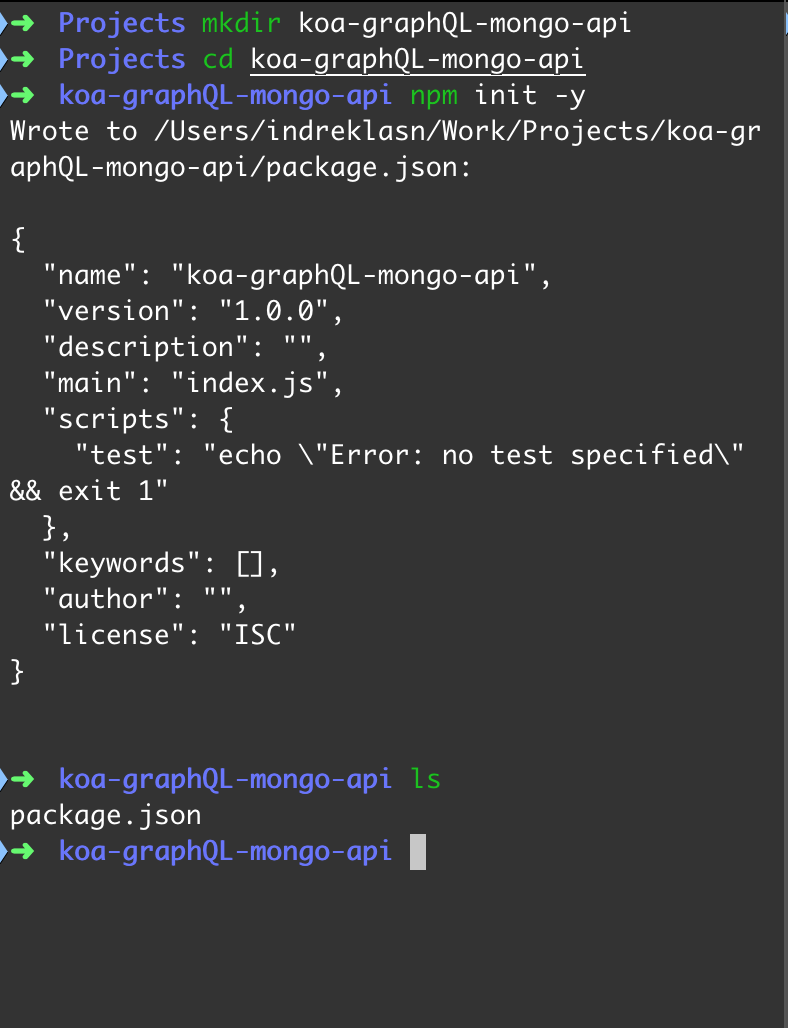
So far we created our project folder, initialized a fresh Node project. Now we have the NPM packages available which we can use to install Koa, Mongo, and GraphQL.
Let’s install koa with NPM.
npm i koa
Starting a new Koa server is very simple. All we need is a server.js file and with the contents;
const Koa = require('koa');

const app = new Koa();

app.listen(9000);

app.on('error', err => {
  log.error('server error', err)
});
Starting the project with Node

GraphQL
We need two packages to setup GraphQL with Koa. koa-mount and koa-graphql.
npm i koa-mount koa-graphql

GraphQL requires we pass our initial schema to the GraphQL server. Let’s create one.
We will place the graphQL schema at graphql/schema.js
const { buildSchema } = require('graphql');

const schema = buildSchema(`
  type Query {
    hello: String
  }
`);

module.exports = schema;
We pass our initial Query to the buildSchema function
Note: Notice how the argument for the buildSchema is a template literal. I encourage you take a look at this article if this is unfamiliar.
And now we can pass the initial schema to our graphql server.
app.use(mount('/graphql', graphqlHTTP({
  schema: schema,
  graphiql: true
})))
Don’t forget to import koa-mount, koa-graphql, and finally the schema.js.
const mount = require('koa-mount');
const graphqlHTTP = require('koa-graphql');
const schema = require('./graphql/schema');
If we head over to localhost:9000/graphql;
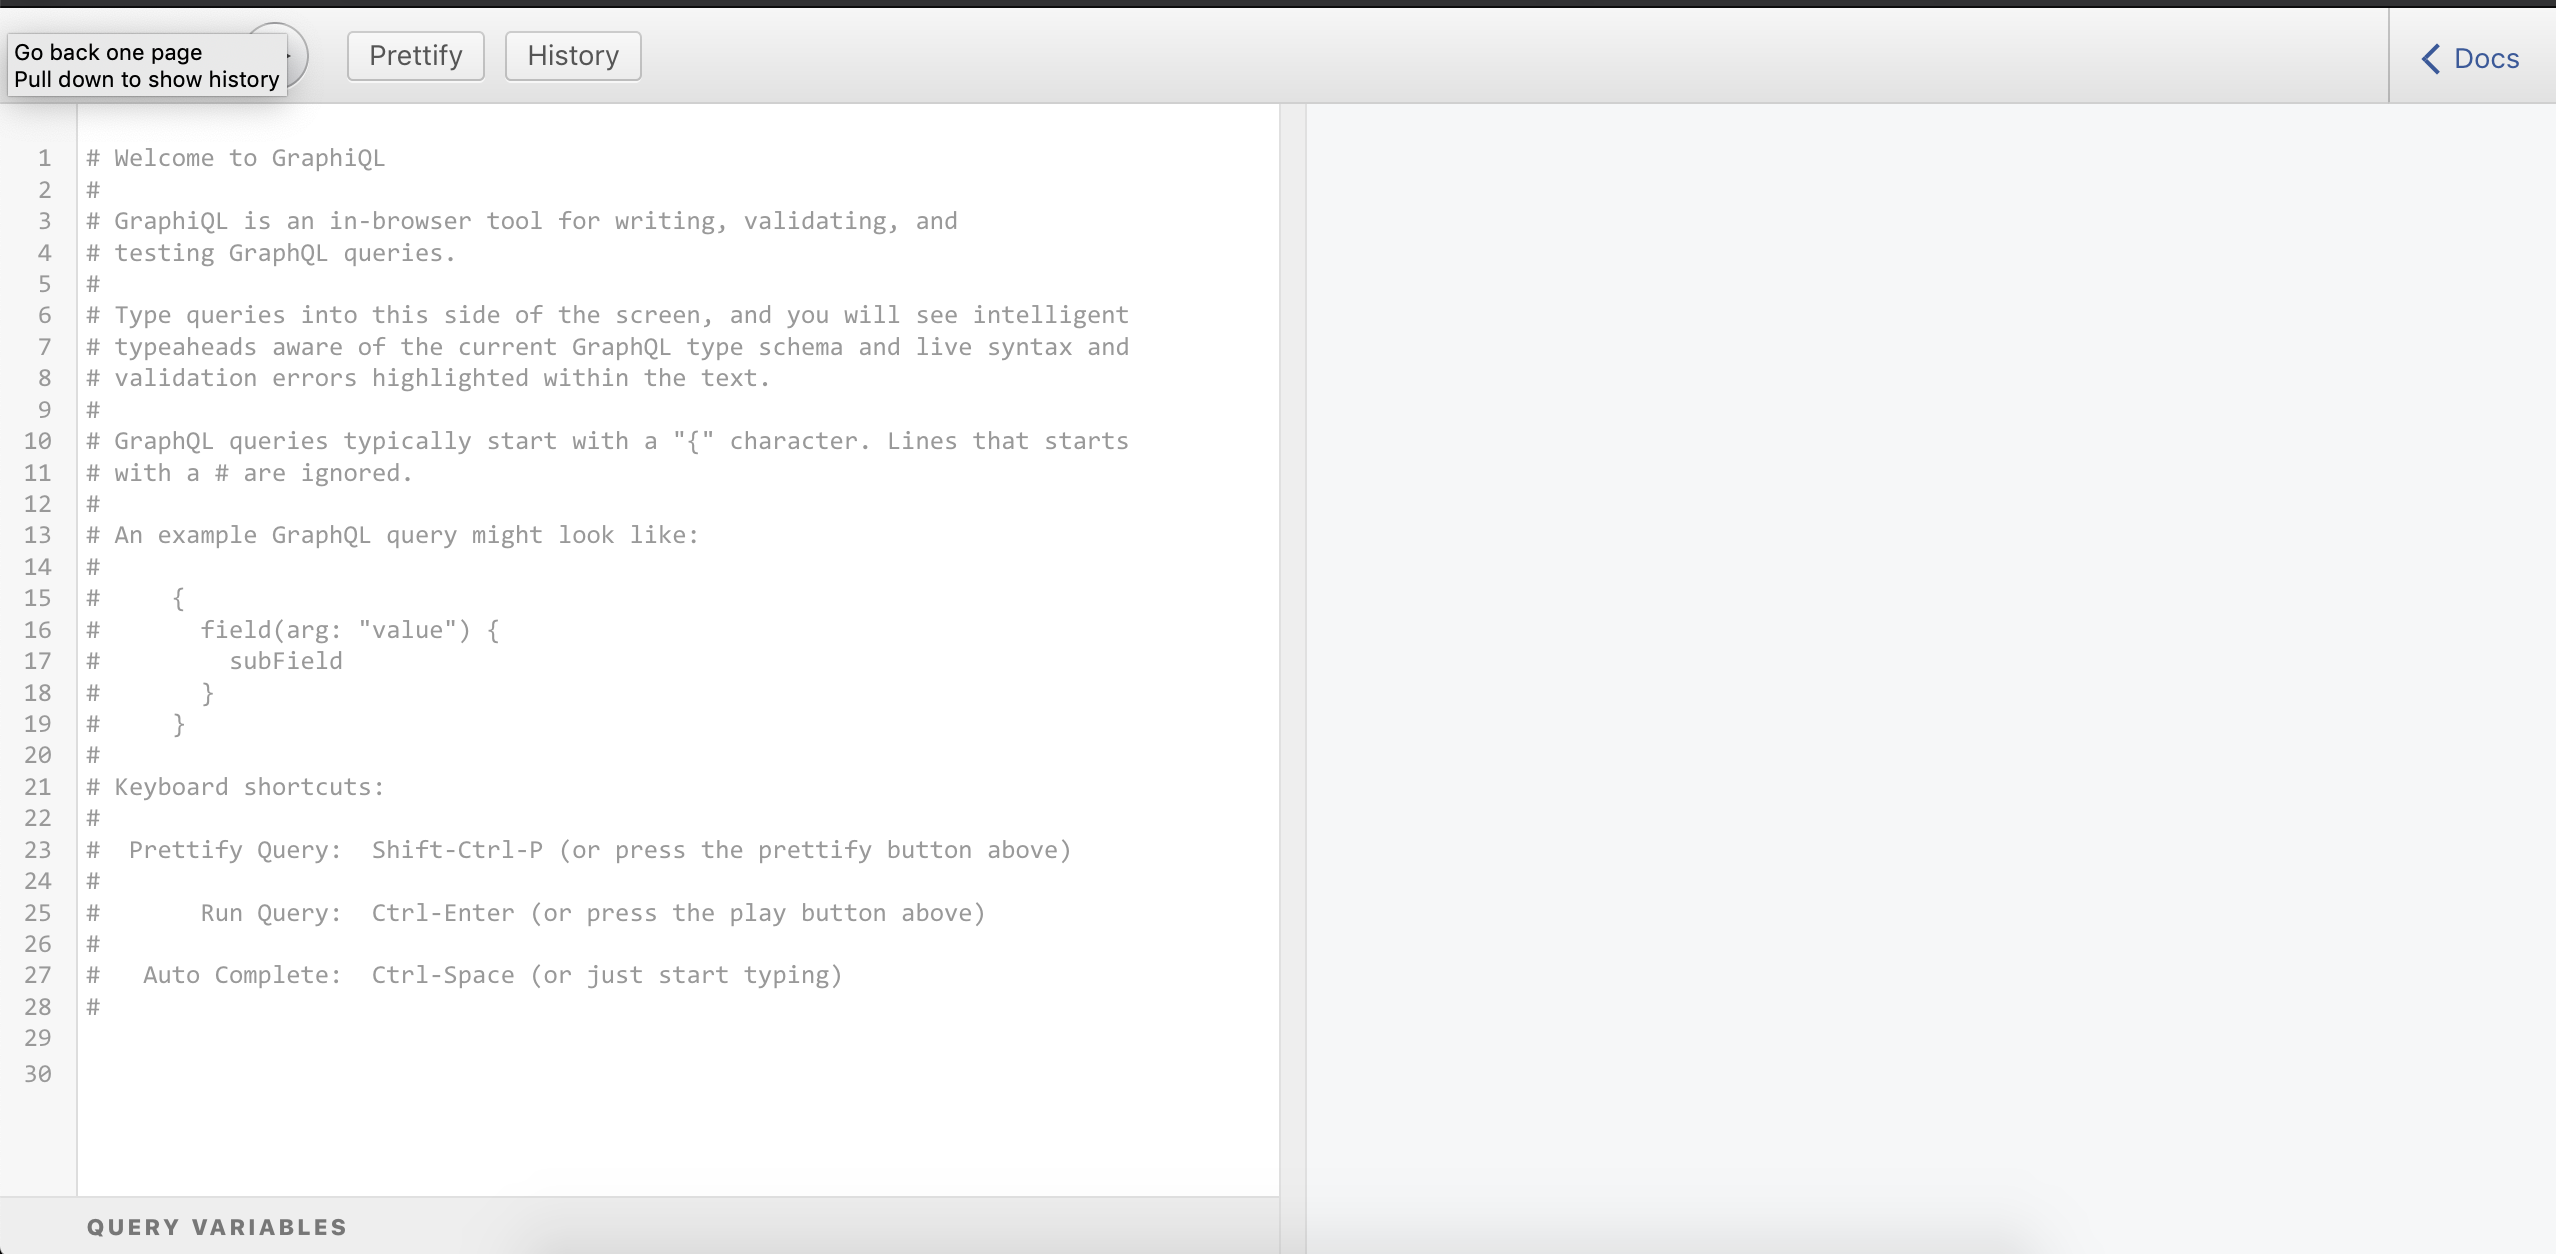
Voila! Initial setup is done. It’s not very useful yet. Ideally, we would like to query GraphQL to save data to our mongodb and read from there.
Setting up MongoDB
In order to read and write with GraphQL, we need a place to read from. This is where Mongo will come in handy. We’ll save and read our data from there.
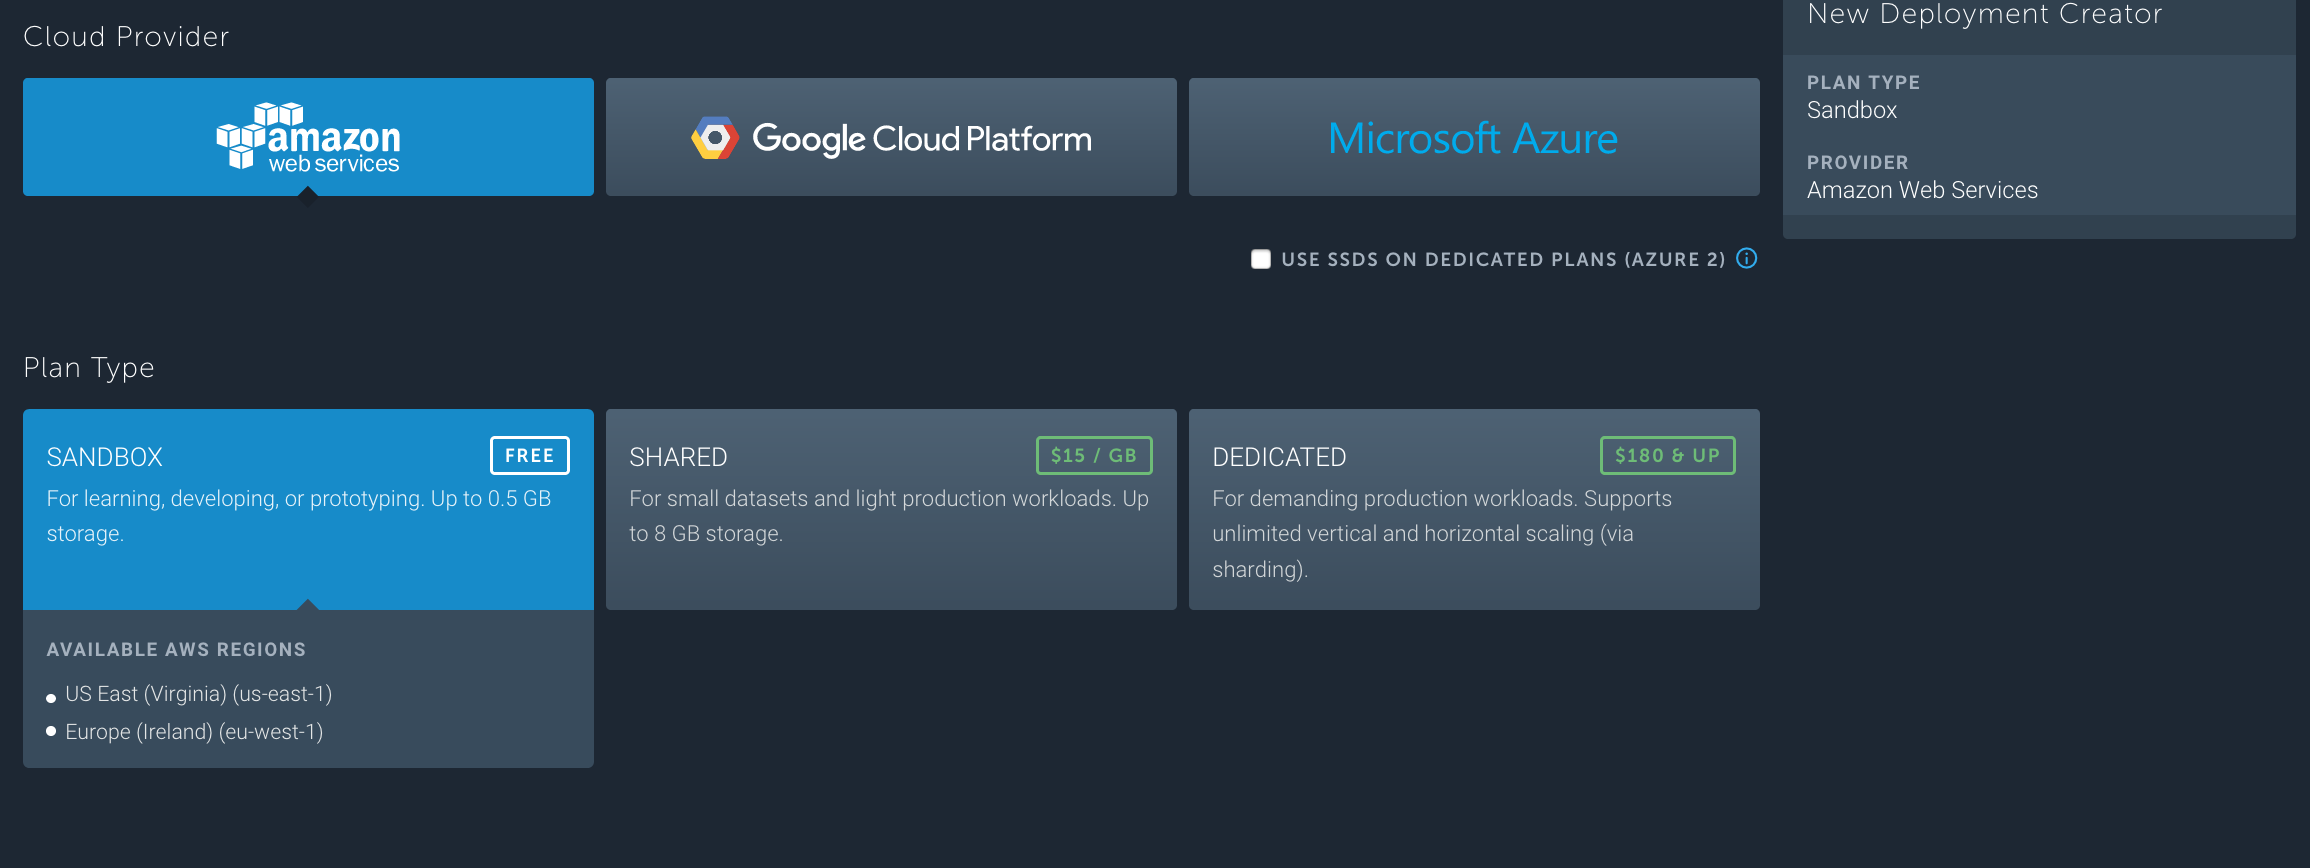
To make things simpler, we’re gonna use a cloud instance for Mongo. Head over to mlab.com and create a user and a mongo database.
Creating mongoDB
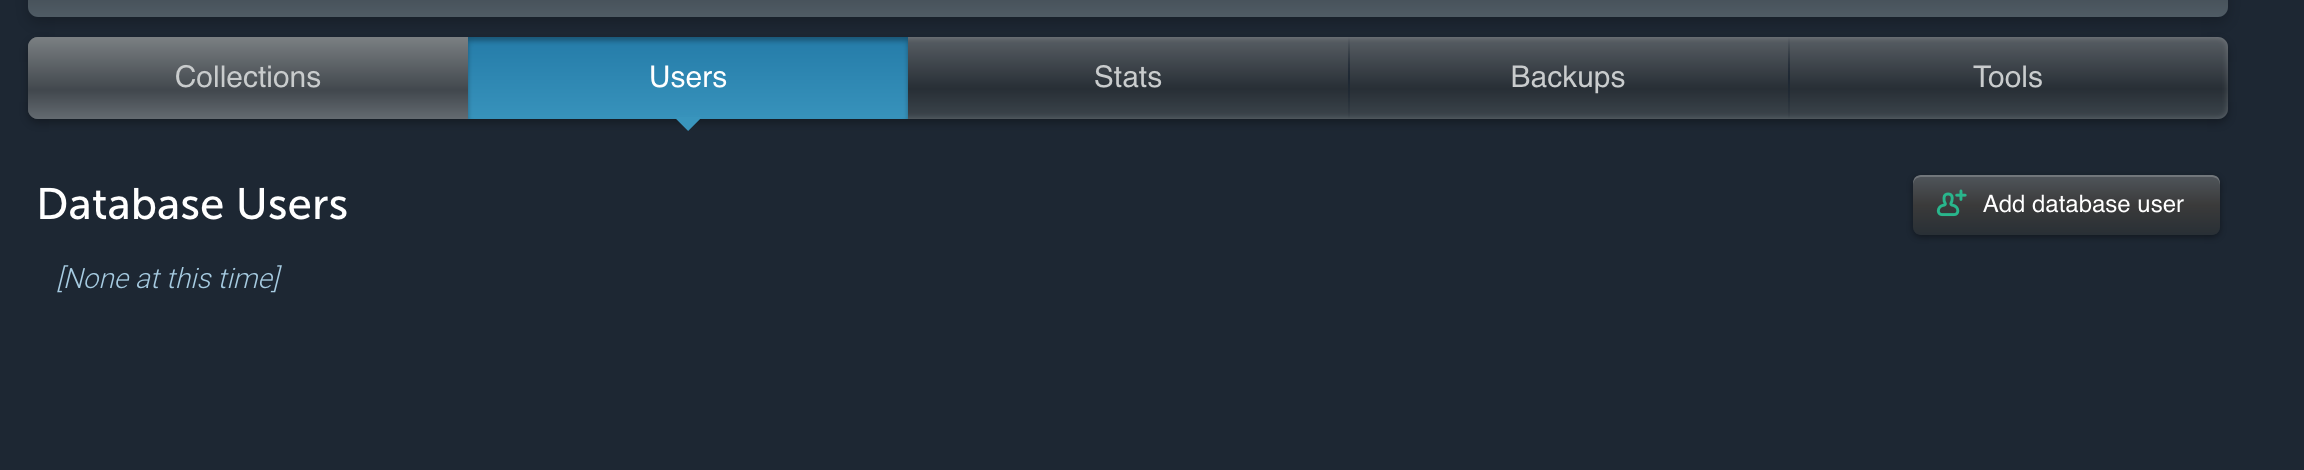
Once you created the database–you’ll need a user for the database.
Creating the MongoDB user
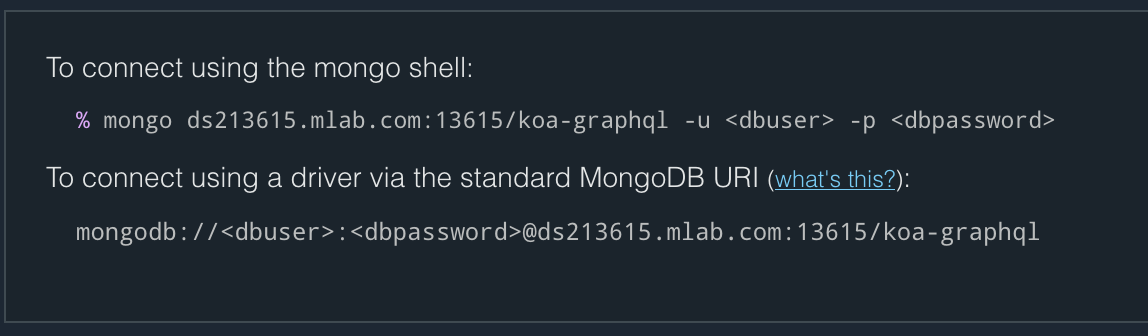
Now you can use the mongoDB paired with Mongoose. The remote url for your database will be;
mongodb://:@ds213615.mlab.com:13615/koa-graphql
Installing mongose
npm i mongoose
Creating database.js file
We create a dedicated file for databse connection.
const mongoose = require('mongoose');

const initDB = () => {

  mongoose.connect(
    'mongodb://indrek:graphql1@ds213615.mlab.com:13615/koa-graphql',
    { useNewUrlParser: true }
  );

  mongoose.connection.once('open', () => {
    console.log('connected to database');
  });

}

module.exports = initDB;
Note: Make sure you use the username and credentials for your database.
This block of code will try to connect to the remote mongodb. We need to call it somewhere now.
Open server.js and require and call the method.
const initDB = require('./database');

initDB();
If we did everything correct, our console should tell us we connected succesfully.

Bravo!
Notice how annoying it is to constantly refresh the server. Let’s solve this with a package called pm2
PM2 is a production process manager for Node.js applications with a built-in load balancer. It allows you to keep applications alive forever, to reload them without downtime and to facilitate common system admin tasks.
npm install pm2 -g
Add a script called start to our package.json
"scripts": {
  "start": "pm2 start server.js"
},
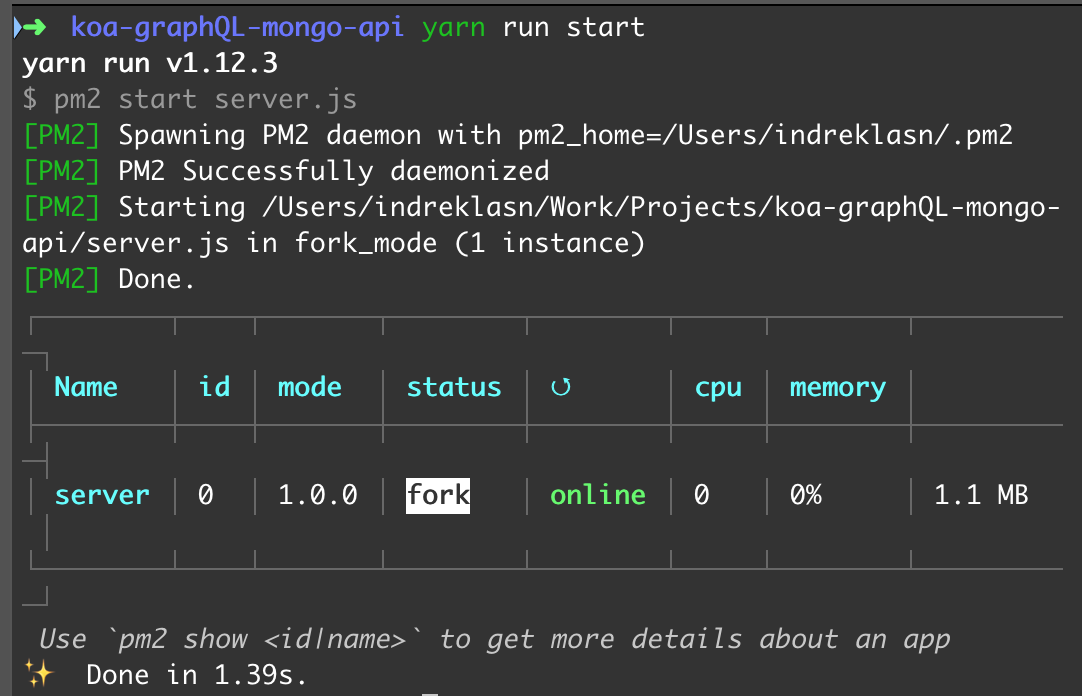
Very lovely for pm2 to run in the background, which frees up our terminal. If you ever want to stop the process, just run pm2 kill. Now we don’t have to restart our server all the time, pm2 does it automatically.
Note: pm2 logs returns the console log statements to the terminal.
MongoDB models
If you ever worked Mongo, you’re aware that mongoDB let’s us creates Models for our data. This is a neat way for us to structure how our data will look like.
Create a folder models and inside a file gadgets.js
const mongoose = require('mongoose');
const Schema = mongoose.Schema;

/*
  notice there is no ID. That's because Mongoose will assign
  an ID by default to all schemas
*/

const GadgetSchema = new Schema({
  name: String,
  release_date: Date,
  by_company: String,
  price: Number,
});

module.exports = mongoose.model('Gadget', GadgetSchema);
Note: There is no ID field in our schema. That’s because Mongoose will assign
an ID by default to all schemas
Great. Let’s also add a collection and some dummy data. The collection name has to map our gadget name in plural. gadgets in this case.

After creating the collection, insert the document in JSON format like so;

That’s all for Mongo. Let’s fetch the data with GraphQL.
GraphQL Queries
GraphQL requires us to create types as well. Think of it like instructions for computers.
graphql/gadgetType.js
const graphql = require('graphql');

const { GraphQLObjectType, GraphQLString } = graphql;

const GadgetType = new GraphQLObjectType({
  name: 'Gadget',
  fields: () => ({

  })
});

module.exports = GadgetType;
Notice we created a graphql type. Inside the fields we can specify the properties of the given type.
const graphql = require('graphql');

const { GraphQLObjectType, GraphQLObjectType } = graphql;

const GadgetType = new GraphQLObjectType({
  name: 'Gadget',
  fields: () => ({
    id: { type: GraphQLString },
    name: { type: GraphQLString },
    release_date: { type: GraphQLString },
    by_company: { type: GraphQLString },
    price: { type: GraphQLString }
  })
});

module.exports = GadgetType;
Notice the GraphQLObjectType and GraphQLObjectType types we deconstruct from graphQL. These are the primitive types for graphQL.
Creating the graphQL types also grants type-hinting which we’ll use when creating our queries.
Last thing we need to do is refactor our schema.js. We want to query a gadget by id.
import the Gadget model,gadgetGraphQLType graphql type and GraphQLSchema, GraphQLObjectType, GraphQLString from graphQL to schema.js.
const { GraphQLSchema, GraphQLObjectType, GraphQLString} = require('graphql');
const gadgetGraphQLType =  require('./gadgetType');
const Gadget = require('../models/gadget');
Next we need a root query. Every graphql query starts with curly brackets {} – this the root query.
const RootQuery = new GraphQLObjectType({
  name: 'RootQueryType',
  fields: {

  }
})
Voila! Inside the fields we can specify the gadget query.
const RootQuery = new GraphQLObjectType({
  name: 'RootQueryType',
  fields: {
    gadget: {
      type: gadgetGraphQLType,
      args: { id: { type: GraphQLString }},
      resolve(parent, args) {
        return Gadget.findById(args.id)
      }
    }
  }
})
Notice the three properties inside the gadget query.
- Node installed
- Text Editor; I pick Visual Studio Code
- Terminal
- Browser
And finally export it.
module.exports = new GraphQLSchema({
  query: RootQuery
});
The file schema.js file should look like this;
const { GraphQLSchema, GraphQLObjectType, GraphQLString} = require('graphql');
const gadgetGraphQLType =  require('./gadgetType');
const Gadget = require('../models/gadget');

const RootQuery = new GraphQLObjectType({
  name: 'RootQueryType',
  fields: {
    gadget: {
      type: gadgetGraphQLType,
      args: { id: { type: GraphQLString }},
      resolve(parent, args) {
        return Gadget.findById(args.id)
      }
    }
  }
})

module.exports = new GraphQLSchema({
  query: RootQuery
});
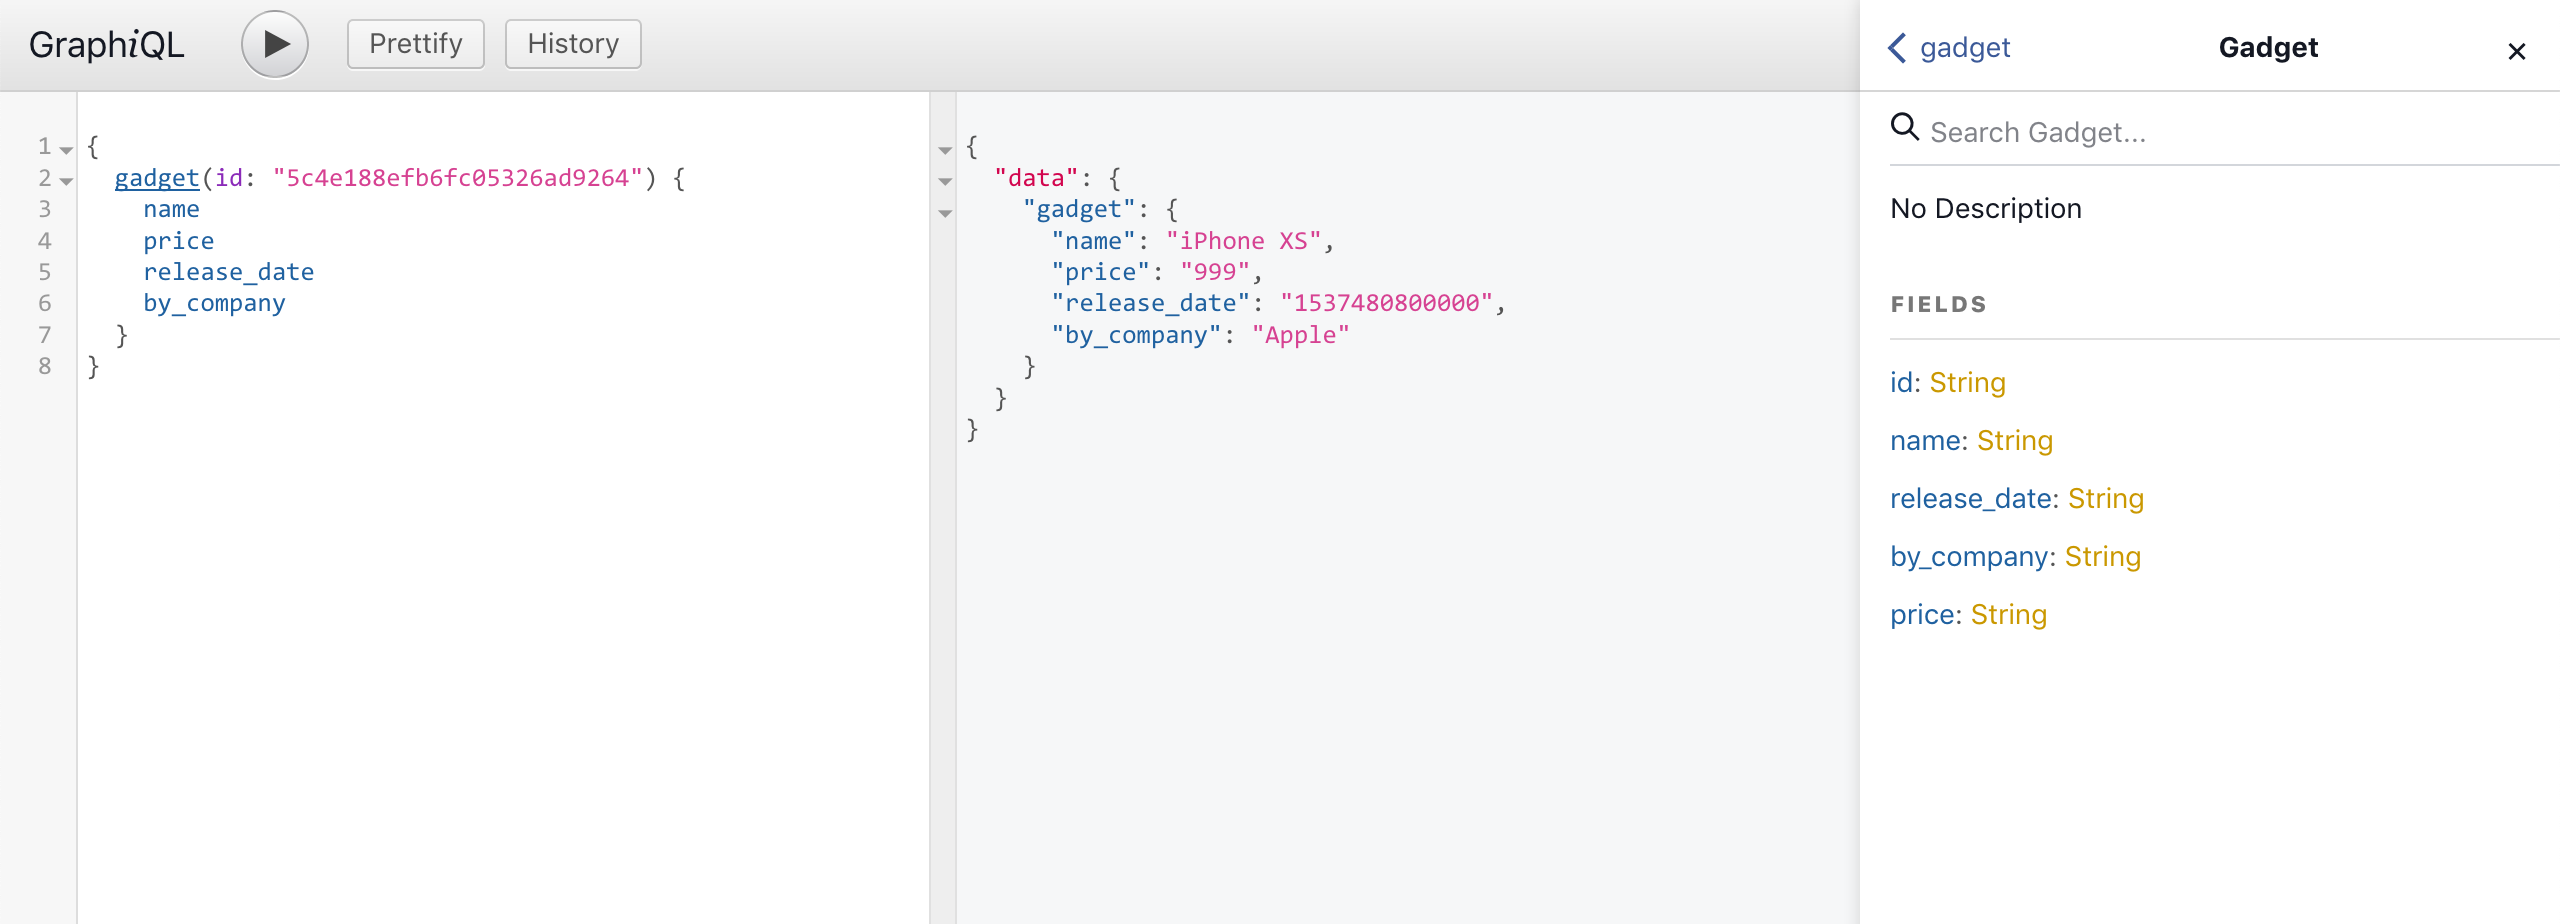
Now head over to http://localhost:9000/graphql and make the query.
{
	gadget(id: "5c4e188efb6fc05326ad9264") {
		name
    price
    by_company
    release_date
    id
  }
}
This it what we should end up with!
Thanks for reading! ❤ The source code can be found here.
#graphql #mongodb #database #api #node-js