Understanding of Basic Data Structures in TypeScript
Basic Data Structures in TypeScript. Queues, stacks, linked lists, and generics
Data structures are a complex topic every programmer must master on their journey to becoming a world-class software developer.
Unfortunately, the average web programmer misses out on the opportunity to learn much about them. In this tutorial, we will explore how to write the three basic data structures one first encounters in a computer science curriculum: linked lists, stacks, and queues.
TypeScript allows us to create data structures in the forms typically seen in traditional, object-oriented programming languages, such as C++, Java, and C#.
These forms are well-known, well-documented, and can be found in any data structures textbook or website.
Prerequisites
You will need a code editor, preferably Visual Studio Code. You will also need to have Node.js and Git installed, and be familiar with the basics of TypeScript
Setup
The starter code is available on GitHub. The completed code is also available on GitHub. Open a terminal window and run the following commands to get the starter code up and running:
git clone git@github.com:richarddprasad/ts-data-struct-starter.git

cd ts-data-struct-starter

npm install

npm start
(after a few seconds) Ctrl+C
npm start
npm runs the start:dev and build:dev scripts in parallel (these can be found in the package.json file).
The first time we run npm start, the code will not have been fully built yet and will crash. This is why we must kill and restart it. Your terminal output should resemble the following:

We can ignore the errors coming from src/queue/queue_examples.ts. They will go away once we implement our first data structure (the queue).
The Basics of a Data Structure
Data structures are all about organizing collections of data in a particular way.
This organization is defined by how we add and remove data. We could dream up hundreds of possible data structures, but there are certain ones that are an essential part of software development: linked lists, stacks, queues, priority queues, hash tables, and binary trees.
Linked lists, stacks, and queues are the most elementary of these data structures.
Basic operations
Data structures differ from each other by the manner in which they organize data. We define the rules for this system of organization by providing a set of special methods:
- An
insertmethod for inserting an item into the data structure. - A
removemethod for removing an item. - An
isEmptymethod to test whether any items are present.
These are generic names. Typically, a particular data structure will have a special name for a given operation. Some data structures will have additional methods that are unique to them.
Queues
Queues are the first data structure we will implement. They are known as first-in, first-out (FIFO) data structures and can be visualized as follows:
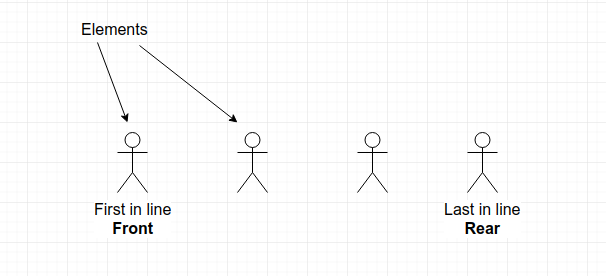
Queue terminology
The beginning of a queue is called the front and the end of it is called the rear.
The first element (i.e., data item) inserted into the queue is the first to be removed, i.e., the element at the front of the queue.
The last element that was inserted is the last to be removed, i.e., the one at the rear of the queue. Any subsequent element inserted into the queue is placed at the rear.
Queue operations
Queues implement the basic operations with the following names:
enqueue: Insert an element at the rear of the queue; this element becomes the new rear.dequeue: Remove the element at the front of the queue; the subsequent element becomes the new front.isEmpty: Check if the queue contains any elements.
Here’s a quick visualization of how a queue operates:

The dequeue operation affects the front of the queue, while the enqueue operation affects the rear.
An example of a queue in the real-world is a grocery checkout line: The first person in line is the first to checkout and the last person is the last to checkout. Checking out from a grocery store is made into an orderly and efficient process thanks to queues.
Operating systems use queues to keep track of each character you type on your keyboard. A network server can store client requests in a queue, responding to each one in the order they came in.
One additional operation common to queues is called peek, though it can also be known by other names:
4. peek: Retrieve the element at the front of the queue without removing it.
Our queue is an array-based implementation, which means it has a finite size. It is also possible to create a list-based implementation, which we will do after we implement a linked list. Since our queue has a size limit, we can test whether or not it is full:
5. isFull: Check to see if our queue contains the maximum amount of items it can hold.
We can also add in a size method to retrieve how many elements are currently in the queue. We will not implement it for our queue, but feel free to do so as an exercise. It’s simply a matter of returning the value of the length property.
Queue implementation
Open the project inside of Visual Studio Code, then open the file src/queue/queue.ts. It will contain the following:
export class Queue {
    // private queue: [];
    private length: number; // number of elements currently in the queue
    private readonly maxSize: number; // maximum number of elements queue can contain

    public constructor(maxSize: number) {
        // Make sure maxSize is at least 1
        this.maxSize = maxSize > 0 ? maxSize : 10;
        this.length = 0;
    }

    public isEmpty() {

    }

    public isFull() {

    }

    public enqueue() {

    }

    public dequeue() {

    }

    public peek() {

    }

    public queueContents(): void {

    }
}
The queue property is currently commented out. We will fix that soon, but first, we need to take a little detour and explore a TypeScript feature called generics.
A Quick Look at Generics
Our queue is storing a collection of elements. We will store these elements in an array (queue). We will specify the maximum number of elements the array can hold (maxSize), and we will keep track of how many elements are currently in the queue (length).
JavaScript arrays can store elements of mixed types, but this is only because JavaScript arrays are not ordinary arrays: they are a special object designed to mimic the functionality of an array.
(JavaScript does provide a means to create arrays that are more conventional in nature. For those who are curious, click see MDN docs.
In languages with a true array structure, arrays can only hold elements of a single type. We will duplicate this here by specifying a type for queue.
But what type do we give it? number? string? We can specify a set of possible types using a union type: number | string | boolean. Unfortunately, there are thousands, if not millions, of possible types, so using a union type is not practical.
Fortunately, TypeScript gives us the ability to use a variable type which we can specify later. This is accomplished using generics and can be implemented as follows:
export class Queue<T> {
    private queue: T[];
    private length: number; // number of elements currently in the queue
    private readonly maxSize: number; // maximum number of elements queue can contain

    public constructor(maxSize: number) {
        // Make sure maxSize is at least 1
        this.maxSize = maxSize > 0 ? maxSize : 10;
        this.length = 0;
        this.queue = new Array<T>(this.maxSize);
    }
    ...
}
We specify that our class accepts a generic parameter: class Queue. Using T as the parameter name is a common convention. Our queue array is an array of type T.
Within the constructor, we are initializing our queue array to be a new JavaScript Array of type T: this.queue = new Array(this.maxSize);.
Back to Our Queue
Let’s implement each of the basic operations one-by-one. We will implement them from easiest to hardest:
isEmpty: Return true iflengthis equal to zero, or false otherwise.
   public isEmpty(): boolean {
        return this.length === 0;
    }
2. isFull: Return true if length is equal to maxSize, or false otherwise.
  public isFull(): boolean {
        return this.length === this.maxSize;
    }
3. peek: Return the front element without removing it; throw an exception if the queue is empty.
 public peek(): T {
        if (this.isEmpty()) {
            throw new Error('Queue is empty');
        }
        return this.queue[0];
    }
4. enqueue: Insert element at the rear if space is available. If we attempt to insert into a full queue, we will cause a queue overflow error.
  public enqueue(newItem: T): void {
        if (this.isFull()) {
            throw new Error('Queue overflow');
        } else {
            this.queue[this.length++] = newItem; // post-increment adds 1 to length after insertion
        }
    }
5. dequeue: Remove and return the front element. This one is more challenging because we need to shift all the elements over. If we try to remove from an empty queue, we will cause a queue underflow error.
  public dequeue(): T {
        if (this.isEmpty()) {
            throw new Error('Queue underflow');
        }

        const retval = this.queue[0];

        for (let i = 0; i < this.length; i++) {
            this.queue[i] = this.queue[i + 1];
        }

        this.length--; // we need to decrease length by 1
        return retval;
    }
Removing an element from a queue is a time-consuming operation because we have to move everything over.
However, this only applies to array-based queues such as this one. Later, we will implement a list-based queue that does not suffer from this performance issue.
6. queueContents: This is not officially part of the queue implementation, but can be useful for debugging purposes. It will print out the contents of the queue.
  public queueContents(): void {
        console.log('Queue Contents');
        for (let i = 0; i < this.length; ++i) {
            console.log(`queue[${i}]: ${this.queue[i]}`);
        }
    }
Here is the complete implementation of our queue:
export class Queue<T> {
    private queue: T[];
    private length: number; // number of elements currently in the queue
    private readonly maxSize: number; // maximum number of elements queue can contain

    public constructor(maxSize: number) {
        // Make sure maxSize is at least 1
        this.maxSize = maxSize > 0 ? maxSize : 10;
        this.length = 0;
        this.queue = new Array<T>(this.maxSize);
    }

    public isEmpty(): boolean {
        return this.length === 0;
    }

    public isFull(): boolean {
        return this.length === this.maxSize;
    }

    public enqueue(newItem: T): void {
        if (this.isFull()) {
            throw new Error('Queue overflow');
        } else {
            this.queue[this.length++] = newItem; // post-increment adds 1 to length after insertion
        }
    }

    public dequeue(): T {
        if (this.isEmpty()) {
            throw new Error('Queue underflow');
        }

        const retval = this.queue[0];

        for (let i = 0; i < this.length; i++) {
            this.queue[i] = this.queue[i + 1];
        }

        this.length--; // we need to decrease length by 1
        return retval;
    }

    public peek(): T {
        if (this.isEmpty()) {
            throw new Error('Queue is empty');
        }
        return this.queue[0];
    }

    public queueContents(): void {
        console.log('Queue Contents');
        for (let i = 0; i < this.length; ++i) {
            console.log(`queue[${i}]: ${this.queue[i]}`);
        }
    }
}
Creating queues
Let’s take a look at how we can create queues to hold different types of elements. Here is an example of creating a queue of numbers:
const numberQueue = new Queue(100);
This creates a queue capable of storing 100 numbers.
We can also create a queue of strings:
const stringQueue = new Queue(50);
This creates a queue that can hold 50 strings.
We are not limited to built-in JavaScript types. Let’s see how we can create a queue of customers:
interface Customer {
    name: string;
    age: number;
    isMember: boolean; // many large grocery store chains have membership programs
    rewardsCard?: string;
}

// A checkout lane with 10 customers
const checkoutLine = new Queue<Customer>(10);
Let’s make a queue of numbers with a maximum size of 100. Then, let’s fill the queue up until it can no longer hold any more numbers, and then tear it down:
// Create a number queue capable of storing 100 numbers
const nq = new Queue<number>(100);

// Fill the queue up with random numbers
while(!nq.isFull()) {
    nq.enqueue(Math.floor(Math.random() * 1000));
}
nq.queueContents();

// Empty out the queue
while(!nq.isEmpty()) {
    console.log(`${nq.dequeue()}`);
}
nq.queueContents();
These examples are provided in the project file src/queue/queue_examples.ts. You can uncomment the line import ‘./queue/quest_examples’; in index.ts to run the code.
Running Tests
Before we move on to the next section, let me mention that I have provided tests for each data structure.
If you are familiar with unit testing, feel free to run the test suites and add your own tests as well. Open a second terminal window or tab and run the following command to run the test suites:
npx jest
Stacks
Stacks are similar to queues, except they insert and remove elements from the same location instead of from opposite ends of the data structure. Stacks are a last-in, first-out (LIFO) data structure.
Stacks play important roles in the inner workings of operating systems and JavaScript engines. For example, stacks are used to keep track of function calls.
Recursive functions that do not resolve to a base case can grow the stack until it hits its size limit, causing a stack smashing error, i.e., a “stack overflow.”
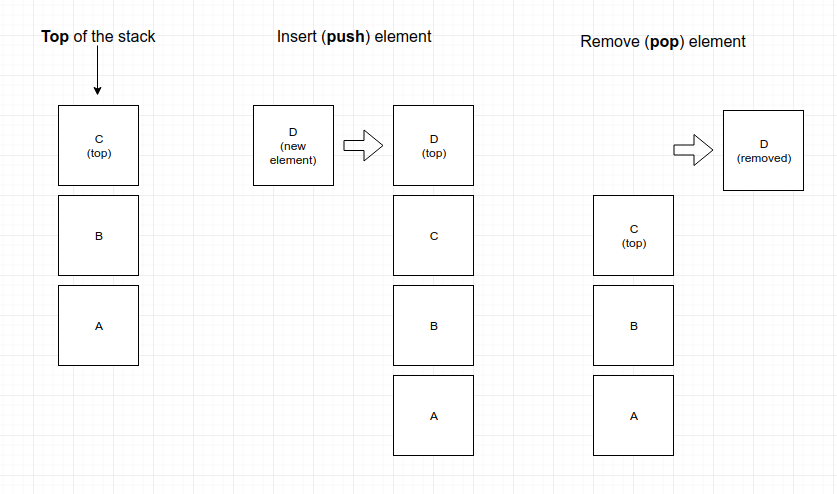
Stack terminology and operations
The end from which we insert and remove elements is called the top of the stack. Stacks implement the basic operations with the following names:
pushfor insertion.popfor removal.topfor retrieving the top element without removing it.
Stacks also have an isEmpty method, as well as an isFull method if it is an array-based stack. We can visualize a stack as follows:
Stack implementation
Open the file src/stack/stack.ts. You will find the following skeleton code:
export class Stack<T> {
    private stack: T[];
    private length: number;
    private readonly maxSize: number;

    public constructor(maxSize: number) {
        this.length = 0;
        this.maxSize = maxSize;
        this.stack = new Array<T>(this.maxSize);
    }

    public isEmpty(): boolean {
        return this.length === 0;
    }

    public isFull(): boolean {
        return this.length === this.maxSize;
    }

    public push(newItem: T): void {
        throw new Error('Implementation not provided');
    }

    public pop(): T {
        throw new Error('Implementation not provided');
    }

    public top(): T {
        throw new Error('Implementation not provided');
    }

    public stackContents(): void {
        console.log('Stack Contents');
        for (let i = 0; i < this.length; ++i) {
            console.log(`stack[${i}]: ${this.stack[i]}`);
        }
    }
}
We only need to implement the push, pop, and top methods. The implementations for the other methods have already been provided.
Stacks are easier to implement than queues because we do not have to shift elements over when removing existing ones. However, we do have to pay close attention to the array index position represented by the length property.
push: Adds an element to the top of the stack.
   public push(newItem: T): void {
        if (this.isFull()) {
            throw new Error('Stack overflow');
        }

        this.stack[this.length++] = newItem;
    }
If we attempt to push into a stack that is already full, we get a stack overflow error. Note how we use the post-increment operator on the length property.
2. pop: Removes and returns the element at the top of the stack.
  public pop(): T {
        if (this.isEmpty()) {
            throw new Error('Stack underflow');
        }

        const retval = this.stack[--this.length];
        return retval;
    }
If we pop from an empty stack, we get a stack underflow error. Note how we use the pre-decrement operator on the length property.
3. top: Retrieves the element at the top of the stack without removing it.
   public top(): T {
        if (this.isEmpty()) {
            throw new Error('Stack is empty');
        }

        return this.stack[this.length - 1];
    }
Notice how the top of the stack is at length minus one.
A quick stack example
Open the file src/test/stack.test.ts. Near the bottom of the file, you will find code for reversing a string using a stack:
describe('reverse a string using a stack', () => {
    const text = 'Hello, World!';

    // Create a stack large enough to hold our text
    const stack = new Stack<string>(text.length);

    test('text is reversed', () => {
        // Add each character from the text to the stack
        text.split('').forEach(c => stack.push(c));

        let reversed: string[] = [];

        // Remove each character from the stack until the stack is empty
        while (!stack.isEmpty()) {
            reversed = reversed.concat(stack.pop());
        }

        // Run our test
        expect(reversed.join('')).toBe('!dlroW ,olleH');
    });
});
Linked Lists
A traditional, non-JavaScript array has a fixed size and cannot grow or shrink. The only way to alter the size of an array is to create a new array of the desired size and copy the contents from the old array to the new one.
The reason for this requires an understanding of how memory allocation works, which is beyond the scope of this article.
Linked lists are an alternative to arrays, and their main benefit over arrays is that they can grow and shrink far more easily.
The caveat is that linked lists are much slower than arrays when accessing data. The position of any given element in an array can be calculated directly:
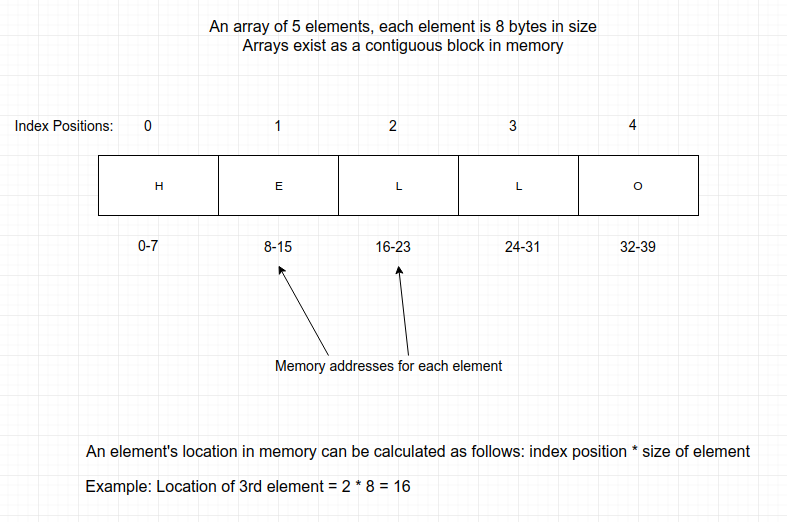
The elements in a linked list do not exist as a contiguous block in memory, but are distributed throughout it.
We will see how this is done shortly, but the main thing to keep in mind is that we cannot calculate an element’s position in a linked list. We must traverse the list until we find what we are looking for, and in the worst case, what we are looking for might be at the end of the list.
A data wrapper
Before we can implement a linked list, we must create a class that wraps our data.
This class is typically called Node (not to be confused with Node.js), and, in addition to holding onto our data, will also contain a reference to another Node .
Open the file src/linked_list/node.ts and take a look at its contents:
// DS = Data Structure
export namespace DS {
    export class Node<T> {
        public item: T | null;
        public next: Node<T> | null;

        public constructor(item: T | null = null) {
            this.item = item;
            this.next = null;
        }
    }
}
Let’s break the code down:
- We are placing our
Nodeclass into a namespace calledDS. ANodeobject already exists in the global scope, so we must encase our own into a separate namespace to avoid conflicts. - Our
Nodeclass accepts a generic parameter of typeT. - The
itemproperty holds our data. The constructor provides a default value ofnullif no argument is provided. This is just for convenience. - The
nextproperty will link oneNodeto another. - Both
itemandnextare public properties. Usually, properties within a class are private or protected, with getters and setters providing access to the properties. Here, we are making an exception. A linked list can have millions of nodes, and the overhead of using getters and setters will be excessive. It is better to give direct access to these properties to enhance performance. itemandnextcan also benull. We could also useundefinedinstead ofnull. We will see why we want to allow null (or undefined) values when we implement our linked list.
Linked list terminology and operations
A linked list can be implemented in different ways. They can be singly-linked, which is what we will implement. They can also be doubly-linked, which means in addition to a next pointer, we also have a prev (previous) pointer.
We are going to use a version that uses dead or sentinel nodes to mark the beginning and end of the list. Sentinel nodes allow us to write less code to handle inserting and removing elements from the list.
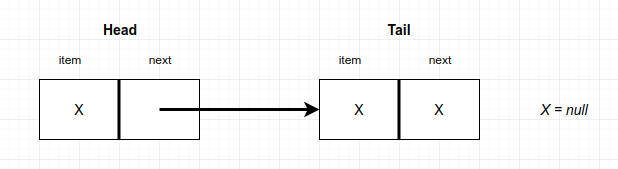
The beginning of the list is called the head and the end is called the tail. An empty linked list consists of two sentinel nodes, head and tail, with the head node pointing to the tail node:
Linked lists implement insert and remove operations, however, there are multiple options for how these operations may be implemented. We can also provide more than one implementation for each, which is what we are going to do.
Our linked list will contain the following methods:
insertFirst: Inserts an element at the beginning of the list.insertLast: Inserts an element at the end of the list.removeFirst: Removes the element at the end of the list.remove: Removes an element with a given key.contains: Checks to see if an element with a given key is in the list.isEmpty: Checks to see if the list contains any nodes other than head or tail.getFirst: Retrieve the first element in the list without removing it.
Linked list implementations can vary in terms of the basic operations they provide as well as the names of those operations.
For example, remove is sometimes called delete. The reason I chose some of these specific methods will become clear later on.
Linked list implementation
Open the file src/linked_list/linked_list.ts and look over the code skeleton provided. A convenience method called listContents is provided to help with debugging.
import { DS } from './node';

export class LinkedList<T> {
    private head: DS.Node<T>;
    private tail: DS.Node<T>;

    constructor() {
        this.head = new DS.Node<T>();
        this.tail = new DS.Node<T>();
        this.head.next = this.tail;
    }

    public isEmpty(): boolean {
        throw new Error('Method not implemented');
    }

    public insertFirst(item: T): void {
        throw new Error('Method not implemented');
    }

    public insertLast(item: T): void {

    }

    public removeFirst(): T | null {
        throw new Error('Method not implemented');
    }

    public remove(searchKey: T): T | null {
        throw new Error('Method not implemented');
    }

    public contains(searchItem: T): boolean {
        throw new Error('Method not implemented');
    }

    public getFirst(): T | null {
        throw new Error('Method not implemented');
    }

    public listContents(): void {
        let cur = this.head.next;

        while (cur && cur !== this.tail) {
            console.log(`${cur.item}`);
            cur = cur.next;
        }
    }
}
Our linked list contains only two properties, the sentinel nodes head and tail. Our constructor sets up the following relationship:
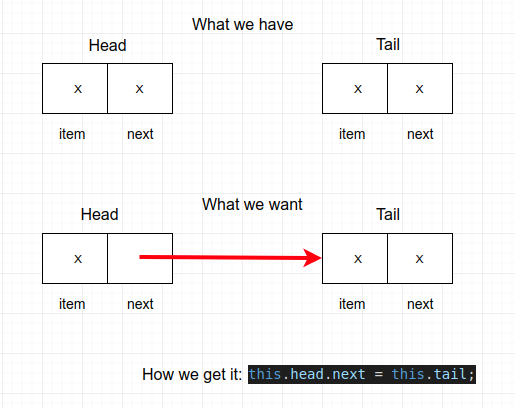
Our sentinel nodes will never hold any data, hence why we have allowed the item property to be null.
The tail node does not point to another node, so we have allowed the next property to be null as well. We could have tail point back to head and create a circular list.
Let’s now implement the remaining operations.
isEmpty: Returns true ifhead.nextpoints totail.
 public isEmpty(): boolean {
        return this.head.next === this.tail;
    }
2. insertFirst: Add a new node to the beginning of the list.
  public insertFirst(item: T): void {
        // Encapsulate our item into a Node object
        const newNode = new DS.Node<T>(item);

        newNode.next = this.head.next;
        this.head.next = newNode;
    }
It is helpful to draw or diagram out the state of our linked list so we can more easily see what we need to do.

3. getFirst: Retrieve the first element without removing it.
 public getFirst(): T | null {
        if (this.isEmpty()) {
            throw new Error('List is empty');
        }

        return this.head.next ? this.head.next.item : null;
    }
In a non-empty list, this.head.next would never be null. However, TypeScript does not know that, hence why we had to introduce some conditional logic in our return statement.
The last method we will implement together will be remove. Solutions for the remaining methods will be provided.
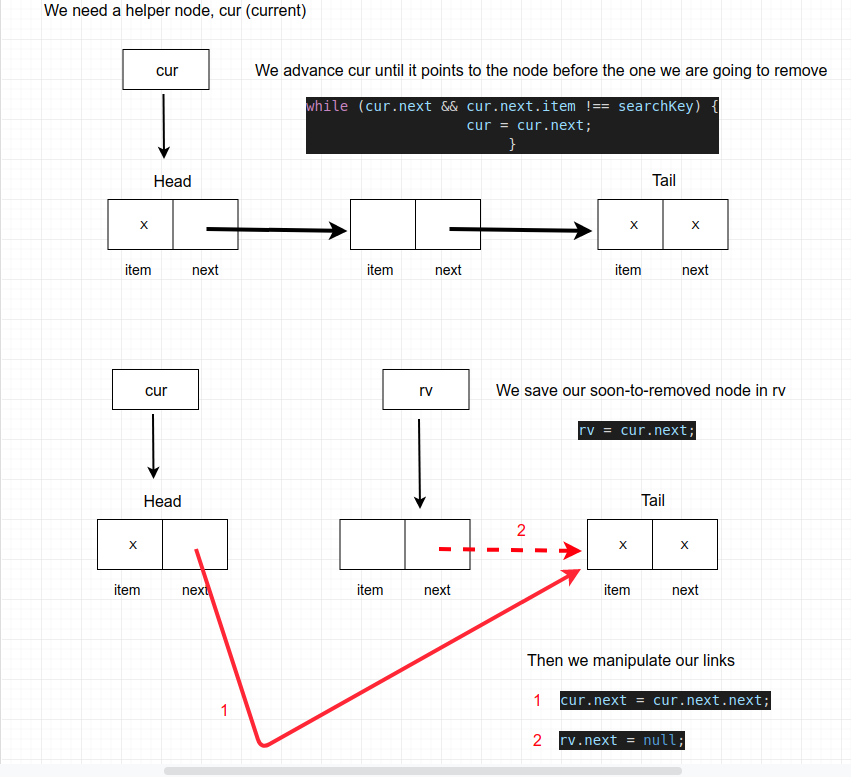
4. remove: Remove a node given a key.
  public remove(searchKey: T): T | null {
        if (this.isEmpty()) {
            throw new Error('List is empty');
        }

        // rv = retval or return value
        let rv: DS.Node<T> | null = null;

        // cur = current
        let cur: DS.Node<T> = this.head;

        // Advance our cur pointer to the node right before our matching node
        while (cur.next && cur.next.item !== searchKey) {
            cur = cur.next;
        }

        if (cur.next) {
            rv = cur.next;
            cur.next = cur.next.next;
            rv.next = null;
        }

        return rv && rv.item ? rv.item : null;
    }
We need the help of a third node, cur (current), to help us remove a specific node.

Here is the complete code for our linked list with solutions for the remaining methods:
import { DS } from './node';

export class LinkedList<T> {
    private head: DS.Node<T>;
    private tail: DS.Node<T>;

    constructor() {
        this.head = new DS.Node<T>();
        this.tail = new DS.Node<T>();
        this.head.next = this.tail;
    }

    public isEmpty(): boolean {
        return this.head.next === this.tail;
    }

    public insertFirst(item: T): void {
        // Encapsulate our item into a Node object
        const newNode = new DS.Node<T>(item);

        newNode.next = this.head.next;
        this.head.next = newNode;
    }

    public insertLast(item: T): void {
        const newNode = new DS.Node<T>(item);

        let cur: DS.Node<T> | null = this.head;

        // Advance our cur pointer to just before the tail node
        while (cur && cur.next !== this.tail) {
            cur = cur.next;
        }

        if (cur) {
            newNode.next = this.tail;
            cur.next = newNode;
        }
    }

    public removeFirst(): T | null {
        if (this.isEmpty()) {
            throw new Error('List is empty');
        }

        let rv: DS.Node<T> | null = this.head.next;

        if (rv) {
            this.head.next = rv.next;
            rv.next = null;
        }

        // We are returning the data, not the node itself
        return rv ? rv.item : null;
    }

    public remove(searchKey: T): T | null {
        if (this.isEmpty()) {
            throw new Error('List is empty');
        }

        // rv = retval or return value
        let rv: DS.Node<T> | null = null;

        // cur = current
        let cur: DS.Node<T> = this.head;

        // Advance our cur pointer to the node right before our matching node
        while (cur.next && cur.next.item !== searchKey) {
            cur = cur.next;
        }

        if (cur.next) {
            rv = cur.next;
            cur.next = cur.next.next;
            rv.next = null;
        }

        return rv && rv.item ? rv.item : null;
    }

    public contains(searchItem: T): boolean {
        if (this.isEmpty()) {
            throw new Error('List is empty');
        }

        let rv: boolean = false;
        let cur: DS.Node<T> | null = this.head;

        // Traverse the list in search of a matching item
        while (cur && cur.next !== this.tail) {
            if (cur.next && cur.next.item === searchItem) {
                rv = true;
                break;
            }
            cur = cur.next;
        }

        return rv;
    }

    public getFirst(): T | null {
        if (this.isEmpty()) {
            throw new Error('List is empty');
        }

        return this.head.next ? this.head.next.item : null;
    }

    public listContents(): void {
        let cur = this.head.next;

        while (cur && cur !== this.tail) {
            console.log(`${cur.item}`);
            cur = cur.next;
        }
    }
}
As an exercise, you can try to come up with your own solutions.
List-Based Queues and Stacks
As mentioned before, I chose to construct our linked list with a specific collection of methods.
We can create queues and stacks from a linked list, and the methods I chose will let us create them easily. Study the following code and see if you can understand how it works.
List-based queue
import { LinkedList } from '../linked_list/linked_list';

export class QueueList<T> {
    private list: LinkedList<T>;

    public constructor() {
        this.list = new LinkedList<T>();
    }

    public isEmpty(): boolean {
        return this.list.isEmpty();
    }

    public enqueue(item: T): void {
        this.list.insertLast(item);
    }

    public dequeue(): T | null {
        return this.list.removeFirst();
    }

    public peek(): T | null {
        return this.list.getFirst();
    }

    public queueContents(): void {
        this.list.listContents();
    }
}
List-based stack
import { LinkedList } from '../linked_list/linked_list';

export class StackList<T> {
    private list: LinkedList<T>;

    public constructor() {
        this.list = new LinkedList<T>();
    }

    public isEmpty(): boolean {
        return this.list.isEmpty();
    }

    public push(item: T): void {
        this.list.insertFirst(item);
    }

    public pop(): T | null {
        return this.list.removeFirst();
    }

    public top(): T | null {
        return this.list.getFirst();
    }

    public stackContents(): void {
        this.list.listContents();
    }
}
We see that we no longer need an isFull method for either one. List-based stacks and queues can grow to an indefinite size.
Our queue no longer has to shift elements over after a dequeue operation, however, an enqueue operation must traverse the entire list to get to the end in order to insert a new element.
We could also have implemented our stack and queue using the built-in JavaScript Array object.
Our linked list a partial recreation of the Array object. This does not mean JS arrays are actually implemented using a linked list; the underlying implementation can vary from engine to engine.
Conclusion
I hope you found this tutorial helpful and insightful. Thank you for reading !
#Typescript #Data Structures #JavaScript #Front End #Development