1.Spring Boot Angular 6 Example
Today web security is very important, creating and using any services without security is very risky nowadays. If you are transmitting very sensitive data, you must like to use a very nice secure layer to protect your confidential data, Isn’t it?.
It’s all about securing our systems.
So, Whenever we are using API call or anything we must have to first consider the security of our sensitive data. There are so many types of security methods available to secure our data. In this post, We comprehensive example on Spring security, Spring boot and angular to demonstrate how we can secure your angular application using Basic Authentication via Spring Security. You will learn to use Spring Boot for quickly building web API, in short, a java backend layer and then adding Spring Security maven dependency for making it secure. We will use Angular platform that makes it easy to build the application with the web and use our own database.
Before beginning developing the application here is the showcase of the application that we are going to build in the next sections.

Above is an example of my heroes that displays a list of hero names. Initially, we will keep the endpoint non-secure so that the Angular is able to display the list of names. Then, we will add a secure REST endpoint and make the necessary changes to our Angular app for accessing the data using Basic Authentication.
2. Technologies Used
- Angular 6
- Spring Boot 2.0.6
- Java 1.8.0
- Apache Maven 3.5.3
- Visual Studio Code 1.28.2
- Spring Tool Suite 3.9.5
- Mysql 5.7.19
3. Build Java back-end using Spring Boot
There are many ways we can create a Spring Boot project. The following is a list of ways:
- Spring Initializer website
- Spring Boot CLI
- Spring Tool Suite
- Curl Command
We will not go deeper into each and everyone will just use Spring Tool Suite to create a project.
3.1 Create a starter project
Go to File->New->Spring Starter Project and enter necessary details and select dependencies as per the following screenshots
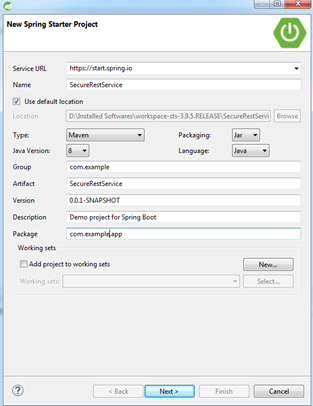
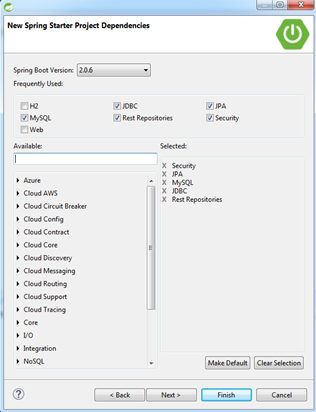
You will have to select these dependencies in order to add in maven POM.xml file, then just hit the finish button and project will be created with required libraries
3.2 Create a database
Create a table into your database then feeds with data, here is the query for creating and inserting records into the table.
CREATE TABLE `heroes` (
`id` int(3) NOT NULL AUTO_INCREMENT,
`name` varchar(20) DEFAULT NULL,
KEY `id` (`id`)
) ENGINE=InnoDB AUTO_INCREMENT=17 DEFAULT CHARSET=utf8;
insert  into `heroes`(`id`,`name`) values (1,'Aung San Suu Kyi'),(2,'Nelson Mandela'),(3,'Tony Blair'),(4,'Dr. Abdul Kalam'),(5,'Srinivas Ramanujan'),(6,'Stephen Hawking'),(7,'Bob Geldof'),(8,'Margaret Thatcher'),(9,'Winston Churchill'),(10,'Bob Dylan'),(11,'Bill Gates'),(12,'Steve Jobs'),(13,'Dalai Lama'),(14,'David Attenborough'),(15,'Mary Robinson'),(16,'Tim Berners-Lee');
3.3 Add an insecure REST endpoint
Just add the following code as shown below to each file :
1. Application.properties :
server.port=7070
spring.datasource.url=jdbc:mysql://localhost:3306/test
spring.datasource.username=root
spring.datasource.password=root
spring.jpa.generate-ddl=true
2. SecureRestServiceApplication.java :
package com.example.app;
import org.springframework.boot.SpringApplication;
import org.springframework.boot.autoconfigure.SpringBootApplication;
import org.springframework.boot.autoconfigure.domain.EntityScan;
import org.springframework.context.annotation.ComponentScan;
import org.springframework.data.jpa.repository.config.EnableJpaRepositories;
@SpringBootApplication
@EntityScan(basePackages = "com.example.model")
@EnableJpaRepositories(basePackages = {"com.example.repository"})
@ComponentScan(basePackages = "com.example.controller")
public class SecureRestServiceApplication {
public static void main(String[] args) {
SpringApplication.run(SecureRestServiceApplication.class, args);
}
}
3. HeroesController.java
package com.example.controller;

import java.util.List;

import org.springframework.beans.factory.annotation.Autowired;
import org.springframework.web.bind.annotation.CrossOrigin;
import org.springframework.web.bind.annotation.RequestMapping;
import org.springframework.web.bind.annotation.RestController;

import com.example.model.Heroes;
import com.example.repository.HeroesRepository;

@RestController
@RequestMapping("/api/")
public class HeroesController {
	@Autowired
	HeroesRepository heroesRepository;

	@RequestMapping("/heroes")
	@CrossOrigin("http://localhost:4200")
	public List getHeroes(){
		return heroesRepository.findAll();
	}
}
4. Heroes.java
package com.example.model;
import javax.persistence.Column;
import javax.persistence.Entity;
import javax.persistence.GeneratedValue;
import javax.persistence.GenerationType;
import javax.persistence.Id;
import javax.persistence.Table;
@Entity
@Table(name = "heroes")
public class Heroes {
@Id
@GeneratedValue(strategy = GenerationType.AUTO)
@Column(name = "id")
private int id;
@Column(name = "name")
private String name;
public Heroes() {}
public Heroes(int id, String name) {
super();
this.name = name;
}
public int getId() {
return id;
}
public void setId(int id) {
this.id = id;
}
public String getName() {
return name;
}
public void setName(String name) {
this.name = name;
}
}
5. HeroesRepository.java
package com.example.repository;
import org.springframework.data.jpa.repository.JpaRepository;
import org.springframework.data.rest.core.annotation.RepositoryRestResource;
import com.example.model.Heroes;
public interface HeroesRepository extends JpaRepository {}
6. Execute in postman or any browser
Now, restart the application, open browser or use postman to hit this URL http://localhost:7070/api/heroes. You should see the information of heroes in JSON format see below :)

4. Build front-end application using Angular
Let’s build a front-end, we will use Angular CLI to create an Angular app. Execute the following command in your command prompt.
ng new secure-hero-app
The command might take few minutes for creating configuration files and bringing in all the dependencies. It will also create a very simple application for you. Once the command completes, execute
ng serve --open
This command will start and will open your default browser automatically with the http://localhost:4200 URL and you will see default angular page.
4.1 Create required artifacts
We now need to create some components, services and routing modules to our angular app. We will create 1 component, 1 routing module and 1 service using these following command
1. Create a service
ng generate service hero
- Hero.service.ts
import { Injectable } from '@angular/core';
import { HttpClient, HttpHeaders } from '@angular/common/http';

@Injectable({
  providedIn: 'root'
})
export class HeroService {

  constructor(private http: HttpClient) { }

  getHeroes() {
    const url = 'http://localhost:7070/api/heroes';
    return this.http.get(url);
  }
}
2. Create a routing module
ng generate module app-routing --flat --module=app
In the app-routing module add the following code.
- App-routing.module.ts
import { HeroesComponent } from './heroes/heroes.component';
import { NgModule } from '@angular/core';
import { RouterModule, Routes} from '@angular/router';

const routes: Routes = [
  { path: 'heroes', component: HeroesComponent}
];

@NgModule({
  imports: [
    RouterModule.forRoot(routes)
  ],
  exports: [ RouterModule]
})
export class AppRoutingModule { }
3. Create a component
ng generate component heroes
Update your component files as shown below :
/* HeroesComponent's private CSS styles */
  .heroes {
    margin: 0 0 2em 0;
    list-style-type: none;
    padding: 0;
    width: 15em;
  }
  .heroes li {
    cursor: pointer;
    position: relative;
    left: 0;
    background-color: #EEE;
    margin: .5em;
    padding: .3em 0;
    height: 1.6em;
    border-radius: 4px;
  }
  .heroes li.selected:hover {
    background-color: #BBD8DC !important;
    color: white;
  }
  .heroes li:hover {
    color: #607D8B;
    background-color: #DDD;
    left: .1em;
  }
  .heroes .text {
    position: relative;
    top: -3px;
  }
  .heroes .badge {
    display: inline-block;
    font-size: small;
    color: white;
    padding: 0.8em 0.7em 0 0.7em;
    background-color: #607D8B;
    line-height: 1em;
    position: relative;
    left: -1px;
    top: -4px;
    height: 1.8em;
    margin-right: .8em;
    border-radius: 4px 0 0 4px;
  }
heroes.component.css
## My Heroes

{{hero.id}} {{hero.name}}
 --> {{hero.id}} {{hero.name}}
**heroes.component.html **
import { HeroService } from './../hero.service';
import { Component, OnInit } from '@angular/core';

@Component({
  selector: 'app-heroes',
  templateUrl: './heroes.component.html',
  styleUrls: ['./heroes.component.css']
})
export class HeroesComponent implements OnInit {

  heroes$: Object;
  constructor(private data: HeroService) { }

  ngOnInit() {
    this.data.getHeroes().subscribe(
      data => this.heroes$ = data
    );
  }

}
heroes.component.ts
4. A glance at the App module
For using HTTP service in our service class, we need to import HttpClientModule as shown below :
- App.module.ts
import { BrowserModule } from '@angular/platform-browser';
import { NgModule } from '@angular/core';

import { AppComponent } from './app.component';
import { HeroesComponent } from './heroes/heroes.component';
import { AppRoutingModule } from './/app-routing.module';
import { HttpClientModule } from '@angular/common/http';

@NgModule({
  declarations: [
    AppComponent,
    HeroesComponent
  ],
  imports: [
    BrowserModule,
    HttpClientModule,
    AppRoutingModule
  ],
  providers: [],
  bootstrap: [AppComponent]
})
export class AppModule { }
4.2 Access the application
After going through the above steps, you should be able to see the list of heroes by accessing http://localhost:4200/heroes in the browser.
5. Secure your REST endpoint using Spring Security
To enable spring security in your app, simply add the following dependency to the pom.xml
org.springframework.boot
spring-boot-starter-security
Now, try accessing http://localhost:7070/api/heroes . You should see a browser dialogue asking for the credentials as shown below

The default username is user and you can get the password from your STS console as shown Below

In order to use your own username and password instead of generating one, you need to specify the following properties in the application.properties file as shown below.
spring.security.user.name=test
spring.security.user.password=test123
6. Update your angular endpoint for accessing secure REST endpoint
If you try to access http://localhost:4200/heroes in the browser or postman it will throw 401 status code that means unauthorized access to the URL. We need to send basic authorization headers in our HTTP request. So let’s update our hero service, specifying the method getHeroes()
getHeroes() {
const url = 'http://localhost:7070/api/heroes';
const headers = new HttpHeaders({Authorization: 'Basic ' + btoa('test:test123')});
return this.http.get(url, { headers });
}
Now try again by verifying http://localhost:7070/api/heroes browser. Does it work?.
No, and the reason for this is we need to add support of CORS protocol at our REST back-end, It is explained in the next section.
7. Cross-origin resource sharing (CORS)
We need to support the CORS protocol for our Angular service to be able to invoke an endpoint on a different domain. By different domain, we mean that our front-end application running on http://localhost:4200 is requesting a resource on another domain i.e. http://localhost:7070. Hence, on the server, we need to configure the CORS. This is done by providing the support for CORS protocol.
We need to create Configuration class for web security, this class will signal the Spring security to allow pre-flight check from the browser. This is done by overriding the configure method of WebSecurityConfigurerAdapter.
We need to create two files CustomFilter.java and SecurityConfiguration.java as shown below :
package com.example.config;

import java.io.IOException;

import javax.servlet.FilterChain;
import javax.servlet.ServletException;
import javax.servlet.http.HttpServletRequest;
import javax.servlet.http.HttpServletResponse;

import org.springframework.web.filter.OncePerRequestFilter;

public class CustomFilter extends OncePerRequestFilter {

	@Override
	protected void doFilterInternal(HttpServletRequest request, HttpServletResponse response, FilterChain chain)
			throws ServletException, IOException {
		response.setHeader("Access-Control-Allow-Origin", "*");
		response.setHeader("Access-Control-Allow-Methods", "POST, GET, OPTIONS, DELETE");
		response.setHeader("Access-Control-Allow-Headers",
				"authorization, content-type, xsrf-token, Cache-Control, remember-me, WWW-Authenticate");
		response.addHeader("Access-Control-Expose-Headers", "xsrf-token");
		chain.doFilter(request, response);

	}

}
Now Verify again http://localhost:4200 in the browser and you should be able to see the listing of heroes again.
Congratulations!!!
8. Short Summary
In this post, we have created a simple REST API using Spring Boot. We secured this using Spring Security Using Basic Authentication type. At last, we used the popular front-end platform Angular for accessing the secure API.
spring boot + angular 4 example, integrate angular 6 with spring boot,
#angular #angular-js #javascript