Google Kubernetes Engine By Example
Exploring Google Kubernetes Engine by creating a complete Node.js / React solution. Serving our application through Google Kubernetes Engine. Securing our application using Google Kubernetes Engine. Beginning to incorporate data persistence. Data persistence in production.
In reading about Kubernetes, I have come to learn that it has the potential to disrupt the PaaS model by leveraging Docker to provide a similar developer-friendly mechanism to deploy applications.
Kubernetes (k8s) is an open-source system for automating deployment, scaling, and management of containerized applications.> Kubernetes (k8s) is an open-source system for automating deployment, scaling, and management of containerized applications.
_— Kubernetes — _Kubernetes
Goal
The goal is create a complete solution, development to production, using Google Kubernetes Engine consisting of:
- TypeScript
- Node.js
- Express
- SQL database
- Object-Relational-Mapping (ORM)
The final solution is available for download.
Prerequisites
The latest versions of Docker Engine and Docker Compose (both included in Docker Desktop); versions 18.09.1 and 1.23.2 as of this writing.
The latest version of Node.js LTS; version 10.15.0 LTS as of this writing.
A text editor; cannot recommend enough the no-cost Visual Studio Code with the following extensions:
- TypeScript
- Node.js
- Express
- SQL database
- Object-Relational-Mapping (ORM)
Node.js / Express Project
We will start with a basic Node.js / Express project as described in the Backend section of another article that I wrote: Tech Stack 2019 Core.
Docker
The assumption is that the reader is already familiar with Docker basics; the Docker Get Started, Part 1: Orientation and SetupandGet Started, Part 2: Containers documentation is sufficient.
Let us start by simply building / running a Docker image / container providing the Node.js / Express application. We start by creating a Docker configuration file:
Dockerfile
FROM node:10.15.0-alpine
WORKDIR /app
COPY . /app
RUN ["npm", "install"]
RUN ["npm", "run", "build-ts"]
EXPOSE 3000
CMD ["npm", "run", "start"]
Much like our .gitignore, we do not want to copy the node_modules and dist folders into the container; we will rather install and build these files as part of building the image.
.dockerignore
node_modules
dist
We build the Docker image using the command:
docker build --tag=hellokubernetes .
and run a Docker container based on the image:
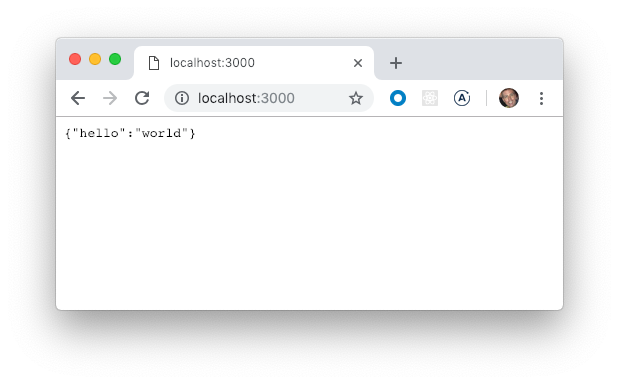
docker run -d -p 3000:3000 hellokubernetes
At this point, we can observe the Docker images and containers:

We can also open a browser and see the API result.
note: For now, we will hold off on publishing images as described in the Docker documentation.
Docker Compose
The assumption is that the reader is already familiar with Docker Compose basics; the Docker Overview of Docker Composeis sufficient.
Let us first stop / remove all the Docker containers and remove all the images from our previous steps.
note: These commands assume that you are not using Docker for any other purposes; otherwise these operations can be targeted.
docker stop $(docker ps -a -q)
docker rm $(docker ps -a -q)
docker rmi $(docker images -a -q)
We can simplify building the Docker image and running the container by creating a Docker Compose configuration file:
docker-compose.yaml
version: '3'
services:
  web:
    build: .
    ports:
- "3000:3000"
and then executing:
docker-compose up -d
At this point, we can observe the Docker images and containers:

And as before, we can also open a browser and see the API result.
Docker Compose Development
We will be using Kubernetes for non-development deployments, at the same time we will be using Docker Compose exclusively for development. With this in mind, we need to refactor our previous implementation to allow for the live build / restart of the application to support our development workflow.
Let us first stop / remove all the Docker containers and remove all the images from our previous steps.
docker stop $(docker ps -a -q)
docker rm $(docker ps -a -q)
docker rmi $(docker images -a -q)
In preparation for our updated Docker Compose configuration, we need to be able to run the development tools via a single npm script (currently requires running both the watch-fs and watch-node scripts). We use the concurrently package to accomplish this.
npm install -D concurrently
And add a develop script:
{
  ...
  "script": {
    ...
    "develop": "npm run build-ts && concurrently 'npm:watch-ts' 'npm:watch-node'"

  }
  ...
}
Observations:
- TypeScript
- Node.js
- Express
- SQL database
- Object-Relational-Mapping (ORM)
We then create a separate Docker configuration file:
Dockerfile-develop
FROM node:10.15.0-alpine
WORKDIR /app
EXPOSE 3000
CMD ["npm", "run", "develop"]
Observations:
- TypeScript
- Node.js
- Express
- SQL database
- Object-Relational-Mapping (ORM)
We then update the Docker Compose configuration file:
docker-compose.yaml
version: '3'
services:
  web:
    build:
      context: .
      dockerfile: Dockerfile-develop
    ports:
    - "3000:3000"
    volumes:
- .:/app
With this in place, we can execute:
docker-compose up -d
With this in place we can open a browser and see the API result. Also, editing the source files will trigger a build and restart the application.
Google Container Registry
We will need an online location to store Docker images in order to deploy them using Google Kubernetes Engine; right now our images are stored in our local Docker registry. Also, it is likely that we will want to keep these images private; so we will need a private registry.
note: In my first pass at this article, I explored using a private registry at Docker Hub. I, however, discovered that while Kubernetes supports private registries, it was a more complicated solution (requiring setting up security keys and separate billing).
Given that we are going to be using Google Kubernetes Engine, the tightly integrated Google Container Registry is a natural solution for our private registry.
Before continuing, there are some important Docker concepts to understand (not well covered in the official Docker documentation):
Kubernetes (k8s) is an open-source system for automating deployment, scaling, and management of containerized applications.> Kubernetes (k8s) is an open-source system for automating deployment, scaling, and management of containerized applications.> Kubernetes (k8s) is an open-source system for automating deployment, scaling, and management of containerized applications.> Kubernetes (k8s) is an open-source system for automating deployment, scaling, and management of containerized applications.> Kubernetes (k8s) is an open-source system for automating deployment, scaling, and management of containerized applications.> Kubernetes (k8s) is an open-source system for automating deployment, scaling, and management of containerized applications.> Kubernetes (k8s) is an open-source system for automating deployment, scaling, and management of containerized applications.
— _Adrian Moaut — _Using Docker, Developing and deploying Software with Containers
Also, if you are going to follow along, you will need to follow the Quickstart for Container Registry to enable the feature in a Google Cloud Platform project (that you will also likely need to create) and install the gcloud command-line tool.
We next need to create an image in our local registry, in the hellokubernetes repository, and with the 1.0.0 tag:
docker build --tag=hellokubernetes:1.0.0 .
We then authorize Docker using credentials supplied to gcloud:
gcloud auth configure-docker
We tag the local image for Google Container Registry:
docker tag hellokubernetes:1.0.0 gcr.io/[PROJECT-ID]/hellokubernetes:1.0.0
Observations:
- TypeScript
- Node.js
- Express
- SQL database
- Object-Relational-Mapping (ORM)
We finally push this tagged image to Google Container Registry:
docker push gcr.io/[PROJECT-ID]/hellokubernetes:1.0.0
Google Kubernetes Engine (GKE)
Now that we have stored our Docker image online with Google Cloud Registry, we will run a container based on it using GKE.
The assumption is that the reader is already familiar with GKE basics; for this there is an excellent article Kubernetes 101: Pods, Nodes, Containers, and Clusters(it is actually a three-part series and all are helpful).
note: If you read the official Docker documentation, they define similar (but different) concepts: stacks, swarms, and clusters. Since we are using Kubernetes, these concepts do not apply.
Also, if you are looking to follow along, you will have to setup a GKE enabled Google Cloud Platform project (the same project used for Google Container Repository) and have access to both the gcloud and kubectl command-line tools; instructions are available at GKE Quickstart.
We first create a cluster: mycluster:
gcloud container clusters create mycluster
and get the credentials so that we can interact with it:
gcloud container clusters get-credentials mycluster
Because we have a stateless application, we create a Kubernetes deployment.
k8s/deployment.yaml
apiVersion: apps/v1
kind: Deployment
metadata:
  name: hellokubernetes
spec:
  replicas: 1
  selector:
    matchLabels:
      app: hellokubernetes
  template:
    metadata:
      labels:
        app: hellokubernetes
    spec:
      containers:
      - name: hellokubernetes
        image: gcr.io/[PROJECT-ID]/hellokubernetes:1.0.0
        ports:
- containerPort: 3000
Observations:
- TypeScript
- Node.js
- Express
- SQL database
- Object-Relational-Mapping (ORM)
We apply this deployment:
kubectl apply -f deployment.yaml
We can see that were successful:
kubectl get deployments

We now have the left side of this final diagram built:

Per the diagram, our last step will be to create a load balancer servicewith an external IP address. The load balancer exposes port 80 that is mapping to port 3000 on pods labeled app: kubernetes.
k8s/service-load-balancer.yaml
apiVersion: v1
kind: Service
metadata:
  name: hellokubernetes
spec:
  selector:
    app: hellokubernetes
  type: LoadBalancer
  ports:
  - port: 80
targetPort: 3000
We apply the service:
kubectl apply -f service-load-balancer.yaml
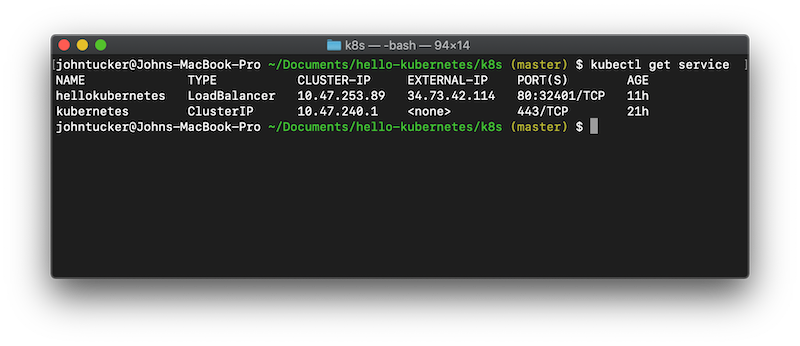
We can see that were successful:
kubectl get service
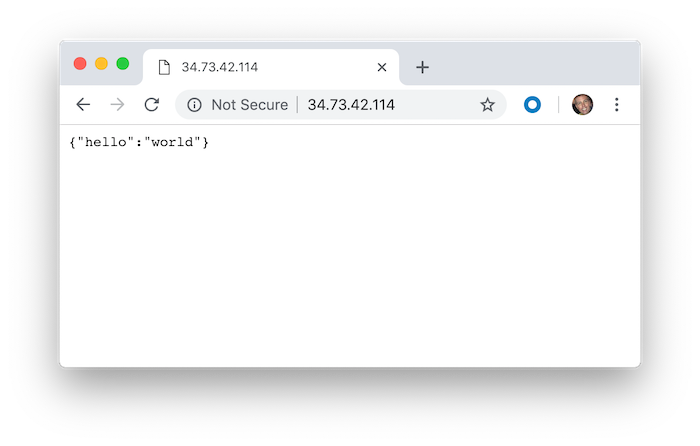
The final validation is opening the external IP address in a browser.
Overview
As you may have noticed, the previous example was not secure; it used HTTP instead of HTTPS. This is because we used a LoadBalancer instead of an Ingress service:
Kubernetes (k8s) is an open-source system for automating deployment, scaling, and management of containerized applications.
_— GKE — _Setting up HTTP Load Balancing with Ingress
We start by first deleting the hellokubernetes and kubernetes (automatically generated) services:
kubectl delete service hellokubernetes
kubectl delete service kubernetes
We, however, will continue to use the deployment that we created earlier.
The rest of this article closely follows the official tutorial Setting up HTTP Load Balancing with Ingress, providing concrete examples along the way.
NodePort
We first need to create a NodePort service in preparation to create an Ingress service.
Kubernetes (k8s) is an open-source system for automating deployment, scaling, and management of containerized applications.
_— Kubernetes — _Services
Ok, if you don’t understand this definition, I am with you; unfortunately I could not find a better explanation in my searches. So let me give an explanation a shot using the following diagram (what we are working towards):

First NodePort services are a low-level service, used by other services, e.g., an Ingress service. They also interact with the actual underlying nodes supporting the cluster.
note: Unless otherwise specified, clusters default to having three nodes.
For each Pod and exposed port (e.g., 3000) that a NodePort service specifies, the NodePort defines a map to a randomly (e.g., 30677) assigned port that is allocated on each Node (same port on each Node). This mapping provides a mechanism to allow other services to direct traffic to a particular Pod without for knowledge of which Node is it running on.
The following is our NodePort configuration file:
k8s/service-node-port.yaml
apiVersion: v1
kind: Service
metadata:
  name: hellokubernetes
spec:
  selector:
    app: hellokubernetes
  type: NodePort
  ports:
- port: 3000
and applying:
kubectl apply -f service-node-port.yaml
and listing:
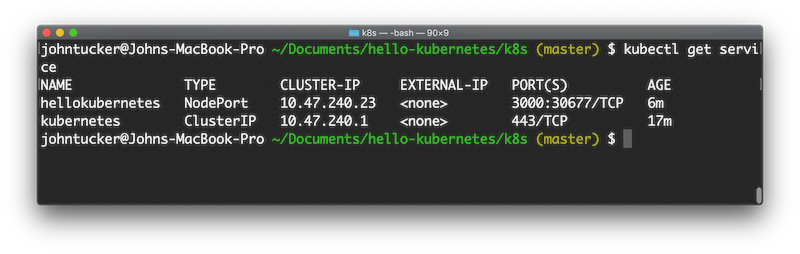
Ingress
Now that we have our NodePort service, we create a an Ingress service that points to it:
k8s/service-ingress.yaml
apiVersion: extensions/v1beta1
kind: Ingress
metadata:
  name: hellokubernetes
spec:
  backend:
    serviceName: hellokubernetes
servicePort: 3000
and applying:
kubectl apply -f service-ingress.yaml
and listing:

Observations:
- TypeScript
- Node.js
- Express
- SQL database
- Object-Relational-Mapping (ORM)
Ingress with Static IP
In order to use HTTPS, we need a DNS entry. In order to use a DNS entry, we need a static IP address. We use Google Cloud to create a static IP address:
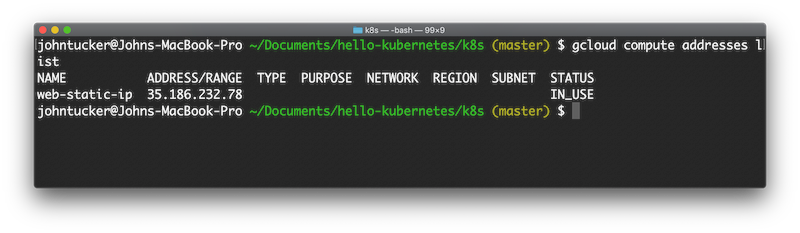
gcloud compute addresses create web-static-ip --global
and list it:
We then update our Ingress service by adding a reference to this static IP address:
k8s/service-ingress.yaml
apiVersion: extensions/v1beta1
kind: Ingress
metadata:
  name: hellokubernetes
  annotations:
    kubernetes.io/ingress.global-static-ip-name: "web-static-ip"
...
and re-applying:
kubectl apply -f service-ingress.yaml
and listing:

Secret
Now that we have a static IP address, the next step towards securing our API with HTTPS is to create a domain name mapping to the static IP address. In my case, created an A record for my larkintuckerllc.com domain (hosted on GoDaddy) to the static IP address.
note: I also created a CNAME record for www.larkintuckerllc.com pointing to the A record.
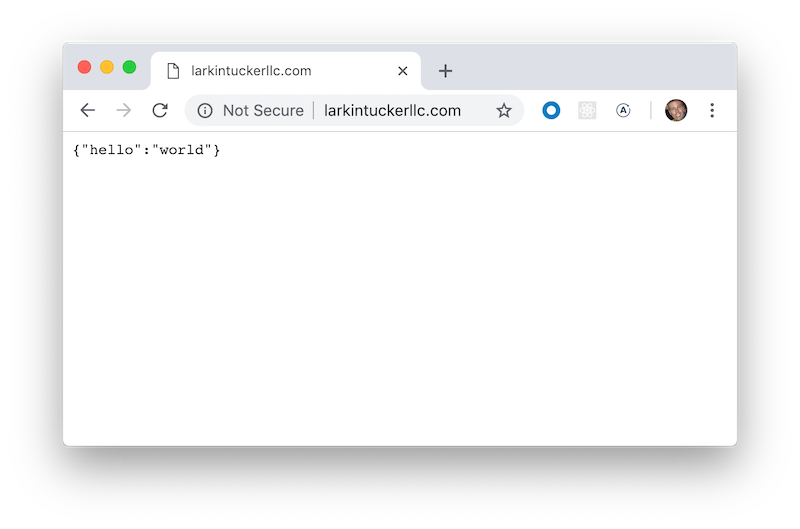
Next, we need to create a HTTPS certificate; I ended paying $8 a year to obtain a PositiveSSL certificate (works for both larkintuckerllc.com and www.larkintuckerllc.com).
note: Getting the no-cost Let’s Encrypt to work with GKE seemed overly complicated; see Let’s Encrypt on GKE.
Having obtained a private key and HTTPS certificate, the next step was to BASE64 encode (single line) them. On MacOS, the command is:
openssl base64 -A -in INFILE -out OUTFILE
Next we create a file:
k8s/secret.yaml
apiVersion: v1
data:
  tls.crt: base64 encoded cert
  tls.key: base64 encoded key
kind: Secret
metadata:
  name: hellokubernetes-tls
  namespace: default
type: Opaque
Observations:
- TypeScript
- Node.js
- Express
- SQL database
- Object-Relational-Mapping (ORM)
and applying:
kubectl apply -f secret.yaml
Ingress with Static IP and TLS
We finally add a tls entry to our final Ingress configuration:
k8s/service-ingress.yaml
apiVersion: extensions/v1beta1
kind: Ingress
metadata:
  name: hellokubernetes
  annotations:
    kubernetes.io/ingress.global-static-ip-name: "web-static-ip"
spec:
  tls:
  - hosts:
    - larkintuckerllc.com
    - www.larkintuckerllc.com
    secretName: hellokubernetes-tls
  backend:
    serviceName: hellokubernetes
servicePort: 3000
and re-applying:
kubectl apply -f service-ingress.yaml
Whew… We have now secured the API:

Development Database
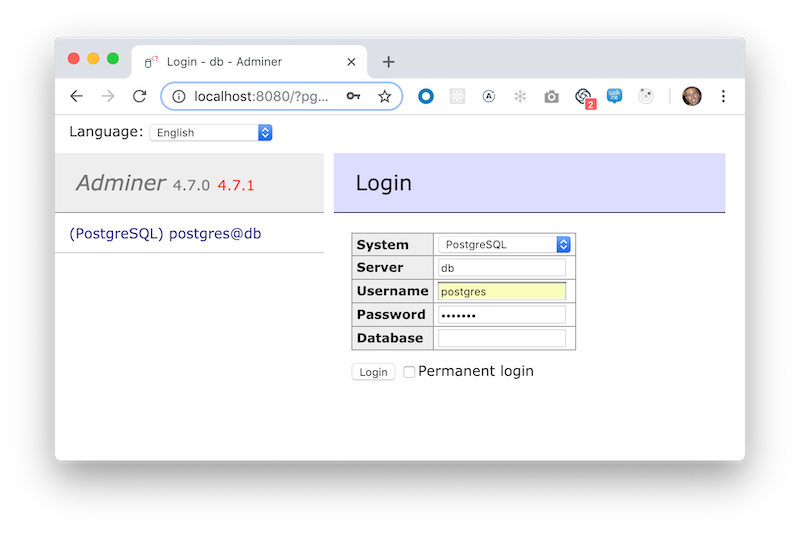
For development, we will run our database using a Docker container; using the Docker Compose instructions at Docker Hub: postgres. Simply amounts to adding the db and adminer sections to our Docker Compose configuration:
docker-compose.yml
version: '3'
services:
  web:
    build:
      context: .
      dockerfile: Dockerfile-develop
    ports:
    - "3000:3000"
    volumes:
    - .:/app

  db:
    image: postgres:11.1
    restart: always
    environment:
      POSTGRES_PASSWORD: example

  adminer:
    image: adminer
    restart: always
    ports:
- 8080:8080
Observations:
- TypeScript
- Node.js
- Express
- SQL database
- Object-Relational-Mapping (ORM)
We rebuild and restart the Docker containers using:
docker-compose up
docker-compose start
Because we do not want to run our application using database administrator access, we create a new database, create a new user, and grant access to the user to the database. To accomplish this, we will use the command-line tool, psql, available in the postgres container.
docker exec -it hello-kubernetes_db_1 /bin/bash
runuser -l postgres -c psql
note: The SQL commands can be also executed using a web interface provided by the the adminer container.
The SQL commands we need to execute are:
create database hellokubernetes;
create user hellouser with password 'hellopassword';
grant all privileges on database hellokubernetes to hellouser;
With this, we will can access the database using an URL (from the web container): postgres://hellouser:hellopassword@db/hellokubernetes
Development Updates
With the database in place, we update the application to use it; using the TypeORM library. These steps closely follow the first article in another series that I wrote: TypeORM By Example: Part 1.
We first install the dependencies:
npm install pg
npm install @types/pg
npm install typeorm
npm install reflect-metadata
As TypeORM uses the experimental TypeScript decorator syntax, we need to update:
tsconfig.json
{
    "compilerOptions": {
        ...
        "emitDecoratorMetadata": true,
        "experimentalDecorators": true
    },
    ...
}
We also need to create a TypeORM configuration file; provides information about database access among other things:
note: In practice, it is important to keep secrets out of configuration files, e.g., the following script incorrectly contains a password. For the purposes of keeping things simpler, will not worry about it now. The correct answer involves using an environment variable which we would set as part of the Deployment configuration.
ormconfig.json
{
  "type": "postgres",
  "host": "db",
  "port": 5432,
  "username": "hellouser",
  "password": "hellopassword",
  "database": "hellokubernetes",
  "synchronize": false,
  "migrationsRun": true,
  "logging": false,
  "entities": [
     "dist/entity/**/*.js"
  ],
  "migrations": [
     "dist/migration/**/*.js"
  ],
  "subscribers": [
     "dist/subscriber/**/*.js"
  ],
  "cli": {
     "entitiesDir": "src/entity",
     "migrationsDir": "src/migration",
     "subscribersDir": "src/subscriber"
  }
}
Observations:
- TypeScript
- Node.js
- Express
- SQL database
- Object-Relational-Mapping (ORM)
Let us create a Todo entity:
src/entity/Todo.ts
import { Column, Entity, PrimaryGeneratedColumn } from 'typeorm';

@Entity()
export class Todo {
  @PrimaryGeneratedColumn()
  public id: number;

  @Column()
  public name: string = '';

  @Column()
  public isComplete: boolean = false;
}

export default Todo;
We login to the web container and generate the migration:
docker exec -it hello-kubernetes_web_1 /bin/sh
./node_modules/.bin/typeorm migration:generate -n Initialize
Observations:
- TypeScript
- Node.js
- Express
- SQL database
- Object-Relational-Mapping (ORM)
We update the server application to run the migration and use the Todo entity:
src/server.ts
import cors from 'cors';
import express from 'express';
import 'reflect-metadata';
import { createConnection } from 'typeorm';
import Todo from './entity/Todo';

createConnection()
  .then(async connection => {
    const app = express();
    app.use(cors());
    app.get('/', (req, res) => res.send({ hello: 'world' }));
    app.get('/create', async (req, res) => {
      const todo = new Todo();
      todo.name = 'A Todo';
      await connection.manager.save(todo);
      res.send(todo);
    });
    app.get('/read', async (req, res) => {
      const todos = await connection.manager.find(Todo);
      res.send(todos);
    });
    app.listen(3000, () => console.log('Example app listening on port 3000!'));
  })
.catch(error => console.log(error));
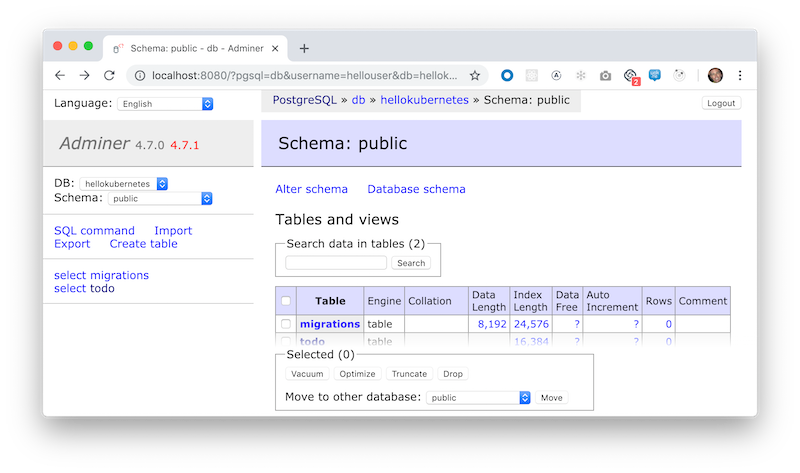
Remember, our development container automatically reloads on file changes. As we can see from using adminer tool_,_ we now have a two new tables; todos holding the Todo entities and migrations keep track of the executed migrations:
Also, we have two new endpoints:
- TypeScript
- Node.js
- Express
- SQL database
- Object-Relational-Mapping (ORM)
to exercise the persistence.
Finally, we update the application’s version:
package.json
{
  ...
  "version": "1.1.0",
  ...
}
Production Database — PersistentVolumeClaim
We will generally follow the instructions in Using Persistent Disks with WordPress and MySQLto setup our production database. The first step is to create a PersistentVolumeClaim because:
Kubernetes (k8s) is an open-source system for automating deployment, scaling, and management of containerized applications.> Kubernetes (k8s) is an open-source system for automating deployment, scaling, and management of containerized applications.
_— GKE — _Using Persistent Disks with WordPress and MySQL
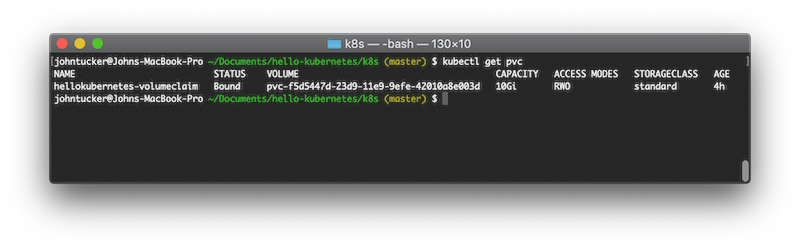
We create a small 10Gi volume that we can use for our PostgreSQL instance:
k8s/persistent-volume-claim.yaml
kind: PersistentVolumeClaim
apiVersion: v1
metadata:
  name: hellokubernetes-volumeclaim
spec:
  accessModes:
    - ReadWriteOnce
  resources:
    requests:
      storage: 10Gi
Observations:
- TypeScript
- Node.js
- Express
- SQL database
- Object-Relational-Mapping (ORM)
We apply the configuration:
kubectl apply -f persistent-volume-claim.yaml
and view the result:
kubectl get pvc
Production Database — Secret
While our database will only be accessible from resources inside our GKE cluster, we will still want to change the default postgres (administrator) password used by the postgres Docker image.
We can accomplish this by creating a Secret:
k8s/secret-postgres.yaml
apiVersion: v1
data:
  password: base64 encoded password
kind: Secret
metadata:
  name: hellokubernetes-postgres
  namespace: default
type: Opaque
Observations:
- TypeScript
- Node.js
- Express
- SQL database
- Object-Relational-Mapping (ORM)
We apply the configuration:
kubectl apply -f secret-postgres.yaml
and view the result:
kubectl get secret
Production Database — Deployment
We now create the database Deployment configuration:
k8s/deployment-postgres.yaml
apiVersion: apps/v1
kind: Deployment
metadata:
  name: hellokubernetes-postgres
spec:
  replicas: 1
  selector:
    matchLabels:
      app: hellokubernetes-postgres
  template:
    metadata:
      labels:
        app: hellokubernetes-postgres
    spec:
      containers:
        - name: hellokubernetes-postgres
          image: postgres:11.1
          env:
            - name: POSTGRES_PASSWORD
              valueFrom:
                secretKeyRef:
                  name: hellokubernetes-postgres
                  key: password
            - name: PGDATA
              value: "/var/lib/postgresql/data/pgdata"
          ports:
            - containerPort: 5432
          volumeMounts:
            - name: hellokubernetes-persistent-storage
              mountPath: /var/lib/postgresql/data
      volumes:
        - name: hellokubernetes-persistent-storage
          persistentVolumeClaim:
claimName: hellokubernetes-volumeclaim
Observations:
- TypeScript
- Node.js
- Express
- SQL database
- Object-Relational-Mapping (ORM)
We then apply:
kubectl apply -f deployment-postgres.yaml
and then view the result:
kubectl get deployment

Production Database — Initial Setup
Much like we did for the development database, we need an initial setup (new database, new user, and user having access to database) for the production database. To accomplish this, we need to login to the Container in the Pod generated by the Deployment. We first get the Pod’s name:
kubectl get pod

We then login to the Containerusing the Pod’s name:
kubectl exec -it hellokubernetes-postgres-6dcf55cd85-868d7 -- /bin/bash
- TypeScript
- Node.js
- Express
- SQL database
- Object-Relational-Mapping (ORM)
note: Similarly one can access a Container’s logs using the kubectl log command using the Pod’s name.
We connect to the database using the command:
runuser -l postgres -c psql
and execute the following SQL commands:
create database hellokubernetes;
create user hellouser with password 'hellopassword';
grant all privileges on database hellokubernetes to hellouser;
note: It was about this point, when I panicked as I recalled that Pods (and their Containers) were ephemeral (meaning changes made to them will not last). We seeming just applied some changes directly on the database Container. Then, I was relieved to remember that PostgreSQL maintains metadata (tables, users, etc.) in a database itself (which is stored on the PersistentVolume.
Production Database — Service
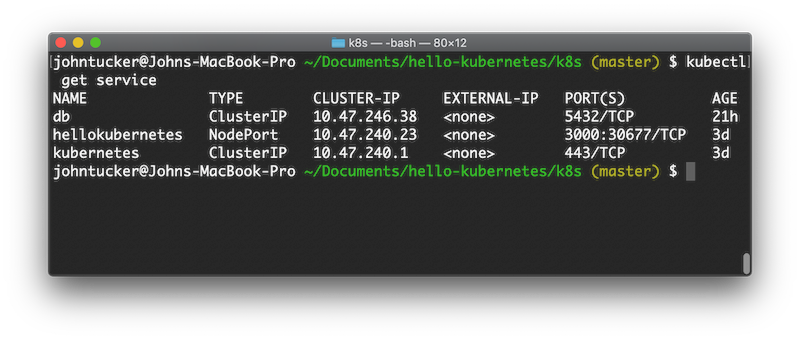
Unlike our local Docker Compose setup, Containers (in Pods) cannot communicate with other Containers in other Pods; we need to create a ClusterIP Service to accomplish this. We can visualize this as such:

We create the ClusterIP Service configuration:
k8s/service-cluster-ip.yaml
apiVersion: v1
kind: Service
metadata:
  name: db
spec:
  type: ClusterIP
  ports:
    - port: 5432
  selector:
app: hellokubernetes-postgres
Observations:
- TypeScript
- Node.js
- Express
- SQL database
- Object-Relational-Mapping (ORM)
We apply:
kubectl apply -f service-cluster-ip.yaml
and view:
kubectl get service
Production Updates
The last step is to update the image, with the new code using the database, in the deployment serving up the API.
We first build a new image and tag it locally:
docker build --tag=hellokubernetes:1.1.0 .
docker tag hellokubernetes:1.1.0 gcr.io/[PROJECT-ID]/hellokubernetes:1.1.0
When the push the image to the Google Container Registry:
docker push gcr.io/[PROJECT-ID]/hellokubernetes:1.1.0
Finally we update the image in the deployment:
kubectl set image deployment/hellokubernetes hellokubernetes=gcr.io/[PROJECT-ID]/hellokubernetes:1.1.0
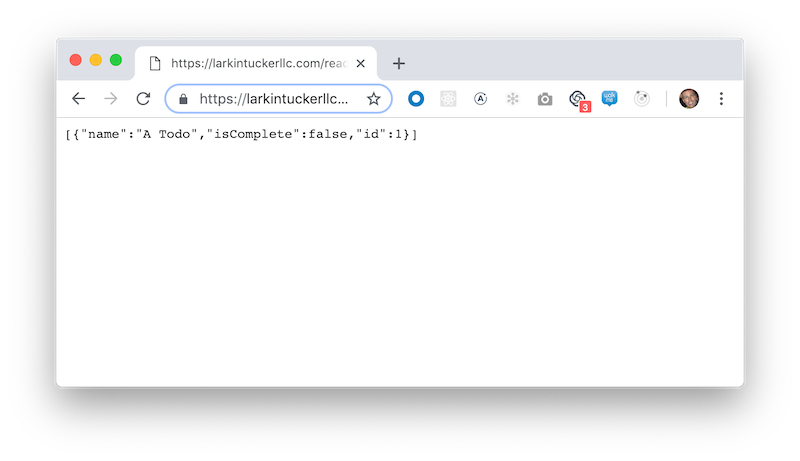
We can now see that the API has the new code, e.g., below is the read endpoint being viewed (after having used the create endpoint).
Wrap Up
Decided to stop here with the series; covered most of the core concepts to get one going with it.
To sum up my experience learning GKE:
- TypeScript
- Node.js
- Express
- SQL database
- Object-Relational-Mapping (ORM)
Learn More
☞ Learn Kubernetes from a DevOps guru (Kubernetes + Docker)
☞ Learn DevOps: The Complete Kubernetes Course
☞ Kubernetes for the Absolute Beginners - Hands-on
☞ Complete DevOps Gitlab & Kubernetes: Best Practices Bootcamp
☞ Learn DevOps: On-Prem or Cloud Agnostic Kubernetes
☞ Master Jenkins CI For DevOps and Developers
☞ Docker Technologies for DevOps and Developers
☞ DevOps Toolkit: Learn Kubernetes with Practical Exercises!
#kubernetes #docker #devops