Start Working with Voice Driven Application with Nodejs
Start Working with Voice Driven Application with Nodejs - An article to create a voice driven application in Node.js application. Here I will explain to create the application step by step.
Artificial intelligence has the potential to offer $15.7 trillion to the global economy by 2030. We all already encounter it every day. Simply think the scenerios of daily life when Amazon recommended a book to you or Netflix suggested a film or TV show. All these recommendations are based on algorithms that examine what you’ve bought or watched or on the base of other activity we do over internet. The algorithms learn from those purchases, using them to suggest other things you might enjoy. Artificial intelligence lies behind those algorithms.
Simple artificial intelligence even filters your incoming emails, diverting spam away from your inbox. It works better than software rules because it learns what could be spam based on the content of the email. The artificial intelligence even builds a model based on your preferences – what is spam to you may not be spam to another user.
Artificial intelligence goes so much further than recommending a book or filtering your emails.
So, In this article, I am going to create a demo application in Node.js to manage the video play, stop and other activity with voice. The voice manipulation gets easier for web pages by Javascript API for speech recognition.
Let’s Get Started
Step 1: Create Node.js Application
// make project directory

mkdir voice-driven-nodejs-app

// move to project folder

cd voice-driven-nodejs-app

// initialize the npm

npm init --yes

// install required package
npm install
 https express
Step 2: Generate Private key and certificate
openssl genrsa -out privatekey.pem 1024
openssl req -new -key privatekey.pem -out certrequest.csr
openssl x509 -req -in certrequest.csr -signkey privatekey.pem -out certificate.pem
Step 3: Create Server File for Nodejs application
Create file with **touch server.js **and put the below code inside this file
 const fs = require("fs");
const https = require('https');
const express = require('express');

const app = express();
app.use(express.static(__dirname + '/public'));

var privateKey = fs.readFileSync('privatekey.pem').toString();
var certificate = fs.readFileSync('certificate.pem').toString();

const httpOptions = {key: privateKey, cert: certificate};
https.createServer(httpOptions, app).listen(8000, () => {
console.log(">> Serving on " + 8000);
});
app.get('/', function(req, res) {
res.sendFile(__dirname + '/public/index.html');
});
Step 4: Create index.html
Create a file under public directory
// create a public/index.html file
mkdir public && cd public && touch index.html
Open the file and put below code inside the body tag of the html page
 <video id="video" controls="" preload="none" muted=”muted”poster="https://media.w3.org/2010/05/sintel/poster.png">
<source id="mp4" src="https://media.w3.org/2010/05/sintel/trailer.mp4" type="video/mp4">
<source id="webm" src="https://media.w3.org/2010/05/sintel/trailer.webm" type="video/webm">
<source id="ogv" src="https://media.w3.org/2010/05/sintel/trailer.ogv" type="video/ogg">
<p>Your user agent does not support the HTML5 Video element.</p>
</video>
<p>
Say : Play / Stop / Mute / Unmute
</p>
<script src='RemoteControl.js'></script>
<script src='main.js'></script>
Step 5: Create main.js under the public directory
Create file with **touch main.js **and put below code inside it.
 var video = document.querySelector("#video");

var remoteControl = new RemoteControl(video);
var recognition = new webkitSpeechRecognition();
recognition.continuous = true;
recognition.interimResults = true;
recognition.lang = "en-US";
recognition.continuous = true;
recognition.start();

recognition.onresult = function(event) {
for (var i = event.resultIndex; i < event.results.length; ++i) {
if (event.results[i].isFinal) {
if (event.results[i][0].transcript.trim() == "play") {
remoteControl.play();
}
if (event.results[i][0].transcript.trim() == "stop") {
remoteControl.stop();
}
if (event.results[i][0].transcript.trim() == "mute") {
remoteControl.mute();
}
if (event.results[i][0].transcript.trim() == "unmute") {
remoteControl.unmute();
}
console.info(`You said : ${event.results[i][0].transcript}`);
}
}
};
Step 7: Create RemoteControl.js under the public directory
create a new file with **touch RemoteControl.js **and put below code insite it
class RemoteControl {

constructor(element) {
this.videoElement = element;
}

play() {
this.videoElement.play();
}
stop() {
this.videoElement.pause();
this.videoElement.currentTime = 0;
}
mute() {
this.videoElement.muted = true;
}
unmute() {
this.videoElement.muted = false;
}
}
Final Step: Run the App
Run the app with below command
node server.js
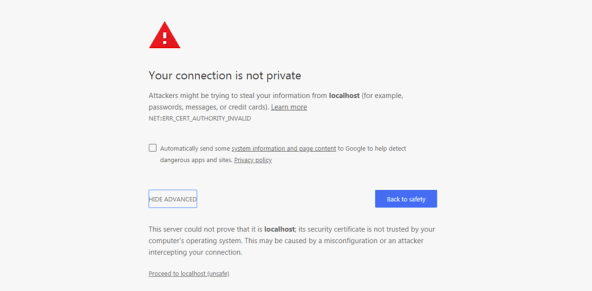
Now navigate to URL: https://localhost:8000/ over browser. A Page will open like below:

Click on advanced:

And then Proceed to localhost (unsafe)

Now we can access the video by saying play/stop/mute/unmute
Conclusion
So in this demo, We tried to Start Working with Voice Driven Application in Nodejs Application. You can also find other demos of Nodejs Sample Application here to start working on enterprise level application. Credit for the demo goes to : click here to see
That’s all for now. Thank you for reading and I hope this demo will be very helpful how AI can be integrated with Node.js and about the use of AI in our daily life.
Originally published at JSONWORLD.
#node-js #web-development
