Now, let us move ahead in this Java Tutorial, where we will understand each aspect of Java in the following sequence:
Hello World ProgramMember variables in JavaData types and operatorsControl StatementsClasses & ObjectsStructure of a programArraysOOPs concept – Inheritance, Encapsulation, Polymorphism, Abstraction
Let’s get started
Hello World Program
First of all, I will give you a simple overview of how a Java program looks like. In the below code, I have created a class – MyFirstJavaProgram and printed “Hello World”. Go ahead and try to execute the below example in your Eclipse IDE. Do not worry, we will discuss about Java class in a while.
public class MyFirstJavaProgram {
       public static void main(String[] args)
   {
    System.out.println("Hello World");
   }
}
Next, let us understand different member variables in Java.
Java Tutorial: Member Variables
A member variable plays a major role in a class as it is used to store a data value. When we define a class, we can declare a member variable. These variables are members of a class.
Member variables are further classified into three types:
Local variableInstance variableClass/Static variable
Let me discuss about each one of them:
Local variable: These are the variables which are declared within the method of a class. Let’s understand this with a programmatic example:
public class Car {
      public void display(int m){  // Method
           int model=m;                 // Created a local variable model
           System.out.println("Model of the car is" +model);
     }
In the above code, my local variable is ‘model’ which I have declared inside a method ‘display’ which has a parameter ‘m’.
Instance variable: Instance variable is declared in a class but outside a method, constructor or any block. Let’s understand this with a programmatic example.
public class Car {
      public String color;     // Created an instance variable color

Car(String c)
   {
    color=c;
   }

public void display() {  // Method
      System.out.println("color of the car is"+color);
   }

public static void main(String args[]){
              Car obj=new Car("black");
                obj.display();
       }
}
In the above code, ‘color’ is my instance variable which has a value “black” associated to it.
Class variable: Class variables are also called as static variables. These variables have only one copy that is shared by all the different objects in a class. Let’s understand this with a programmatic example.
public class Car {
      public static int tyres;   // Created a class variable tyres
        public static void main(String args[]){
           tyres=4;
           System.out.println("Number of tyres are"+tyres);
        }
}
All cars must be having 4 tyres, right? So in my above code, I have declared a static variable as ‘tyre’ whose value remains same throughout the class.
Let’s move ahead in this Java Tutorial blog and look at our next topic i.e data types and operators in Java.
**Java Tutorial: Data types **
A data type is used to represent different values which are stored in a variable. They are mainly classified into 4 different aspects – Integer, Float, Character and Boolean. You can refer to the below image to understand the different data types with respect to the memory allocated to them.
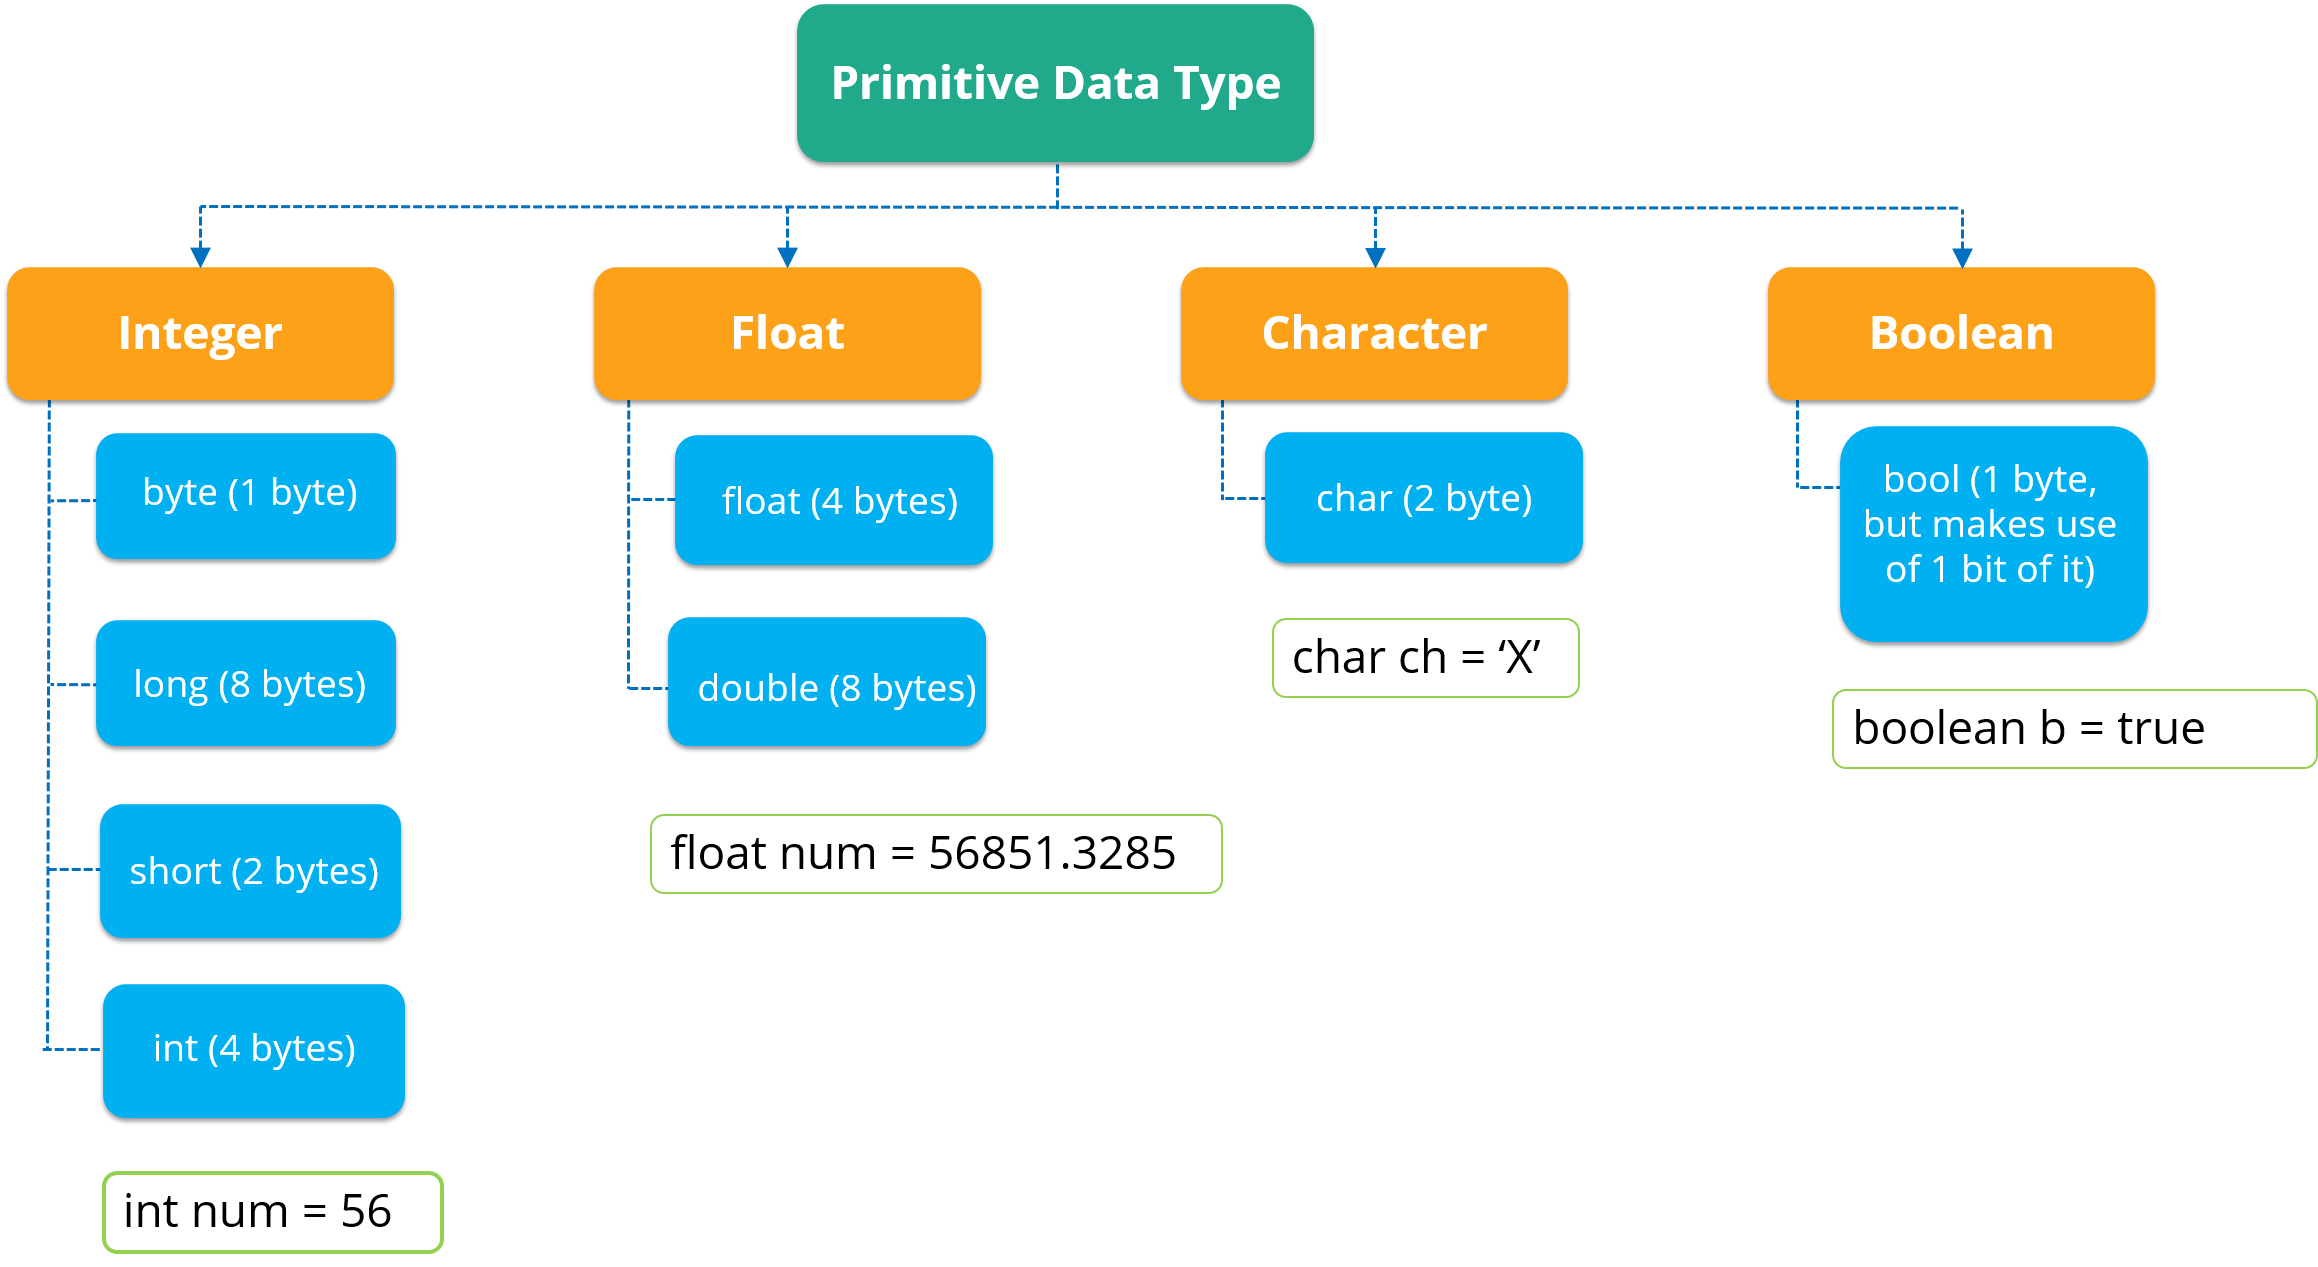
As you can see in the above image, data types are of 4 major types.
The first data type is an Integer which stores a numerical value.Now, if a numerical value contains decimal part, it will be referred as float.Next, if you wish to store a character, then the third data type i.e char is used. In char, you can store any alphabetical character as well as a special character.The last data type is Boolean which stores only ‘true’ or ‘false’ value.
Let’s move forward and look at the various data operations which you can perform in Java.
Java Tutorial: Data Operators
There are mainly 4 different types of operators, which are listed below:
- Arithmetic Operator: Perform arithmetic operations such as addition, subtraction, multiplication, division and modulus.
- Unary Operator: Unary operators are used to increment or decrement a particular value. For example: ++ stands for increment, – – stands for decrement.
- Relational Operator: It defines some kind of relation between two entities. For example: <, >, <=, >=, !=, ==.
- Logical Operator: Logical operators are typically used with boolean (logical) values.
Next, let us move forward in Java Tutorial blog and understand the concept of control statements.
Java Tutorial: Control statements
Control statements are the statements that define the flow of your program. There are 3 types of control statements in Java: Selection, iteration and jump statements.
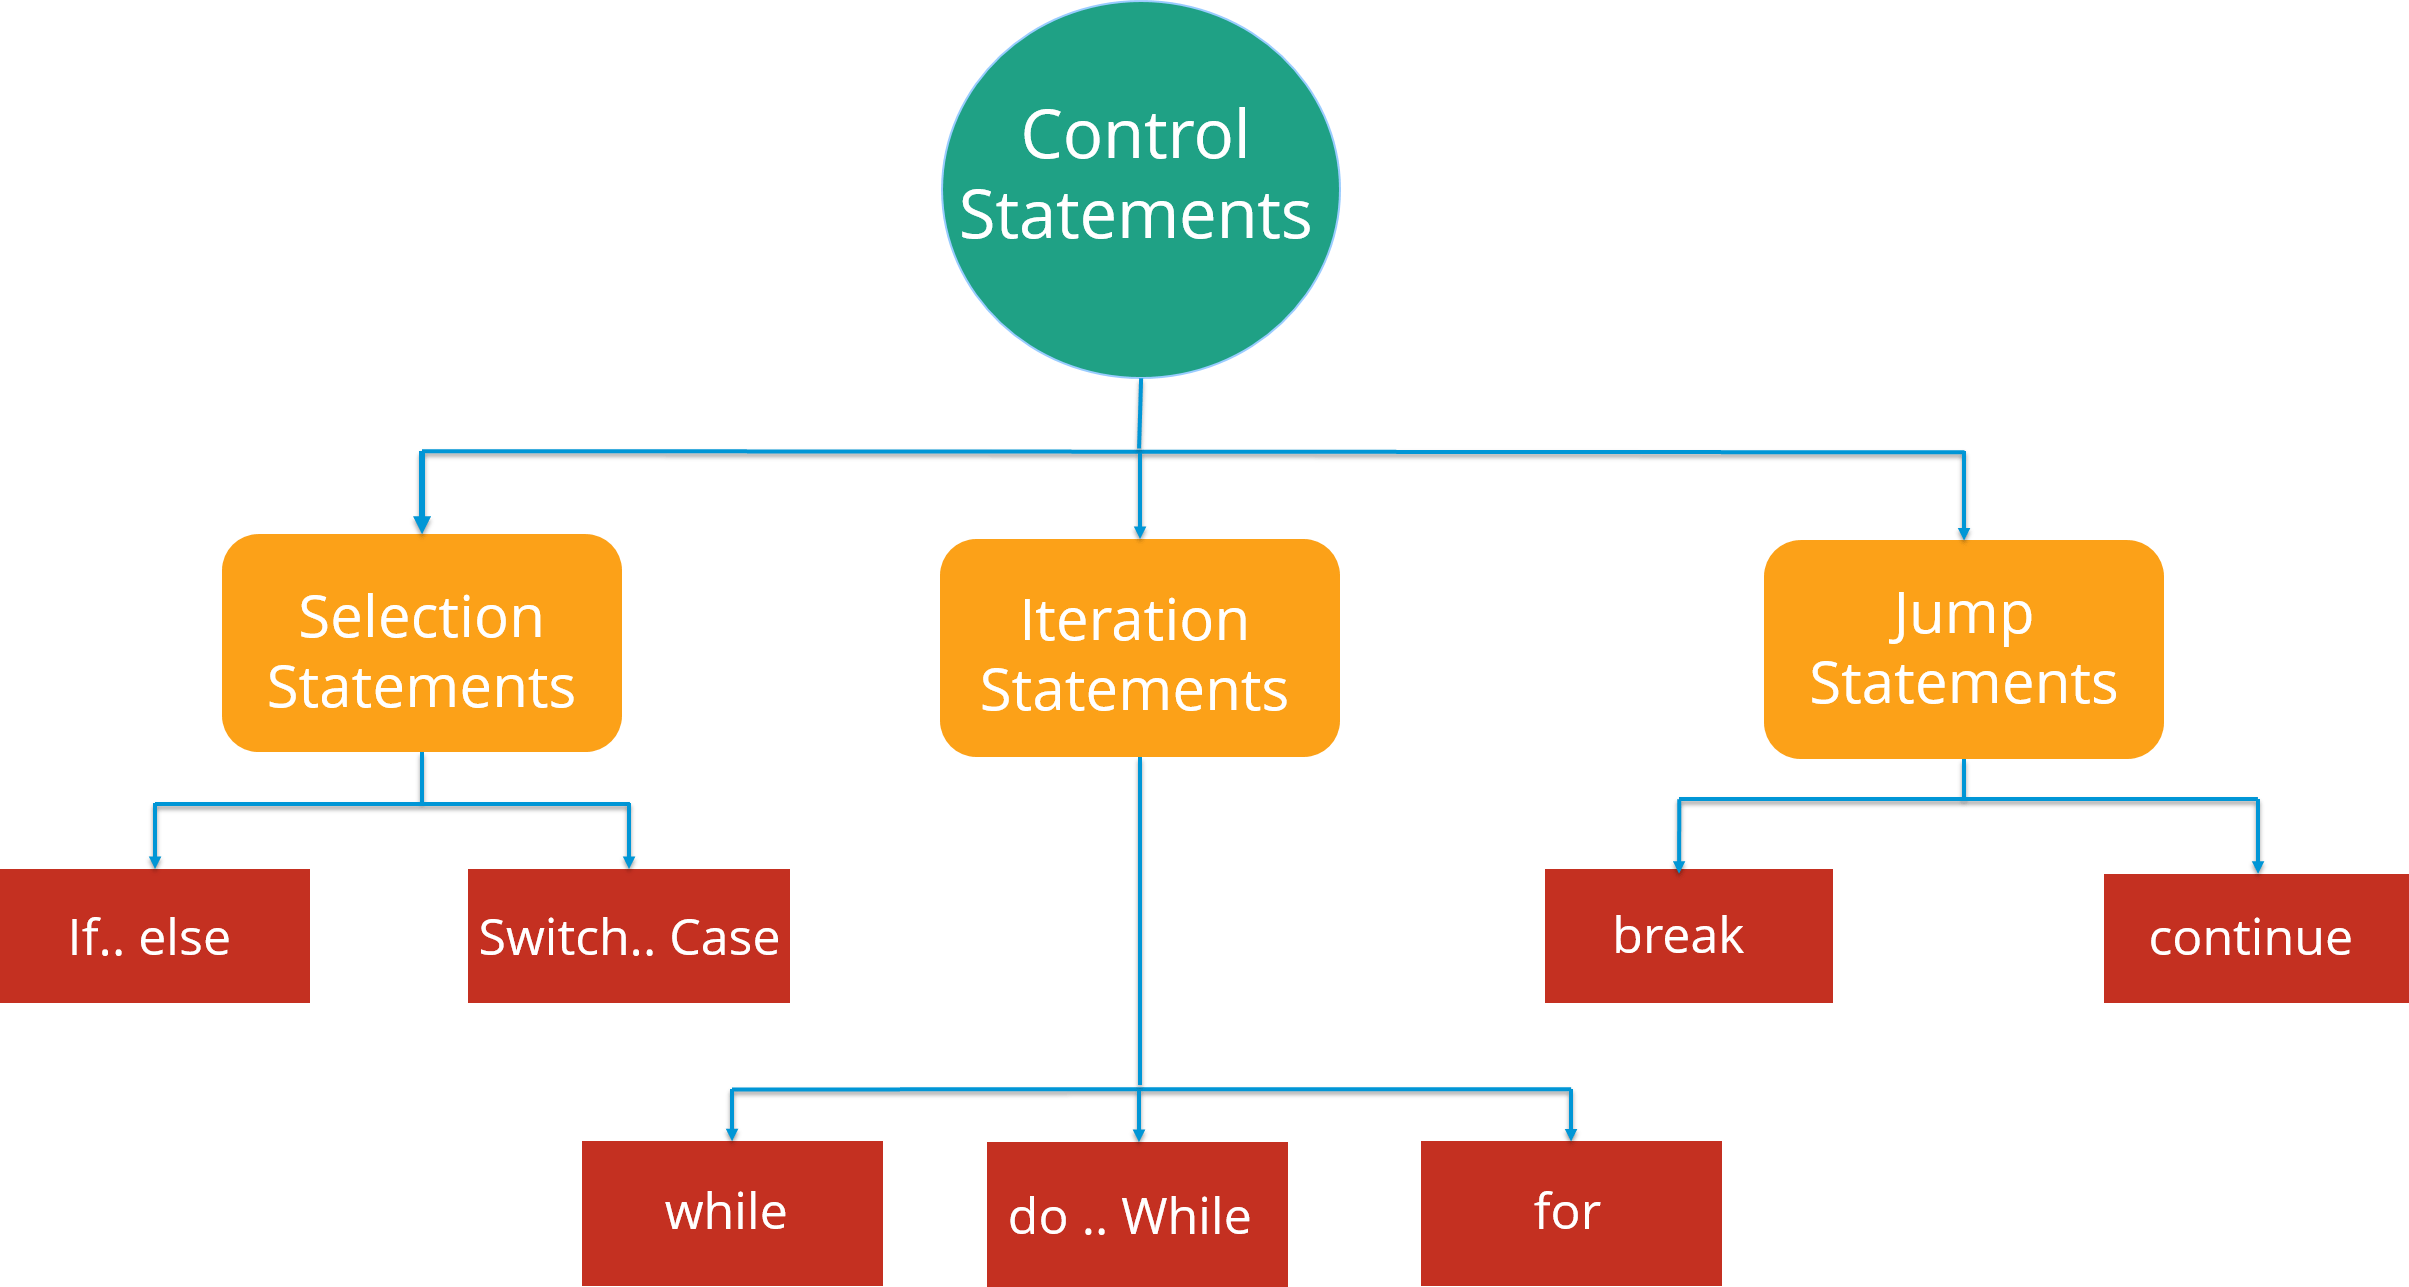
Lets see these control statements one by one.
**Selection Statements: **Selection statements allow you to control the flow of the program during run time on the basis of the outcome of an expression or state of a variable. For example: you want to eat pizza, but then where can you get that pizza in best price. You can select between various popular options like Domino’s, Pizza Hut or any other outlet. So here you are following a selection process from the various options available.
Now these statements can be further classified into the following:
If-else StatementsSwitch Statements
Refer to the following flowchart to get a better understanding of if-else statements:
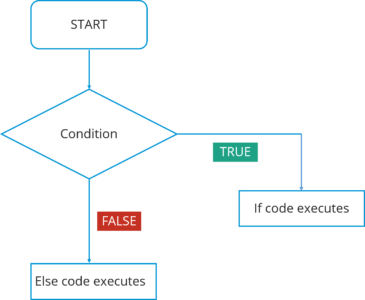
In this flowchart, the code will respond in the following way:
First of all, it will enter the loop where it checks the condition.If the condition is true, the set of statements in ‘if’ part will be executed.If the condition is false, the set of statements in the ‘else’ part will be executed.
Here you must have got an idea of how these if-else statements work. Now, how can we use these statements in Eclipse IDE? Let’s have a look at the code:
public class Compare {
     int a=10,
     int b=5;

if(a>b)
      {  // if condition
     System.out.println(" A is greater than B");
      }
else
      {     // else condition
      System.out.println(" B is greater");
      }
}
In the above code, I have created a class Compare where I have compared two numbers ‘a’ and ‘b’. First of all, it will go in ‘if’ condition where it checks whether the value of ‘a’ is greater than ‘b’ or not. If the condition is true, it will print “A is greater than B” else it will execute “B is greater”.
Moving on, we have Switch case statement. The switch statement defines multiple paths for execution of a set of statements. It is a better alternative than using a large set of if-else statements as it is a multi-way branch statement.
Refer to the following flowchart to get a better understanding of switch statements:
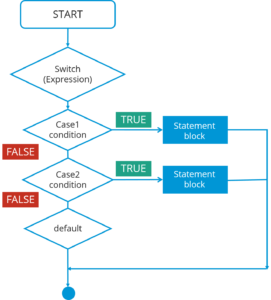
In this Switch case flowchart, the code will respond in the following steps:
First of all it will enter the switch case which has an expression.Next it will go to Case 1 condition, checks the value passed to the condition. If it is true, Statement block will execute. After that, it will break from that switch case.In case it is false, then it will switch to the next case. If Case 2 condition is true, it will execute the statement and break from that case, else it will again jump to the next case.Now let’s say you have not specified any case or there is some wrong input from the user, then it will go to the default case where it will print your default statement.
Again, if we look at the code for switch statements in IDE, here it is:
public class SwitchExample {
     int week=7;
     String weeknumber;

switch(week){    // switch case
case 1:
          weeknumber="Monday";
       break;

case2:
          weeknumber="tuesday";
       break;

case3:
          weeknumber="wednesday";
       break;

default:        // default case
          weeknumber="invalid week";
       break;
     }
  System.out.println(weeknumber);
     }
}
In the above code, I have created a class SwitchExample which has 3 cases that print days of a week. It also has a default case which is executed whenever a user doesn’t specify a case.
Concluding both of the selection statements, we understood that if we are comparing two statements, we are using if-else, but let’s say if you are checking a specific value against a particular statement, then we are going for the Switch statement.
Next, there is another set of control statements, i.e Iteration Statements.
**Iteration Statements: **In Java, these statements are commonly called as loops, as they are used to iterate through small pieces of code. Iteration statements provide the following types of loop to handle looping requirements.
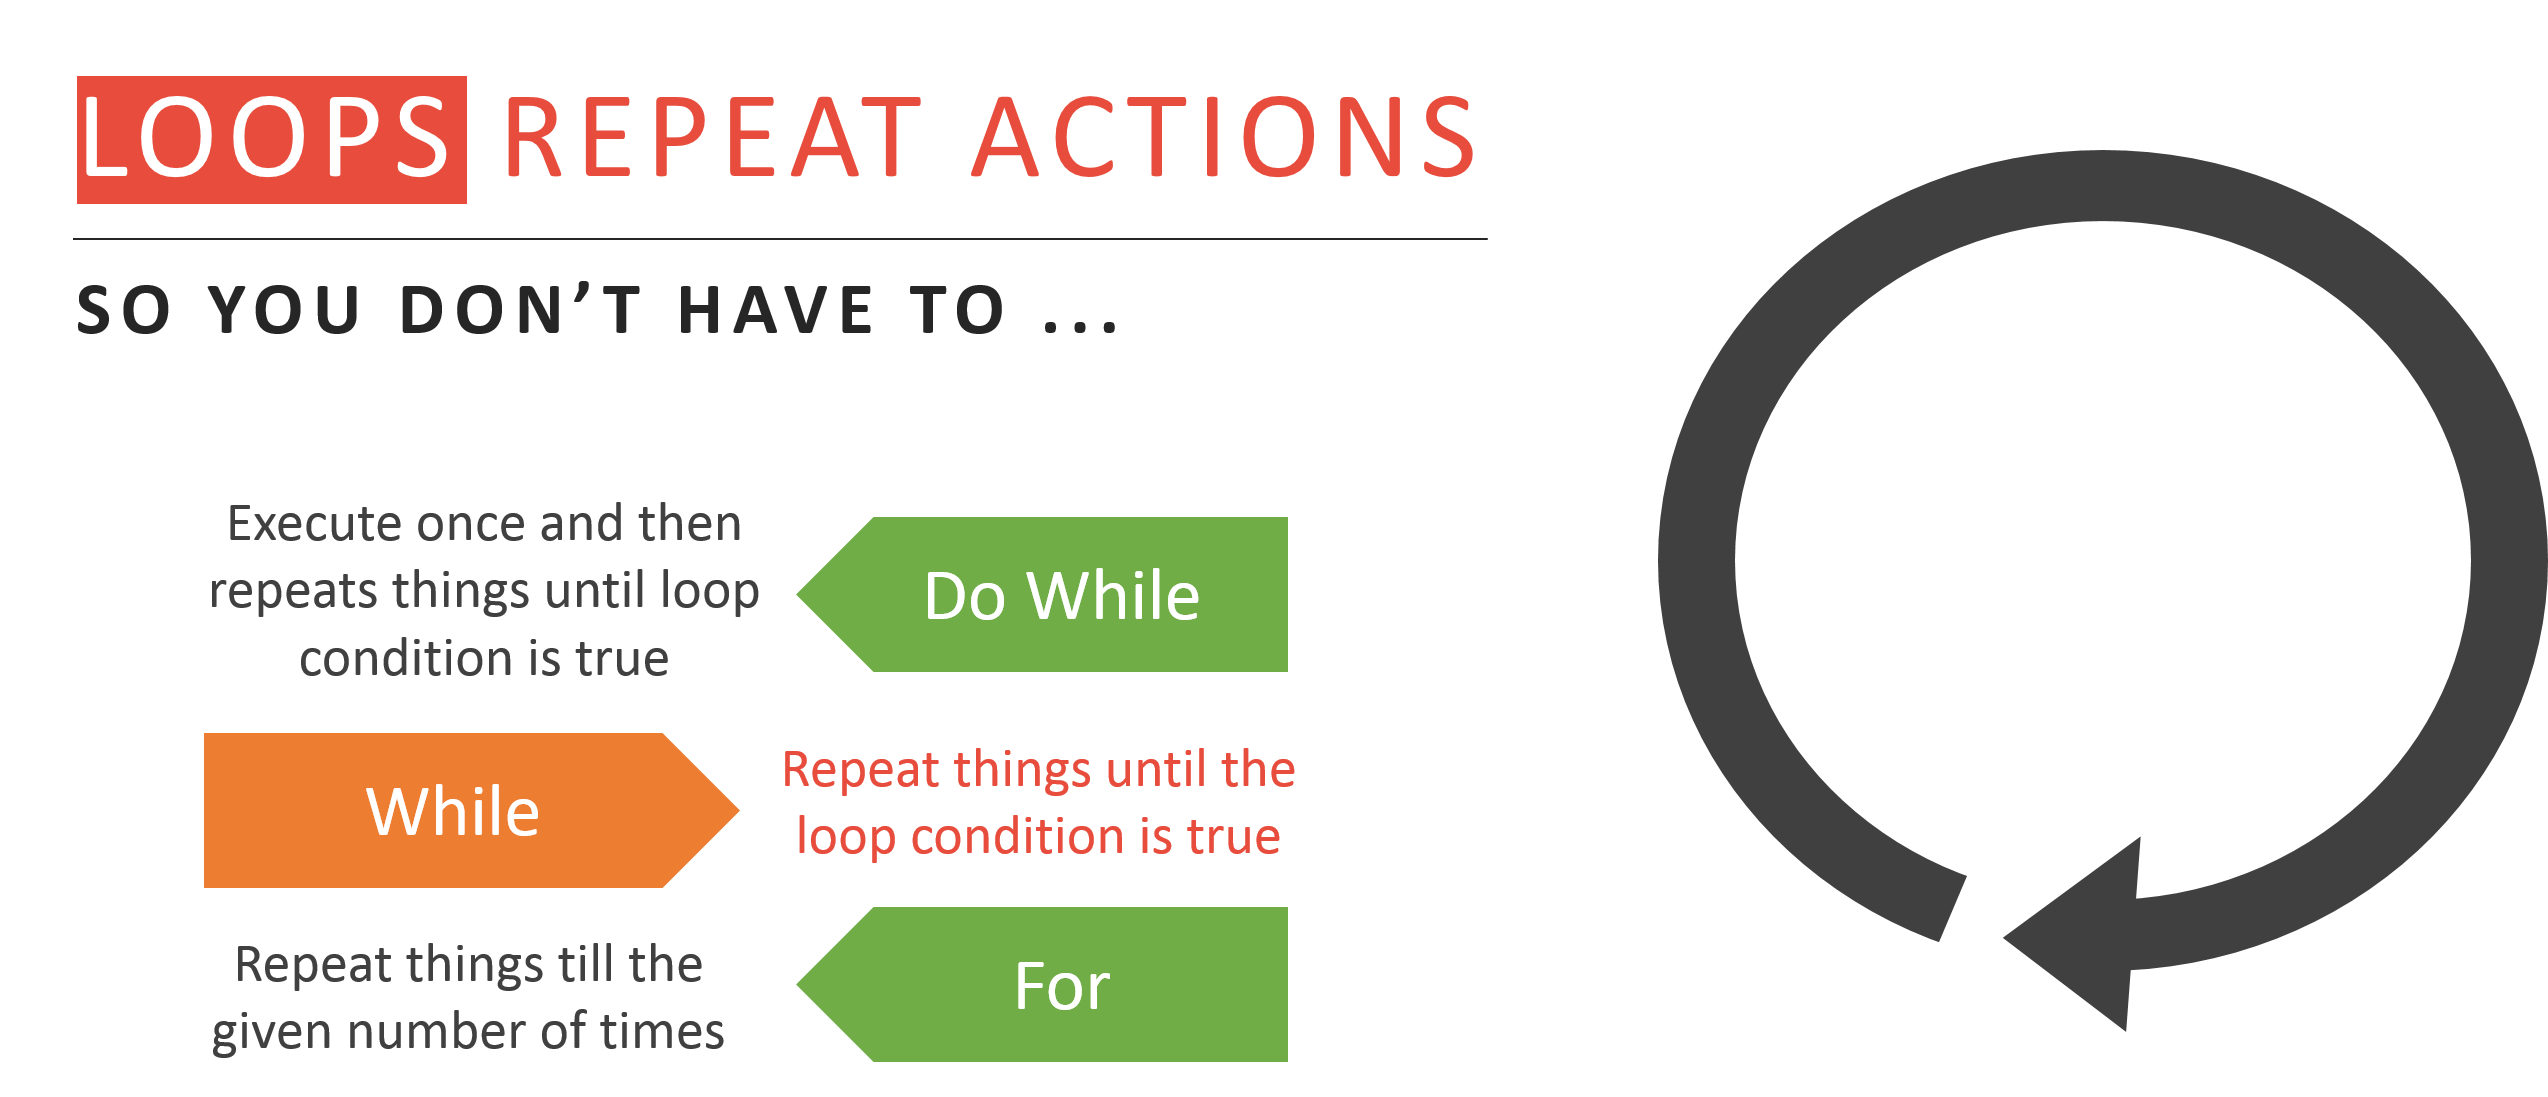
Let’s understand each one of them in detail:
While statement: Repeat a group of statements while a given condition is true. It tests the condition before executing the loop body. Let’s understand this better with a flow chart:
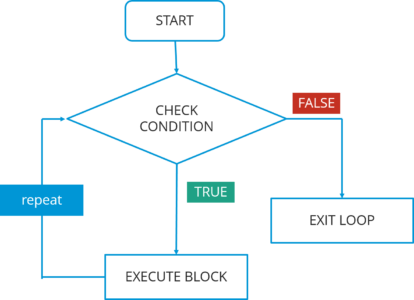
In this flowchart, the code will respond in the following steps:
- First of all, it will enter the loop where it checks the condition.
- If it’s true, it will execute the set of code and repeat the process.
- If it’s False, it will directly exit the loop.
Now, let us see how you can implement the code in IDE.
public class WhileExample {
      public static void main(String args[]) {
         int a=5;
   while(a<10)   //while condition
         {
         System.out.println("value of a" +a);
         a++;
   System.out.println("
");
         }
    }
}
In the above code, it first checks the condition whether the value of a is less than 10 or not. Here, the value of a is 5 which in turn satisfy the condition, and thus perform functions.
Do-while statement: It is like a while statement, but it tests the condition at the end of the loop body. Also, it will executes the program at least once. Let’s understand this better with a flow chart:
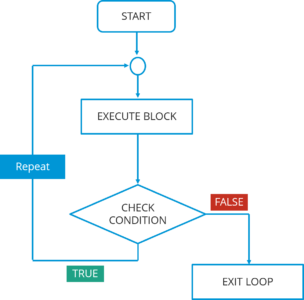
In this do-while flowchart, the code will respond in the following steps:
First of all, it will execute a set of statements that is mentioned in your ‘do’ block.After that, it will come to ‘while’ part where it checks the condition.If the condition is true, it will go back and execute the statements.If the condition is false, it will directly exit the loop.
Let’s see how you can implement the code in IDE.
public class DoWhileExample {
      public static void main(string args[]){
          int count=1;
do {                        // do statement
     System.out.println("count is:"+count);
     count++;
   }
 while (count<10)            // while condition
       }
  }
In the above code, it will first execute the ‘do’ statements and then jump to the while part. In this program, the output would be : 1 2 3 4 5 6 7 8 9.
For statement: For statement execute a sequence of statements multiple time where you can manage the loop variable. You basically have 3 operations here: initialization, condition and iteration. Let’s understand this better with a flow chart:
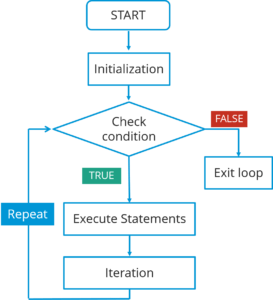
In this flowchart, the code will respond in the following steps:
- First of all, it will enter the loop where it checks the condition.
- Next, if the condition is true, the statements will be executed.
- If the condition is false, it directly exits the loop.
Let’s see how you can implement the code in IDE.
public class ForExample {
      public static void main(String args[]) {
          for(int i=0; i<=10; i++)  // for condition
          {
          System.out.println(i);
          }
     }
}
In the above code, it will directly print the numbers from 1 to 10.
The last type of control statement we will be discussing is Jump Statement.
Jump statement: Jump statement are used to transfer the control to another part of your program. These are further classified into – break and continue.
Let’s learn about them in detail:
- Break statement: Whenever a break statement is used, the loop is terminated and the program control is resumed to the next statement following the loop. Let’s understand this better with a flow chart:
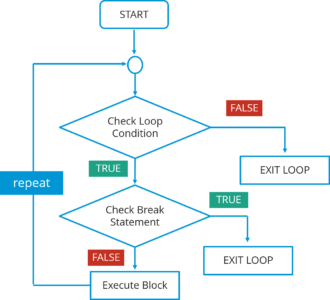
In this flowchart, the code will respond in the following steps:
- First of all, it will enter the loop where it checks the condition.
- If the loop condition is false, it directly exits the loop.
- If the condition is true, it will then check the break condition.
- If break condition is true, it exists from the loop.
- If the break condition is false, then it will execute the statements that are remaining in the loop and then repeat the same steps.
The syntax for this statement is just the ‘break’ keyword followed by a semicolon.
**2. Continue statement: **Continue statement is another type of control statements. The continue keyword causes the loop to immediately jump to the next iteration of the loop. Let’s understand this better with a flow chart:
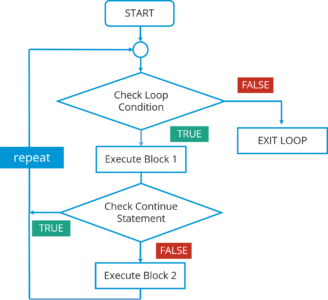
In this flowchart, the code will respond in the following steps:
First of all, it will enter the loop where it checks the condition.If the loop condition is false, it directly exits the loop.If the loop condition is true, it will execute block 1 statements.After that it will check for ‘continue’ statement. If it is present, then the statements after that will not be executed in the same iteration of the loop.If ‘continue’ statement is not present, then all the statements after that will be executed.
The syntax is just the ‘continue’ keyword followed by a semicolon.
Next, let us see what are classes and objects in Java.
Java Tutorial: Classes and Objects
A class in Java is a blueprint which includes all your data. A class contain fields(variables) and methods to describe the behavior of an object. Let’s have a look at the syntax of a class.
class Abc {
      member variables // class body
        methods
 }
But how can you access these member variables and methods? Here comes the concept of Object.
An object is a major element in a class which has a state and behavior. It is an instance of a class which can access your data. Let’s see the syntax to create an object in Java:
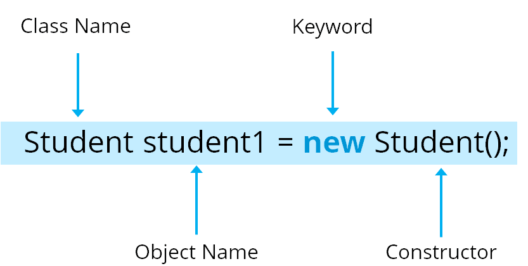
Here, Student is your class name followed by the name of the object. Then there is a “new” keyword which is used to allocate memory. Finally, there is a call to constructor. This call initializes the new object.
Now let’s see how can you call a method using an object in Java:
class Student()
      void display(); {            // Method
     ------                           // logic of method
}
public static void main(String args[]){
      Student obj=new Student();   // Created an object
      obj.display();               // Method called
}
Want to know more about them? I would suggest you to see this Java class video which will take you through in-depth details of Java classes and the different key-components in Java. Go ahead, enjoy the video and tell me what you think.
Next, let us move ahead in our Java Tutorial blog where we’ll be discussing about another key concept i.e. Arrays.
Java Tutorial: Arrays
Arrays in Java is similar to that of C++ or any other programming langauage. An array is a data structure which holds the sequential elements of the same type.
Let’s say you want to store 50 numbers. Instead of declaring individual variables, such as number0, number1, … and so on. You can declare one array variable – “numbers” and use number[0], number[1] to represent individual variables. This will ease your task and minimizes the redundancy.
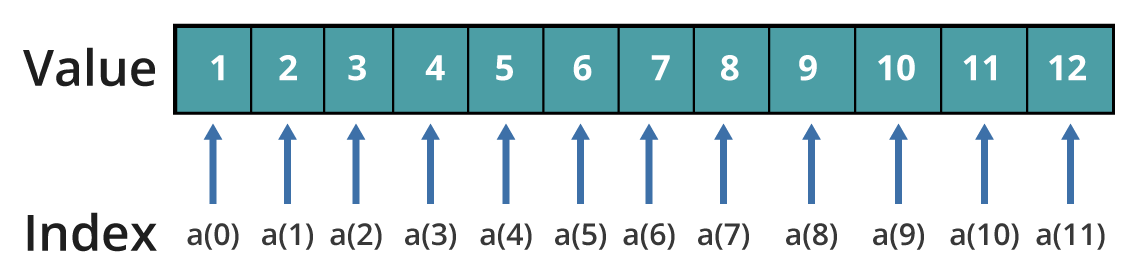
Each array has two components: index and value. Refer to the below image for better understanding:
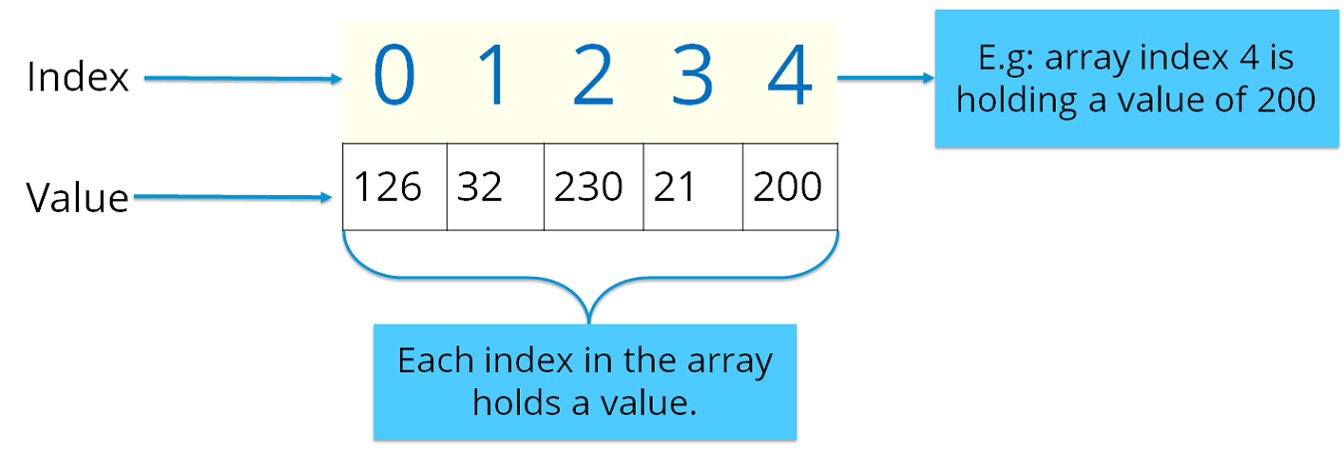
Here the indexing starts from zero and goes till (n-1) where n= size of the array. Let’s say you want to store 10 numbers, then the indexing starts from zero and goes till 9.
There are two types of arrays in Java:
Single-dimension ArrayMulti-dimension Array
Single-dimension Array: In a single-dimension array, a list of variables of the same type can be accessed by a common name. You can initialize the array using the following syntax:
int a[] = new int[12];
You can refer to the below image where I have stored data with respect to the given index.
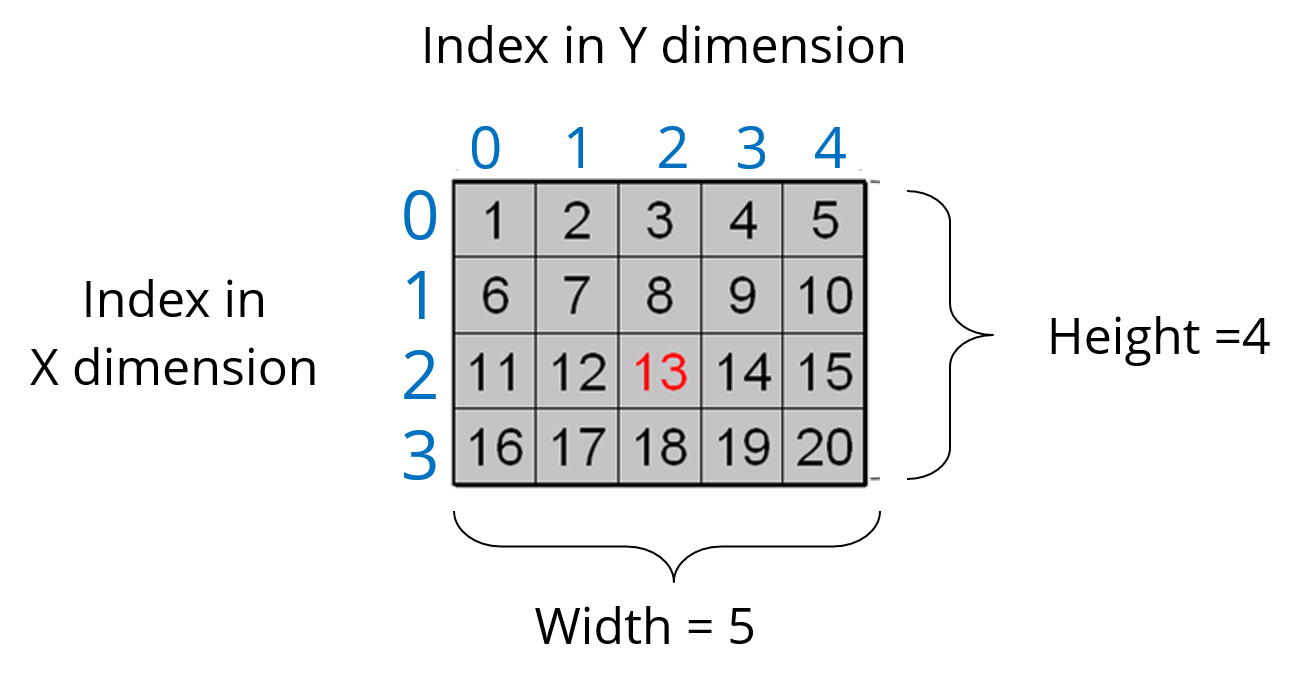
**Multi–dimension Array: **In a multi-dimension array, your data is stored in a matrix form. Here, you can initialize the array using the following syntax:
int table[][]= new int[4][5];
It is quite similar to the matrix that we use in mathematics. Refer to the below image where I have stored data with respect to different dimensions.
 Thus, arrays help you in optimizing the code where you can insert the data at any location.
Let’s see the below code to understand the concept of array in Java.
import java.util.*;
public class ArrayExample {
      public static void main( String args[])
     {
     double invoice[][]= new double[10][2];  // Initializing array
          Scanner obj= new Scanner(System.in);    // creating a scanner object to take input from user
          for(i=0;i<10;i++){                       // nested for loops
              for(j=0;j<2;j++);
               {
               System.out.println("Enter the value");
               invoice[i][j]=obj.nextDouble();         // store values to array
          for(i=0;i<10;i++){
              for(j=0;j<2;j++)
               {
                System.out.println(invoice[i][j]);
               }
         }
     }
}
In the above code, I have explained how you can take input for the array and print the same.
I hope you guys are clear with how an array looks like and how do you initialize one. Now, let’s summarize the above topics and see the entire structure of a Java program.
Java Tutorial: Structure of a Program
Till now, we have learned about member variables, data types, control statements, classes and objects. Let’s see how all of them are structured together in a class in Java.
public class Car{                    // Class creation
       String color;                        // Member variables
       String model;
       public void SpeedCheck(int s)        // Method
         {
         int speed=s;
           if(speed>100)                        // Control statement
           {
           System.out.println(" You are driving very fast");
           }
           else
           {
            System.out.println("You are driving at normal speed");
           }
public static void main ( String args[])
         {
         Car obj= new Car();                  // Object creation
         obj.speed(60);
         }
Finally, we come to our last topic in Java Tutorial blog i.e Object Oriented programming concepts.
Java Tutorial: OOPs Concept
We have already discussed about classes and objects in Java. Let’s discuss the 4 main concepts of object oriented programming – Inheritance, Encapsulation, Polymorphism and Abstraction.
Let’s begin with the first concept i.e. Inheritance.
Inheritance: Most of you must be familiar with inheritance. Inheritance is a process where one class acquires the properties of another. But whose properties are inherited? Here we have two classes, a child class which inherits the properties of a base class.
A Class which inherits the properties are known as **Child class. **It is also referred as derived class or a subclass. Next, the class whose properties are inherited are known as **Parent class **or a base class.
Let’s understand these classes by looking at this real-life example of animals.
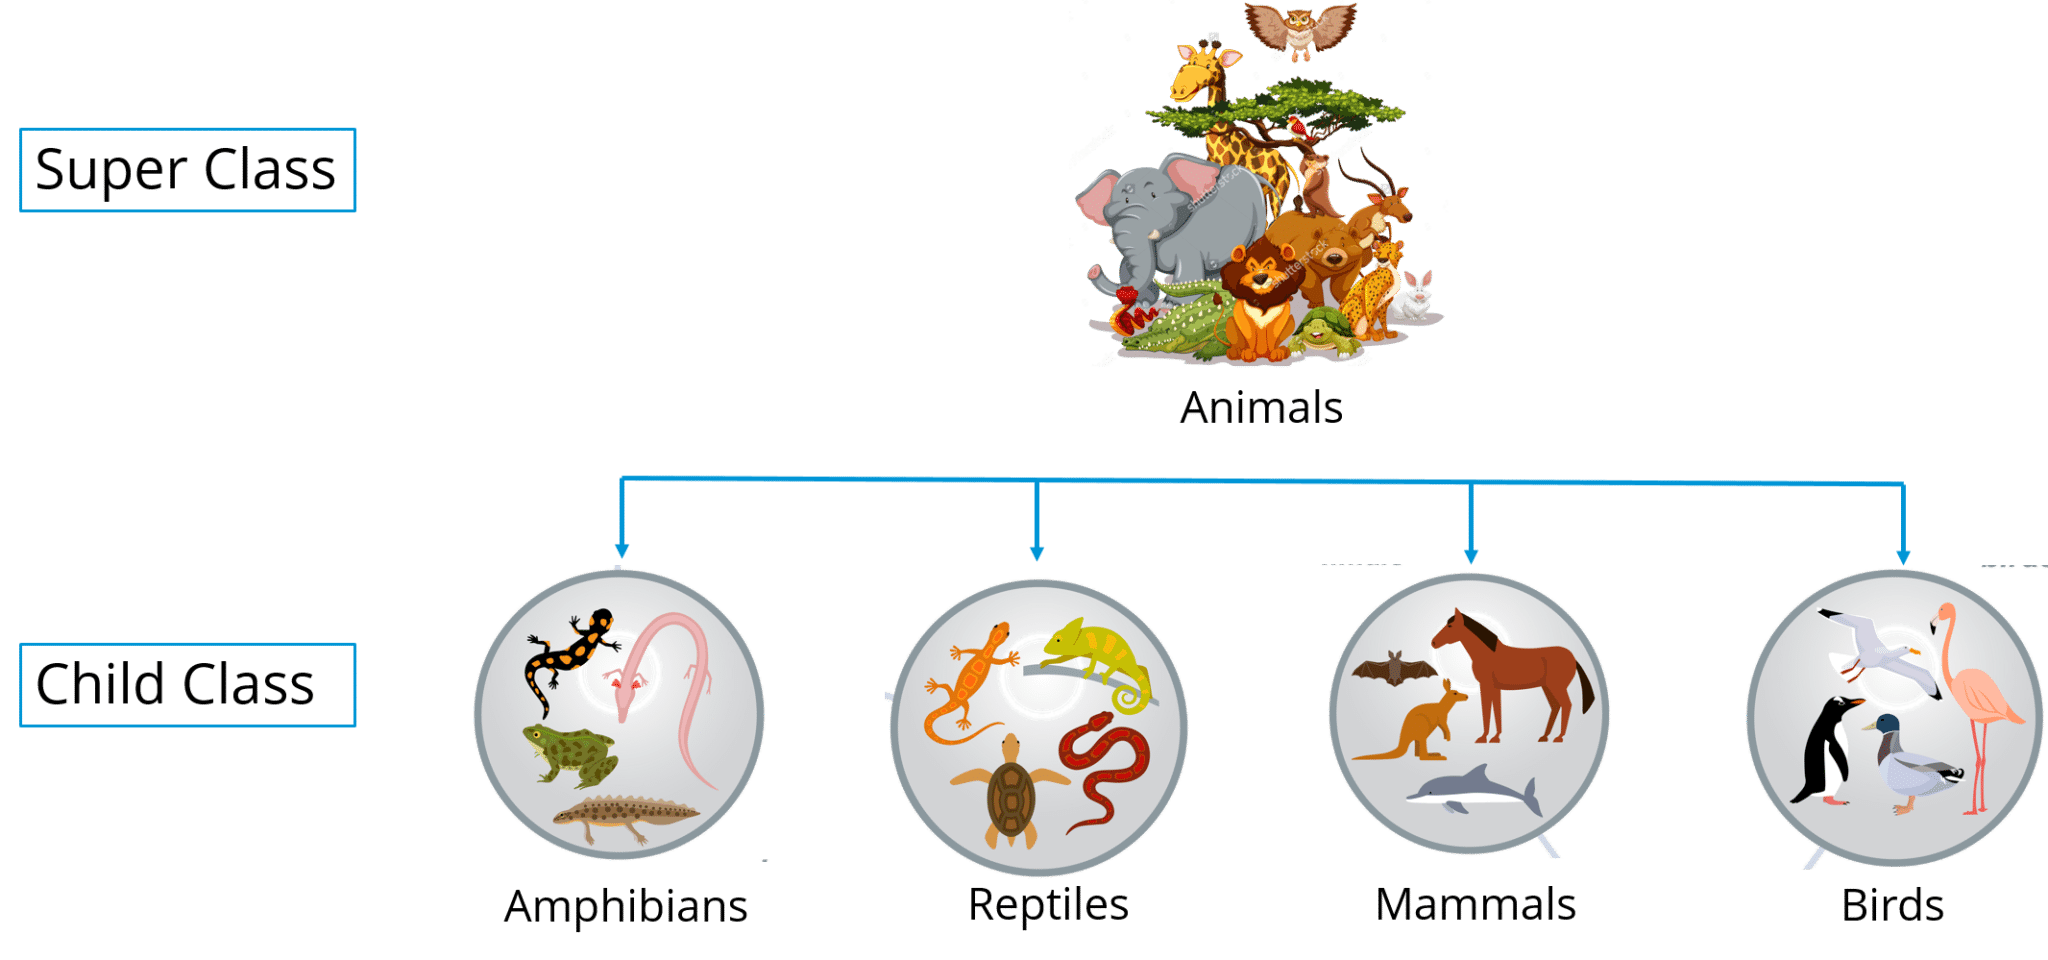
In the above image, Animal is the superclass whereas amphibians, reptiles, mammals and birds are your child classes which are inheriting the properties from ‘Animal’ class.
In Java, inheritance is used to avoid code redundancy. Also, inheritance has many types, don’t worry, we will be going into more depth in my next blog on object oriented programming.
**Encapsulation: **Encapsulation in Java is a mechanism of wrapping up the data and code together as a single unit. Refer to the below image where all your methods, variables are binded together in a single class.

In encapsulation, the variables of a class will be hidden from other classes, and can be accessed only through the methods of their current class.
**Polymorphism: **Polymorphism is the ability of a variable, function or object to take multiple forms. The most common use of polymorphism in OOPs occur when a parent class is used to refer a child class object. Polymorphism is also achieved through function overloading. Don’t worry! I will be explaining the whole concept in my next blog. For now, let’s take a real life scenario where a teacher tells student to draw different shape/figure having different functionalities.

Let’s say I want to draw a specific shape which already has multiple functions present as part of my program. So the functions that are dealing with shape, I’ll call them as draw(). Now based on the values that I have passed to these functions, it will draw different shapes. Let’s say in case of a rectangle, I am passing two values – length and breadth. Similarly for a circle, I am passing a radius. Based on the values you pass, different function will be called that serve different purposes. So this can be achieved through function overloading. Stay tuned, the concept of function overloading will be covered in detail in my next blog.
Abstraction: It is basically the quality of dealing with ideas rather than events. Abstraction is the methodology of hiding the implementation details from the user and only providing the functionality to the users. Let’s see this real-life example of a car where i’ll help you understand what exactly abstraction is.

If you consider the case of this car, here the mechanic is repairing a certain function in a car. But the user or you can say driver doesn’t want to know about these things, he just wants his car back in a working condition. So here, you basically segregate the implementation and show the other person what he actually wants to see and that exactly refers to abstraction.
#java #web-development