Amazon Alexa Skill With Node.js
In this tutorial, we will implement a custom skill for Amazon Alexa by using nodejs, npm and AWS Lambda Functions. This skill is basically a Hello World example. With this tutorial you will be able to create a custom skill for Amazon Alexa, implement functionality by using nodejs and start your custom skill both from your local computer and from AWS.
This tutorial contains materials from different resources that can be seen on Resources section.
Adding the ASK SDK to Your Project
- From within your NPM project, run the following commands to install the standard ASK SDK v2 for Node.js distribution:
npm install --save ask-sdk
Configuring Amazon Alexa Custom Skill
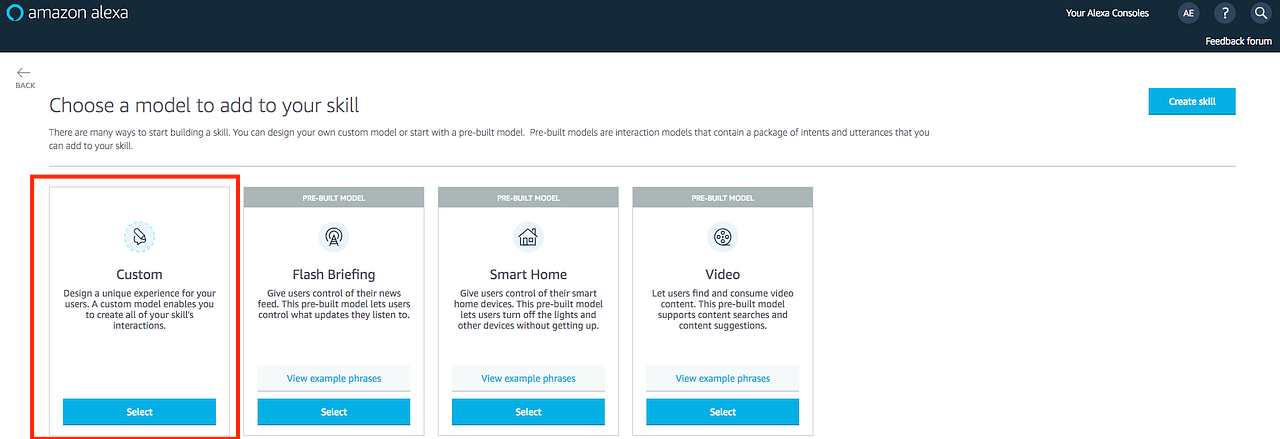
- Create a new skill in the developer console. When prompted to choose a model, select the Custom model.
- Go to developer.amazon.com/alexa.
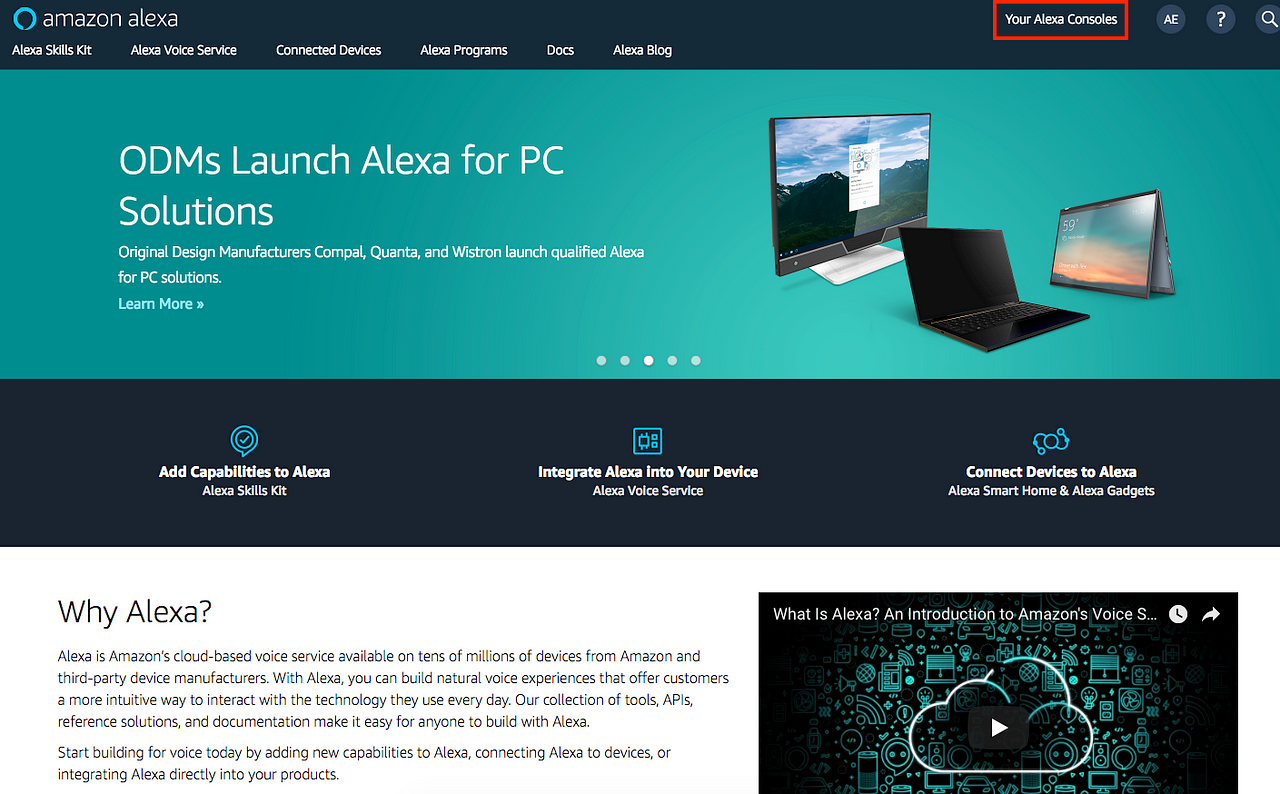
- Click Your Alexa Consoles and then click Skills. This opens the developer console and displays any skills you have already created.
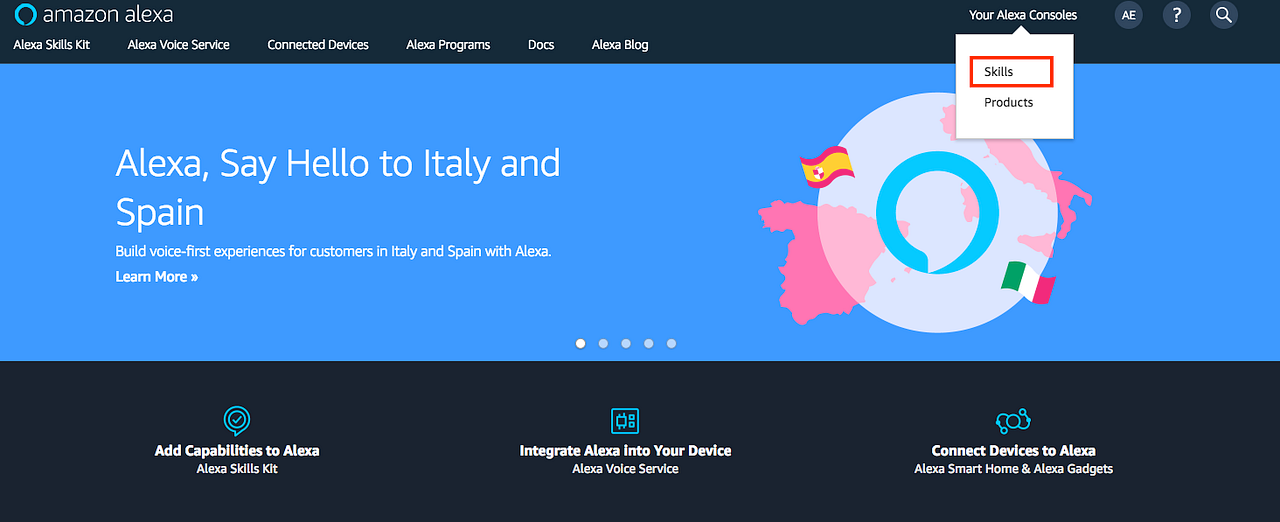
- Click Create Skill.

- Enter the skill name. This is the name customers will see when you publish the skill. You can edit this name later on the Distribution page.

- If necessary, change the initial language for the skill, then click Next.
- Click the Select button the model you want to include (For this tutorial, we will use custom).
Implementing Request Handlers
First create the request handlers needed to handle the different types of incoming requests to your skill.
LaunchRequest Handler
The following code example shows how to configure a handler to be invoked when the skill receives a LaunchRequest. The LaunchRequest event occurs when the skill is invoked without a specific intent.
Create a file called index.js and paste in the following code.
const LaunchRequestHandler = {
    canHandle(handlerInput) {
        return handlerInput.requestEnvelope.request.type === 'LaunchRequest';
    },
    handle(handlerInput) {
        const speechText = 'Welcome to the Alexa Skills Kit, you can say hello!';

return handlerInput.responseBuilder
            .speak(speechText)
            .reprompt(speechText)
            .withSimpleCard('Hello World', speechText)
            .getResponse();
    }
};
The canHandle function returns true if the incoming request is a LaunchRequest. The handle function generates and returns a basic greeting response.
HelloWorld Intent Handler
The following code example shows how to configure a handler to be invoked when the skill receives the HelloWorldIntent.
Paste the following code into your index.js file, after the previous handler.
const HelloWorldIntentHandler = {
    canHandle(handlerInput) {
        return handlerInput.requestEnvelope.request.type === 'IntentRequest'
            && handlerInput.requestEnvelope.request.intent.name === 'HelloWorldIntent';
    },
    handle(handlerInput) {
        const speechText = 'Hello World!';

return handlerInput.responseBuilder
            .speak(speechText)
            .withSimpleCard('Hello World', speechText)
            .getResponse();
    }
};
The canHandle function detects if the incoming request is an IntentRequest, and returns true if the intent name is HelloWorldIntent. The handle function generates and returns a basic “Hello world” response.
HelpIntent Handler
The following code example shows how to configure a handler to be invoked when the skill receives the built in intent AMAZON.HelpIntent.
Paste the following code into your index.js file, after the previous handler.
const HelpIntentHandler = {
    canHandle(handlerInput) {
        return handlerInput.requestEnvelope.request.type === 'IntentRequest'
            && handlerInput.requestEnvelope.request.intent.name === 'AMAZON.HelpIntent';
    },
    handle(handlerInput) {
        const speechText = 'You can say hello to me!';

return handlerInput.responseBuilder
            .speak(speechText)
            .reprompt(speechText)
            .withSimpleCard('Hello World', speechText)
            .getResponse();
    }
};
Similar to the previous handler, this handler matches an IntentRequest with the expected intent name. Basic help instructions are returned.
CancelAndStopIntent Handler
The CancelAndStopIntenthandler is similar to the HelpIntent handler, as it is also triggered by built-in intents. The following example uses a single handler to respond to two different intents, Amazon.CancelIntent and Amazon.StopIntent.
Paste the following code into your index.js file, after the previous handler.
const CancelAndStopIntentHandler = {
    canHandle(handlerInput) {
        return handlerInput.requestEnvelope.request.type === 'IntentRequest'
            && (handlerInput.requestEnvelope.request.intent.name === 'AMAZON.CancelIntent'
                || handlerInput.requestEnvelope.request.intent.name === 'AMAZON.StopIntent');
    },
    handle(handlerInput) {
        const speechText = 'Goodbye!';
return handlerInput.responseBuilder
            .speak(speechText)
            .withSimpleCard('Hello World', speechText)
            .getResponse();
    }
};
The response to both intents is the same, so having a single handler reduces repetitive code.
SessionEndedRequest Handler
Although you can not return a response with any speech, card or directives after receiving a SessionEndedRequest, the SessionEndedRequestHandler is a good place to put your cleanup logic.
Paste the following code into your index.js file, after the previous handler.
const SessionEndedRequestHandler = {
    canHandle(handlerInput) {
        return handlerInput.requestEnvelope.request.type === 'SessionEndedRequest';
    },
    handle(handlerInput) {
        //any cleanup logic goes here
        return handlerInput.responseBuilder.getResponse();
    }
};
Error Handler
ASK SDK v2 for Node.js brings better support for error handling, making it easy for skill to ensure a fluent user experience. Error handler is a good place to inject your error handling logic such as unhandled request, api service time out, etc. The following sample adds a catch all error handler to your skill to ensure skill returns a meaningful message in case of all errors.
Paste the following code into your index.js file, after the previous handler.
const ErrorHandler = {
    canHandle() {
      return true;
    },
    handle(handlerInput, error) {
      console.log(`Error handled: ${error.message}`);

return handlerInput.responseBuilder
        .speak('Sorry, I can\'t understand the command. Please say again.')
        .reprompt('Sorry, I can\'t understand the command. Please say again.')
        .getResponse();
    },
};
Creating the Lambda Handler
The Lambda handler is the entry point for your AWS Lambda function. The following code example creates a Lambda handler function to route all inbound request to your skill. The Lambda handler function creates an SDK Skill instance configured with the request handlers that you just created.
Add the following code at the beginning of your index.js file. The code should be before the handlers you created earlier. (Remeber, this is the ASK SDK v2!)
'use strict';
const Alexa = require('ask-sdk-core');
// use 'ask-sdk' if standard SDK module is installed

////////////////////////////////
// Code for the handlers here //
////////////////////////////////

exports.handler = Alexa.SkillBuilders.custom()
     .addRequestHandlers(LaunchRequestHandler,
                         HelloWorldIntentHandler,
                         HelpIntentHandler,
                         CancelAndStopIntentHandler,
                         SessionEndedRequestHandler)
     .lambda();
Configuring Your Skill
Select the Invocation option from the sidebar and enter “greeter” for the Skill Invocation Name.

Next, add an intent called HelloWorldIntent to the interaction model. Click the Add button under the Intents section of the Interaction Model.

Leave “Create custom intent” selected, enter “HelloWorldIntent” for the intent name, and create the intent. On the intent detail page, add some sample utterances that users can say to invoke the intent. For this example, you can use these:
say hello
say hello world
hello
say hi
say hi world
hi
how are you
Since AMAZON.CancelIntent, AMAZON.HelpIntent, and AMAZON.StopIntent are built-in Alexa intents, you do not need to provide sample utterances for them.
The Developer Console also allows you to edit the entire skill model in JSON format. Select JSON Editor from the sidebar. For this sample, you can use the following JSON schema.
{
  "interactionModel": {
    "languageModel": {
      "invocationName": "greeter",
      "intents": [
        {
          "name": "AMAZON.CancelIntent",
          "samples": []
        },
        {
          "name": "AMAZON.HelpIntent",
          "samples": []
        },
        {
          "name": "AMAZON.StopIntent",
          "samples": []
        },
        {
          "name": "HelloWorldIntent",
          "slots": [],
          "samples": [
            "how are you",
            "hi",
            "say hi world",
            "say hi",
            "hello",
            "say hello world",
            "say hello"
          ]
        }
      ],
      "types": []
    }
  }
}
Once you are done editing the interaction model, be sure to save and build the model.
Starting your Alexa Skill on Local
Installing NPM Package and Configuration Files
We will use a npm packet called alexa-skill-local for this part. In order to start your application you should also create a asl-config.json file in your root directory. Config file has to be of following format (If you are not sure of the “stage”, in most cases it is “development”):
{
    "skillId" : "your_skill_id_here",
    "stage" : "stage_of_the_skill"
}
You can find your skill id on the Alexa Console page, it looks like amzn1.ask.skill.6f2f04b5-abba-3f47–9fc9–0sbba79b1535. Use Node.js v8.x.x to run. You can install alexa-skill-local globally (recommended) or in your project directory (in this case you many want to run it from npm scripts in package.json).
$ npm install -g alexa-skill-local
Usage
Run following command. When prompted open http://localhost:3001 in your browser. Login with Amazon to grant alexa-skill-local an access to update your skill’s endpoint.
$ alexa-skill-local
After that follow the instructions on the console.
Configuring Amazon Alexa Skill
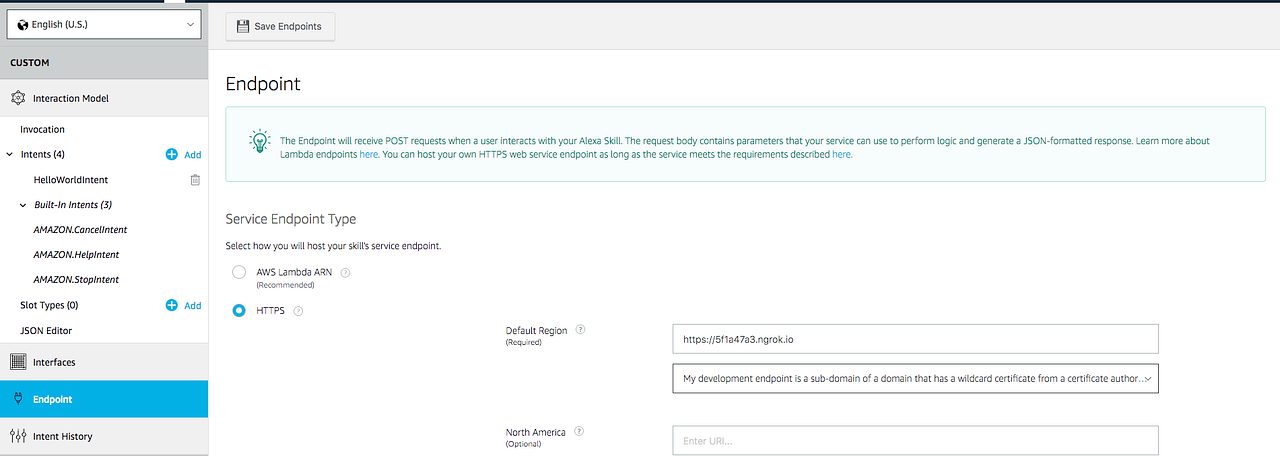
Configure the endpoint for the skill. Under Endpoint select HTTPS and paste in the URL that has been provided on the command line. Select SSL certificate type as My Development endpoint is a sub-domain of a domain that has a wildcard certificate from a certificate authority. The rest of the settings can be left at their default values. Click Save Endpoints.
Starting your Alexa Skill using AWS Lambda
Creating AWS Lambda Function
- If you do not already have an account on AWS, go to Amazon Web Services and create an account.
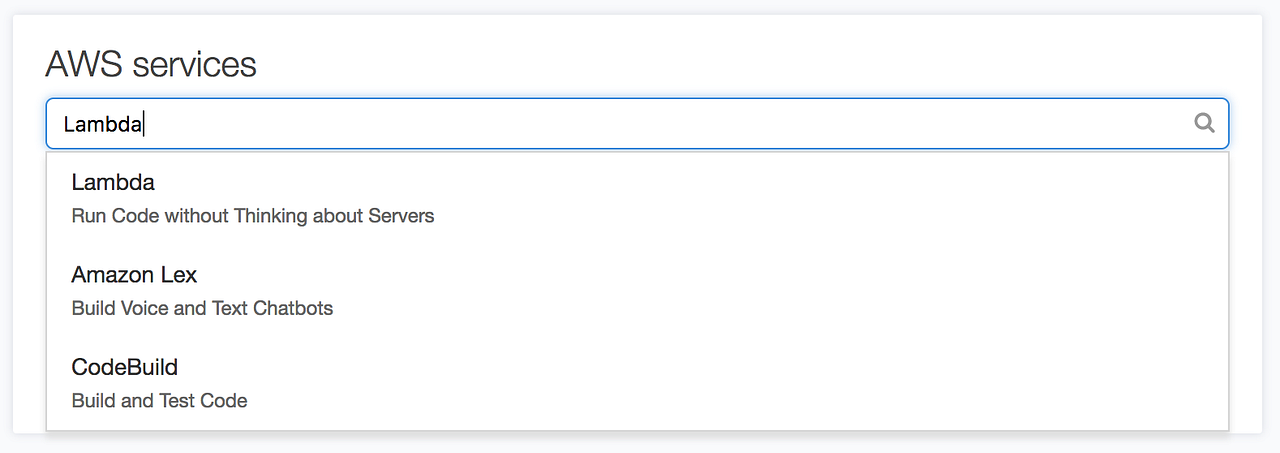
- Log in to the AWS Management Console and navigate to AWS Lambda.
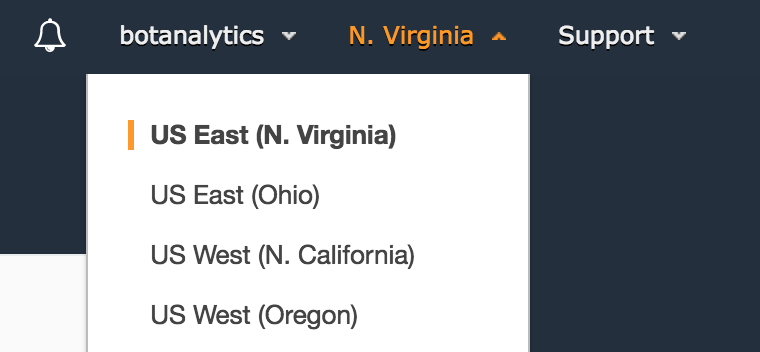
- Click the region drop-down in the upper-right corner of the console and select one of the regions supported for Alexa skills: Asia Pacific (Tokyo), EU (Ireland), US East (N. Virginia), or US West (Oregon).
- If you have no Lambda functions yet, click Get Started Now. Otherwise, click Create a Lambda Function.

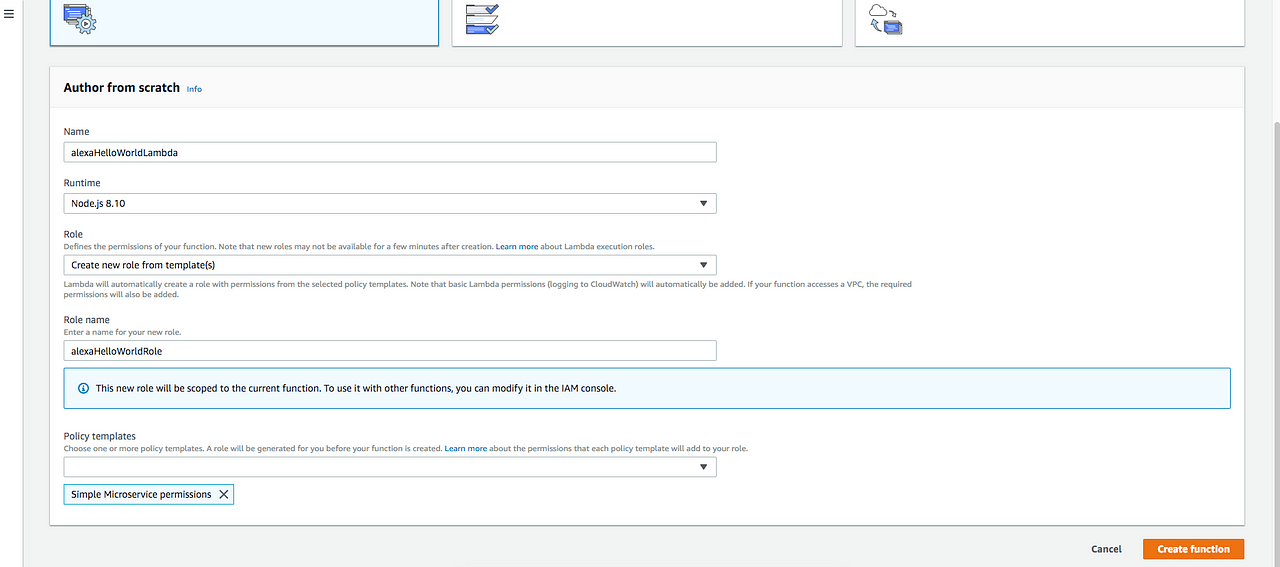
- Select Author From Scratch.
- Enter a Name for the function.
- Select the Role for the function. This defines the AWS resources the function can access.
- To use an existing role, select the role under Existing role.
- To create a new role. Remember that we need a Simple Microservice permissions for this role!
- Select the language you want to use for the Runtime (Node.js, Java, or Python). For this tutorial, we are using Node.js.
- Click Create function.
- Configure the Alexa Skills Kit trigger.
Adding Alexa Skills Kit Trigger
- Go to https://www.developer.amazon.com/alexa.
- Click Your Alexa Consoles and then click Skills. This opens the developer console and displays any skills you have created.
- Find the skill in the list. The ID is displayed below the skill name.
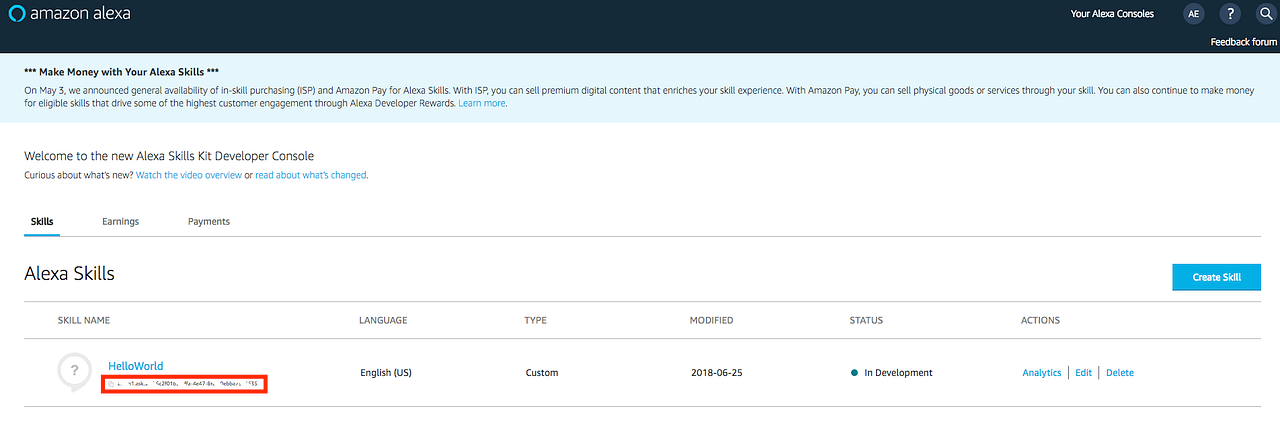
Once you have your skill ID, add the trigger to the function:
- Log in to the AWS Management Console and navigate to AWS Lambda.
- Click your function in the list to open the configuration details.
- Make sure you are on the Configuration page.
- In the Designer section, under Add triggers, click Alexa Skills Kit to select the trigger.
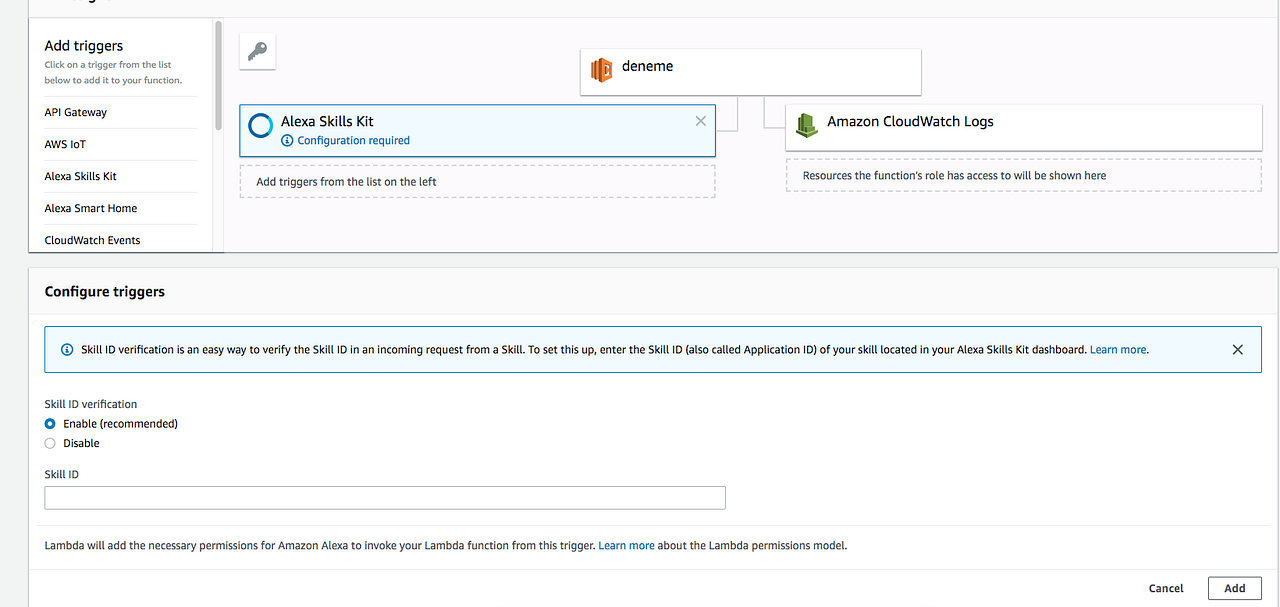
- Under Configure triggers, select Enable for Skill ID verification.
- Enter your skill ID in the Skill ID edit box.
- Click Add.
- Click Save to save the change.
Creating the Skill Package
With the skill code complete, you can create the skill package. To prepare the skill for upload to AWS Lambda, create a zip file that contains the skill file plus the node_modules folder. Make sure to compress all project files directly, NOT the project folder.
Uploading Your Skill to AWS Lambda
Once you’ve created your AWS Lambda function and configured “Alexa Skills Kit” as a trigger, upload the .zip file produced in the previous step and leave the handler as default index.handler. Finally, copy the ARN for your AWS Lambda function because you’ll need it when configuring your skill in the Amazon Developer console.

Configuring Amazon Alexa Skill
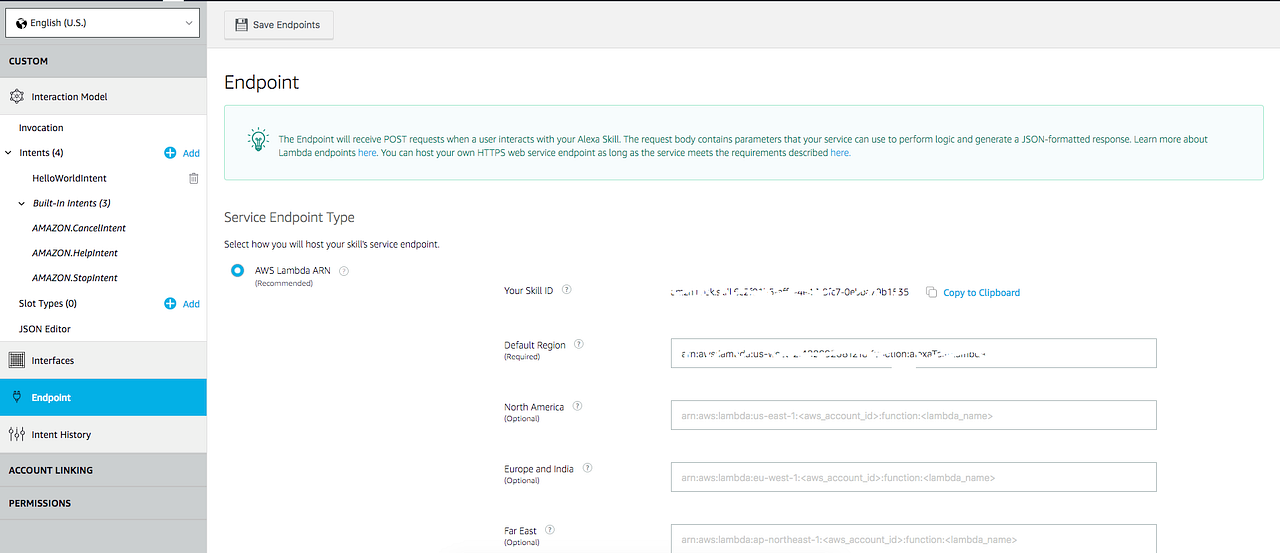
Configure the endpoint for the skill. Under Endpoint select AWS Lambda ARN and paste in the ARN of the function you created previously. The rest of the settings can be left at their default values. Click Save Endpoints.
Testing Your Skill
At this point you can test the skill. Click Test in the top navigation to go to the Test page. Make sure that the Test is enabled for this skill option is enabled. You can use the Test page to simulate requests, in text and voice form. Use the invocation name along with one of the sample utterances. For example, “tell greeter to say hi world” should result in your skill responding with “Hello world”. There are multiple options for testing a new skill:
Use the invocation name along with one of the sample utterances we just configured as a guide. For example, “tell greeter to say hello” should result in your skill responding with “Hello world”. You should also be able to go to the Alexa App (on your phone or at https://alexa.amazon.com) and see your skill listed under Your Skills. From here, you can enable the skill on your account for testing from an Alexa enabled device.
You need to track your bot’s performance on a regular basis, keep an eye on how it is performing to make it hit the charts.
Finally, connect your skill to Botanalytics for getting your free analytics for Amazon Alexa skills. You cannot improve what you don’t measure, right? You can use our official Node.js library to easily integrate Botanalytics.
Thanks for reading!
#nodejs #alexa tutorials #aws lambda #alexa skills
