Build Dynamic Maps from 0 Consuming Data from a REST API using ReactJS + Hooks
Build dynamic maps from 0 consuming data from a REST API using ReactJS + Hooks
In this tutorial you will learn to create dynamic maps totally free, with markers and obtain the coordinates of the map, building a weather app using reactJS.
Introduction
-
We will be exploring reactJS so it is necessary that you have a basic knowledge of this technology and JavaScript.
-
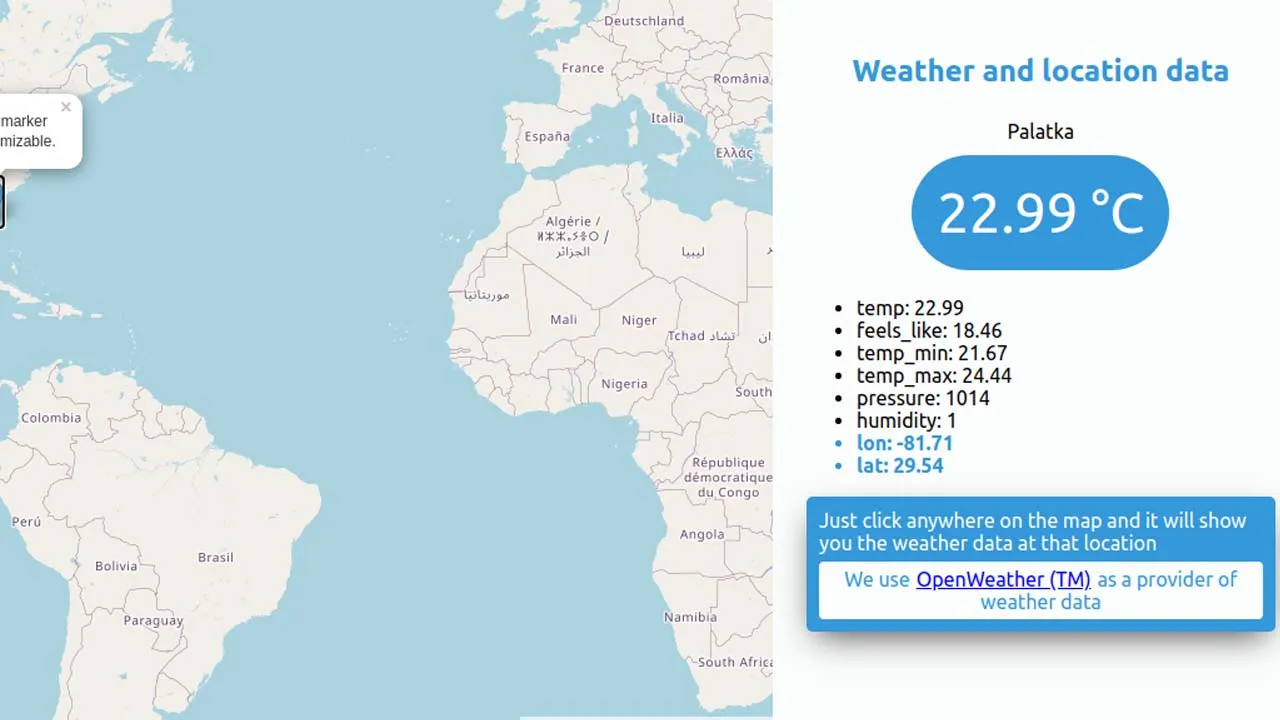
We will create a weather app that tells you the temperature of the place where you clicked anywhere on the map handling HTTP requests. You will also learn how to place markers on the map.
-
To follow the tutorial we will use Create React App and the API from https://openweathermap.org/api
-
This tutorial was created with the following versions: React version 16.14.0, react-dom 16.14.0, react-leaflet: 2.7.0, axios: 0.20.0, nodeJS v12.18.3, NPM 6.14.8

Getting started - Preparation
Before creating your project with Create React App make sure you have nodeJS installed on your computer https://nodejs.org/es/download/
- As a first step open a command line or terminal and type
$ npx create-react-app my-first-map
npx comes with npm 5.2+ and higher
- You will see that a folder was created with the name of my-first-map, move to it from the terminal with
$ cd my-first-map - Congratulations you already have your react app ready to start working, you can type
$ npm startand open this URL http: // localhost: 3000 /
Our first map
In order to create our first map with reactJS we will be using Leaflet, it is an open-source library to be able to create free maps with JS, we will be using react-leaflet (react-leaflet is a library based on Leaflet but adapted to react components) https: / /react-leaflet.js.org/
Steps:
-
Install react-leaflet and leaflet in our project
$ npm install react-leaflet leaflet -
Create a file called MapComponent.js inside / src and we are going to create a function type component called MapComponent inside this same file
-
We import the components to put our map
import { Map, Marker, Popup, TileLayer } from 'react-leaflet' -
Excellent, we are just one step away from creating our first map, we only need one thing and that is to place in the index.html the base css styles that Leaflet needs to work and display the maps correctly within the labels
<head> nuestro link </head>
Path where you have to add the an HTML tag * public / index.html
   <link
    	    rel="stylesheet"
    	    href="https://unpkg.com/leaflet@1.6.0/dist/leaflet.css"
    	    integrity="sha512-xwE/Az9zrjBIphAcBb3F6JVqxf46+CDLwfLMHloNu6KEQCAWi6HcDUbeOfBIptF7tcCzusKFjFw2yuvEpDL9wQ=="
    	    crossOrigin=""
    />
- Now what we need is to place in the render the components that will generate our map for that our component will look like this:
import React from 'react'
import { Map, Marker, Popup, TileLayer } from 'react-leaflet'
export const MapComponent = ({ positionDefault = [4.660779178475431, -74.08494168529754] }) => {
return (
<Map center={positionDefault} zoom={4} style={{ height: '500px', width: '100%' }}>
<TileLayer
url='https://{s}.tile.openstreetmap.org/{z}/{x}/{y}.png'
attribution='© <a href="http://osm.org/copyright">OpenStreetMap</a> contributors'
/>
<Marker position={[4.660779178475431, -74.08494168529754]}>
<Popup>This is your marker<br />Easily customizable.</Popup>
</Marker>
</Map>
)
}
- To see your map you have to go to src / App, js | import the component and render it in the app
import { MapComponent } from './MapComponent'
const App = () => {
  return (
    <>
      <MapComponent />
    </>
  )
}
Congratulations you have just created your first map with a marker using reactJS and react-leaflet, if you could figure it out, we have Map that receives values for props to be able to function and they are the center, zoom, and style styles, they are thanks to these props that we indicate to the map where we want to center our map with the zoom it has and the styles to be able to give the map dimensions. Then inside Map we have a TileLayer this component receives two props the URL and the attribution this what it does is to be able to show the cartography of the map, (That is one of the best advantages when creating maps with Leaflet,
Here are some examples of the maps you can make https://leafletjs.com/examples.html
Manage onClick of our map and obtain coordinates of that event
Since you learned to create a basic map, we are going to increase the complexity of this map a bit, what do you think if we create a map that when you click anywhere on the map it returns the coordinates so I can create a marker.
- The first thing we have to do is start handling the onClick events of the map, onClick receives a function with the event in this case we are only showing ‘click’ in the console each time a click is made on the map.
<Map center={positionDefault} zoom={4} style={{ height: '500px', width: '100%' }} onClick={(e) => console.log('click')}>
<TileLayer
url='https://{s}.tile.openstreetmap.org/{z}/{x}/{y}.png'
attribution='© <a href="http://osm.org/copyright">OpenStreetMap</a> contributors'
/>
<Marker position={[4.660779178475431, -74.08494168529754]}>
<Popup>This is your marker<br />Easily customizable.</Popup>
</Marker>
</Map>
- Already handling this flow we can pass the onClick event a handler function that handles every time we click on the map and to see the coordinates of where the click was made, we only have to access the e.latlng of the event, this returns an object with the latitude and length of where it was clicked.
import React from 'react'
import { Map, Marker, Popup, TileLayer } from 'react-leaflet'
export const MapComponent = ({ positionDefault = [4.660779178475431, -74.08494168529754] }) => {
const handleClick = (e) => {
console.log(e.latlng) // muestra en consola las coordenadas
}
return (
<Map center={positionDefault} zoom={4} style={{ height: '500px', width: '100%' }} onClick={handleClick}>
<TileLayer
url='https://{s}.tile.openstreetmap.org/{z}/{x}/{y}.png'
attribution='© <a href="http://osm.org/copyright">OpenStreetMap</a> contributors'
/>
<Marker position={[4.660779178475431, -74.08494168529754]}>
<Popup>This is your marker<br />Easily customizable.</Popup>
</Marker>
</Map>
)
}
- Knowing this, we can do great things like every time we click, place new markers where we clicked, to do that we have to use the useState hook, this allows us to handle state as we did in class components but now available in functional components thanks to this hook we just have to import it and use it like this:
import React, { useState } from 'react'
import { Map, Marker, Popup, TileLayer } from 'react-leaflet'
export const MapComponent = ({ positionDefault = [4.660779178475431, -74.08494168529754] }) => {
const [markers, setMarkers] = useState([[4.660779178475431, -74.08494168529754]])
const handleClick = (e) => {
console.log(e.latlng)
setMarkers([...markers, [e.latlng.lat, e.latlng.lng]])
}
return (
<Map center={positionDefault} zoom={4} style={{ height: '500px', width: '100%' }} onClick={handleClick}>
<TileLayer
url='https://{s}.tile.openstreetmap.org/{z}/{x}/{y}.png'
attribution='© <a href="http://osm.org/copyright">OpenStreetMap</a> contributors'
/>
{
markers.map((markerPosition, i) => {
return (
<Marker position={markerPosition} key={i}>
<Popup>
lat: {markerPosition[0]}
<br />
lng: {markerPosition[1]}
</Popup>
</Marker>
)
})
}
</Map>
)
}
What this code does is every time we click anywhere on the map a new marker is generated in that place with a popup that when you open it shows the coordinates of that marker, look at the handleClick every time we click this we set the state with setMarkers ([… markers, [e.latlng.lat, e.latlng.lng]]) | We spread on markers and then add another array with the new lat and lng of the new marker. When modifying the state a new render is generated and this new marker is shown on the map with its Popup
HTTP REQUESTS TO OBTAIN THE WEATHER DATA OF A PLACE (CLIMATE APP)
Perfect so far you already know how to handle the click events of the map and you know how to place markers on the map with its Popup, excellent but imagine creating a map and every time you click on a position, handle those coordinates to, for example, obtain the forecast of the weather using HTTP requests from that cool place right? Let’s get started:
-
As a first step we have to install axios https://www.npmjs.com/package/axios as a dependency of our project to be able to make HTTP requests (you can also use the browser’s fetch API)
$ npm i axios -
Once axios is installed, we are ready to make requests to an API, in this case we will consult the data from https://openweathermap.org/api, it is necessary to register to obtain the API_KEY necessary for it to respond with the weather data
-
The first thing we have to do is detect in the parent component of MapComponent it finds out every time there is a click event and just when that event is detected in App.js (the parent of the map) make the HTTP request sending the coordinates to the API so that it returns us the weather data in those coordinates
// App.js
import React, { useState, useCallback } from 'react'
import axios from 'axios'
import { MapComponent } from './MapComponent'

const App = () => {
  const [dataApi, setDataApi] = useState({ isLoadingApi: false, errorApi: false, data: {} })

  const fetchData = useCallback(async (coord) => {
    setDataApi({ ...dataApi, isLoadingApi: true })
    try {
      const { data } = await axios.get(`https://api.openweathermap.org/data/2.5/weather?lat=${coord.lat}&lon=${coord.lng}&units=metric&appid=TU_API_KEY`)
      setDataApi({ ...dataApi, isLoadingApi: false, errorApi: false, data })
      console.log(data)
    } catch (error) {
      setDataApi({ ...dataApi, isLoadingApi: false, errorApi: error?.message })
    }
  }, [dataApi])

  const handleOnClickMap = (coords) => {
    fetchData(coords)
  }

  return (
    <>
      <MapComponent
        onClickMap={handleOnClickMap}
      />
     <div>
      <h2>Weather and location data</h2>
      {dataApi.errorApi && <div><span>⚠ {dataApi.errorApi} ⚠</span></div>}
      <div>
        <div>
          {
            dataApi.isLoadingApi
              ? <span>Cargando...</span>
              : (
                <span>
                  <span>{dataApi.data?.name}</span>
                  <br />
                  <span>
                    {dataApi.data?.main?.temp || 0} °C
                  </span>
                </span>
              )
          }
        </div>
        {
          (Object.keys(dataApi.data).length > 0 && !dataApi.isLoadingApi) && (
            <div>
              <ul>
                {
                  Object.keys(dataApi.data?.main).map((elem, i) => {
                    return (<li key={i}>{elem}: {dataApi.data?.main[elem]}</li>)
                  })
                }
                {
                  Object.keys(dataApi.data?.coord).length > 0 && Object.keys(dataApi.data?.coord).map((elem, i) => {
                    return (<li key={i}>{elem}: {dataApi.data?.coord[elem]}</li>)
                  })
                }
              </ul>
            </div>
          )
        }
      </div>
    </div>
    </>
  )
}

export default App
- As we can see, the App.js component passes a function to mapComponent through props and this is called every time they click anywhere on the map
onClickMap={handleOnClickMap}, it receives the coordinates by parameters and then we make the HTTP request to obtain the weather data in Those coordinates and then we set the state and then show them in the UI, In MapComponent the only thing we do is receive the onClickMap function by props and in the handleClick call that function that arrives by props passing it the coordinates like this:
export const MapComponent = ({ positionDefault = [4.660779178475431, -74.08494168529754], onClickMap }) => {
  const [markers, setMarkers] = useState([[4.660779178475431, -74.08494168529754]])
  const handleClick = (e) => {
    setMarkers([...markers, [e.latlng.lat, e.latlng.lng]])
    onClickMap(e.latlng) // evento que le notifica al padre pasandole las coordenadas
  }

  return (
    <Map center={positionDefault} zoom={4} style={{ height: '500px', width: '100%' }} onClick={handleClick}>
…
Whats Next?
Congratulations if you have come this far, you learned the basic concepts to make maps with reactJS and Leaflet, just keep in mind that this is just a small part of what you can do. I invite you to continue researching and learning about the subject to build more complex and fun maps. .
Don’t limit yourself …
Using all the features that reactJS and react-leaflet (Leaflet) offer us, we can make maps of any kind. Anyway, here I leave you the official links of the libraries used in this tutorial, and if you download this repository and install the dependencies you will be able to find the last part of the tutorial (weather app) (better organized / structured with css styles, etc. ) but using the same concepts learned in this tutorial to be able to build maps with reactJS from 0 totally free.
To download the finished project you can clone this repository https://github.com/willydavid1/maps-with-react , install the dependencies $ npm iand create a .env file in the root of the repository, open it and paste REACT_APP_APIKey = API_KEY_DE_OPENWEATHERMAP you have to register in openweathermap .org to obtain the API_KEY, if you want to learn more about environment variables link https://es.wikipedia.org/wiki/Variable_de_environment
LINKS
- https://react-leaflet.js.org/
- https://leafletjs.com/
- https://leafletjs.com/examples.html
- https://es.reactjs.org/
- https://github.com/axios/axios
- https://es.reactjs.org/docs/hooks-reference.html
Download Details:
Author: willydavid1
Demo: https://willydavid1.github.io/maps-with-react/
Source Code: https://github.com/willydavid1/maps-with-react
#react #reactjs #javascript