How to Integrate Sendbird in React Native Application
Learn how to integrate Sendbird into a React Native application to create a real-time chat feature that allows users to share images, videos, and documents for reference
Sendbird is a popular messaging and chat API that enables real-time communication between users. In this article, we’ll learn how to integrate Sendbird into a React Native application to create a more engaging user experience. We’ll incorporate a chat screen that lets users chat with tech support in real-time and share images, videos, and documents for reference. Let’s get started!
Contents:
- React Native app structure
- Create a React Native app
- Setting up a Sendbird account with the developer plan
- Incorporating Sendbird SDK in a React Native App
- Setting up Navigation
- Creating inner screens
React Native app structure
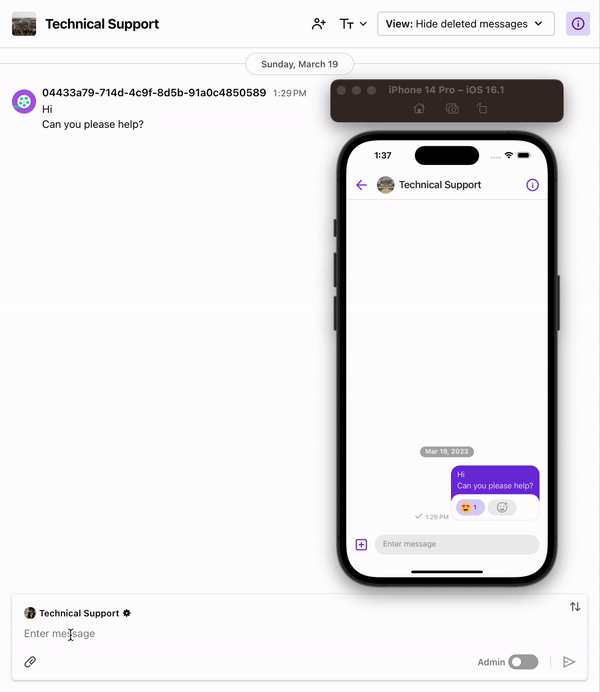
Our React Native app will consist of three screens. The Home Screen will have a single button reading Contact Us. Upon clicking that button, we’ll navigate users to the Contact Us screen, which will contain a list of developers with whom our app users can chat to receive technical help or feedback.
The Contact Us screen will display a user called Technical Support. When clicked, this will either begin or resume the user’s chat with your app’s tech support staff. Finally, on the Chat Screen, users can chat with your app’s support staff or app developers in real-time.
The final app UI will look like the images below:

You can find the complete source code in this GitHub repository.
Create a React Native app
We’ll start by creating a new React Native app. If you’re new to React Native, you can check out the documentation to set up your development environment. To create a React Native project, execute the command below:
npx react-native init <app_name_here>The command above will create a new React Native project in your current working directory. Execute the two commands below to install CocoaPods for iOS and JavaScript dependencies:
yarn

OR

npm i


cd ios && pod install && cd ..
Now, we can run the app in the simulator:
yarn ios
OR
npm run ios
yarn android
OR
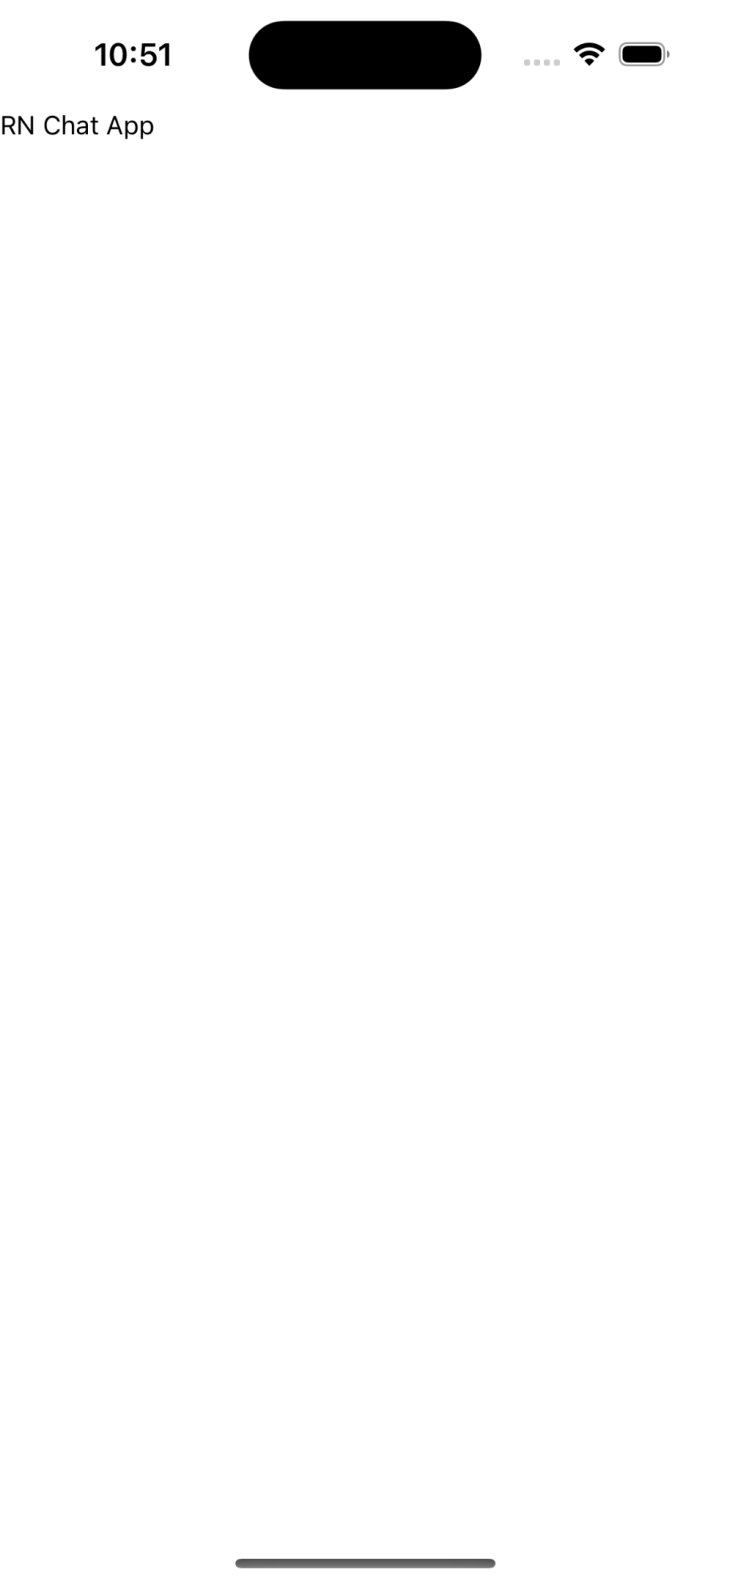
npm run androidReplace the code in App.js with the following code:
import React from 'react';
import {SafeAreaView, Text} from 'react-native';

const App = () => (
  <SafeAreaView>
    <Text>RN Chat App</Text>
  </SafeAreaView>
);

export default App;
Once the app runs on the iOS and Android simulators, you’ll see a UI similar to the following:
Now that our app is running, we can begin integrating Sendbird’s SDK. But, before we do so, we’ll complete a few additional steps.
Setting up a Sendbird account with the developer plan
Before we begin, you’ll need to sign up for a Sendbird account. Once you’ve created an account, you can access the Sendbird dashboard, where you can create and manage your chat applications.
Head over to the Sendbird dashboard, log in or register with your preferred account, and create a new application in your account. After creating a new application, you can access the APPLICATION_ID, which we’ll use to communicate with the Sendbird SDK.
To integrate chat into our app, we’ll use Sendbird UIKit, which provides ready-to-use UI components for chat implementation. For additional info, you can also refer to the documentation.
To install the Sendbird SDK and the other helper libraries, execute the command below:
npm install @sendbird/uikit-react-native \
            @sendbird/chat \
            date-fns \
            react-native-safe-area-context \
            @react-native-community/netinfo \
            @react-native-async-storage/async-storage

OR

yarn add @sendbird/uikit-react-native \
            @sendbird/chat \
            date-fns \
            react-native-safe-area-context \
            @react-native-community/netinfo \
            @react-native-async-storage/async-storage
Once the dependencies above are installed, we’ll add a few more dependencies that Sendbird uses to access React Native’s features:
yarn add react-native-video \
         react-native-permissions \
         react-native-file-access \
         react-native-image-picker \
         react-native-document-picker \
         react-native-create-thumbnail \
         @react-native-clipboard/clipboard \
         @react-native-camera-roll/camera-roll \
         @react-native-firebase/app \
         @react-native-firebase/messaging \
         @bam.tech/react-native-image-resizer

cd ios && pod install && cd ..
There are a few additional steps that you need to follow to set up react-native-permissions and @react-native-firebase/app. Since this tutorial is focused on chat integration, I won’t get into detail on those. But, you can follow these simple steps from their documentation to set them up:
Incorporating Sendbird SDK in a React Native app
Now, we’ll implement platform services interfaces, which Sendbird uses to communicate with React Native features.
Inside the root of your project, create a new folder named services. Inside of it, create an index.tsx file. Alternately, you can execute the command below:
mkdir services && cd services && touch index.tsx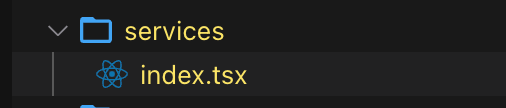
Add the following code inside of index.tsx:
import {
  createNativeClipboardService,
  createNativeFileService,
  createNativeMediaService,
  createNativeNotificationService,
} from '@sendbird/uikit-react-native';
import * as ImageResizer from '@bam.tech/react-native-image-resizer';
import {CameraRoll} from '@react-native-camera-roll/camera-roll';
import Clipboard from '@react-native-clipboard/clipboard';
import RNFBMessaging from '@react-native-firebase/messaging';
import * as CreateThumbnail from 'react-native-create-thumbnail';
import * as DocumentPicker from 'react-native-document-picker';
import * as FileAccess from 'react-native-file-access';
import * as ImagePicker from 'react-native-image-picker';
import * as Permissions from 'react-native-permissions';
import Video from 'react-native-video';

export const ClipboardService = createNativeClipboardService(Clipboard);
export const NotificationService = createNativeNotificationService({
  messagingModule: RNFBMessaging,
  permissionModule: Permissions,
});
export const FileService = createNativeFileService({
  fsModule: FileAccess,
  permissionModule: Permissions,
  imagePickerModule: ImagePicker,
  mediaLibraryModule: CameraRoll,
  documentPickerModule: DocumentPicker,
});
export const MediaService = createNativeMediaService({
  VideoComponent: Video,
  thumbnailModule: CreateThumbnail,
  imageResizerModule: ImageResizer,
});
In the code above, we export different services that we initialize with their respective native modules. Next, add the following code in App.js:
import AsyncStorage from '@react-native-async-storage/async-storage';
import {SendbirdUIKitContainer} from '@sendbird/uikit-react-native';
import React from 'react';
import {Text} from 'react-native';
import {
  ClipboardService,
  FileService,
  MediaService,
  NotificationService,
} from './services';

const App = () => (
  <SendbirdUIKitContainer
    appId={'ENTER_YOUR_APP_ID_HERE'}
    chatOptions={{localCacheStorage: AsyncStorage}}
    platformServices={{
      file: FileService,
      notification: NotificationService,
      clipboard: ClipboardService,
      media: MediaService,
    }}
    userProfile={{
      onCreateChannel: () => {},
    }}>
    <Text>RN Chat App</Text>
  </SendbirdUIKitContainer>
);
export default App;
In the code above, we wrapped our app code inside of the SendbirdUIKitContainer component, which is a context provider container that passes data from the chat SDK down to its child components. To make the chat work, you’ll also notice a prop called appId; you’ll need to paste your APPLICATION_ID from Sendbird here.
With that, we’ve successfully integrated the Sendbird SDK into our app’s code, but we haven’t utilized it anywhere. To do so, we’ll need multiple screens in our app. For that, let’s add a navigation library to our project.
Setting up navigation
You can add any navigation library of your choice, but for this tutorial, I’ll go with React Navigation. Run the command below to install React Navigation in your project:
yarn add @react-navigation/native @react-navigation/native-stack react-native-screens react-native-safe-area-context

cd ios && pod install && cd ..
Now that our library is set up, let’s add screens and navigation to our empty app. Create a new folder named src. Here, we’ll add most of our application code. Create another folder called navigation and a file named index.tsx.
Add the code below to the src/navigation/index.tsx file:
import {NavigationContainer} from '@react-navigation/native';
import {createNativeStackNavigator} from '@react-navigation/native-stack';
import {useSendbirdChat} from '@sendbird/uikit-react-native';
import React from 'react';
import {GroupChannelCreateScreen} from '../screens/GroupChannelCreateScreen';
import {GroupChannelScreen} from '../screens/GroupChannelScreen';
import {HomeScreen} from '../screens/HomeScreen';

const RootStack = createNativeStackNavigator();

export const Navigation = () => {
  const {currentUser} = useSendbirdChat();
  return (
    <NavigationContainer>
      <RootStack.Navigator screenOptions={{headerShown: false}}>
        {!currentUser ? (
          <RootStack.Screen name={'Home'} component={HomeScreen} />
        ) : (
          <>
            <RootStack.Screen
              name={'GroupChannelCreate'}
              component={GroupChannelCreateScreen}
            />
            <RootStack.Screen
              name={'GroupChannel'}
              component={GroupChannelScreen}
            />
          </>
        )}
      </RootStack.Navigator>
    </NavigationContainer>
  );
};
In the code above, we show the user the HomeScreen until they are no longer connected with the Sendbird servers. When they are connected, then we’ll have two screens, GroupChannelCreateScreen and GroupChannelScreen. We haven’t created these files yet. Before doing so, let’s implement navigation in our App.js file:
import AsyncStorage from '@react-native-async-storage/async-storage';
import {SendbirdUIKitContainer} from '@sendbird/uikit-react-native';
import React from 'react';
import {
  ClipboardService,
  FileService,
  MediaService,
  NotificationService,
} from './services';
import {Navigation} from './src/navigation';

const App = () => (
  <SendbirdUIKitContainer
    appId={'APP_ID_HERE'}
    chatOptions={{localCacheStorage: AsyncStorage}}
    platformServices={{
      file: FileService,
      notification: NotificationService,
      clipboard: ClipboardService,
      media: MediaService,
    }}
    userProfile={{
      onCreateChannel: () => {},
    }}>
    {/* Add the below code */}
    <Navigation />
  </SendbirdUIKitContainer>
);
export default App;
Creating inner screens
Now, we’ll create the screens for navigating throughout our app. Create a new folder called screens inside of src and create a new file called HomeScreen.tsx. Before writing any code in HomeScreen, let’s add a helper library to generate unique IDs for users:
yarn add react-native-uuidAdd the following code in HomeScreen.tsx:
import AsyncStorage from '@react-native-async-storage/async-storage';
import {useConnection} from '@sendbird/uikit-react-native';
import React, {useEffect, useState} from 'react';
import {
ActivityIndicator,
Pressable,
SafeAreaView,
StyleSheet,
Text,
} from 'react-native';
import uuid from 'react-native-uuid';
export const HomeScreen: React.FC = () => {
const {connect} = useConnection();
const [userId, setUserId] = useState<string>('');
const [isLoading, setIsLoading] = useState<boolean>(false);
const fetchUserID = async () => {
const USER_ID = await AsyncStorage.getItem('USER_ID');
if (!USER_ID) {
const uniqueId = uuid.v4().toString();
await AsyncStorage.setItem('USER_ID', uniqueId);
setUserId(uniqueId);
} else {
setUserId(USER_ID);
}
};
useEffect(() => {
fetchUserID();
}, []);
const handlePress = () => {
setIsLoading(true);
connect(userId, {nickname: userId});
};
return (
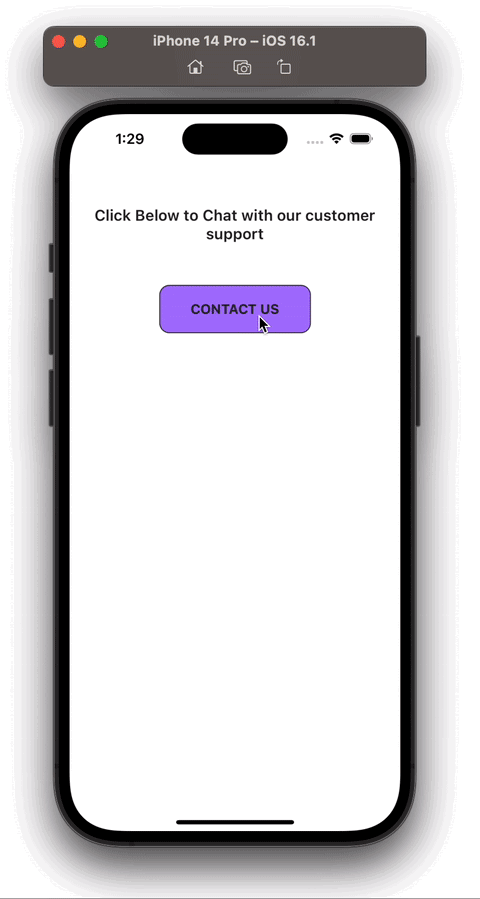
<SafeAreaView style={styles.container}>
<Text style={styles.text}>
{'Click Below to Chat with our customer support'}
</Text>
<Pressable
disabled={isLoading}
style={styles.button}
onPress={handlePress}>
{isLoading ? (
<ActivityIndicator size={'small'} color={'#000'} />
) : (
<Text style={styles.buttonText}>{'CONTACT US'}</Text>
)}
</Pressable>
</SafeAreaView>
);
};
const styles = StyleSheet.create({
container: {
flex: 1,
backgroundColor: '#fff',
},
text: {
fontWeight: '600',
fontSize: 18,
letterSpacing: 0.4,
lineHeight: 22,
color: '#222',
textAlign: 'center',
paddingHorizontal: 18,
paddingVertical: 50,
},
button: {
backgroundColor: '#a7f',
padding: 18,
borderRadius: 12,
borderWidth: 1,
borderColor: '#222',
alignSelf: 'center',
justifyContent: 'center',
alignItems: 'center',
width: 180,
},
buttonText: {
fontWeight: 'bold',
fontSize: 16,
color: '#222',
letterSpacing: 0.2,
},
});In the code above, we generate a unique ID for the user and store it in local storage. If they already have one, then we simply update our state userId variable. Then, by using the connect method from the useConnection Hook, provided by @sendbird/uikit-react-native, the userId connects the user to the Sendbird SDK.
When the user presses the CONTACT US button, we navigate them to GroupChannelCreateScreen, which we’ll create now. Inside the screens directory, create a new file called GroupChannelCreateScreen and add the following code:
import {useNavigation} from '@react-navigation/native';
import {useConnection} from '@sendbird/uikit-react-native';
import React from 'react';
import createGroupChannelCreateFragment from
  '../helpers/createGroupChannelCreateFragment';

const GroupChannelCreateFragment = createGroupChannelCreateFragment();

export const GroupChannelCreateScreen = () => {
  const navigation = useNavigation<any>();
  const {disconnect} = useConnection();
  const handleBackPress = () => {
    disconnect();
  };
  const navigateToGroupChannelScreen = async channel => {
    navigation.replace('GroupChannel', {channelUrl: channel.url});
  };
  return (
    <GroupChannelCreateFragment
      onCreateChannel={navigateToGroupChannelScreen}
      onPressHeaderLeft={handleBackPress}
    />
  );
};
In the code above, we used GroupChannelCreateFragment, a UI component that displays a list of users who can be added to the newly created channel, but we’ve customized it according to our requirements. You’ll also notice that we used createGroupChannelCreateFragment, but we haven’t created it yet. Let’s create it first, then we’ll see what it does.
In src, create a new folder called helpers and add a new file called createGroupChannelCreateFragment. Then, paste the following code inside:
import React from 'react';
import {Image, Text, TouchableOpacity} from 'react-native';
import {useUserList} from '@sendbird/uikit-chat-hooks';
import {
  createUserListModule,
  GroupChannelCreateFragment,
  useLocalization,
  UserListModule,
  useSendbirdChat,
} from '@sendbird/uikit-react-native';
import {
  PASS,
  SendbirdGroupChannelCreateParams,
  useFreshCallback,
  UserStruct,
} from '@sendbird/uikit-utils';

const createGroupChannelCreateFragment = <UserType extends UserStruct>(
  initModule?: Partial<UserListModule<UserType>>,
): GroupChannelCreateFragment<UserType> => {
  const UserListModule = createUserListModule<UserType>(initModule);
  const TECH_SUPPORT_USER_ID: string =
    'THIS_IS_DEVELOPER_OR_TECH_SUPPORT_USER_ID';
  const HEADER_TITLE = 'CONTACT US';
  return ({
    onPressHeaderLeft,
    onBeforeCreateChannel = PASS,
    onCreateChannel,
    sortComparator,
    queryCreator,
    channelType = 'GROUP',
    renderUser,
  }) => {
    const {sdk, currentUser} = useSendbirdChat();
    const {STRINGS} = useLocalization();
    const {users, refreshing, loading, error, refresh, next} = useUserList(
      sdk,
      {
        queryCreator,
        sortComparator,
      },
    );
    const handleCreateChannelPress = async () => {
      const params: SendbirdGroupChannelCreateParams = {
        invitedUserIds: [currentUser?.userId, TECH_SUPPORT_USER_ID],
        name: 'Technical Support',
        coverUrl: 'https://picsum.photos/600/1000',
        isDistinct: true,
        isDiscoverable: false,
        isPublic: false,
        operatorUserIds: [TECH_SUPPORT_USER_ID],
      };
      const processedParams = await onBeforeCreateChannel(params, users);
      const channel = await sdk.groupChannel.createChannel(processedParams);
      onCreateChannel(channel);
    };
    const _renderUser: NonNullable<typeof renderUser> = useFreshCallback(
      (user, selectedUsers, setSelectedUsers) => {
        if (queryCreator && !renderUser) {
          const hasRequiredKey =
            Object.hasOwn(user, 'profileUrl') &&
            Object.hasOwn(user, 'nickname');
          if (!hasRequiredKey)
            throw new Error(
              'You should provide "renderUser" when providing "queryCreator"',
            );
        }
        if (renderUser)
          return renderUser(user, selectedUsers, setSelectedUsers);
        const isMe = user.userId === currentUser?.userId;
        if (isMe) return null;
        const userIdx = selectedUsers.findIndex(u => u.userId === user.userId);
        const isSelected = userIdx > -1;
        const isTechSupportUser = user.userId === TECH_SUPPORT_USER_ID;
        if (!isTechSupportUser) return null;
        return (
          <TouchableOpacity
            activeOpacity={0.7}
            onPress={handleCreateChannelPress}
            style={{
              flexDirection: 'row',
              alignItems: 'center',
              padding: 18,
              backgroundColor: '#ddd8',
            }}>
            <Image
              source={{uri: 'https://picsum.photos/100'}}
              resizeMode={'contain'}
              style={{height: 40, width: 40, borderRadius: 20, marginRight: 18}}
            />
            <Text
              style={{
                fontWeight: '600',
                fontSize: 20,
                lineHeight: 24,
                letterSpacing: 1,
                color: '#222',
              }}>{`${user?.nickname ?? 'USER NAME'}`}</Text>
          </TouchableOpacity>
        );
      },
    );
    return (
      <UserListModule.Provider
        headerRight={() => ''}
        headerTitle={HEADER_TITLE}>
        <UserListModule.Header
          onPressHeaderLeft={onPressHeaderLeft}
          onPressHeaderRight={() => {}}
        />
        <UserListModule.List
          onLoadNext={next}
          users={users}
          renderUser={_renderUser}
          onRefresh={refresh}
          refreshing={refreshing}
          ListEmptyComponent={<UserListModule.StatusEmpty />}
        />
      </UserListModule.Provider>
    );
  };
};

export default createGroupChannelCreateFragment;
In the code above, we created a custom fragment for listing only one user from the Sendbird dashboard. When the user selects the user from technical support, a channel is then created for the specified user in the code and the current user.
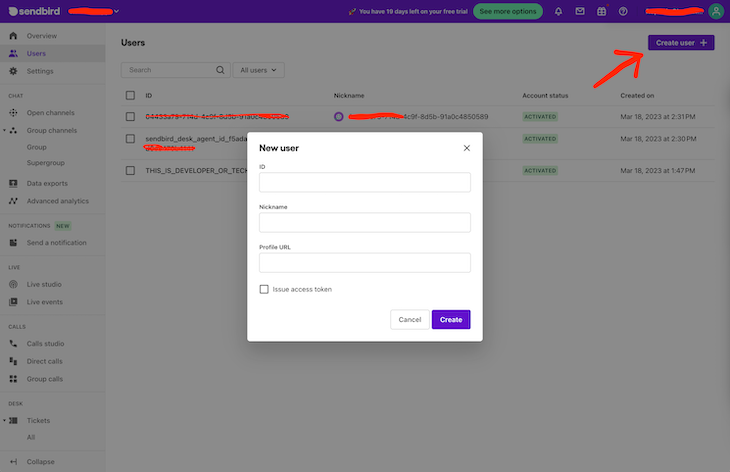
You also need to create an Operator user from your Sendbird dashboard and replace the userID with THIS_IS_DEVELOPER_OR_TECH_SUPPORT_USER_ID in the code above:
Now, we have just one final screen remaining, GroupChannelScreen. Let’s create it; inside the screens folder, create a new file called GroupChannelScreen.tsx and add the following code inside:
import {useRoute} from '@react-navigation/native';
import {useGroupChannel} from '@sendbird/uikit-chat-hooks';
import {
  createGroupChannelFragment,
  useConnection,
  useSendbirdChat,
} from '@sendbird/uikit-react-native';
import React from 'react';

const GroupChannelFragment = createGroupChannelFragment();

export const GroupChannelScreen = () => {
  const {params} = useRoute<any>();
  const {disconnect} = useConnection();
  const {sdk} = useSendbirdChat();
  const {channel} = useGroupChannel(sdk, params.channelUrl);
  if (!channel) {
    return null;
  }
  const handleBackPress = async () => await disconnect();
  return (
    <GroupChannelFragment
      channel={channel}
      onChannelDeleted={handleBackPress}
      onPressHeaderLeft={handleBackPress}
      onPressHeaderRight={() => {}}
    />
  );
};
In the code above, we used createGroupChannelFragment from @sendbird/uikit-react-native. This UI component handles the chat part:
Conclusion
Integrating Sendbird into your React Native app is a straightforward process that can greatly enhance your app’s user experience. By following the steps outlined in this article, you can add a feature to chat with technical support. You can also adapt this to add even more similar features, like user-to-user chats, and create a more engaging and interactive experience for your users.
I hope you enjoyed this article. Thanks for reading!
Source: https://blog.logrocket.com
#reactnative