This tutorial is a follow-up from my earlier post on dockerizing and deploying a Keras model with FastAPI, Redis, and Docker. Here, we will see how to use the same code with the same docker-compose.yml to easily scale our deployment onto multiple hosts with Docker Swarm.
We will also use Locust to load test and illustrate how our response time improves with each worker we add to the swarm.
Recap

In the previous post, we saw how we dockerized the services in Adrian Rosebrock’s tutorial and made it super easy to spin up the entire service.
However, we also saw with a load test that the service may not be performant enough for production use. In this tutorial, we will use Docker Swarm to replicate our model servers to provide better performance.
As before, all the code in this tutorial can be found at this here:
What Is Docker Swarm?
Docker Swarm is native clustering for Docker. Modern versions of Docker come with swarm mode built-in for managing a cluster of Docker engines, effectively turning a pool of Docker hosts into a single virtual host.
Why Docker Swarm?
There are alternatives to Docker Swarm for container orchestration, namely Kubernetes, which is also arguably the more popular option. There are also cloud-based solutions for deploying machine learning models (e.g. AWS SageMaker).
However there are times where we may want to roll our own solution, whether it is for learning or for self-hosting the entire pipeline (i.e., not relying on the cloud). The latter being quite common in government or regulated industries.
In my job where data scientists and engineers often need to deploy within various sensitive and air-gapped networks that are “infra-constrained” (e.g., one cannot expect an on-premise Kubernetes cluster raring to go), we had to be self-sufficient in deploying and scaling ML models in a variety of constrained environments.
Docker Swarm is my preferred choice in these admittedly niche scenarios. Docker Swarm comes fully integrated with Docker, utilizes the same CLI, and can be configured with the same configuration file as Docker Compose. It is also a lot easier to set up and run at scale compared to Kubernetes.
Deciding Where to Host Your Docker Swarm
You can choose to set up a Docker Swarm cluster using virtual machines for development and testing purposes. The official Docker website has a good tutorial for initializing a swarm of VMs on your local machine. However, by doing this, we won’t see the performance benefits of scaling out the model server across multiple machines (since the VMs are still running off the same physical host with limited resources).
The easiest way to host a swarm is on the cloud (e.g., on Google Cloud Platform; GCP). You can spin up and install Docker easily on GCP instances using Docker Machine. This tutorial breaks it all down into a few commands.
If you’re working in an offline environment, or if you choose to self-host, then setting up a swarm could be a matter of installing Docker Engine on a number of physical machines and wiring them up with a few simple Docker commands. For this post, I chose to run them off my home server (a white box Supermicro Xeon-D server humming away in a closet).
Regardless of where you choose to host your swarm, you should be able to follow the following steps with a few minor differences.
Creating a Docker Swarm
Assuming we’re not hosting our swarm on an environment that can be provisioned using Docker Machine, we will then have to manually install Docker Engine and Docker Compose on all our hosts.
For this exercise, we will set up one manager node and three worker nodes.
Once you’ve done this, run docker swarm init on the node you want to use as the manager. You’ll see the join command, along with the token, needed to add new workers to the node:
Swarm initialized: current node (12mfhmaqslwd2x2jqs8c6k36m) is now a manager.

To add a worker to this swarm, run the following command:

docker swarm join --token xxxxxxx 10.145.1.20:2377

To add a manager to this swarm, run 'docker swarm join-token manager' and follow the instructions.
10.145.1.20 is my manager node. We’ll run the above command docker swarm join --token xxxxxxx 10.145.1.20:2377 on our three worker nodes to add them to the swarm.
Now run docker node ls and you should see all the nodes in your swarm:
$ docker node ls
ID                            HOSTNAME            STATUS              AVAILABILITY        MANAGER STATUS      ENGINE VERSION
niairu4mt6az6y8263qk3yl4y *   swarm-manager-1     Ready               Active              Leader              19.03.2
n2gzk977b02byajotketwlhb3     swarm-worker-1      Ready               Active                                  19.03.2
aupx477hzv4m8t0f4n1hqlmt2     swarm-worker-2      Ready               Active                                  19.03.2
711gwle1dpzr9cjen6rqbqwdr     swarm-worker-3      Ready               Active                                  19.03.2
That’s it!
Deploying on Docker Swarm
Now that we’ve created our swarm, deploying our machine learning service on it is just as easy.
On your manager node, download the docker-compose.yml and app.env, which contains the environment variables, then deploy a stack named mldeploy as follows:
$ wget https://gist.githubusercontent.com/shanesoh/225b99902410a43fecb42b5f26ea5673/raw/e622e263911fc5bd285038f83e3c2d9e7cc0ce97/docker-compose.yml

$ wget https://raw.githubusercontent.com/shanesoh/deploy-ml-fastapi-redis-docker/master/app.env

$ docker stack deploy -c docker-compose.yml mldeploy
Run docker stack ps mldeploy and you should see that the three services are spun up:
ID                  NAME                     IMAGE                         NODE                DESIRED STATE       CURRENT STATE           ERROR               PORTS
hffngo1qrnch        mldeploy_webserver.1     shanesoh/webserver:latest     swarm-manager-1     Running             Running 2 minutes ago
otctku7gvpaf        mldeploy_modelserver.1   shanesoh/modelserver:latest   swarm-worker-2      Running             Running 2 minutes ago
hwvr9mm50rhe        mldeploy_redis.1         redis:latest                  swarm-manager-1     Running             Running 2 minutes ago
The web server on the manager node, one instance of the model server on a worker node, and a Redis node on either the manager or worker node.
version: '3'

services:
  redis:
    image: redis
    networks:
    - deployml_network

  modelserver:
    image: shanesoh/modelserver
    build: ./modelserver
    depends_on:
    - redis
    networks:
    - deployml_network
    env_file:
    - app.env
    environment:
    - SERVER_SLEEP=0.25  # Time in ms between each poll by model server against Redis
    - BATCH_SIZE=32
    deploy:
      replicas: 1
      restart_policy:
        condition: on-failure
      placement:
        constraints:
        - node.role == worker

  webserver:
    image: shanesoh/webserver
    build: ./webserver
    ports:
    - "80:80"
    networks:
    - deployml_network
    depends_on:
    - redis
    env_file:
    - app.env
    environment:
    - CLIENT_SLEEP=0.25  # Time in ms between each poll by web server against Redis
    - CLIENT_MAX_TRIES=100  # Num tries by web server to retrieve results from Redis before giving up
    deploy:
      placement:
        constraints:
        - node.role == manager

networks:
    deployml_network:
docker-compose.yml
This happens because we’ve constrained the node.role of our modelserver and webserver in the Compose file. Also, notice that we have set the replicas: 1 by default.
The main source of scalability of this machine learning service comes from replication of the modelserver provided by the replicas: argument. We’ll illustrate this using a load test and dynamic scaling of the modelserver in the next section.
Scaling the Model Server and Load Testing With Locust
We saw in my previous post how Locust can be used for load testing HTTP endpoints like ours.

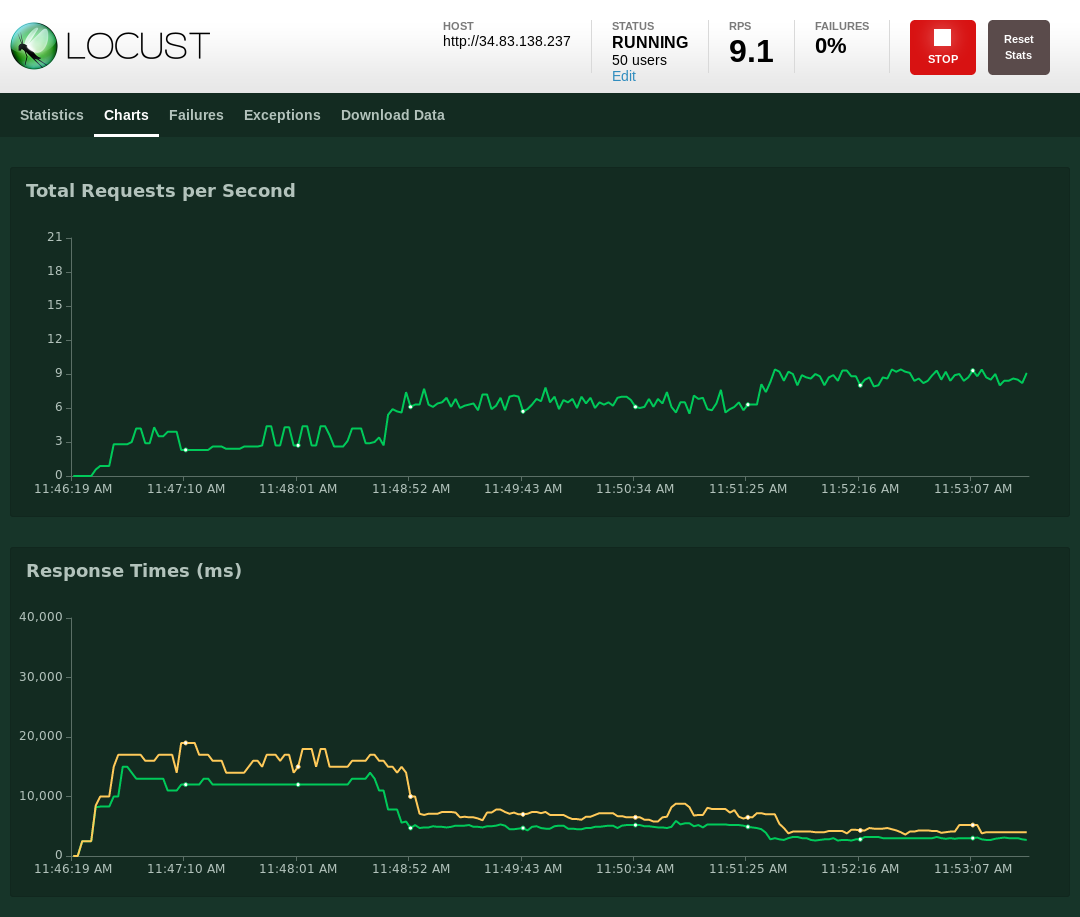
Green for median response time; yellow for p95
We also saw that our performance wasn’t great with 50 simulated users. As shown in the graph, the p95 response time is around 5000 ms.
We’ll start up Locust again with the provided locustfile from the repo with locust — host=http://localhost. Now point your browser to http://localhost:8089 to access the web UI and start a test with 50 users.

Scaling from one worker to two workers, and then three workers.
Note that the response time is higher now (around 12000 ms) because I chose to hit the endpoint from the Internet (to simulate someone accessing this service over the web).
I ran the Locust test for a minute or two to stabilize the response time before scaling modelserver to two workers using the command:
docker service scale mldeploy_modelserver=2
Give it a few seconds for the second worker to kick in and you should see the response time drop. In my case, the response time dropped from 12000 ms to around 5000 ms: a nice >100% improvement just by scaling out the model server.
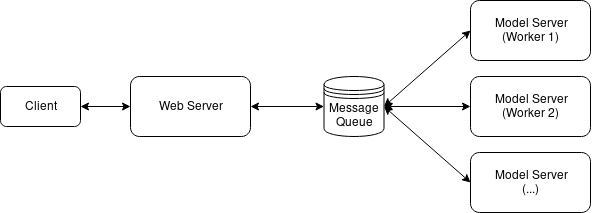
What’s happening now is that the two model servers are both polling the Redis message queue and processing the requests in parallel.
The performance can be further improved by scaling modelserver to three workers with docker service scale mldeploy_modelserver=3. The response time dropped further to around 3000 ms. This is a smaller improvement as we asymptotically approach the response time of overheads (from the network, processing, code inefficiencies, etc.) that we cannot get around by simply scaling out the model server.
Conclusion
In this post, we saw how we could quickly build our own Docker-native cluster (i.e., Docker Swarm) and deploy a scalable machine learning service on top of it. We also did a load test and observed how replicating the model server improved performance.
Originally published by Shane Soh at medium.com
#docker #machine-learning
