react native dev,blogger, tech writer
You might have seen Google Maps in almost all the apps these days. Some mobile apps are displaying their outlet locations, track users (like Uber), showing nearby places, etc. So, it shows the importance of maps support in mobile apps. Today, we are going to integrate Google Maps in a React Native app step by step, using the popular React Native Maps package.
At Instamobile, we are using this exact implementation in many of our React Native templates, such as the Store Locator app templates.
As a developer or a company, it is very important to manage their app’s codebase. So, these days in mobile app development there are platforms like React Native you can apps for both iOS and Android. I’m not going to dig in deep in about react and react native stuff in the article, instead, we will focus more google maps integration on both platform apps, iOS and Android.
There are two ways to integrate Google Maps into a React Native mobile app:
1. create-react-native-app cli
2. react-native-cli
There are a few differences between these two that I would like to clear.
**react-native-cli **is developer friendly and gives the flexibility to use native components. But with this, you have to configure every small bit in the application. Apart from this, if you want to test your application then you have to use the real device or you have to use simulators for both iOS and Android. You might generate a lot of bugs while installing various rpm packages and configuring them.
**create-react-native-app, **you can expo SDK built-in modules. This is a hassle-free environment for developing apps faster. You don’t need any device (not even simulators) to run and test the apps. You only need to develop the code and test using the expo app built for Android and iOS. You just need the QR Code generated by your application when you run using npm start.
It is very easy to integrate such modules in native code bases like Java or swift. I would say one thing after reading the whole tutorial you can easily integrate google maps with React Native as well. You’ll also learn how to build a brand new React Native app from scratch. So, without further ado let’s get started.
Prerequisites
We’re assuming that you have at least basic or intermediate knowledge of JavaScript, React & React Native. Let’s begin with create-react-native-app.
What are the things you need to integrate React Native Maps?
1. **Text Editor or IDE **(We are using Visual Studio Code)
2. Node JS (As always needed to install packages & other stuff)
3. create-react-native-app, (A CLI command line tool to install React Native on to your system.)
4. Expo, (More About Expo)
How to install React Native on to your local system? Let’s install the React Native on to our system. Open up your command line in VS Code using Ctrl + ~ in Windows or go to the terminal on the menu and click on Add a new terminal.
Run the command:
> npm install -g create-react-native-app
npm: (Node Package Manager, which manage all your package from installing to deleting).install: Install is used to give a command to NPM to install a package. You can also use -I instead of this. -g: It denotes or says NPM to install create-react-native-app globally in the system. This means it will available after this command to all of your systems and you can create a react native app in any directory.**create-react-native-app: **A tool which is made by react native developers to make starting a new mobile app in React Native hassle-free. It generates all the bolierplate code needed to get started right away with your app development process.
So, let’s move on to the next step.
It’s now time to dive into the meat of the project. We are going to build an app which integrates google maps. What would be the name of our app?** Let’s name it as “location-finder”.**
Let’s create the location-finder App
Run this command in your Terminal:
create-react-native-app locationfinder
You will see a lot of dependencies installation and it will take some time to install on your system as shown in the picture.
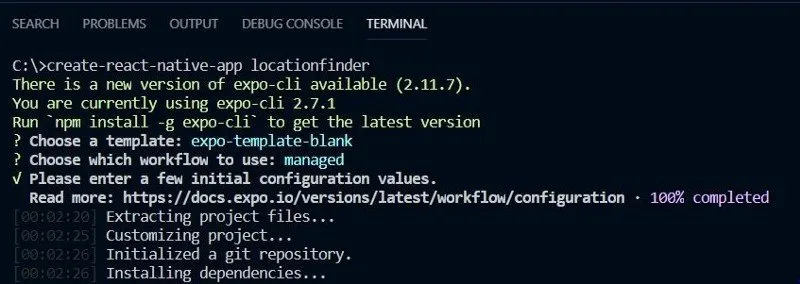
When you hit enter in the command line. It will ask you what do you want: a blank template or tabbed template. Hit enter again to choose app blank template. After that, it will ask you for the app name and also showing slug to you. Don’t worry type the name you want.
You can go and have a cup of coffee until the install finishes. It usually takes a few minutes.
So now finally, your app is created. If you want to run and test the installation then, in command line type:
> cd locationfinder (to get inside the app folder)
> npm start
You can test using with the **Expo app **by scanning the QR Code generated by the command. Otherwise, you can use the simulator for iOS and the emulator for Android. To use them **press “i” **for iOS else **press “a” **for Android. You can use any third-party emulator like Gennymotion.
#react-native #google-maps #tutorial #react