In this article we are going to learn Flask CRUD Application with SQLAlchemy, we are going to build web application that you can create employee, read employee data from mysql database, update employee data and also delete employee. also we are using SQLAlchemy for this tutorial
What is Flask ?
Flask is a web framework. This means flask provides you with tools, libraries and technologies that allow you to build a web application. This web application can be some web pages, a blog, a wiki or go as big as a web-based calendar application or a commercial website.
Flask is part of the categories of the micro-framework. Micro-framework are normally framework with little to no dependencies to external libraries. This has pros and cons. Pros would be that the framework is light, there are little dependency to update and watch for security bugs, cons is that some time you will have to do more work by yourself or increase yourself the list of dependencies by adding plugins.
What is SQLAlchemy ?
SQLAlchemy is the Python SQL toolkit and Object Relational Mapper that gives application developers the full power and flexibility of SQL.
It provides a full suite of well known enterprise-level persistence patterns, designed for efficient and high-performing database access, adapted into a simple and Pythonic domain language.
What is Flask-SQLAlchemy ?
Flask-SQLAlchemy is an extension for Flask that adds support for SQLAlchemy to your application. It aims to simplify using SQLAlchemy with Flask by providing useful defaults and extra helpers that make it easier to accomplish common tasks.
See the SQLAlchemy documentation to learn how to work with the ORM in depth. The following documentation is a brief overview of the most common tasks, as well as the features specific to Flask-SQLAlchemy.
Installation
For this article first you need to install flask, and after that you need to install flask-sqlalchemy.
pip install Flask
pip install Flask-SQLAlchemy
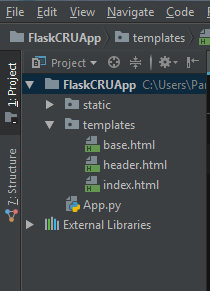
OK after the installation first you need to create a database, iam using Wamp Server for this tutorial and my database name is crud. after that you need to open your Pycharm IDE and create two folders one for your static files and the second for your templates, in the video i have used bootstrap and jquery static files, but in here i have changed that to BootstrapCDN. in your templates you need to create some html files.

So you can see i have static folder, but because iam using BootstrapCDN, iam not going to add bootstrap and jquery files in their. in the templates folder i have the HTML files that i need for this tutorial.
So this is index.html
{% extends 'base.html' %}
{% include 'header.html' %}


{% block title %} Home {% endblock %}


{% block body %}

<div class="container">
    <div class="row">
        <div class="col md-12">

            <div class="jumbotron p-3">

                <h2>Manage <b>Employees </b>  <button type="button"  class="btn btn-success float-right"
                data-toggle="modal" data-target="#mymodal">Add New Employees</button> </h2>


                {% with messages = get_flashed_messages() %}

                {% if messages %}

                {% for message in messages %}

                <div class="alert alert-success alert-dismissable" role="alert">

                    <button type="button" class="close" data-dismiss="alert" aria-label="close">

                        <span aria-hidden="true">x</span>

                    </button>


                {{message}}


                </div>


                {% endfor %}

                {% endif %}
                {% endwith %}


                <table class="table table-hover table-dark">

                    <tr>

                        <th>ID</th>
                        <th>Name</th>
                        <th>Email</th>
                        <th>Phone</th>
                        <th>Action</th>

                    </tr>


                   {% for row in employees %}
                    <tr>
                        <td>{{row.id}}</td>
                        <td>{{row.name}}</td>
                        <td>{{row.email}}</td>
                        <td>{{row.phone}}</td>

                        <td>
                            <a href="/update/{{row.id}}" class="btn btn-warning btn-xs" data-toggle="modal" data-target="#modaledit{{row.id}}">Edit</a>
                            <a href="/delete/{{row.id}}" class="btn btn-danger btn-xs" onclick="return confirm('Are You Sure To Delete ?')">Delete</a>


                        </td>

                    </tr>


                  <!-- Modal Edit Employee-->
<div id="modaledit{{row.id}}" class="modal fade" role="dialog">
   <div class="modal-dialog">


      <div class="modal-content">


         <div class="modal-header">


            <h4 class="modal-title">Update Information</h4>


         </div>


         <div class="modal-body">


            <form action="{{url_for('update')}}" method="POST">


               <div class="form-group">


                  <label>Name:</label>
                   <input type="hidden"  name="id" value="{{row.id}}">

                  <input type="text" class="form-control" name="name" value="{{row.name}}">


               </div>


               <div class="form-group">


                  <label>Email:</label>

                  <input type="text" class="form-control" name="email" value="{{row.email}}">


               </div>


               <div class="form-group">


                  <label>Phone:</label>

                  <input type="text" class="form-control" name="phone" value="{{row.phone}}">


               </div>


               <div class="form-group">


                  <button class="btn btn-primary" type="submit">Update</button>


               </div>


            </form>


         </div>


         <div class="modal-footer">


            <button type="button" class="btn btn-secondary" data-dismiss="modal">Close</button>


         </div>


      </div>


   </div>

</div>


                    {% endfor %}


                </table>


            </div>


                  <!-- Modal Add Employee-->


<div id="mymodal" class="modal fade" role="dialog">
   <div class="modal-dialog">
      <div class="modal-content">
         <div class="modal-header">

            <h4 class="modal-title">Add Employee</h4>
         </div>
         <div class="modal-body">

            <form action="{{url_for('insert')}}" method="POST">


               <div class="form-group">

                  <label>Name:</label>
                  <input type="text" class="form-control" name="name" required="1">


               </div>


                <div class="form-group">


                  <label>Email:</label>
                  <input type="email" class="form-control" name="email" required="1">


               </div>


                <div class="form-group">


                  <label>Phone:</label>
                  <input type="number" class="form-control" name="phone" required="1">


               </div>


               <div class="form-group">


                  <button class="btn btn-primary" type="submit">Add Employee</button>


               </div>


            </form>


         </div>


         <div class="modal-footer">


            <button type="button" class="btn btn-secondary" data-dismiss="modal">Close</button>


         </div>


      </div>


   </div>


</div>


        </div>

    </div>


</div>


{% endblock %}
This is our base.html
<!DOCTYPE html>
<html lang="en">
<head>


    <link rel="stylesheet" href="https://stackpath.bootstrapcdn.com/bootstrap/4.4.1/css/bootstrap.min.css" integrity="sha384-Vkoo8x4CGsO3+Hhxv8T/Q5PaXtkKtu6ug5TOeNV6gBiFeWPGFN9MuhOf23Q9Ifjh" crossorigin="anonymous">

    <meta charset="UTF-8">
    <title>{% block title %} {% endblock %} </title>
</head>
<body>

{% block body %} {% endblock %}


<script src="https://code.jquery.com/jquery-3.4.1.slim.min.js" integrity="sha384-J6qa4849blE2+poT4WnyKhv5vZF5SrPo0iEjwBvKU7imGFAV0wwj1yYfoRSJoZ+n" crossorigin="anonymous"></script>
<script src="https://cdn.jsdelivr.net/npm/popper.js@1.16.0/dist/umd/popper.min.js" integrity="sha384-Q6E9RHvbIyZFJoft+2mJbHaEWldlvI9IOYy5n3zV9zzTtmI3UksdQRVvoxMfooAo" crossorigin="anonymous"></script>
<script src="https://stackpath.bootstrapcdn.com/bootstrap/4.4.1/js/bootstrap.min.js" integrity="sha384-wfSDF2E50Y2D1uUdj0O3uMBJnjuUD4Ih7YwaYd1iqfktj0Uod8GCExl3Og8ifwB6" crossorigin="anonymous"></script>

</body>
</html>
you can see that i have added the BootstrapCDN in my base.html, you need to add the css files at the top, for jquery and javascript add those files in the below.
This is header.html file
{% extends 'base.html' %}


{% block title %} Flask CRUD {% endblock %}


{% block body %}

<div class="jumbotron p-3">
    <div class="well text-center">

        <h1>Python Flask CRUD Web Application Development </h1>

    </div>


</div>


{% endblock %}
and now this is our App.py
from flask import Flask, render_template, request, redirect, url_for, flash
from flask_sqlalchemy import SQLAlchemy


app = Flask(__name__)
app.secret_key = "Secret Key"

#SqlAlchemy Database Configuration With Mysql
app.config['SQLALCHEMY_DATABASE_URI'] = 'mysql://root:''@localhost/crud'
app.config['SQLALCHEMY_TRACK_MODIFICATIONS'] = False

db = SQLAlchemy(app)


#Creating model table for our CRUD database
class Data(db.Model):
    id = db.Column(db.Integer, primary_key = True)
    name = db.Column(db.String(100))
    email = db.Column(db.String(100))
    phone = db.Column(db.String(100))


    def __init__(self, name, email, phone):

        self.name = name
        self.email = email
        self.phone = phone


#This is the index route where we are going to
#query on all our employee data
@app.route('/')
def Index():
    all_data = Data.query.all()

    return render_template("index.html", employees = all_data)


#this route is for inserting data to mysql database via html forms
@app.route('/insert', methods = ['POST'])
def insert():

    if request.method == 'POST':

        name = request.form['name']
        email = request.form['email']
        phone = request.form['phone']


        my_data = Data(name, email, phone)
        db.session.add(my_data)
        db.session.commit()

        flash("Employee Inserted Successfully")

        return redirect(url_for('Index'))


#this is our update route where we are going to update our employee
@app.route('/update', methods = ['GET', 'POST'])
def update():

    if request.method == 'POST':
        my_data = Data.query.get(request.form.get('id'))

        my_data.name = request.form['name']
        my_data.email = request.form['email']
        my_data.phone = request.form['phone']

        db.session.commit()
        flash("Employee Updated Successfully")

        return redirect(url_for('Index'))


#This route is for deleting our employee
@app.route('/delete/<id>/', methods = ['GET', 'POST'])
def delete(id):
    my_data = Data.query.get(id)
    db.session.delete(my_data)
    db.session.commit()
    flash("Employee Deleted Successfully")

    return redirect(url_for('Index'))


if __name__ == "__main__":
    app.run(debug=True)
Also before runing your application, you need to create tables in database, because we are using SQLAlchemy, first you need to run python in Pycharm IDE and after that use these commands.
from App import db
db.create_all()
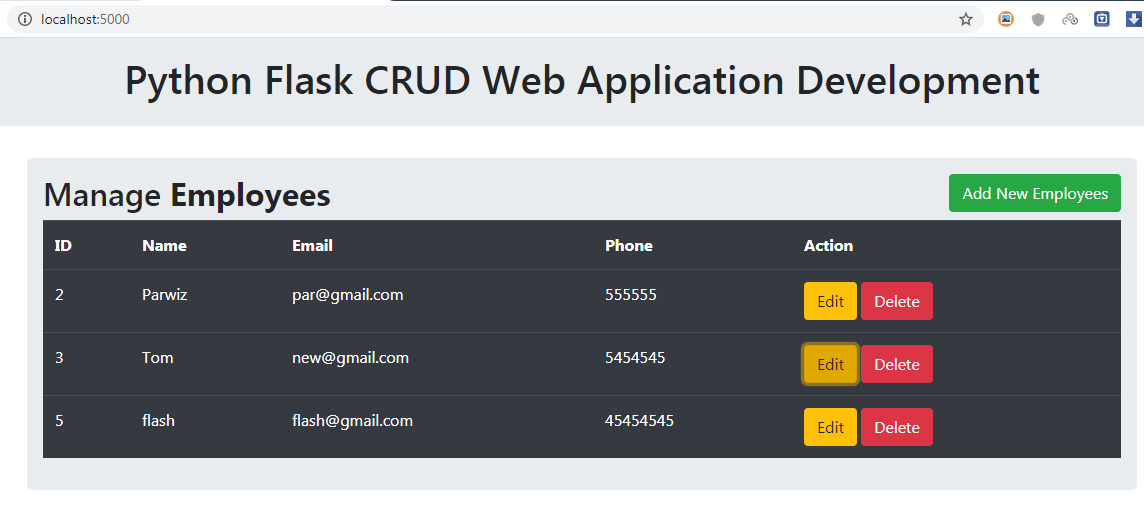
After runing the project this will be the result

#Flask #SQLAlchemy #Python
